How to Zoom-in and Zoom-out Image Using JavaScript?
![]()
JavaScript can be used to manipulate an HTML element’s style property to create a zoom-in and zoom-out effect. To do this, simply access the width attribute using the style property and increase it or decrease it according to the requirement. To access this style property of an HTML element, a reference to the HTML element must be created and stored inside a variable of JavaScript. Let’s go over the step-by-step procedure for achieving the task at hand.
Step 1: Setting up the HTML Document
Start by creating a new HTML document with the following lines inside it:
- First a new image element is being created with the local url for a picture that will be displayed on the HTML document.
- The image element has the id set to “pic” so that JavaScript can reference it.
- After that, create a new button, “Zoom-In”, with the onclick property that will search for the function zoomIn() in the script file or in the script tag.
- After that, create a new button, “Zoom-Out”, which has been created with the onclick property that will search for the function zoomOut() in the script file or in the script tag.
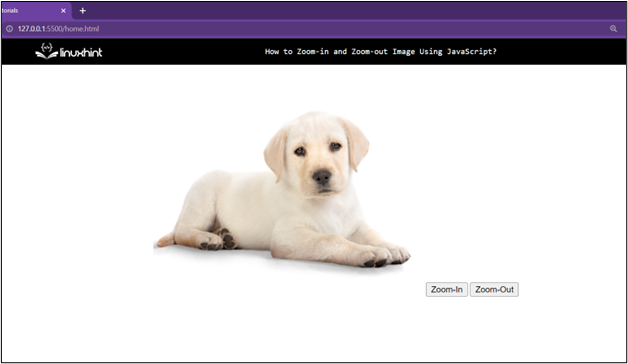
Running the HTML document at this point will yield the following output on the browser:
Step 2: Adding Functionality Using JavaScript
In the second step, either create a script tag in the same HTML document or create a new JavaScript file and link it to the HTML document. No matter the case, the first thing in JavaScript is to create the function for the zoom-in button with the following lines of code:
function zoomIn ( ) {
var pic = document.getElementById ( «pic» ) ;
var width = pic.clientWidth;
pic.style.width = width + 100 + «px» ;
}
In the above code snippet:
- Function zoomIn() has been created which will be called every time the Zoom-In button is clicked.
- Inside the function, the first step is to get the reference of the image element by using its ID and store it inside the variable “pic”.
- After that, get the current width of the image element by using the clientWidth attribute.
- And then access the style property and the width attribute within the style property and increase its value by adding some pixels in the current width of the image.
This will mimic a zoom-in effect on the image every time the zoom-in button is clicked.
After that, create the function for the Zoom-Out button using the following lines:
function zoomOut ( ) {
var pic = document.getElementById ( «pic» ) ;
var width = pic.clientWidth;
pic.style.width = width — 100 + «px» ;
}
In the above code snippet:
- Function zoomOut() has been created which will be called every time the Zoom-Out button is clicked.
- Inside the function, the first step is to get the reference of the image element by using its ID and store it inside the variable “pic”.
- After that, get the current width of the image element by using the clientWidth attribute and store it inside the “width” variable.
- And then access the style property and the width attribute within the style property and decrease its value by removing some pixels from the current width of the image element.
This will mimic a zoom-out effect on the image every time the zoom-out button is pressed.
Step 3: Testing the Functionality
The last step to run the HTML document and observe the working of the HTML document to be as:
As it is clear from the gif above that the zoom-in and the zoom-out button are working perfectly as intended.
Wrap up
It is quite easy to mimic a zoom-in and a zoom-out effect on an image element with the help of JavaScript. After the HTML document is all set-up, go into the JavaScript file and access the width property of the image. And then change the value of that width property according to the button that has been pressed by the user.
About the author
Abdul Mannan
I am curious about technology and writing and exploring it is my passion. I am interested in learning new skills and improving my knowledge and I hold a bachelor’s degree in computer science.
Imitate Browser Zoom in JavaScript

This article will discuss how to zoom or scale a particular element using the scale method of the transform property in JavaScript.
Imitate Browser Zoom Using the scale Method in JavaScript
The transform property allows you to manipulate the HTML element like rotate, scale, skew or translate and apply 2D or 3D transformations.
There is no harm in using this property since it’s supported on all browsers. The transform property has a scale method that can be used to achieve zoom.
The scale method takes the two values — sx and sy .
The sx specifies how much you want to scale towards the x-axis. And sy sets how much you want to scale towards the y-axis.
Both default values are 1, but the sy value is optional. So, if you don’t define sy , it will take the sx value.
Let’s have an example to see how we can use this property to zoom an HTML element in JavaScript.
Below, we have a div element inside the container with a square ID. This is the element we will apply zoom or the scale property.
Then we also have a div with an ID of btns , which contain all of our buttons. We have added three buttons to our page: zoom in, zoom out, and reset.
The zoom-in button has a class of in , the zoom-out button has out , and the reset button has reset . We added an onclick event of all three buttons, so a function will be called whenever a user clicks on these buttons.
body> h1>Zoom the below squareh1> div class="container"> div id="square">div> div class="btns"> button class="in" onclick="zoomIn()">Zoom Inbutton> button class="out" onclick="zoomOut()">Zoom Outbutton> button class="reset" onclick="reset()">Resetbutton> div> div> script src="./script.js">script> body> Inside our CSS, we have just provided basic properties to the square like width, height, background, and margin, and notice that we used em and not px . Utilizing relative units like em and rem is good practice for making responsive designs.
Within the container div, we have two separate div elements. We want them to show side by side, so we used the display: flex property on the container element.
We also want to give some spacing before and after the elements, and for that, we have used flexbox’s justify-content property.
And the align the buttons vertically, we have changed flex-direction to the column. This property has a value of row by default.
You can write the CSS below inside the style tag or create a new file for writing CSS.
#square width: 10em; height: 10em; background-color: tomato; margin: 4em; > .container display: flex; > .btns display: flex; flex-direction: column; justify-content: space-evenly; > Now, it’s time to dive into JavaScript.
First, we have to get the reference of the square which we have created using its ID by the getElementById() method, and then we will store it inside a variable square . To track the zoom in and zoom out value, we will use a variable counter and initialize it to 1.
We set the counter variables value as 1 because the default scale of the HTML element and the scale method is also 1, i.e., 100%. We will be defining three functions zoomIn() , zoomOut() , and reset() inside the JavaScript file.
var square = document.getElementById('square'); var counter = 1; function zoomIn() if(counter 2) counter += 0.1; square.style.transform = `scale($counter>)`; > > function zoomOut() if(counter > 0.2) counter -= 0.1; square.style.transform = `scale($counter>)`; > > function reset() square.style.transform = "scale(1)"; counter = 1; > The zoomIn function will be responsible for zooming in the square div element to scale(2) , i.e., 200% maximum. Inside this function, we have the condition that if the value of the counter variable is less than 2, we will increment the counter variable by .1.
Then we will set the transform property, a CSS property on the square using style.transform . To this property, we will assign a value scale() as a string literal and then pass the counter variable inside it as scale($) .
Notice that we have used backticks and not double quotes as a string literal. This allows us to pass a variable inside a string.
The zoomOut() function will be responsible for zooming out the square div element till scale(0.1) , i.e., 10% minimum value.
Here also, we have added a condition that if the value of the counter variable is greater than .2, then only we will decrement the value of the counter variable and set the value of the counter variable to the transform property of the square.
Take note that if you set the scale to zero, then the element will not be visible on the screen, and that’s why we will take the scale value beyond 0.1.
The rest() function will change the scale of the square div element back to its original size scale(1) . Also, don’t forget to set the counter variable’s value back to 1.
If you run the code, it will look like this.
The zoom values will range between 0.1 to 2. By default, it will be set to 1, i.e., 100%.
Another property available in CSS called the zoom property can also be used to implement zoom. But this is not a standard way of implementing zoom on a production website.
This can create issues because some elements and animations on the website might not work as expected.
Sahil is a full-stack developer who loves to build software. He likes to share his knowledge by writing technical articles and helping clients by working with them as freelance software engineer and technical writer on Upwork.