- How to Compile C++ on Mac Terminal
- Does your Mac have a C++ Compiler?
- Installing the GNU GCC Package with the C++ Compiler for Mac
- Step 1: Start the Terminal application.
- Step 2: Run the xcode-select –install command.
- Step 3: Click on Install
- Step 4: Agree to the license agreement
- Step 5: The installer will download and install the software.
- Compiling a C++ Source File
- C++ Compile Example
- Step 1: Start the Terminal application.
- Step 2: Create a directory for your source files.
- Step 3: Move to the new directory.
- Step 4: Create the test.cpp file.
- Step 5: Save the file and exit the editor.
- Step 6: Compile the code using the g++ command.
- FAQs
- What is GCC?
- Why doesn’t the gcc command compile my C++ source code?
- If gcc can’t compile C++, why can g++ compile C?
- Conclusion
- LibreBay
- понедельник, 5 декабря 2016 г.
- Как скомпилировать программу на C/C++ в Ubuntu
- Текстовый редактор gedit
- Компиляция программы на C
- Компиляция программы на С++
- Заключение
How to Compile C++ on Mac Terminal
Whether you’re new to C++ or a veteran programmer who wants to develop code on your Mac, being able to compile your source files using Mac Terminal is an excellent option to have.
Sure there are desktop interfaces and applications for this, but sometimes we just want a quick and straightforward solution.
You can compile C++ from the command line using Mac Terminal with this one command:
My name is Eric, and as a software engineer, I have spent plenty of time writing and compiling C++ code. Years ago, I mostly did all of my work from a command line interface like Mac Terminal, so I can show you how to do this.
Read below if you want more details about compiling C++ on Mac Terminal. I will also show you how to get your C++ compiler up and running on your Mac if you need help.
- Does your Mac have a C++ Compiler?
- Installing the GNU GCC Package with the C++ Compiler for Mac
- Step 1: Start the Terminal application.
- Step 2: Run the xcode-select –install command.
- Step 3: Click on Install
- Step 4: Agree to the license agreement
- Step 5: The installer will download and install the software.
- Step 1: Start the Terminal application.
- Step 2: Create a directory for your source files.
- Step 3: Move to the new directory.
- Step 4: Create the test.cpp file.
- Step 5: Save the file and exit the editor.
- Step 6: Compile the code using the g++ command.
- What is GCC?
- Why doesn’t the gcc command compile my C++ source code?
- If gcc can’t compile C++, why can g++ compile C?
Does your Mac have a C++ Compiler?
If you have never used your Mac to compile C++ code, it most likely does not have the compiler. The macOS does not come with it by default, but luckily it is free and straightforward to download and install.
Like its relatives, LINUX and UNIX, macOS is compatible with the free GNU compiler in the GCC (GNU Compiler Collection). If you are unsure whether or not it is installed, you can do a quick test by opening a Terminal session and typing the following command.
If the compiler is installed on your system, you will see a message showing the current version of the compiler.

If you see a command not found message or a message similar to the one shown below, then you will need to install it, but no worries, installing is quite easy, and I will show you how in the next section.
Installing the GNU GCC Package with the C++ Compiler for Mac
If you need to install the GNU C++ compiler, it’s a relatively simple process. It consists of running a command from the Terminal command line, clicking a few buttons on the popup screens, and then watching the files download and install. Below are the detailed steps.
Step 1: Start the Terminal application.
Step 2: Run the xcode-select –install command.
xcode-select –install
Step 3: Click on Install
In the popup window, click on the install button to install the developer’s tools which let you run the xcode-select commands.
Step 4: Agree to the license agreement
Click on the Agree button to accept the terms of the license agreement.
Step 5: The installer will download and install the software.
The installer will run for about 10 minutes; it will download and install all the software you need, including the C++ compiler.
When completed, you will see a message indicating that the software was installed, as shown below.
Compiling a C++ Source File
Once you have verified that you have the C++ compiler or installed it, you are ready to compile code. You can use the command in the format I showed at the beginning of this article.
Just ensure that you are in the directory containing your source files, or you supply the path to the files in your command.
C++ Compile Example
If you are a little unclear on how to proceed or would just like to see an example, I will provide one below. I will create a simple C++ source file and then compile it. This should give you a good idea of how to compile C++ on your Mac.
Step 1: Start the Terminal application.
Start the Terminal application using your preferred method.
Step 2: Create a directory for your source files.
Here we will just create a directory to keep our C++ source file and the executable it creates once it compiles. This is optional, but I prefer to keep the files organized and in a location where I can find everything.
mkdir test_c
Step 3: Move to the new directory.
Once I have created the test_c directory. I move to it using the cd command.
Step 4: Create the test.cpp file.
I used nano to create my C++ file, as shown in the image above, but you can create yours with whatever editor you feel comfortable with. Once the file is open, I put the following text into it to create a simple C++ file that will print a message. Below is the text if you would like to copy it, and you can see it in the image as well.
Step 5: Save the file and exit the editor.
Save the file and exit back out to the command line.
Step 6: Compile the code using the g++ command.
We will compile the test.cpp source code file and create an executable file called test using the following command.
g++ -o test test.cpp
The compiler will run, and when complete, you can see the executable file in your directory using the ls command.
You can now run the executable file by typing in the command and hitting the return key, as shown below.
You will see the output of the command, which means that your C++ source file is compiled and runs properly.
FAQs
Below are a few frequently asked questions about compiling c++ on Mac Terminal.
What is GCC?
GCC stands for GNU Compiler Collection. It includes compilers and libraries for many different languages, such as C, C++, Objective-C, Fortran, Ada, Go, and D. It’s a whole collection of compilers you can use in UNIX/LINUX and macOS environments.
Why doesn’t the gcc command compile my C++ source code?
You can use the gcc command to compile C source code. C is the predecessor to C++, and GNU has a separate compiler for it which is the gcc command. The GCC compiler is incompatible with C++, so you must use the g++ command.
If gcc can’t compile C++, why can g++ compile C?
The C++ compiler (g++) was designed to be backward compatible, meaning it can compile C++ as well as its predecessor C. Developers may often use old C libraries or reuse old C code and routines that were developed long ago but still work. So an application can have a mix of C and C++ code. Therefore the C++ compiler can compile both.
Conclusion
Compiling C++ on Mac Terminal is very straightforward and can be done by anyone once the compiler is installed. You can easily install the compiler using Mac Terminal.
I hope the above information can help you compile C++ on your Mac Terminal. Let me know if you have questions or comments. I would love to hear from you.
LibreBay
Статьи про ОС Ubuntu. Языки программирования Си и C++.
Инструменты разработки и многое другое.понедельник, 5 декабря 2016 г.
Как скомпилировать программу на C/C++ в Ubuntu
Помню, когда я только начинал программировать, у меня возник вопрос: «Как скомпилировать программу на C в Ubuntu?» Для новичков это не легкая задача, как может показаться на первый взгляд.
Мой путь изучения C начался с бестселлера «Брайан Керниган, Деннис Ритчи, Язык программирования C, 2-е издание». Там рассказывается как скомпилировать программу в операционной системе Unix, но этот способ не работает в Linux. Авторы книги выкрутились, написав следующее:
В других системах это процедура будет отличаться. Обратитесь к справочнику или специалисту за подробностями.
Побуду специалистом 🙂 и расскажу в данной статье, как скомпилировать первые программы на C и заодно на C++ в терминале Ubuntu.
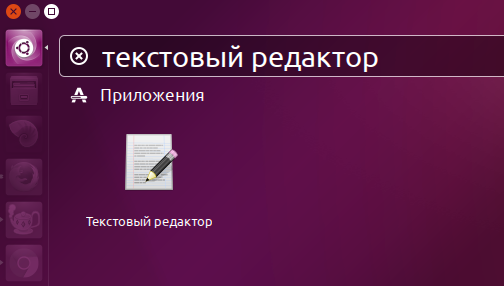
Текстовый редактор gedit
Для написания первых программ подойдет обычный, используемый по умолчанию в Ubuntu, текстовый редактор с подсветкой синтаксиса — gedit.
Рис. 1. Запуск текстового редактора. Первой программой по традиции является «Hello, World!», выводящее приветствие на экран:
#include int main(int argc, char **argv)
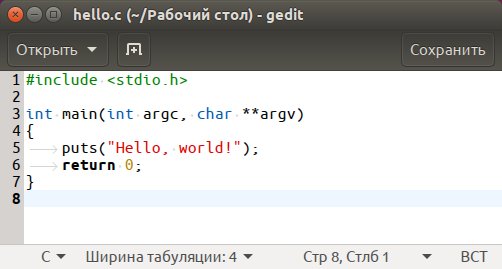
Печатаем или копируем текст программы в gedit и сохраняем в файл Hello.c , например, на рабочий стол. Не самое лучше место для сохранения, но это позволит рассмотреть случай, когда в имени директории содержится пробел.
Рис. 2. Программа hello, World. Компиляция программы на C
Теперь запускаем терминал, можно через Dash, а можно с помощью горячих клавиш + + . Здесь в начале установим инструменты сборки, куда входят необходимые компиляторы gcc для языка C и g++ для языка C++:
sudo apt install build-essential
Для установки требуется ввести пароль, при вводе которого может сложиться впечатление, что ничего не происходит, но на самом деле терминал просто в целях безопасности не отображает символы.
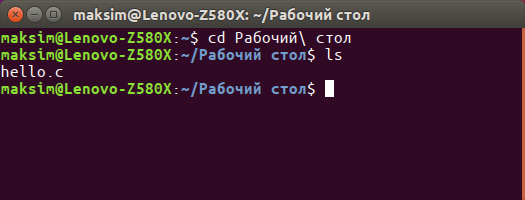
Далее в терминале нам необходимо перейти в директорию, куда сохранили файл с текстом программы. Перемещение выполняется командой cd (англ. change directory — изменить каталог). Чтобы воспользоваться командой в начале пишется cd , затем через пробел путь , куда нужно перейти.
Для перехода на рабочий стол, команда будет следующей:
Обратите внимание на символ обратной косой черты \ в имени директории Рабочий стол . Обратная косая экранирует пробел, и сообщает команде cd , что пробел и следующие за ним символы являются частью имени. Символ ~ в начале пути обозначает путь до домашней папки пользователя.
Для просмотра содержимого директории применяется команда ls (сокращение от англ. list).
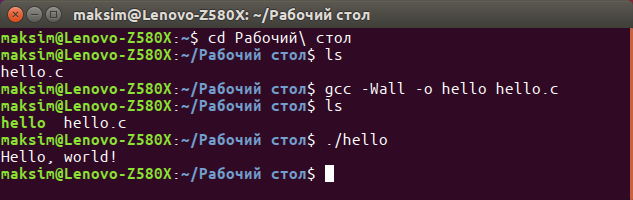
Рис. 3. Работа в терминале. Команда компиляции для программы на C выглядит следующим образом:
- gcc — компилятор для языка программирования C;
- -Wall — ключ вывода всех предупреждений компилятора;
- -o hello — с помощью ключа -o указывается имя выходного файла;
- hello.c — имя нашего исходного файла, который компилируем.
В завершение запустим hello , вводом имени программы с префиксом ./ :
Префикс ./ сообщает терминалу о необходимости выполнить программу с заданным именем в текущем каталоге. (Точка — это условное название текущего каталога.)
Рис. 4. Работа в терминале, продолжение. Компиляция программы на С++
Программы на C++ компилируются аналогично, как и программы на C. «Hello, World!» на C++ можно написать так:
#include int main(int argc, char **argv)
Сохраняем текст программы в файл под именем hello2.cpp . Таким образом, команда компилирования будет иметь вид:
g++ -Wall -o hello2 hello2.cpp
Для запуска результата вводим в терминале:
Заключение
Данный способ позволяет скомпилировать программу лишь из одного файла с исходным кодом. Но этого вполне достаточно, чтобы начать изучение языков программирования C/C++ по книгам или по статьям в интернете.
- Иванов Н. Н. — Программирование в Linux. Самоучитель. — 2-е издание;
- Нейл Метьэ, Ричард Стоунс — Основы программирования в Linux: Пер. с англ. — 4-е издание;
- Колисниченко Д. Н. — Разработка Linux-приложений.