Your Page TITLE goes here

HTML Tutorial 2. A First Web Page

Lesson 2. Tutorial introducing the basics of producing a simple Web page, using HTML tags, HTML elements

Page Contents — First Simple Web Page

First Simple Web Page — Introduction What you will learn from this page

Step 1. Create a Folder The location «To save your web page»

First Simple Web Page — Introduction

In this first HTML tutorial you will learn:

  1. How to create a folder on your computer to hold your web pages and graphic files
  2. Learn make a simple web page in HTML using HTML tags
  3. The code for a simple HTML page
  4. How to add additional HTML tags to produce a very simple web page named:
    index.html
  5. The use of HTML elements and attributes.
  6. How this code consists of HTML tags and plain text
  7. How to save the HTML files to a folder named my-first-web-pages on your hard drive.
  8. How to validate your file to ensure that it correct HTML
  9. How to view those pages in your browser.
  10. Tutorial 7 shows you How to link pages together’, so that the viewer can easily view other pages.
  11. Tutorials 3 — 6 show you ‘How to improve the look of your pages
Читайте также:  Питон как использовать while

You will find out how producing you first web page is very gratifying

Step 1. Create a Folder

You require a dedicated Folder to hold your Web site files & sub folder(s) that you will produce on your own computer.

Folder Name

In this tutorial I will name the folder
my-first-web-pages

I will keep referring to this name. If you wish to use use a name of your own choice make a note of it for future reference.

my-first-web-pages folder location

In this tutorial I want to place the my-first-web-pages folder in the following location:
C: > Users > Your User Name>

  1. Copy from this Tutorial the name of the folder you will create
    my-first-web-pages
  2. In Windows Explorer browse to C: > Users >Your User Name>
  3. Right Click your User Name, in my case it is Jon
  4. In the drop down menu Mouse over New then select Folder
  5. A New Folder will be highlighted Paste or Type in my-first-web-pages

The actual folder name & where you save it is up to you — What is essential is that you make a note of the folder name and where you save it, so that you can find it easily.

How to Create a Folder in Windows Video

The video shows you how to create the folder my-first-web-pages

Lesson 1. My First Web Page

Required HTML tags

All HTML5 web pages require the following code, in the form of HTML tags, which will work & produce a simple BLANK web page, that will validate as correct oncesome content is placed within the tag.


Your Page CONTENT goes here. The p tag indicates that this is a paragraph

When you start a new page in a web editor, the editor will usually create most of these lines of Source Code automatically.

To check this: Select the Source view / Code or similar named option in your editor and see the code produced. Note the code produced may vary slightly depending on the editor used.

Use the following code if you are using either Blue Griffon, Notebook or Dreamweaver or a web editor that can prepare HTML5

Click for specific instructions information & videos

for using these Web Editors

  • Look for Your Page TITLE goes here in the
    • top line of the window (Not in the Chrome browser)
    • & in the Tab

    Then re-read the code & compare to the result.

    Code Explanations

    HTML Tags & HTML Elements

    HTML Tags

    In the above code you will see several letters or words within angle brackets <> such as &

    These are HTML tags

      Basically HTML tags are the markup code that imparts information to either the web browser or to search engines.

  • HTML tags are enclosed in a pair of less than and greater than brackets < >these brackets are known as the open delimiter and close delimiter respectively.
    • Although the Declaration is enclosed in < >brackets it is a Declaration & not a tag.
  • It is now recommended that tags are written in lower case letters
  • Most HTML tags, but not all, require both a
    • start tag e.g.
    • end tag,
      Note how the end tag, is the same as the start tag, with the inclusion of a / before the tag name.
  • HTML has a few tags that do not have a end tag,
    • (Break, starts a new line)
    • (Image tag)
  • Tags are not displayed by the browser.
  • Examples of tags are:
    • tag defines a paragraph. This is the most frequently used tag.
    • defines a line break. Starts a new line
    • defines an image. Such as a photograph or graphic
  • Some tags are not supported by some browsers, some are supported differently, hence the different appearance of web pages in different browsers.

HTML Elements

  • All tags, except the
    have some content with them e.g.

    These words within the P tag are content

  • An HTML tag + it’s content is known as an HTML Element.

!DOCTYPE Declaration Explanation

The declaration must be the very first thing in your HTML document, before the tag.

The declaration informs the web browser what type of document to expect

The declaration is not a tag, therefore it does not have an end tag.

HTML5 !DOCTYPE

HTML 4.01 !DOCTYPE

  • This is the declaration to the Web browser that this page (file) is an HTML 4.01 document
  • If you wish to use HTML 4.01 or to amend an HTML 4.01 file then see more information on http://www.w3schools.com/TAgs/tag_doctype.asp
  • There are 3 HTML 4.01 !DOCTYPEs

Источник

Sample HTML Code For Homepage

In this article, we will show you how to create a homepage using HTML and CSS step by step. You can use this code as a starting point for your own website as a developer. Sample HTML code for homepage is also give.

Introduction

Every web developer should create a basic portfolio website using HTML and CSS. This will create a showcase of your work and will also help you learn basic concepts of HTML and CSS.

Start with something basic like this one and then add more to it in the future.

We are going to explain each step of the process in this article and also provide you sample HTML code of homepage.

Look and Feel

Here is how our homepage will look like.

sample HTML code for homepage

Structure Of Homepage

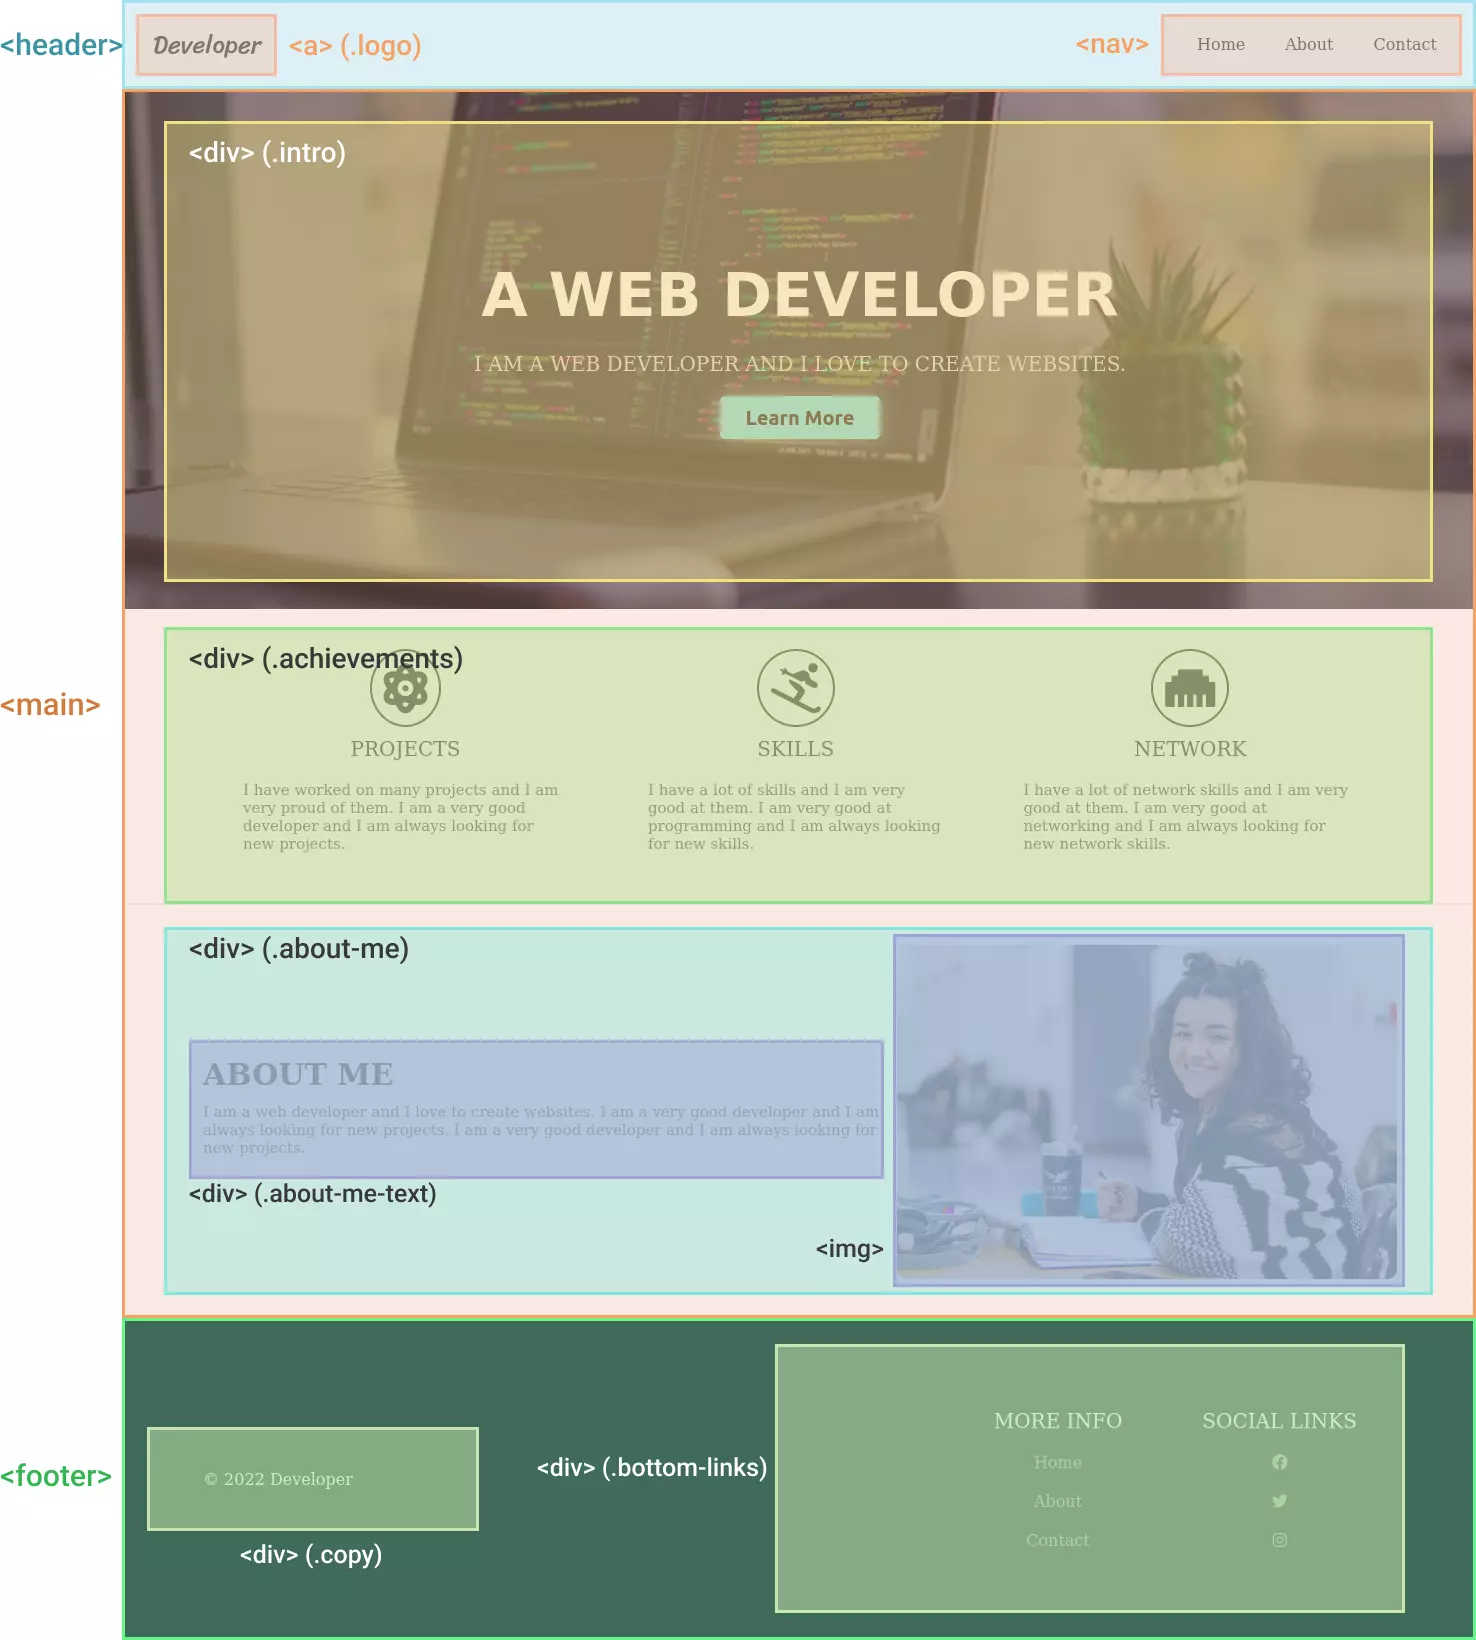
Before we start, first have a look at the HTML components that create each section of this homepage.

The picture below shows different HTML elements with its name that gives you a rough idea of how to create the HTML structure of the home page.

sample HTML code for homepage structure

  1. The home page is divided into 3 sections: header, main and, footer .
  2. The header section contains the logo and the navigation bar.
  3. The main section contains the main content of the page like introduction, achievements, projects, etc.
  4. The footer section contains the copyright, contact details, and social media links.

Step 1: Create a basic HTML page

Using the structure of the homepage explained above, create a basic HTML page.

The page is divided into 3 sections by HTML elements:

The header section contains the logo which is nothing but just a link to the homepage here (you add your own logo image) and also contains the navigation bar.

Main

The main section contains almost everything that you want to show on the homepage so it is also bigger than any other section.

For simplicity, we are just using the intro, achievements, and about us section in this example.

From the image, you can get a rough idea of the structure of the main section.

 
A Web Developer

I am a web developer and I love to create websites.

About Me

I am a web developer and I love to create websites. I am a very good developer and I am always looking for new projects. I am a very good developer and I am always looking for new projects.

me

Main section code explained : The main section is divided into 3 sections: intro, achievements, and about me .

  1. Intro — The intro section is a div element with a background image. The section contains a heading, a paragraph, and a button.
  2. Achievements — The achievements section is another div element that uses font-awesome icons to display icons at the top of each section. The section contains 3 div elements each with a heading, a paragraph and, an icon.
  3. About Me — The about me section has 2 inner elements one is text and another is an image.

The footer section contains the contact information and social media links.

 
More Info Home About Contact
Social Links

Footer code explained : The footer section contains the contact information and social media links.

  1. Copy — The copy section is a div element that contains copyright information.
  2. Bottom Links — The bottom links section is a div element that contains the links to the other sections and social media information.

Step 2: Style The Elements Using CSS

We have created the HTML part now let’s style the elements using CSS.

To select the element to style use the CSS selectors.

We are going to use CSS flexbox to align the elements horizontally and vertically.

The complete CSS code is as follows:

@import url('https://fonts.googleapis.com/css2?family=Sriracha&display=swap'); body < margin: 0; box-sizing: border-box; >/* CSS for header */ .header < display: flex; justify-content: space-between; align-items: center; background-color: #f5f5f5; >.header .logo < font-size: 25px; font-family: 'Sriracha', cursive; color: #000; text-decoration: none; margin-left: 30px; >.nav-items < display: flex; justify-content: space-around; align-items: center; background-color: #f5f5f5; margin-right: 20px; >.nav-items a < text-decoration: none; color: #000; padding: 35px 20px; >/* CSS for main section */ .intro < display: flex; flex-direction: column; justify-content: center; align-items: center; width: 100%; height: 520px; background: linear-gradient(to bottom, rgba(0, 0, 0, 0.5) 0%, rgba(0, 0, 0, 0.5) 100%), url("https://images.unsplash.com/photo-1587620962725-abab7fe55159?ixlib=rb-1.2.1&ixid=MnwxMjA3fDB8MHxwaG90by1wYWdlfHx8fGVufDB8fHx8&auto=format&fit=crop&w=1031&q=80"); background-size: cover; background-position: center; background-repeat: no-repeat; >.intro h1 < font-family: sans-serif; font-size: 60px; color: #fff; font-weight: bold; text-transform: uppercase; margin: 0; >.intro p < font-size: 20px; color: #d1d1d1; text-transform: uppercase; margin: 20px 0; >.intro button < background-color: #5edaf0; color: #000; padding: 10px 25px; border: none; border-radius: 5px; font-size: 20px; font-weight: bold; cursor: pointer; box-shadow: 0px 0px 20px rgba(255, 255, 255, 0.4) >.achievements < display: flex; justify-content: space-around; align-items: center; padding: 40px 80px; >.achievements .work < display: flex; flex-direction: column; justify-content: center; align-items: center; padding: 0 40px; >.achievements .work i < width: fit-content; font-size: 50px; color: #333333; border-radius: 50%; border: 2px solid #333333; padding: 12px; >.achievements .work .work-heading < font-size: 20px; color: #333333; text-transform: uppercase; margin: 10px 0; >.achievements .work .work-text < font-size: 15px; color: #585858; margin: 10px 0; >.about-me < display: flex; justify-content: center; align-items: center; padding: 40px 80px; border-top: 2px solid #eeeeee; >.about-me img < width: 500px; max-width: 100%; height: auto; border-radius: 10px; >.about-me-text h2 < font-size: 30px; color: #333333; text-transform: uppercase; margin: 0; >.about-me-text p < font-size: 15px; color: #585858; margin: 10px 0; >/* CSS for footer */ .footer < display: flex; justify-content: space-between; align-items: center; background-color: #302f49; padding: 40px 80px; >.footer .copy < color: #fff; >.bottom-links < display: flex; justify-content: space-around; align-items: center; padding: 40px 0; >.bottom-links .links < display: flex; flex-direction: column; justify-content: center; align-items: center; padding: 0 40px; >.bottom-links .links span < font-size: 20px; color: #fff; text-transform: uppercase; margin: 10px 0; >.bottom-links .links a

To play with style try using your own positioning and color values.

Complete Sample HTML Code For Homepage

Here is the complete sample HTML code for the homepage. You can click the run button below to see the result.

        @import url('https://fonts.googleapis.com/css2?family=Sriracha&display=swap'); body < margin: 0; box-sizing: border-box; >/* CSS for header */ .header < display: flex; justify-content: space-between; align-items: center; background-color: #f5f5f5; >.header .logo < font-size: 25px; font-family: 'Sriracha', cursive; color: #000; text-decoration: none; margin-left: 30px; >.nav-items < display: flex; justify-content: space-around; align-items: center; background-color: #f5f5f5; margin-right: 20px; >.nav-items a < text-decoration: none; color: #000; padding: 35px 20px; >/* CSS for main element */ .intro < display: flex; flex-direction: column; justify-content: center; align-items: center; width: 100%; height: 520px; background: linear-gradient(to bottom, rgba(0, 0, 0, 0.5) 0%, rgba(0, 0, 0, 0.5) 100%), url("https://images.unsplash.com/photo-1587620962725-abab7fe55159?ixlib=rb-1.2.1&ixid=MnwxMjA3fDB8MHxwaG90by1wYWdlfHx8fGVufDB8fHx8&auto=format&fit=crop&w=1031&q=80"); background-size: cover; background-position: center; background-repeat: no-repeat; >.intro h1 < font-family: sans-serif; font-size: 60px; color: #fff; font-weight: bold; text-transform: uppercase; margin: 0; >.intro p < font-size: 20px; color: #d1d1d1; text-transform: uppercase; margin: 20px 0; >.intro button < background-color: #5edaf0; color: #000; padding: 10px 25px; border: none; border-radius: 5px; font-size: 20px; font-weight: bold; cursor: pointer; box-shadow: 0px 0px 20px rgba(255, 255, 255, 0.4) >.achievements < display: flex; justify-content: space-around; align-items: center; padding: 40px 80px; >.achievements .work < display: flex; flex-direction: column; justify-content: center; align-items: center; padding: 0 40px; >.achievements .work i < width: fit-content; font-size: 50px; color: #333333; border-radius: 50%; border: 2px solid #333333; padding: 12px; >.achievements .work .work-heading < font-size: 20px; color: #333333; text-transform: uppercase; margin: 10px 0; >.achievements .work .work-text < font-size: 15px; color: #585858; margin: 10px 0; >.about-me < display: flex; justify-content: center; align-items: center; padding: 40px 80px; border-top: 2px solid #eeeeee; >.about-me img < width: 500px; max-width: 100%; height: auto; border-radius: 10px; >.about-me-text h2 < font-size: 30px; color: #333333; text-transform: uppercase; margin: 0; >.about-me-text p < font-size: 15px; color: #585858; margin: 10px 0; >/* CSS for footer */ .footer < display: flex; justify-content: space-between; align-items: center; background-color: #302f49; padding: 40px 80px; >.footer .copy < color: #fff; >.bottom-links < display: flex; justify-content: space-around; align-items: center; padding: 40px 0; >.bottom-links .links < display: flex; flex-direction: column; justify-content: center; align-items: center; padding: 0 40px; >.bottom-links .links span < font-size: 20px; color: #fff; text-transform: uppercase; margin: 10px 0; >.bottom-links .links a 
A Web Developer

I am a web developer and I love to create websites.

About Me

I am a web developer and I love to create websites. I am a very good developer and I am always looking for new projects. I am a very good developer and I am always looking for new projects.

me
More Info Home About Contact
Social Links

Conclusion

Following the tutorials above you have created a beautiful portfolio website for you. You have learned how to create a website using HTML and CSS. You have used flexbox and fon-awesome icons. Sample HTML code for the homepage is available in the editor above.

For more webpage ideas like this visit HTML webpage examples.

Источник

Web Building — Creating a Web Site (HTML)

Building a web site from scratch. Part I: Creating a web site.

What We Will Do

In this chapter we will create a web site on your computer.

Note The web site will only be visible to you. Later you will learn how to make it public.

Create the Web Site

Create a new folder on your computer (a new folder on your desktop is OK).

Name the new folder demoweb.

Now you have a local web site.

Create a Home Page

In the demoweb folder, create a new file named index.html.

Use Notepad (or any other text editor) to put the following content in the file:

index.html

Welcome to Our Company

Web Site Main Ingredients:

Pages (HTML)

Style Sheets (CSS)

Computer Code (JavaScript)

Live Data (Files and Databases)

Note After you have saved the file, you can open it in your browser, and see how it runs.

Add an About Page

In the demoweb folder, create a new file named about.html.

Put the following in the file:

about.html

About Us

Lorem Ipsum Porem Lorem Ipsum Porem

The files above contain headings and a paragraphs

. Please feel free to edit the content.

In the next chapter, we will add a CSS style sheet. After that we will add computer code and data.

Read More

Read more about HTML in our HTML Tutorial.

Источник

Оцените статью