- Где находится php.ini для WordPress?
- Для чего нужен файл php.ini для WordPress
- Конфигурация файла php.ini, где он находится на хостинге
- Изменение файла php.ini
- Изменение файла user.ini, где он лежит
- Добавление php директив для ВордПресс в файл .htaccess
- Если ничего не помогло
- Where is PHP.ini in WordPress?
- Where is PHP.ini in WordPress?
- Where is PHP.ini in WAMP?
- Where to Find PHP.ini in XAMPP?
- Where to Find PHP.ini in Linux?
- Where is PHP.ini in cPanel?
- What are the Recommended Configurations for PHP.ini in WordPress?
- PHP.ini
- .htaccess file
- wp-config.php file
- PHP.ini Configurations You Can Change
- Memory_limit
- Max_execution_time
- Post_max_size
- Upload_max_filesize
- Max_input_time
Где находится php.ini для WordPress?
Сайты на WordPress имеют ограничения на размер импортируемых данных. Например, вы не можете загрузить на сайт аудио и видеофайлы, которые превышают разрешенный хостером объем. Чтобы изменить этот параметр, понадобится доступ к файлу php.ini на сервере.
Для чего нужен файл php.ini для WordPress
Файл php.ini содержит настройки конфигурации для интерпретатора PHP, который обслуживает сервер. В этом файле задаются методы работы с данными, параметры безопасности системы и служебная информация, необходимая для корректной работы сервера, на котором располагается ваш сайт.
Чтобы избежать нежелательного изменения настроек сервера и не затронуть параметры сайтов, соседствующих с вашим на одном виртуальном хостинге, зачастую хостер ограничивает доступ к файлу php.ini. Однако, вы можете переопределить заданные в нем параметры для своего сайта либо использовать альтернативные способы, чтобы обойти некоторые настройки.
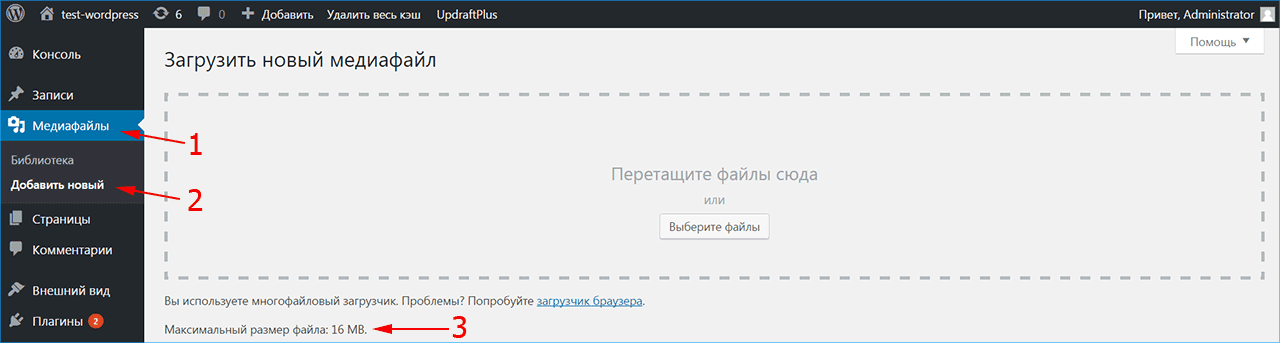
К примеру, хостер может ограничивать размер импортируемых на сервер данных. Допустимый размер загруженных файлов можно посмотреть в админке WordPress. Зайдите в меню «Медиафайлы» и выберите пункт «Добавить новый». Как правило, этот параметр задается хостером в интервале 2–128 Мб. При необходимости увеличения допустимого объема импортируемого файла, потребуется изменить соответствующий параметр в файле php.ini.
Конфигурация файла php.ini, где он находится на хостинге
Прежде всего необходимо выяснить, где на сервере находится файл php.ini.
- Запустите текстовый редактор и напечатайте в нем строчку:
- Сохраните созданный файл под названием info.php.
- Через файловый менеджер подключитесь к серверу хостинга, на котором располагается ваш сайт, и скопируйте в корневой каталог сайта файл info.php.
- Теперь в адресной строке браузера наберите http://site.ru/info.php, вместо site.ru задайте имя своего сайта.
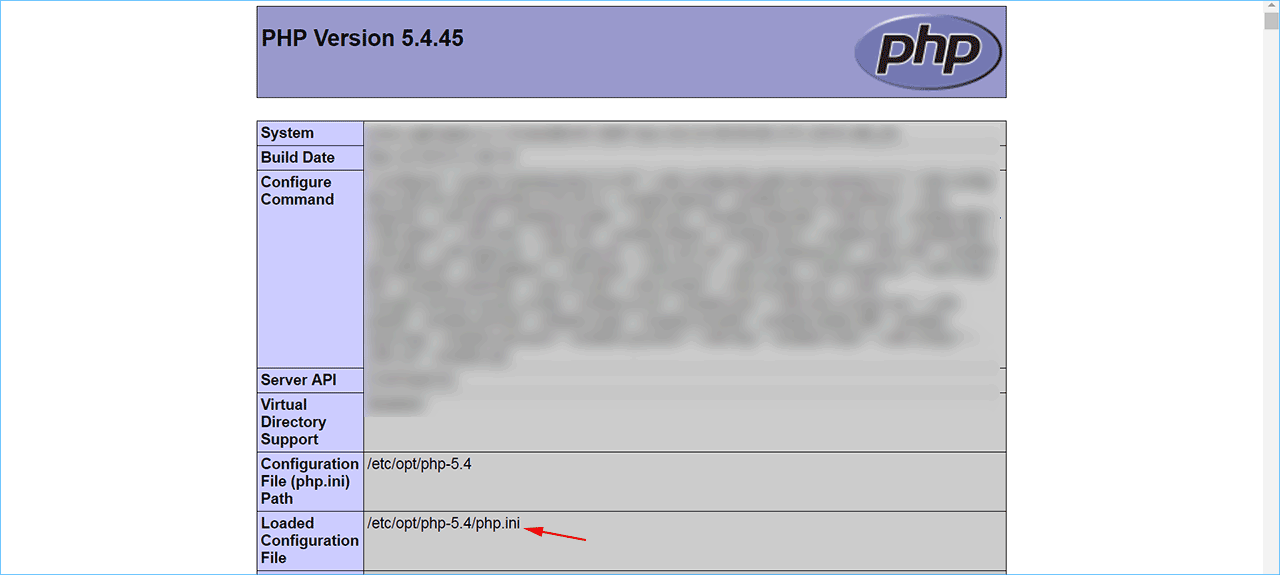
В результате в браузере показываются данные о версии PHP, используемой на хостинге, и сведения о его конфигурации. В графе Loaded Configuration File отображается путь к файлу php.ini на сервере хостера.
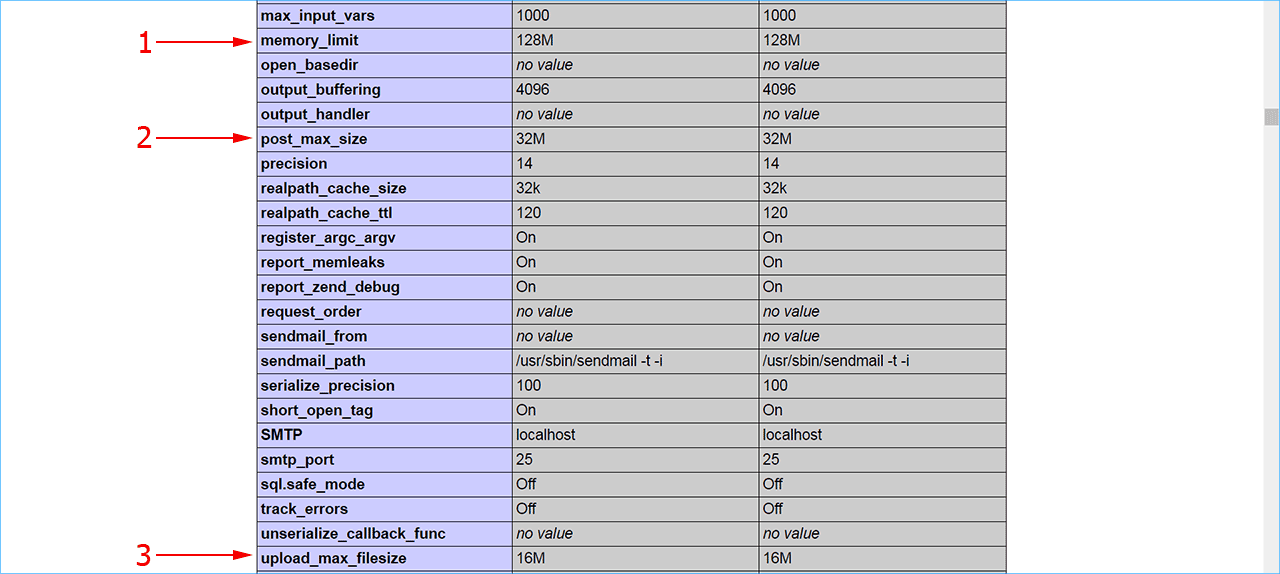
Среди множества настроек проверьте значение трех параметров, которые определяют объем данных, импортируемых на сервер:
- memory_limit – максимальный размер памяти (128 Мб), которая отводится хостером для выполнения скриптов на сайте;
- post_max_size – допустимый размер единовременного запроса на импорт файла (32 Мб в нашем случае);
- upload_max_filesize – предельный объем данных, который разрешается импортировать на сайт (16 Мб, как и показал WordPress).
Изменение файла php.ini
Для увеличения допустимого объема данных, импортируемых на сайт, требуется скорректировать величину, задаваемую в директивах upload_max_filesize и post_max_size. В случае виртуального хостинга пользователь может не владеть полным доступом к глобальным настройкам сервера, чтобы провести подобную операцию. Как правило, полный доступ к этому файлу имеется на локальном сервере (Denwer, OpenServer) либо на VPS хостинге.
При наличии доступа откройте файл php.ini в режиме правки и задайте новые значения в директивах upload_max_filesize и post_max_size. При этом величина upload_max_filesize должна быть меньше, чем post_max_size, а величина post_max_size не должна быть выше memory_limit. Не забудьте выполнить бэкап сайта и сохранить резервную копию файла php.ini, прежде чем вносить правки.
На виртуальном хостинге не всегда предоставляется доступ к php.ini, часто создается конфигурационный файл отдельно для каждого пользователя. Это необходимо, чтобы его конфигурация не затрагивала соседние сайты, размещенные на том же хостинге. Для проверки результата может потребоваться чистка кэша сайта и браузера.
Изменение файла user.ini, где он лежит
Если доступ к файлу php.ini отсутствует, пользователь может скорректировать необходимые величины в файле user.ini. Путь к нему указывается в разделе «Additional .ini files parsed» при открытии файла info.php. Этот способ работает для версии PHP не ниже 5.
- Запустите текстовый редактор и задайте файлу имя user.ini.
- Внесите в него директивы memory_limit, post_max_size и upload_max_filesize с нужными параметрами.
- Через файловый менеджер скопируйте файл user.ini в корневой каталог сайта.

Добавление php директив для ВордПресс в файл .htaccess
Еще один способ задать новые значения – изменить файл .htaccess, размещенный в корневом каталоге сайта. Перед изменением этого файла обязательно создайте его резервную копию, поскольку при неправильных настройках сайт работать не будет.
- Откройте файл .htaccess в редакторе кода.
- Добавьте необходимые директивы, используя перед каждой команду php_value.
- Сохраните файл в корневом каталоге сайта.
- Откройте сайт и убедитесь, что он работает после внесения правок. В противном случае восстановите файл .htaccess из резервной копии.

Если ничего не помогло
Важно понимать, что пользовательские настройки не имеют приоритета перед настройками сервера. Если используемый вами тарифный план ограничивает на сервере максимально разрешенный объем файла 50 мегабайтами, а вы запишете в директиву upload_max_filesize 500 мегабайт – этот вариант работать не будет.
Следует обратиться в службу технической поддержки хостинга:
- если вы не имеете доступа к файлу php.ini;
- если переопределение директив в файлах php.ini, user.ini или .htaccess не помогло.
iPipe – надёжный хостинг-провайдер с опытом работы более 15 лет.
- Виртуальные серверы с NVMe SSD дисками от 299 руб/мес
- Безлимитный хостинг на SSD дисках от 142 руб/мес
- Выделенные серверы в наличии и под заказ
- Регистрацию доменов в более 350 зонах
Where is PHP.ini in WordPress?
There are many commands in the php.ini file, by changing each command changes happen in WordPress. Therefore we need to know where is PHP.ini in wordpress.
As you probably know WordPress is developed by the powerful programming language of PHP. In this article, we would like to talk about the php.ini file and where is PHP.ini in WordPress?
Therefore, one of the most important files you may come across in the hosting panel is the php.ini file. There are many commands in the php.ini file, by changing each command a lot of things change in WordPress.
First, let us discuss where you can actually find the php.ini file in the server, Linux, XAMPP and etc. Then, we will recommend a few configurations for the php.ini file.
Where is PHP.ini in WordPress?
The first question we answer is where to find the php.ini file?
It doesn’t matter if WordPress is on a live server or a local server. The best way to find the location of this file is to create a PHP file.
It doesn’t matter what name you use for this file. You only need to use the .php extension for it.
Then copy and paste the code below into the created file:
Finally, once the file is saved, open it in the browser. After running the file, you should be able to see the information of php.ini file.
The location of php.ini should be visible in the Configuration file path or in the Loaded Configuration File.
In normal circumstances, the file will be placed in the first location. Otherwise, if the PHP is installed as a module, it will be in the second location.
Creating the .php file may not always work and you have to use other methods to find the location of the php.ini file.
Where is PHP.ini in WAMP?
If you have WordPress installed locally on your computer, you can find the file via the program you are using. Although, the location of php.ini is different in each program. Below, we discuss different programs and where to find the php.ini in each of them.
If you are using the WAMP, then finding the php.ini is an easy task. Simply, right-click on the icon of the program and from the appeared menu click on PHP. In the opened menu you will be able to see the php.ini. This is all you need to do to find the php.ini file in the WAMP server.
Where to Find PHP.ini in XAMPP?
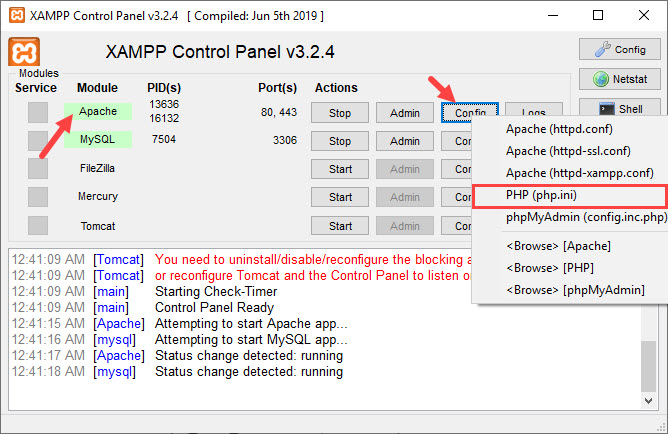
Finding php.ini in the XAMPP server is a bit different. Open the program and click on Config next to the Apache module. From the opened menu click on PHP(php.ini).
Where to Find PHP.ini in Linux?
If you are a Linux user, to find the php.ini file, type the code below in the Linux terminal:
PHP –I | grep “Loaded Configuration File”The output you receive should be like below:
Loaded Configuration File => /usr/local/lib/php.iniNormally, the php.ini file is located in the Loaded Configuration File. If you couldn’t find it there, simply change the path to Configuration File.
Where is PHP.ini in cPanel?
As mentioned above, it doesn’t matter if you have WordPress installed locally or on a live server.
In any case, there are multiple ways of finding the php.ini file in WordPress. Follow the steps below if you have WordPress installed on a live server and have access to the cPanel:
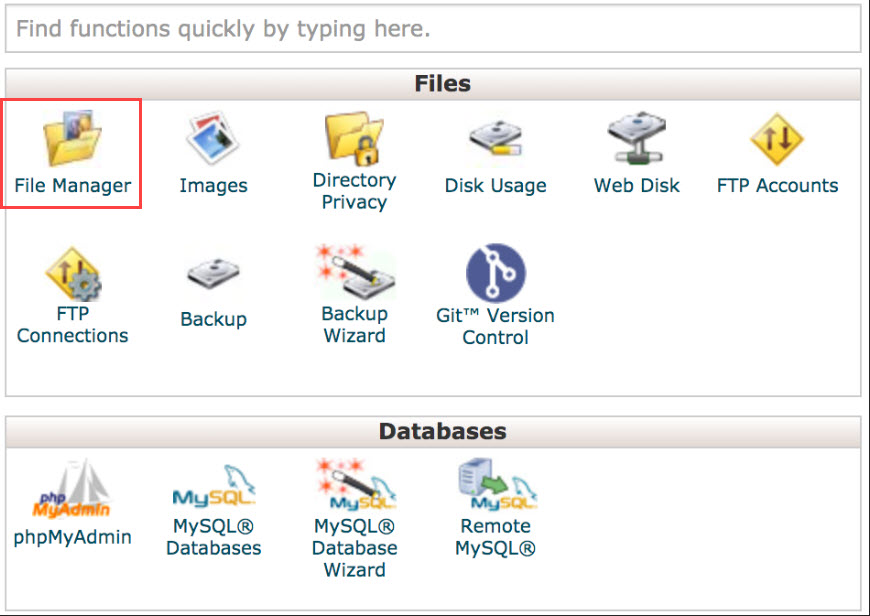
- Login to your hosting panel
- Open File Manager
- Php.ini file is located in the Root directory
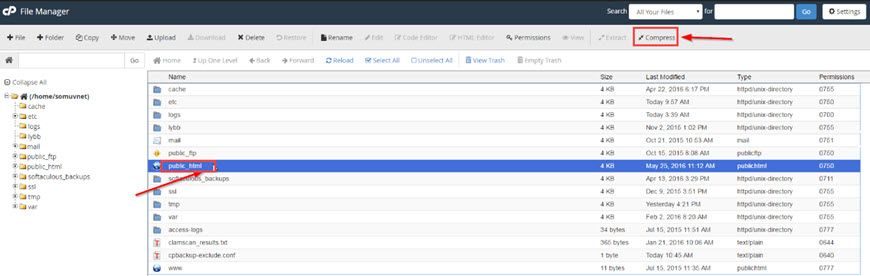
Don’t forget that the root directory is in the public_html folder. Simply click on it from the left-hand side menu.
What are the Recommended Configurations for PHP.ini in WordPress?
There are some recommended configurations for the php.ini that makes the WordPress run better. Other than php.ini configurations there are other options that we will mention down below:
PHP.ini
Copy and paste the following code in the PHP.ini file:
max_execution_time = 60 memory_limit = 128M post_max_size = 8M upload_max_filesize = 8M max_input_time = 60 file_uploads = On safe_mode = Off.htaccess file
Copy and paste the line below into the .htaccess file. This file can be found in the root directory of your website. Often, it is hidden. Therefore, use an FTP client like FileZilla to show the hidden files.
php_value max_execution_time = 60wp-config.php file
Copy and paste the line below in the wp-config.php file to eliminate the run-time limit. Or if it is already in the file, change the value to 60.
PHP.ini Configurations You Can Change
There are many commands in the php.ini file. Some of them can be changed. Below are those that we can change. Knowing what each of them does is very important.
Memory_limit
As you can probably tell by its name, memory_limit is the command to limit the memory usage of PHP in WordPress.
The value you define for the memory_limit must be more than the file you are trying to upload. This is the memory needed to upload files and run commands. The recommended value is 128 MB.
Max_execution_time
The time needed to execute every script is defined by this command. In other words, the time the server needs to run the commands.
For example, if you are uploading a fairly big size to the server, it will take more than a few seconds. Therefore, you must remove the execution time or increase it.
Post_max_size
This command defines the maximum data a post can have. To eliminate the limitation change the value to 0. By using the POST method you can call the post from the server.
Upload_max_filesize
This command defines the maximum file you are allowed to upload on WordPress. You have probably seen the limited upload number displayed in the WordPress gallery. This command defines that limitation.
If the memory limit exhaust error occurred, you must eliminate this command or increase it.
Max_input_time
This command defines the seconds required for each data to be analyzed. Data like POST and GET.
The time begins exactly when the command requests PHP from the server and it ends when the command starts. The default value is -1. To eliminate this limitation, set the value to 0.