Automating Windows Applications Using COM
Python has many options for natively creating common Microsoft Office file types including Excel, Word and PowerPoint. In some cases, however, it may be too difficult to use the pure python approach to solve a problem. Fortunately, python has the “Python for Windows Extensions” package known as pywin32 that allows us to easily access Window’s Component Object Model ( COM ) and control Microsoft applications via python. This article will cover some basic use cases for this type of automation and how to get up and running with some useful scripts.
What is COM ?
From the Microsoft Website, the Component Object Model ( COM ) is:
a Platform-independent, distributed, object-oriented system for creating binary software components that can interact. COM is the foundation technology for Microsoft’s OLE (compound documents) and ActiveX (Internet-enabled components) technologies. COM objects can be created with a variety of programming languages.
This technology allows us to control Windows applications from another program. Many of the readers of this blog have probably seen or used VBA for some level of automation of an Excel task. COM is the foundational technology that supports VBA .
pywin32
The pywin32 package has been around for a very long time. In fact, the book that covers this topic was published in 2000 by Mark Hammond and Andy Robinson. Despite being 18 years old (which make me feel really old :), the underlying technology and concepts still work today. Pywin32 is basically a very thin wrapper of python that allows us to interact with COM objects and automate Windows applications with python. The power of this approach is that you can pretty much do anything that a Microsoft Application can do through python. The downside is that you have to run this on a Windows system with Microsoft Office installed. Before we go through some examples, make sure you have pywin32 installed on your system using pip or conda
One other recommendation I would make is that you keep a link to Tim Golden’s page handy. This resource has many more details on how to use python on Windows for automation and other administration tasks.
Getting Started
All of these applications start with similar imports and process for activating an application. Here is a very short example of opening up Excel:
import win32com.client as win32 excel = win32.gencache.EnsureDispatch('Excel.Application') excel.Visible = True _ = input("Press ENTER to quit:") excel.Application.Quit()
Once you run this from the command line, you should see Excel open up. When you press ENTER , the application will close. There are a few key concepts to go through before we actually make this a more useful application.
The first step is to import the win32 client. I’ve used the convention of importing it as win32 to make the actual dispatch code a little shorter.
The magic of this code is using EnsureDispatch to launch Excel. In this example, I use gencache.EnsureDispatch to create a static proxy. I recommend reading this article if you want to know more details about static vs. dynamic proxies. I have had good luck using this approach for the types of examples included in this article but will be honest — I have not widely experimented with the various dispatch approaches.
Now that the excel object is launched, we need to explicitly make it visible by setting excel.Visible = True
The win32 code is pretty smart and will close down excel once the program is done running. This means that if we just leave the code to run on its own, you probably won’t see Excel. I include the dummy prompt to keep Excel visible on the screen until the user presses ENTER .
I include the final line of excel.Application.Quit() as a bit of a belt and suspenders approach. Strictly speaking win32 should close out Excel when the program is done but I decided to include excel.Application.Quit() to show how to force the application to close.
This is the most basic approach to using COM . We can extend this in a number of more useful ways. The rest of this article will go through some examples that might be useful for your own needs.
Open a File in Excel
In my day-to-day work, I frequently use pandas to analyze and manipulate data, then output the results in Excel. The next step in the process is to open up the Excel and review the results. In this example, we can automate the file opening process which can make it simpler than trying to navigate to the right directory and open a file.
import win32com.client as win32 import pandas as pd from pathlib import Path # Read in the remote data file df = pd.read_csv("https://github.com/chris1610/pbpython/blob/master/data/sample-sales-tax.csv?raw=True") # Define the full path for the output file out_file = Path.cwd() / "tax_summary.xlsx" # Do some summary calcs # In the real world, this would likely be much more involved df_summary = df.groupby('category')['ext price', 'Tax amount'].sum() # Save the file as Excel df_summary.to_excel(out_file) # Open up Excel and make it visible excel = win32.gencache.EnsureDispatch('Excel.Application') excel.Visible = True # Open up the file excel.Workbooks.Open(out_file) # Wait before closing it _ = input("Press enter to close Excel") excel.Application.Quit()
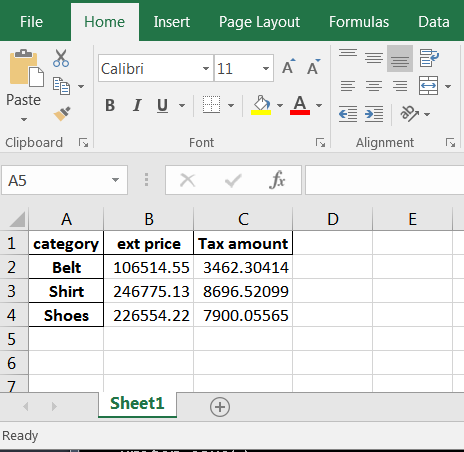
Here’s the resulting Excel output:
This simple example expands on the earlier one by showing how to use the Workbooks object to open up a file.
Attach an Excel file to Outlook
Another simple scenario where COM is helpful is when you want to attach a file to an email and send to a distribution list. This example shows how to do some data manipulation, open up a Outlook email, attach a file and leave it open for additional text before sending.
import win32com.client as win32 import pandas as pd from pathlib import Path from datetime import date to_email = """ Lincoln, Abraham ; chris@example.com """ cc_email = """ Franklin, Benjamin """ # Read in the remote data file df = pd.read_csv("https://github.com/chris1610/pbpython/blob/master/data/sample-sales-tax.csv?raw=True") # Define the full path for the output file out_file = Path.cwd() / "tax_summary.xlsx" # Do some summary calcs # In the real world, this would likely be much more involved df_summary = df.groupby('category')['ext price', 'Tax amount'].sum() # Save the file as Excel df_summary.to_excel(out_file) # Open up an outlook email outlook = win32.gencache.EnsureDispatch('Outlook.Application') new_mail = outlook.CreateItem(0) # Label the subject new_mail.Subject = "%d> Report Update".format(date.today()) # Add the to and cc list new_mail.To = to_email new_mail.CC = cc_email # Attach the file attachment1 = out_file # The file needs to be a string not a path object new_mail.Attachments.Add(Source=str(attachment1)) # Display the email new_mail.Display(True)
This example gets a little more involved but the basic concepts are the same. We need to create our object (Outlook in this case) and create a new email. One of the challenging aspects of working with COM is that there is not a very consistent API . It is not intuitive that you create an email like this: new_mail = outlook.CreateItem(0) It generally takes a little searching to figure out the exact API for the specific problem. Google and stackoverflow are your friends.
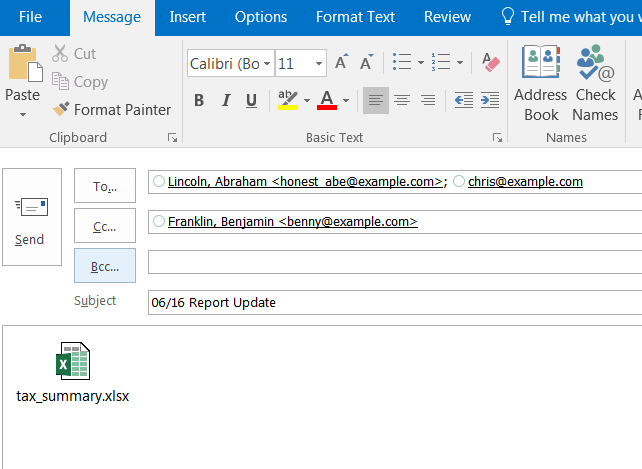
Once the email object is created, you can add the recipient and CC list as well as attach the file. When it is all said and done, it looks like this:
The email is open and you can add additional information and send it. In this example, I chose not to close out Outlook and let python handle those details.
Copying Data into Excel
The final example is the most involved but illustrates a powerful approach for blending the data analysis of python with the user interface of Excel.
It is possible to build complex excel with pandas but that approach can be very laborious. An alternative approach would be to build up the complex file in Excel, then do the data manipulation and copy the data tab to the final Excel output.
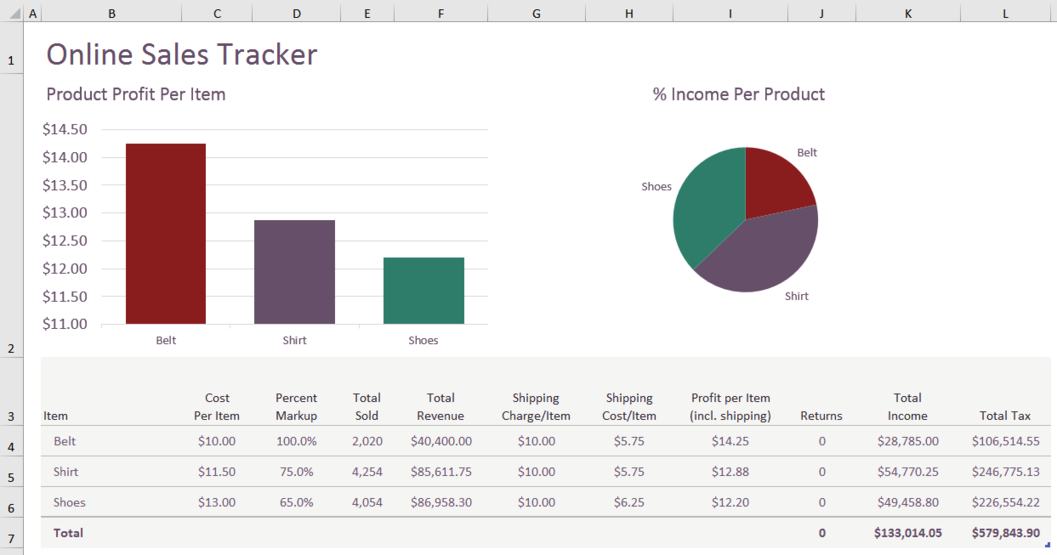
Here is an example of the Excel dashboard we want to create:
Yes, I know that pie charts are awful but I can almost guarantee that someone is going to ask you to put one in the dashboard at some point in time! Also, this template had a pie chart and I decided to keep it in the final output instead of trying to figure out another chart.
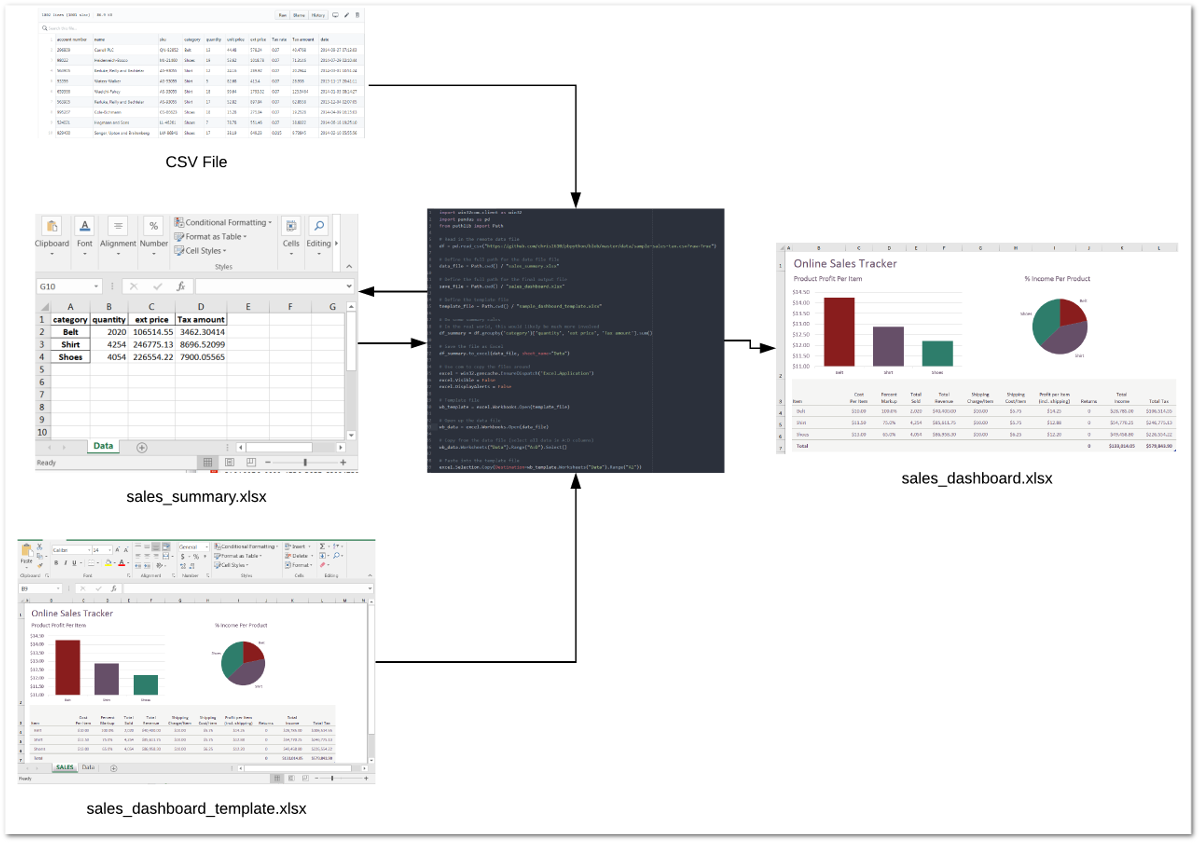
It might be helpful to take a step back and look at the basic process the code will follow:
Let’s get started with the code.
import win32com.client as win32 import pandas as pd from pathlib import Path # Read in the remote data file df = pd.read_csv("https://github.com/chris1610/pbpython/blob/master/data/sample-sales-tax.csv?raw=True") # Define the full path for the data file file data_file = Path.cwd() / "sales_summary.xlsx" # Define the full path for the final output file save_file = Path.cwd() / "sales_dashboard.xlsx" # Define the template file template_file = Path.cwd() / "sample_dashboard_template.xlsx"
In the section we performed our imports, read in the data and defined all three files. Of note is that this process includes the step of summarizing the data with pandas and saving the data in an Excel file. We then re-open that file and copy the data into the template. It is a bit convoluted but this is the best approach I could figure out for this scenario.
Next we perform the analysis and save the temp Excel file:
# Do some summary calcs # In the real world, this would likely be much more involved df_summary = df.groupby('category')['quantity', 'ext price', 'Tax amount'].sum() # Save the file as Excel df_summary.to_excel(data_file, sheet_name="Data")
Now we use COM to merge the temp output file into our Excel dashboard tab and save a new copy:
# Use com to copy the files around excel = win32.gencache.EnsureDispatch('Excel.Application') excel.Visible = False excel.DisplayAlerts = False # Template file wb_template = excel.Workbooks.Open(template_file) # Open up the data file wb_data = excel.Workbooks.Open(data_file) # Copy from the data file (select all data in A:D columns) wb_data.Worksheets("Data").Range("A:D").Select() # Paste into the template file excel.Selection.Copy(Destination=wb_template.Worksheets("Data").Range("A1")) # Must convert the path file object to a string for the save to work wb_template.SaveAs(str(save_file))
The code opens up Excel and makes sure it is not visible. Then it opens up the dashboard template and data files. It uses the Range(«A:D»).Select() to select all the data and then copies it into the template file.
The final step is to save the template as a new file.
This approach can be a very convenient shortcut when you have a situation where you want to use python for data manipulation but need a complex Excel output. You may not have an apparent need for it now but if you ever build up a complex Excel report, this approach is much simpler than trying to code the spreadsheet by hand with python.
Conclusion
My preference is to try to stick with python as much as possible for my day-to-day data analysis. However, it is important to know when other technologies can streamline the process or make the results have a bigger impact. Microsoft’s COM technology is a mature technology and can be used effectively through python to do tasks that might be too difficult to do otherwise. Hopefully this article has given you some ideas on how to incorporate this technique into your own workflow. If you have any tasks you like to use pywin32 for, let us know in the comments.
Changes
How to install win32com.client in Python
This tutorial will see how to install win32com.client in Python. Using this you can access the windows 32 APIs from Python.
From python version 3.9 onwards this library is preinstalled with the python package. And for other versions, it is not. So before installing check the python version using this command.
Note: Also try to import the library in some Python code to see if it’s giving any ImportError. If it’s not it means it’s already installed in your Python version.
Install pywin32 using pip
Now open the command prompt on your machine and type the following command to install pywin32 using pip.
It will download and install the package on your machine.
After successful installation, try to use the library in Python code to ensure that the package is working appropriately.
Example:
After execution, it returned 1 which means the code has been executed successfully without any errors.
Install win32api using conda
You can also install the win32api module using conda , which is the package manager for the Anaconda distribution of Python. To install the win32api module using conda , type the following command in the command prompt:
conda install -c anaconda pywin32
Once the win32api module is installed, you can import it into your Python code and use its functions. For example:
import win32api # Get the current working directory cwd = win32api.GetCurrentDirectory() print(cwd)


