- Java Debugging with Eclipse — Tutorial
- 1.2. Debugging support in Eclipse
- 1.3. Setting Breakpoints
- 1.4. Starting the Debugger
- 1.5. Controlling the program execution
- 1.6. Breakpoints view and deactivating breakpoints
- 1.7. Evaluating variables in the debugger
- 1.8. Changing variable assignments in the debugger
- 1.9. Controlling the display of the variables with Detail Formatter
- 2. Advanced Debugging
- 2.1. Breakpoint properties
- Debugging the Eclipse IDE for Java Developers
- Beginner’s Guide to Quick Start Debugging
- 1. Launching and Debugging a Java program
- 2. Breakpoints
- 3. Debug Perspective
- 4.Stepping commands
- Advanced Tools to Debug Complex Scenarios
- 1. Watchpoints, Exception Breakpoints, Conditional Breakpoints
- 2. Remote Debugging
- New Features in Eclipse Oxygen
- 1. Tracepoints
- 2. Trigger Point
- 2. Logical Structures
- 3. Method Result After Step Operation
- 4. Launch Group
- Breakpoints Grouping and Sorting
- Conclusion
Java Debugging with Eclipse — Tutorial
Debugging allows you to run a program interactively while watching the source code and the variables during the execution.
A breakpoint in the source code specifies where the execution of the program should stop during debugging. Once the program is stopped you can investigate variables, change their content, etc.
To stop the execution, if a field is read or modified, you can specify watchpoints.
Breakpoints and watchpoints are sometimes called stop points.
1.2. Debugging support in Eclipse
Eclipse allows you to start a Java program in Debug mode.
Eclipse provides a Debug perspective which gives you a pre-configured set of views. Eclipse allows you to control the execution flow via debug commands.
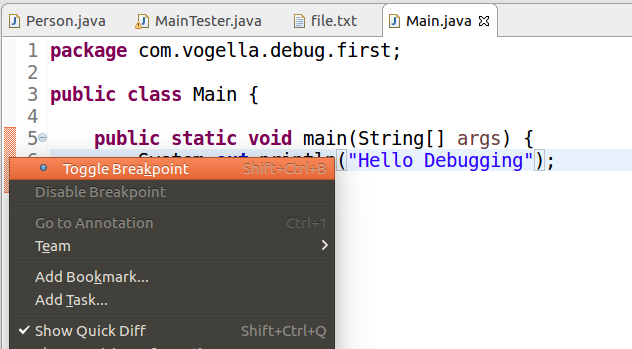
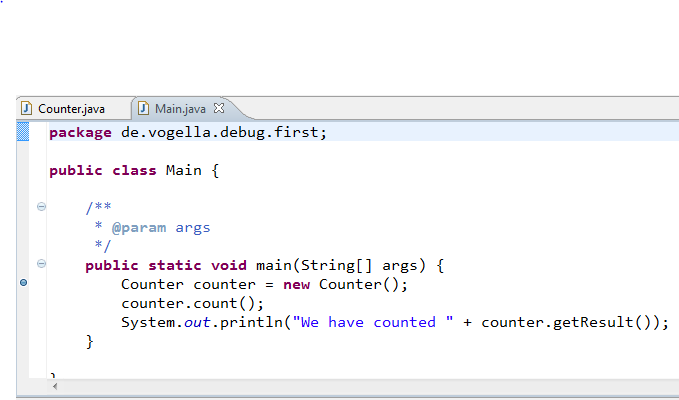
1.3. Setting Breakpoints
To define a breakpoint in your source code, right-click in the left margin in the Java editor and select Toggle Breakpoint. Alternatively you can double-click on this position.
For example in the following screenshot we set a breakpoint on the line Counter counter = new Counter(); .
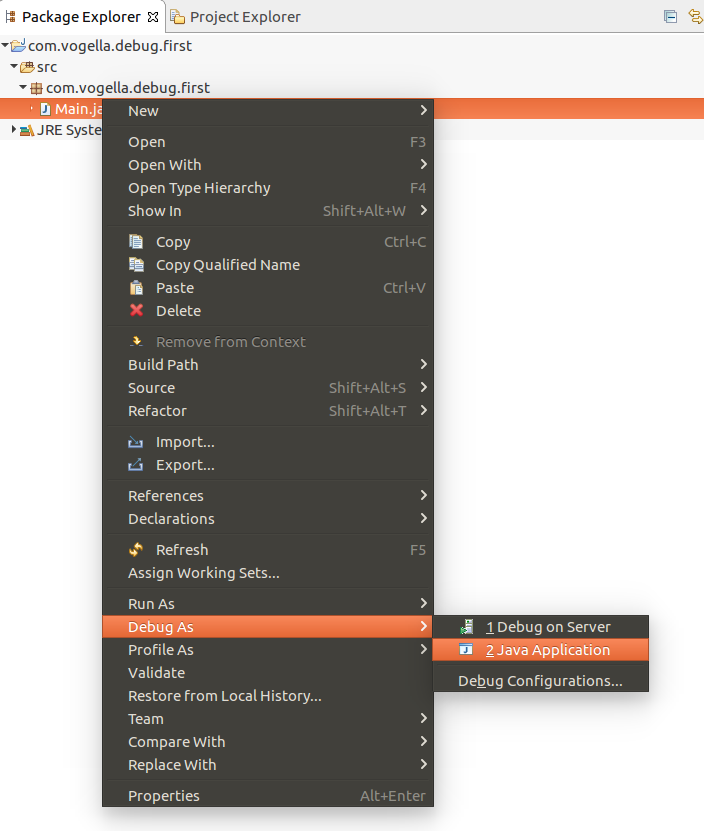
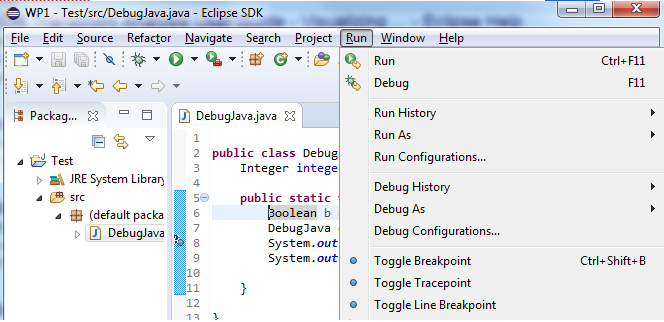
1.4. Starting the Debugger
To debug your application, select a Java file with a main method. Right-click on it and select Debug As Java Application .
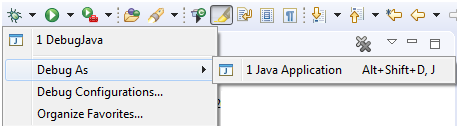
If you started an application once via the context menu, you can use the created launch configuration again via the Debug button in the Eclipse toolbar.

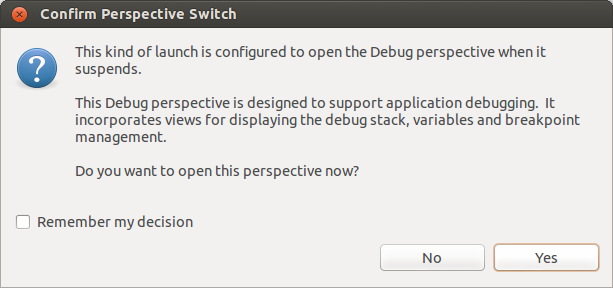
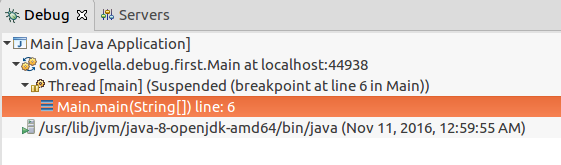
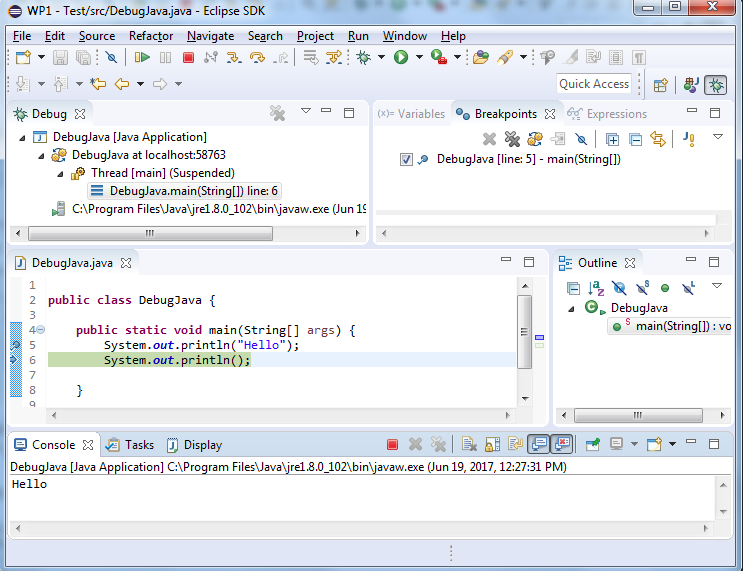
If you have not defined any breakpoints, program as normally. To debug the program you need to define breakpoints. Eclipse asks you to switch to the Debug perspective once a stop point is reached. Answer Yes in the corresponding dialog. Afterwards Eclipse opens this perspective.
1.5. Controlling the program execution
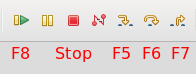
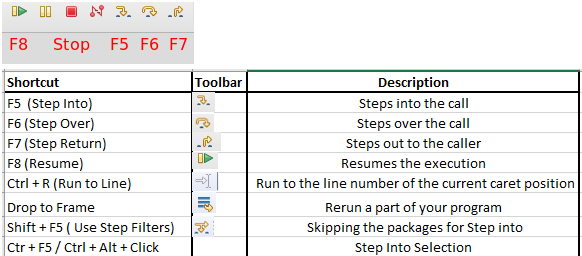
Eclipse provides buttons in the toolbar for controlling the execution of the program you are debugging. Typically, it is easier to use the corresponding keys to control this execution.
You can use allow use shortcut key to step through your coding. The meaning of these keys is explained in the following table.
Executes the currently selected line and goes to the next line in your program. If the selected line is a method call the debugger steps into the associated code.
F6 steps over the call, i.e. it executes a method without stepping into it in the debugger.
F7 steps out to the caller of the currently executed method. This finishes the execution of the current method and returns to the caller of this method.
F8 tells the Eclipse debugger to resume the execution of the program code until is reaches the next breakpoint or watchpoint.
The following picture displays the buttons and their related keyboard shortcuts.
The call stack shows the parts of the program which are currently executed and how they relate to each other. The current stack is displayed in the Debug view.
1.6. Breakpoints view and deactivating breakpoints
The Breakpoints view allows you to delete and deactivate breakpoints and watchpoints. You can also modify their properties.
To deactivate a breakpoint, remove the corresponding checkbox in the Breakpoints view. To delete it you can use the corresponding buttons in the view toolbar. These options are depicted in the following screenshot.
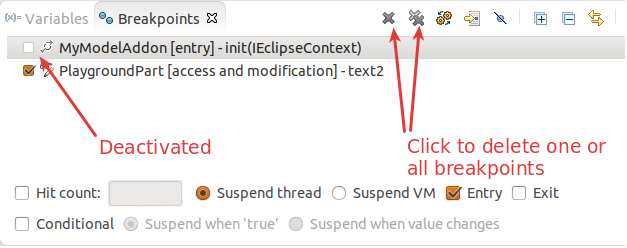
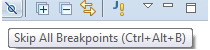
If you want to disable all breakpoints at the same time, you can press the Skip all breakpoints button. If you press it again, your breakpoints are reactivated. This button is highlighted in the following screenshot.

1.7. Evaluating variables in the debugger
The Variables view displays fields and local variables from the current executing stack. Please note you need to run the debugger to see the variables in this view.
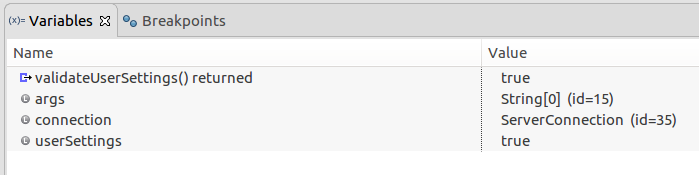
As of Eclipse 4.7 you also see the return statement of the last method call in the debugger.
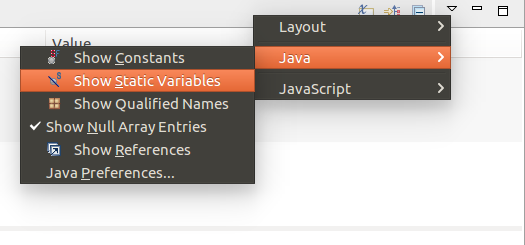
Use the drop-down menu to display static variables.
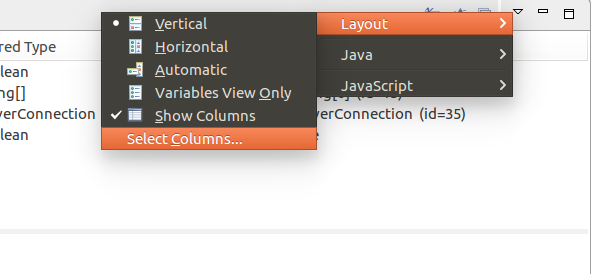
Via the drop-down menu of the Variables view you can customize the displayed columns.
For example, you can show the actual type of each variable declaration. For this select Layout Select Columns… Type .
1.8. Changing variable assignments in the debugger
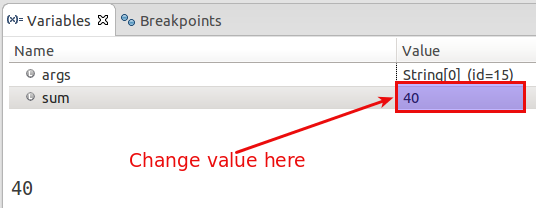
The Variables view allows you to change the values assigned to your variable at runtime. This is depicted in the following screenshot.
1.9. Controlling the display of the variables with Detail Formatter
By default the Variables view uses the toString() method to determine how to display the variable.
You can define a Detail Formatter in which you can use Java code to define how a variable is displayed.
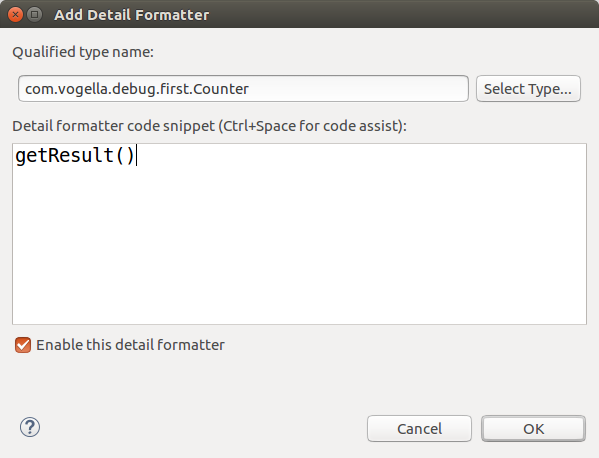
For example, the toString() method in the Counter class may show meaningless information, e.g. com.vogella.combug.first.Counter@587c94 . To make this output more readable you can right-click on the corresponding variable and select the New Detail Formater… entry from the context menu.
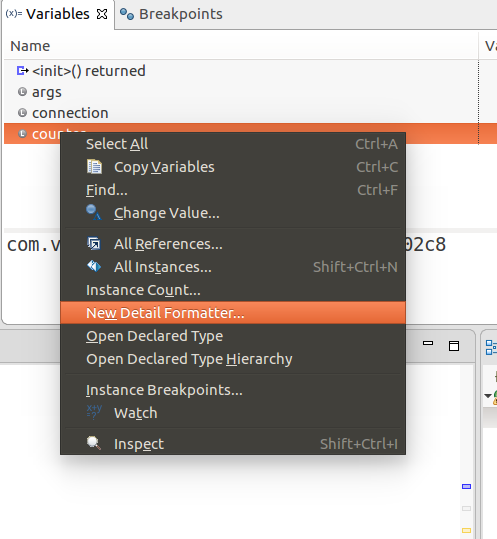
Afterwards you can use a method of this class to determine the output. In this example the getResult() method of this class is used. This setup is depicted in the following screenshot.
2. Advanced Debugging
The following section shows more options you have for debugging.
2.1. Breakpoint properties
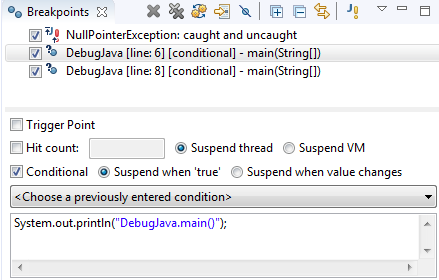
After setting a breakpoint you can select the properties of the breakpoint, via right-click Breakpoint Properties . Via the breakpoint properties you can define a condition that restricts the activation of this breakpoint.
You can for example specify that a breakpoint should only become active after it has reached 12 or more times via the Hit Count property.
You can also create a conditional expression. The execution of the program only stops at the breakpoint, if the condition evaluates to true. This mechanism can also be used for additional logging, as the code that specifies the condition is executed every time the program execution reaches that point.
The following screenshot depicts this setting.
Debugging the Eclipse IDE for Java Developers
Debugging is the routine process of locating and removing bugs, errors or abnormalities from programs. It’s a must have skill for any Java developer because it helps to find subtle bug that are not visible during code reviews or that only happens when a specific condition occurs. The Eclipse Java IDE provides many debugging tools and views grouped in the Debug Perspective to help the you as a developer debug effectively and efficiently. There are many improvements included in the latest Eclipse Java Development Tools (JDT) release included in the Eclipse Oxygen Simultaneous Release. This article will start with a beginner’s guide to start you with debugging. In the second part of the article, you will find a more advanced guide to debugging and you’ll discover what’s new for debugging in Eclipse Oxygen.
Beginner’s Guide to Quick Start Debugging
Here are some quick tips and tools that will help you get started quickly with debugging your Java project.
1. Launching and Debugging a Java program
A Java program can be debugged simply by right clicking on the Java editor class file from Package explorer. Select Debug As → Java Application or use the shortcut Alt + Shift + D, J instead. 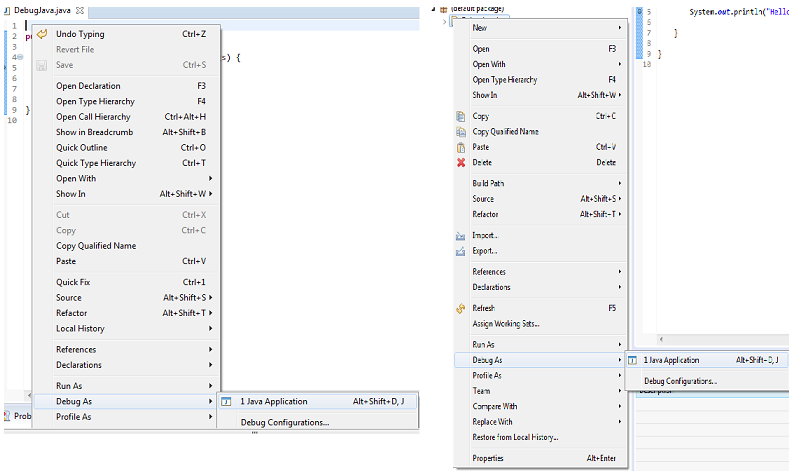
 Either actions mentioned above creates a new Debug Launch Configuration and uses it to start the Java application.
 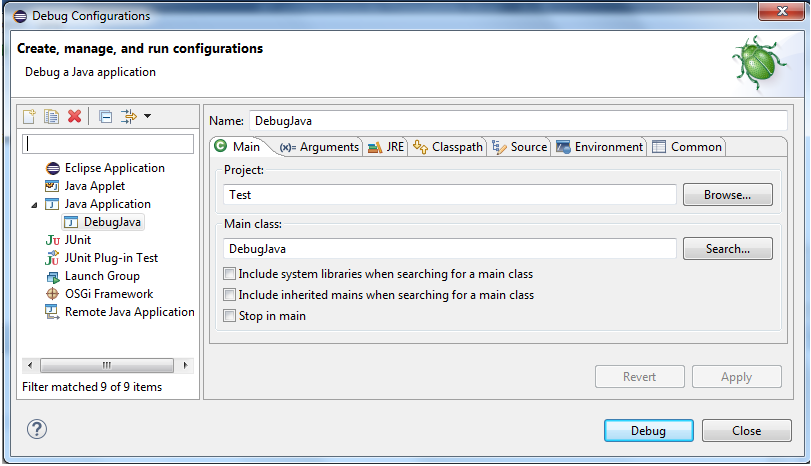 In most cases, users can edit and save the code while debugging without restarting the program.This works with the support of HCR (Hot Code Replacement), which has been specifically added as a standard Java technique to facilitate experimental development and to foster iterative trial-and-error coding.
2. Breakpoints
A breakpoint is a signal that tells the debugger to temporarily suspend execution of your program at a certain point in the code. To define a breakpoint in your source code, right-click in the left margin in the Java editor and select Toggle Breakpoint. Alternatively, you can double-click on this position. 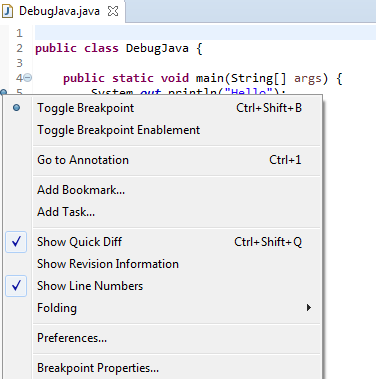 The Breakpoints view allows you to delete and deactivate Breakpoints and modify their properties.
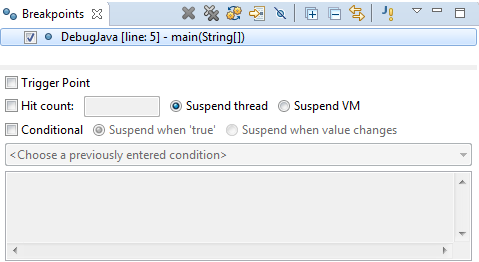
 All breakpoints can be enabled/disabled using Skip All Breakpoints. Breakpoints can also be imported/exported to and from a workspace.
3. Debug Perspective
- Debug view – Visualizes call stack and provides operations on that.
- Breakpoints view – Shows all the breakpoints.
- Variables/Expression view – Shows the declared variables and their values. Press Ctrl+Shift+d or Ctrl+Shift+i on a selected variable or expression to show its value. You can also add a permanent watch on an expression/variable that will then be shown in the Expressions view when debugging is on.
- Display view – Allows to Inspect the value of a variable, expression or selected text during debugging.
- Console view – Program output is shown here.
4.Stepping commands
The Eclipse Platform helps developers debug by providing buttons in the toolbar and key binding shortcuts to control program execution.
For more information about debugging visit: Eclipse Stepping Commands Help
Advanced Tools to Debug Complex Scenarios
This section will give you more advanced tips and tricks to help you debug your Java project. The Eclipse Oxygen release includes many great improvements for Java debugging. Here’s a quick overview.
1. Watchpoints, Exception Breakpoints, Conditional Breakpoints
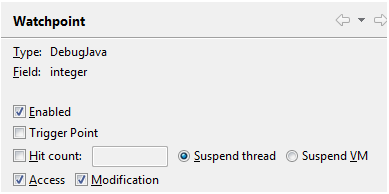
a. Watchpoints — A watchpoint is a special breakpoint that stops the execution of an application whenever the value of a given expression/field changes, without specifying where it might occur. User can specify by Breakpoint Properties… if they want the execution to stop when the watch expression is Accessed, Modified or both.
b. Exception Breakpoints – An exception breakpoint is specified for thrown exception using Add Java Exception Breakpoint.
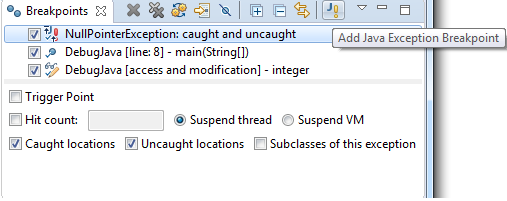
Breakpoint for NullPointerException will halt whenever/wherever this exception is thrown.
c. Condition Breakpoints – Eclipse users can create conditions to restrict the activation of breakpoints.
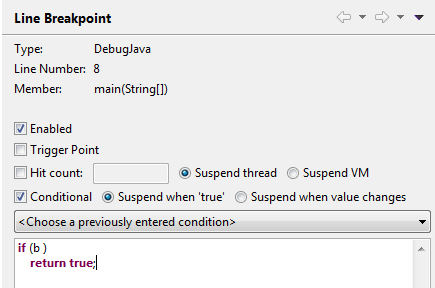
Breakpoint will be activated only if value of Boolean b is true. Hit count can be provided to halt the execution at nth hit of the breakpoint. The breakpoint is disabled until either it is re-enabled or its hit count is changed or the program ends.
2. Remote Debugging
– The Eclipse IDE allows you to debug applications that runs on another Java Virtual Machine (JVM) or even on another machine. You can create a new debug configuration of the Remote Java Application type. To enable remote debugging you need to start your Java application with certain flags. Connection Type can be specified as a Socket Attach or Socket Listen. Socket Listen supports multiple incoming connections.

New Features in Eclipse Oxygen
Here are the new features that have been added to the latest Eclipse Java IDE release.
1. Tracepoints
A new feature in the Eclipse Platform that allows users to creates conditional breakpoints to print out messages without halting at the breakpoints and cluttering the code base.
The Eclipse Platform created tracepoint with systrace template.
2. Trigger Point
Now users can activate Trigger Point. A set of trigger points can be defined for the breakpoints in a workspace.
All the other breakpoints that are initially suppressed by triggers will be hit only after any of the all Trigger Points have been hit. All the triggers are disabled after a Trigger Point is hit and will be re-enabled after the run.
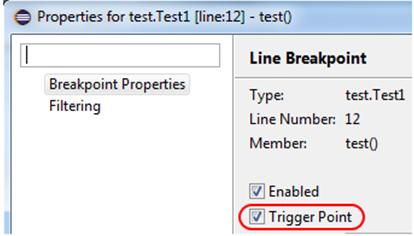
Any breakpoint can be set as a trigger point by using Breakpoint Properties via the dialog or the detail pane of the Breakpoints view.
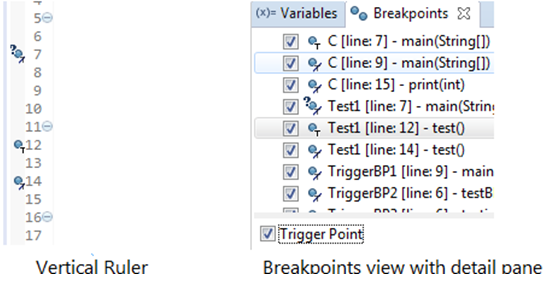
Triggers are rendered with an overlay of «T» and the breakpoints suppressed by the triggers are rendered with an overlay of «T» with a cut.
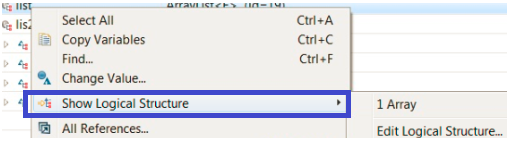
2. Logical Structures
In the Variables view, collection objects directly show their contained elements instead of their internal structure. Logical structures are now activated by default in the Oxygen release. Show Logical Structure can be turned off to show the internal structure.

The Show Logical Structure context menu lets you create, choose or edit the representation.
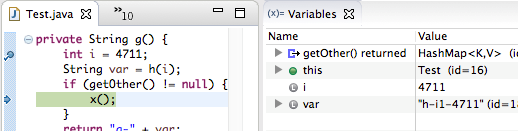
3. Method Result After Step Operation
Also new to the Oxygen release are Method Results. During debugging, the last method result (per return or throw) that was observed during Step Into, Step Over or Step Return, is shown as first line in the Variables view.
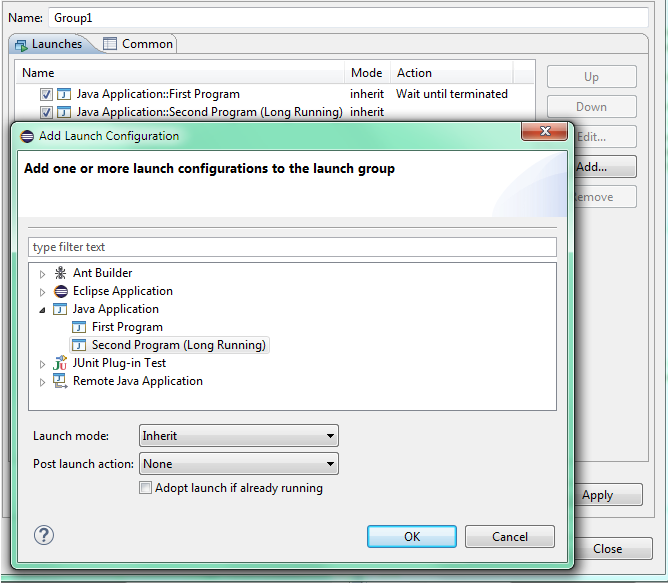
4. Launch Group
Also new in Oxygen, Launch Group launch configuration type allows you to launch multiple other launch configurations sequentially, with configurable actions after launching each group member. New launch groups can be created via the Run → Run Configurations. or Run → Debug Configurations. dialogs.
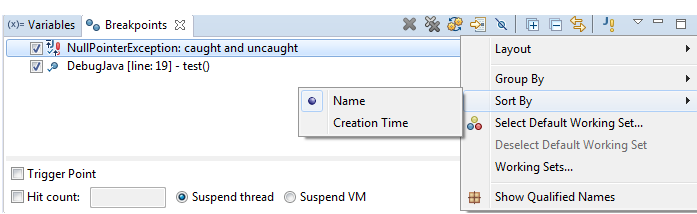
Breakpoints Grouping and Sorting
Eclipse users can now group the breakpoints by different categories in Eclipse Oxygen. Breakpoint Working Sets defines a group of breakpoints. User can perform actions like enable/disable on a working set.
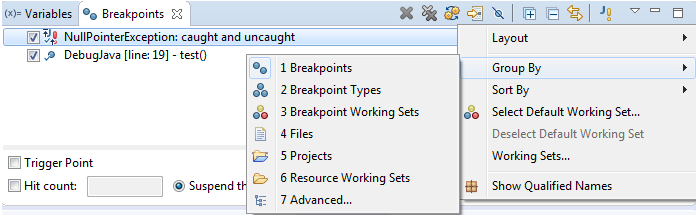
Breakpoints are sorted by Name by default, sorting order can be changed to Creation Time.
For more information about debugging visit: Eclipse Remote Debugging Help
Conclusion
This article covered some of the important debugging tools and some new tools provided by the Eclipse Java IDE in the Oxygen Release. Eclipse Oxygen is now available for download here.
For in depth knowledge, user can refer to: