- What is custom php ini
- Default Settings
- Why create a custom php.ini file?
- Discover the Handler
- Create a PHP.ini in cPanel
- Create Custom PHP.ini with suPHP
- Create Custom PHP.ini with DSO
- How to use custom php.ini files on shared hosting
- Step 1:- Create a php.ini file
- Step 2:- Create a .htaccess file
- Step 3:- Test your php.ini file
- Controlling PHP settings with a custom php.ini file
- Setting up a custom php.ini file
- More Information
- Article Details
- Other Articles in This Category
- Related Articles
- Grow Your Web Business
What is custom php ini
The php.ini file is where you declare changes to your PHP settings. You can use the default settings for the server, change specific settings by editing the existing php.ini, or create a new text file and name it php.ini.
There are several instances that may require you to modify a setting in the php.ini file for your website, such as increasing the PHP upload limit. We definitely permit the use of a custom php.ini file, but there are some requirements involved just to ensure that the files work as expected.
Default Settings
The server is already configured with standard settings for PHP that have been selected by our administrators to be the most optimal setting for a majority of our customers. Unless you specifically need to change one or more of the settings, there is no need to create or modify a php.ini file. If the php.ini file does not exist in your account, then your site will use the default PHP settings defined on the server.
Why create a custom php.ini file?
Some examples of what may be changed by using a custom php.ini file are:
- Editing the maximum size of a file that can be uploaded in a PHP script (upload_max_filesize = 10M)
- Editing the maximum PHP post size which must at least match upload_max_filesize (post_max_size = 10M)
- Editing the maximum file execution time in seconds (max_execution_time = 30)
Discover the Handler
Before a custom PHP directive can be set, the PHP handler needs to be determined, so that the correct method can be used. To find out your PHP handler:
- Log into shell as root
- Check the file ‘/etc/httpd/conf/php.conf’
If you see the line ‘ LoadModule suphp_module modules/mod_suphp.so ‘ then you are using suPHP.
If you see the line ‘ LoadModule php5_module modules/libphp5.so ‘ then you are not using suPHP, and can use the DSO instructions.
Create a PHP.ini in cPanel
This file should be created in your cPanel Home directory (/home/username/). Be sure to replace ‘username’ with your actual cPanel user name, and ‘$DOMAIN’ with your actual domain.
- Log into cPanel
- From the Files section, click File Manager
- Select Home Directory from the available options and click Go
- Click New File, at the top of the page
- In the New File Name field enter ‘php.ini’ and click Create New File
- Click the file named php.ini
- Click Edit at the top of the page, and then click Edit from the popup box
Now you can input the contents of your php.ini file and click Save.
Create Custom PHP.ini with suPHP
To begin creating your very own custom php.ini file:
- Copy your php.ini file in your cPanel user home directory, ‘cp /usr/local/lib/php.ini /home/user/’ (where ‘user’ is your cPanel username)
- Create a .htaccess file inside the ‘public_html’ directory of your site OR edit the existing .htaccess file, if one exists, by adding the following line: suPHP_ConfigPath /home/user Note: you do not need to add ‘php.ini’ to the end of it.
Once you have completed the above steps your php.ini file will be active. You will now be able to make edits to the custom php.ini. Your edits will only affect directories below the .htaccess file in which you referenced the file.
Create Custom PHP.ini with DSO
On the DSO server, directives should be placed in the .htaccess file for the directory to which they should apply. In most cases, this will be ‘/home/user/public_html/ where ‘user’ is your cPanel username.
To edit a boolean value (on/off) you can use php_flag like this:
php_flag magic_quotes_gpc off
To edit a numeric value you can use php_value like this:
php_value memory_limit 256M
Should you require any further assistance with creating a custom php.ini file then check in with one of our fantastic Support people.
How to use custom php.ini files on shared hosting
The advantages of using php with apache web server are many. The wonderful file named .htaccess makes things easier by allowing the webmaster (thats you!) to play around with many settings which would otherwise need the php.ini to be edited. This is a boon for people having their websites hosted on a shared server. Such people can’t even dream of editing the php.ini file located on their web hosting provider’s server. Thus the concept of custom php.ini was born. Webmasters who have their website hosted on a server with support for custom php.ini can create a php.ini within their directory and provide all the necessary settings they require. But custom php.ini doesn’t work out-of-the-box. This article explains how to use custom php.ini on a shared hosting server.
Note:- First ask your web hosting provider whether they support custom php.ini. If they don’t there is no point in trying anything further.
Step 1:- Create a php.ini file
Create a file named php.ini inside your root directory. By root directory I mean the directory outside your document root. If you are confused here is the clear explanation, if you upload files inside /home/username/public_html then it is your document root, you should create the php.ini inside /home/username for your safety and security.
Step 2:- Create a .htaccess file
Even for custom php.ini feature to work the infamous .htaccess is required. Create a .htaccess file inside your root directory i.e. the directory outside your document root if you upload your website file at /home/username/htdocs then the htaccess file should be in /home/username
Add the following line to the .htaccess file
SetEnv PHPRC /home/username/php.ini
Wait its not over the php.ini file needs to be secured so along with the above line add the following
order allow,deny deny from all
This will return a 403 error whenever someone tries to view your php.ini files or any file with a .ini extension. You could argue that no one can access it via the url as it is located outside the document root, but even if you accidentally copy the file into the document root you’ll be in trouble. So better safe than sorry.
Step 3:- Test your php.ini file
Create a file named info.php into your document root and add the following code
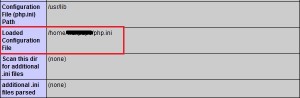
Save the file and access it by typing in the url (http://example.com/info.php) check the value next to “Loaded Configuration File” it should point to the location of the new php.ini file.
Now you can edit the php.ini file as you wish. Here are some sample configurations
display_errors = On date.timezone = Europe/London upload_max_filesize = 30M
IMPORTANT Remove the file containing phpinfo immediately because it exposes many sensitive information about your web server
Controlling PHP settings with a custom php.ini file
This article describes how to use custom php.ini files to control PHP settings for your web site.
This article applies to non-Turbo managed hosting packages with the cPanel management interface. For Turbo hosting packages, please see this article.
Setting up a custom php.ini file
A php.ini file contains directives for controlling many PHP settings. You can set up one or multiple custom php.ini files to define how your web site functions. For example, you might have a custom file in your /home/username/public_html directory for your web site’s main pages, and a separate custom file in your /home/username/public_html/images directory for your web site’s image files.
To set up a custom php.ini file, follow these steps:
lsapi_phpini /home/username/public_html/php.ini More Information
To view a complete list of php.ini directives, please visit http://www.php.net/manual/en/ini.list.php.
Article Details
Other Articles in This Category
- What is PHP?
- PHP script basics
- Viewing PHP settings
- Changing PHP settings and versions
- Custom php.ini files
- Using php.ini directives
- Custom .htaccess files for PHP settings
- Using PHP directives in custom .htaccess files
- Run PHP scripts from cron jobs
- Using PHP to send e-mail messages
- PHP include paths
- PEAR packages
- Determining if a PHP function is available
- ‘500 Internal Server Error’ while running PHP
- ‘String could not be parsed as XML’ error message in PHP
- Using the Exif extension in PHP
- Common issues after PHP upgrade
- Using a custom php.ini file for cPanel cron jobs
- Using PHP sessions
- ionCube PHP Loader support
- Specifying the MySQL character set in PHP
- ‘Unable to allocate memory for pool’ error message in PHP
- Optimizing Symfony using APC
- Using the internationalization extension in PHP
- Installing PHP composer
- Determining if APC is installed on a server
- Using the MailChimp API with PHP
- ‘Allowed memory size exhausted’ error message in PHP
- Using ionCube Loader with different PHP versions
- Enabling PHP opcode caching
- Sending e-mail with PHPMailer
- Hardening PHP 7 and earlier versions
- Custom PHP settings per directory with .user.ini files
- ionCube PHP Loader unavailable on PHP 8.0
- Changing the PHP version for a specific directory
Related Articles
Grow Your Web Business
Subscribe to receive weekly cutting edge tips, strategies, and news you need to grow your web business.
No charge. Unsubscribe anytime.
Did you find this article helpful? Then you’ll love our support. Experience the A2 Hosting difference today and get a pre-secured, pre-optimized website. Check out our web hosting plans today.