- Webslesson
- PHP, MySql, Jquery, AngularJS, Ajax, Codeigniter, Laravel Tutorial
- Thursday, 27 October 2016
- Datatables Jquery Plugin with Php MySql and Bootstrap
- Source Code
- index.php
- [Modal] AJAX Login Form using Bootstrap, PHP OOP, MySQL & jQuery
- How to Create AJAX Login Form using PHP OOP & MySQL?
- Step-1) Create MySQL DB & Tables
- Step-2) Build PHP Class
- UserClass.php
- Step-3) Database Connection
- dbconnect.php
- Step-4) Build Modal Login Form
- index.php
- Step-5) PHP Login Process
- login.php
- Step-6) Create User Dashboard Page
- dashboard.php
- Step-7) Add Logout Process
- logout.php
- Step-8) Script.js
- Step-9) custom.css
- Webslesson
- PHP, MySql, Jquery, AngularJS, Ajax, Codeigniter, Laravel Tutorial
- Saturday, 7 January 2017
- PHP PDO CRUD with Ajax Jquery and Bootstrap
- Source Code
- index.php
- action.php
- Database
Webslesson
PHP, MySql, Jquery, AngularJS, Ajax, Codeigniter, Laravel Tutorial
Thursday, 27 October 2016
Datatables Jquery Plugin with Php MySql and Bootstrap
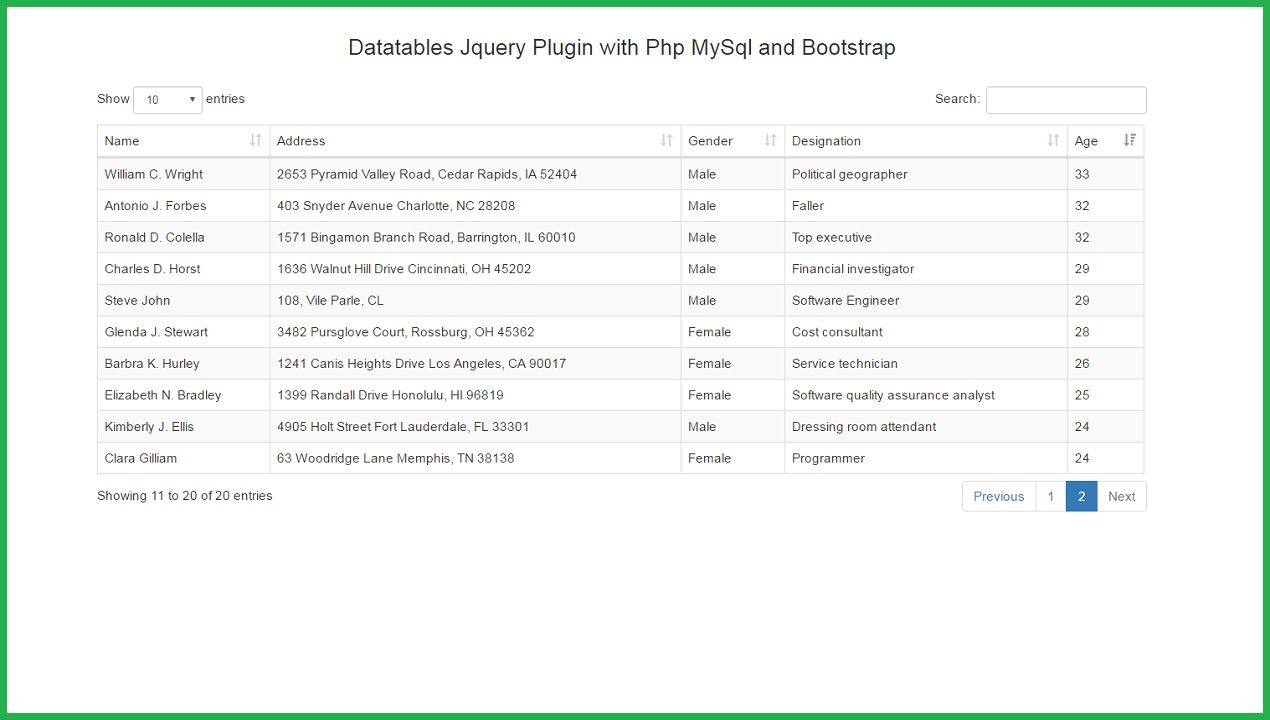
Hello friends in this post we are going to learn how to use Datatables jQuery plugin with php mysql and how can we use this plugin with Bootstrap. In this tutorial we will use Bootstrap library with Datatables jquery plugin and by using php script we will display mysql table data into Datatables styling with Bootstrap library. Datatables is a Jquery plugin and it is highly flexible tools for displaying data in html table. The most benefit of using this plugin into our web project is that it reduces our lots of server side code like code for pagination, code for search data from table, code for multi column ordering. It has also support different type of data source like JavaScript ajax and server side processing. It can be easily themeable with it’s own Datatables, jquery user interface, Bootstrap. Here we have simple load data from mysql table by using php scipt and this we have make html table and then after we have load data into html table so our HTML table with data is ready so now we want to only activate Datatables plugin on that table so we have activate data tables plugin by using DataTable() method with table. So This method has activate functionality of Datatables plugin on table. By using this plugin we have to write less code and get more functionality like column sorting, instant searching, show number of entry on single page, pagination and many more without writing a single line of code. This plugin is easily themeable with Bootstrap library. This all advantage of using Data tables plugin into our project.
Source Code
index.php
Datatables Jquery Plugin with Php MySql and Bootstrap
Name Address Gender Designation Age '.$row["name"].' '.$row["address"].' '.$row["gender"].' '.$row["designation"].' '.$row["age"].' '; > ?>
[Modal] AJAX Login Form using Bootstrap, PHP OOP, MySQL & jQuery
Hi! This time I have come up with jquery ajax login form using bootstrap, php oop & mysql database. And the interesting part is, this login form’s design resembles Google login form but ours is a modal form built with Bootstrap. I always liked Google’s simple and clean style and wanted to try it here and got the chance now. Since our login is a modal form, I’m going to use AJAX to submit form without refresh. So today’s tutorial is about building Modal Login Script using AJAX, PHP OOP & MySQL.
As for user interface I have used bootstrap but with pretty good customization to the css. Also used PHP for server-side processing and MySQL for backend database. The script has Object oriented programming approach and includes complete login logout system in php.
How to Create AJAX Login Form using PHP OOP & MySQL?
We’ll need database for the demo. So let’s create it first.
Step-1) Create MySQL DB & Tables
CREATE DATABASE IF NOT EXISTS `db_login`; USE `db_login`; CREATE TABLE IF NOT EXISTS `users` ( `id` int(9) NOT NULL AUTO_INCREMENT, `name` varchar(30) NOT NULL, `email` varchar(60) NOT NULL, `password` varchar(40) NOT NULL, PRIMARY KEY (`id`), UNIQUE KEY `email` (`email`) ) ENGINE=MyISAM DEFAULT CHARSET=latin1 AUTO_INCREMENT=2; INSERT INTO `users` (`id`, `name`, `email`, `password`) VALUES (1, 'Test', 'test@mydomain.com', '098f6bcd4621d373cade4e832627b4f6');
Step-2) Build PHP Class
Next create the php class for login module. The class includes three functions 1. userLogin() to authenticate user, 2. userLogout() for logging out user and destroy session and 3. escapeString() which is used to escape user input to avoid sql injection.
UserClass.php
db = $db; > function userLogin($email, $pwd) < $result = $this->db->query("SELECT * FROM users WHERE email = '" . $email. "' and password = '" . md5($pwd) . "'"); if ($result->num_rows > 0) < // success @session_start(); $row = $result->fetch_assoc(); $_SESSION['user_id'] = $row['id']; $_SESSION['user_name'] = $row['name']; return true; > else < // login fail return false; >> function userLogout() < session_destroy(); unset($_SESSION['user_id']); unset($_SESSION['user_name']); return; >function escapeString($str) < return $this->db->real_escape_string($str); > > ?> Step-3) Database Connection
Next we’ll create a separate file for database connection. It uses mysqli library for establishing php connection to mysql server. Please make sure to change the connection details like username, password to yours.
dbconnect.php
connect_errno) die('Error ' . $this->db->connect_error); include_once('UserClass.php'); $con = new UserClass($db); ?> Step-4) Build Modal Login Form
We need to create our user interface. Create a file named ‘index.php’ in application root and build modal form using bootstrap. The modal login form wouldn’t be visible at first and would be shown when the user clicks on ‘Login’ menu on top navigation.
index.php
This login form includes jquery validation and both ‘Email’ & ‘Password’ fields are required. Input fields will be highlighted with red color if user fails to enter the details.
Once the user fill in the credentials and clicks on ‘Sign In’ button, form data will be posted to the backend php script using jQuery Ajax() method.
It will be processed there and if user credentials are valid they will taken to the Dashboard page. Else proper error message will be shown in the login form.
Step-5) PHP Login Process
Next create ‘login.php’, here is the form data will be submitted and processed against database.
login.php
escapeString($_POST['email']); $upwd = $con->escapeString($_POST['password']); echo $con->userLogin($uemail, $upwd); > ?>
Step-6) Create User Dashboard Page
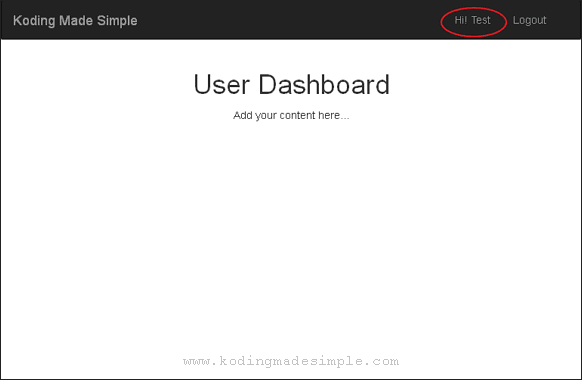
This is the dashboard page where the users will be redirected once they are logged in to the website. This page remains inaccessible for guests. Only logged in users get to access it and if not they will be redirected to index page.
dashboard.php
Step-7) Add Logout Process
Then create a file ‘logout.php’ which will be executed when user clicks on ‘Logout’ button. The script destroys user session and flush out the user data stored in session variables.
logout.php
userLogout(); header('Location: index.php'); ?> Step-8) Script.js
This is the JavaScript file loaded in the index page. It contains all jquery functions we have used to validate the login form and Ajax function to submit the user data to login.php file.
$('document').ready(function() < $('#email').on('focus', function () < $('#email').removeClass('error'); >); $('#email').on('blur', function () < if ($('#email').val() == '') < $('#email').addClass('error'); >>); $('#password').on('focus', function () < $('#password').removeClass('error'); >); $('#password').on('blur', function () < if ($('#password').val() == '') < $('#password').addClass('error'); >>); $('#login-form').on('submit', function (e) < e.preventDefault(); $('#err-msg').html(''); var err = false; if ($('#email').val() == '') < $('#email').addClass('error'); err = true; >if ($('#password').val() == '') < $('#password').addClass('error'); err = true; >if (err == true) < return false; >$.ajax( < type: 'POST', url: 'login.php', data: $('#login-form').serialize() + '&' + $('#login').attr('name') + '=' + $('#login').val(), success: function(status)< if (status == true) < $('#login').val('Signing in. '); setTimeout('window.location.href = "dashboard.php";',3000); >else < $('#err-msg').html('Invalid email or password!'); $('#email').val(''); $('#password').val(''); > > >); >); >); Step-9) custom.css
Finally our custom stylesheet for the login form. It includes the css I have used to override bootstrap styles and some additional styles for designing the login form.
* < border-radius: 2px !important; -moz-border-radius: 2px !important; -webkit-border-radius: 2px !important; >.login-modal-container < max-width: 350px; width: 100% !important; background-color: #F7F7F7; margin: 0 auto; padding: 20px; box-shadow: 0px 2px 2px rgba(0, 0, 0, 0.3); overflow: hidden; >.login-modal-container .modal-body < padding: 20px 10px; >.login-modal-container .modal-footer < text-align: center; margin: 0 10px; >.login-modal-container h2 < text-align: center; font-size: 25px; margin-bottom: 25px; >.login-modal-container input < font-size: 16px; >.login-modal-container input[type=submit] < background-color: #4D90FE; border: 2px solid #4D90FE; text-shadow: 0 1px rgba(0,0,0,0.1); >.login-modal-container input[type=submit]:hover < background-color: #357AE8; border: 2px solid #357AE8; >.error
Please make sure to include ‘custom.css’ after loading ‘bootstrap.css’ for the styles to kick in and take effect.
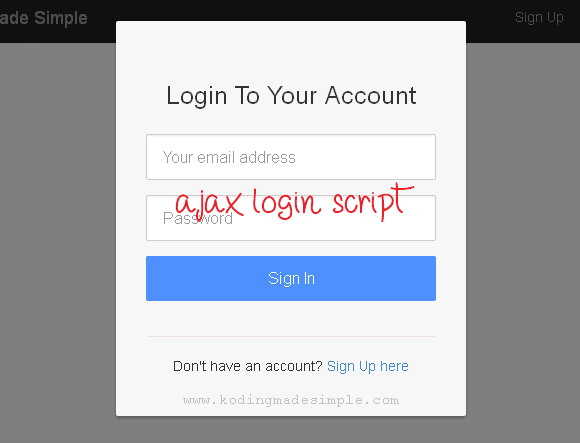
Done! We have finished the coding part. Now to test this ajax login script, run index.php and you will see page like this.
Click on ‘Login’ button on the top and it will launch the modal login form.
Click on the ‘Sign In’ button without providing email or password will trigger validation error and the corresponding fields will be highlighted with red color like this,
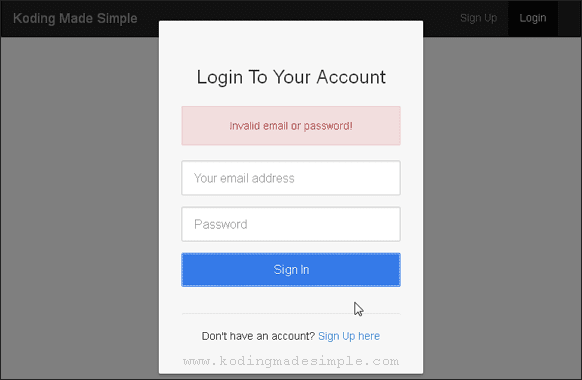
If the email and password doesn’t match up with the database details, then you’ll be shown error message like this,
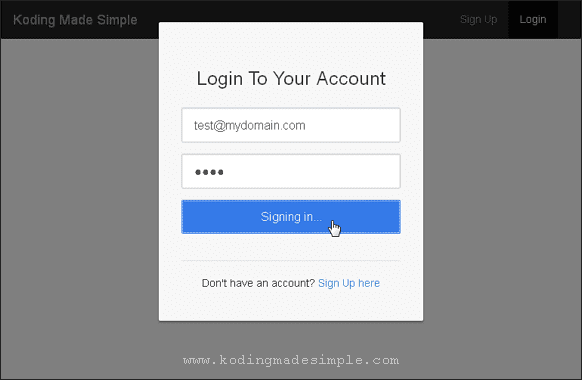
To test successful login, enter ‘test@mydomain.com’ for email and ‘test’ for password field and click on ‘Sign In’ button.
These are the valid login details, so you will see ‘Signing in. ‘ message on the form and will be redirected to Dashboard page.
Since you are logged in to the system, you will see ‘Logout’ button on top menu. Clicking it will logout you and redirects to index page. That accounts for our ajax login logout system.
Well! That explains about building ajax login script using php oop, mysql & jquery. I hope you liked this tutorial. Meet you in another interesting post.
Webslesson
PHP, MySql, Jquery, AngularJS, Ajax, Codeigniter, Laravel Tutorial
Saturday, 7 January 2017
PHP PDO CRUD with Ajax Jquery and Bootstrap
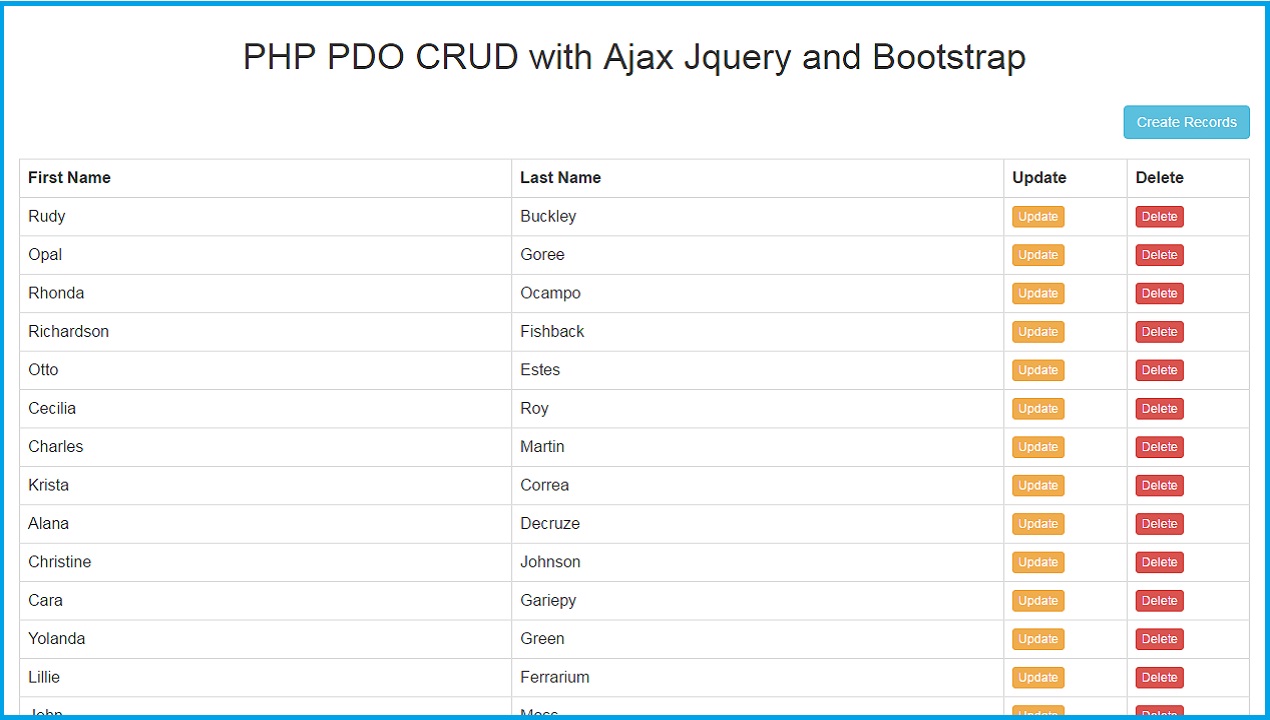
This is one more post on How to create Crud system in PHP Language. But in this post we have make Crud System in PHP by using PHP PDO Modal class with Ajax Jquery with Bootstrap. In this system we have use Ajax JQuery method with PHP PDO modal, so we can perform all CRUD operation like Create, Read, Update and Delete on single page event without refresh of page.
We have already make this type of Crud system by using Simple PHP Object Oriented Programming and we have also make Crud system in Codeigniter Framework also. But now we have use PHP PDO Modal class for making this Crud system in PHP. There are many benefits of using PHP PDO for our web development projects. Following are the benefits of using PHP PDO.
- It is an Object Oriented.
- Bind parameters in statements.
- Allows for prepared statements and rollback functionality
- Throws catch able exceptions for better error handling.. and many more
In this tutorial you can find how to Insert or Add data, Update or Edit Data, Delete or remove data and Select or Fetch data from database by using PHP PDO with Ajax JQuery. You can find Source source code for how to perform this crud operation in PHP PDO with JQuery Ajax method. By using this source code you can make single page CRUD application by using PHP PDO with Ajax JQuery.
Source Code
index.php
body < margin:0; padding:0; background-color:#f1f1f1; >.box PHP PDO CRUD with Ajax Jquery and Bootstrap
Create New Records
action.php
prepare("SELECT * FROM customers ORDER BY id DESC"); $statement->execute(); $result = $statement->fetchAll(); $output = ''; $output .= ' First Name Last Name Update Delete '.$row["first_name"].' '.$row["last_name"].' Data not Found
'; echo $output; > //This code for Create new Records if($_POST["action"] == "Create") < $statement = $connection->prepare(" INSERT INTO customers (first_name, last_name) VALUES (:first_name, :last_name) "); $result = $statement->execute( array( ':first_name' => $_POST["firstName"], ':last_name' => $_POST["lastName"] ) ); if(!empty($result)) < echo 'Data Inserted'; >> //This Code is for fetch single customer data for display on Modal if($_POST["action"] == "Select") < $output = array(); $statement = $connection->prepare( "SELECT * FROM customers WHERE LIMIT 1" ); $statement->execute(); $result = $statement->fetchAll(); foreach($result as $row) < $output["first_name"] = $row["first_name"]; $output["last_name"] = $row["last_name"]; >echo json_encode($output); > if($_POST["action"] == "Update") < $statement = $connection->prepare( "UPDATE customers SET first_name = :first_name, last_name = :last_name WHERE " ); $result = $statement->execute( array( ':first_name' => $_POST["firstName"], ':last_name' => $_POST["lastName"], ':id' => $_POST["id"] ) ); if(!empty($result)) < echo 'Data Updated'; >> if($_POST["action"] == "Delete") < $statement = $connection->prepare( "DELETE FROM customers WHERE ); $result = $statement->execute( array( ':id' => $_POST["id"] ) ); if(!empty($result)) < echo 'Data Deleted'; >> > ?>
Database
-- -- Database: `crud` -- -- -------------------------------------------------------- -- -- Table structure for table `customers` -- CREATE TABLE IF NOT EXISTS `customers` ( `id` int(11) NOT NULL AUTO_INCREMENT, `first_name` varchar(255) NOT NULL, `last_name` varchar(255) NOT NULL, PRIMARY KEY (`id`) ) ENGINE=MyISAM DEFAULT CHARSET=latin1 AUTO_INCREMENT=68 ; -- -- Dumping data for table `customers` -- INSERT INTO `customers` (`id`, `first_name`, `last_name`) VALUES (18, 'Joseph', 'Harman'), (19, 'John', 'Moss'), (20, 'Lillie', 'Ferrarium'), (21, 'Yolanda', 'Green'), (22, 'Cara', 'Gariepy'), (55, 'Opal', 'Goree'), (23, 'Christine', 'Johnson'), (24, 'Alana', 'Decruze'), (25, 'Krista', 'Correa'), (26, 'Charles', 'Martin'), (54, 'Rhonda', 'Ocampo'), (51, 'Cecilia', 'Roy'), (52, 'Otto', 'Estes'), (53, 'Richardson', 'Fishback'), (56, 'Rudy', 'Buckley');
