- Your First PHP Web Application using MySQL and PHP with Examples
- What is PHP?
- Why PHP?
- PHP and MySQL
- Introducing Myflix Video Library Application
- Myflix Video Library Screenshots
- Summary
- How To Develop A PHP MYSQL Web App (Simple Example)
- TABLE OF CONTENTS
- PHP WEB APP DEVELOPMENT
- PART 1) GATHER THE REQUIREMENTS
- PART 2) BUILD THE DATABASE
- PART 3) PHP LIBRARY
- PART 4) USER INTERFACE
- 4A) HTML PAGE
- 4B) CSS COSMETICS
- 4C) THE JAVASCRIPT
- DOWNLOAD & NOTES
- SUPPORT
- EXAMPLE CODE DOWNLOAD
- EXTRA BITS & LINKS
- SOFTWARE DEVELOPMENT NEVER ENDS
- LINKS & REFERENCES
- THE END
Your First PHP Web Application using MySQL and PHP with Examples
Congratulations for your success completion of the SQL tutorial series.
We looked at how we can design a database from scratch, the relational database management system model among others, MySQL as a database management system and how it implements the SQL language, what tools are available for us to use in the database design phase, SQL development and MySQL server administration such as MySQL workbench and finally produced a working database for a fictional video library system “Myflix”.
Excited as you might be with your newly acquired knowledge, have you given any thoughts’ as to how your database uses will use your database?
How about developing an simple web application using PHP and MySQL that hides all the SQL statements inside and provide a visual graphical user interface for the users to use when interacting with the database?
We can use PHP to create sample PHP application with MySQL…
What is PHP?
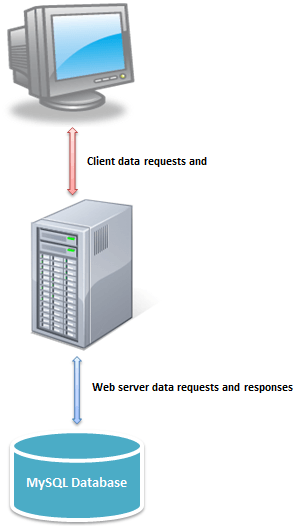
PHP is a general purpose server side scripting language that we can use to develop dynamic web sites and applications. PHP only needs to be installed on the web server that will host the web application and client applications can access the server resources via web browsers. The diagram shown below illustrates the basic architecture of a PHP web application.

Why PHP?
You have obviously head of a number of programming languages out there; you may be wondering why we would want to use PHP over other languages to develop our video library application? PHP just like MySQL is open source and free, you don’t need to pay for you to get PHP; all you have to do is download it. Packages such as XAMPP come bundled already with a web server, MySQL and PHP among others. This is also unbelievably free. This makes PHP a cost effective choice compared to other scripting languages such as CFML or ASP.
Other benefit that you get with PHP is that it’s a server side scripting language; this means you only need to install it on the server and client computers requesting for the resources from the server do not need to have PHP installed; only a web browser would be enough.
PHP also has in built support for working hand in hand with MySQL; this doesn’t mean you can’t use PHP with other database management systems.
PHP is cross platform which means you can deploy your application on a number of different operating systems such as windows, Linux, Mac OS etc.
PHP and MySQL
PHP and MySQL are like two different sides of the same coin. Just like MySQL has built in functions for data manipulations, so does PHP has built in functions for connecting to MySQL server and manipulating the data in the database. Let’s now look at some of PHP functions that allow us to manipulate MySQL databases
$dh = mysql_connect(servername,username,password);
- “mysql_connect” is the PHP built in function for connecting to MySQL database
- “servername” is the name of the server running MySQL server.
- “username” is the name of the user that we will use to authenticate ourselves when connecting to the server.
- “password” is the password that we will use to authenticate ourselves when connecting to the server.
Alternatively we can also use the PHP Data Object PDO to connect to MySQL server. It has the following basic syntax.
$dbconn = new PDO(mysql:host=servername;dbname=databasename,username,password);
- “dbconn” is the database connection object that we can use to manipulate our database.
- “new PDO (…)” creates an instance of the PDO class.
- “mysql:host=servername;” is the name of the server running MySQL server.
- “dbname=databasename” is the name of the database to be manipulated from PHP.
- “username,password” are login credentials we will use to authenticate ourselves.
As you can see from the above PHP sample application database connection examples, not only is PHP simple to use but it’s also flexible. The PHP web application example diagram shown below illustrates how the client application, PHP powered web server and MySQL interact.
Introducing Myflix Video Library Application
Assuming we have acquired knowledge of the PHP language combined with what we just learnt in the MySQL tutorial series, we can write the web based application in PHP that runs on top of the MySQL database to provide our Myflix database users with a Visual Graphical User Interface for interactions.
Myflix Video Library Screenshots
The screenshots of PHP MySQL example below show how the video library application running on top of Myflixdb would look like.
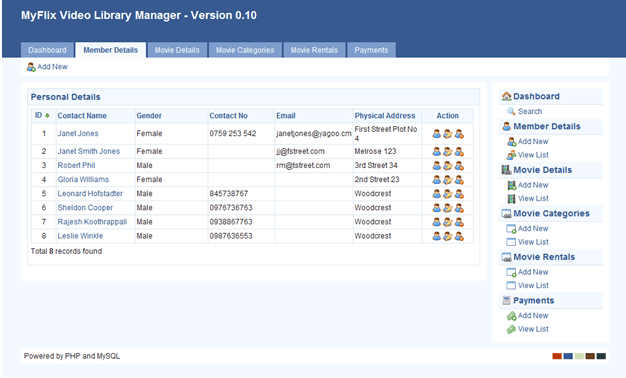
Members listing window shown in the above PHP with MySQL project:
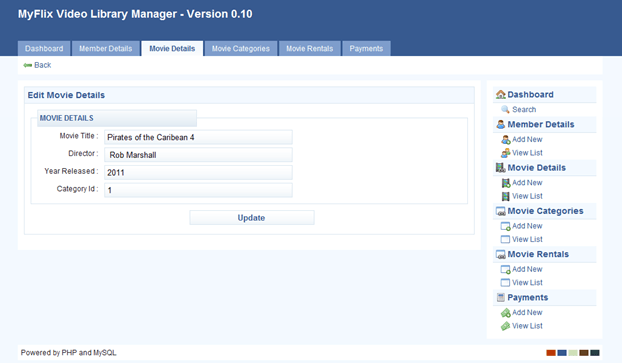
Movie details editing window shown above
Summary
- MySQL is a powerful open source database engine that can meet the requirements of both stand-alone as well as client server applications.
- PHP is a general purpose scripting language that can be used to develop client applications that run on top of MySQL databases.
- Equipping yourself with both MySQL and PHP web application development knowledge is double blessing.
How To Develop A PHP MYSQL Web App (Simple Example)
Welcome to a quick tutorial on how to develop a simple web application with PHP and MySQL. When it comes to building a full-stack web application, some beginners go blank and do not know where to get started.
Web applications are developed in stages, in a step-by-step manner.
- Gather the requirements – Know what the users want, what the application should do, what the goals are.
- Design the structure of the database.
- Build the core PHP scripts and libraries.
- Design the interface, build the pages with HTML, CSS, Javascript.
- Finally, test and deploy the web application.
Yes, some of you may have already heard of it, this is called the software development life cycle (SDLC). One does not tackle a project without any plans but takes it apart piece by piece. Let us walk through the development cycle of a simple example to-do list in this guide – Read on!
TABLE OF CONTENTS
PHP WEB APP DEVELOPMENT
All right, let us now get into the details of developing a simple “to-do” list in PHP and MYSQL – Step by step.
PART 1) GATHER THE REQUIREMENTS
This is the most important step that some people miss out on, thinking that it’s useless and a waste of time. Well, no. Big or small projects, it all starts with “boring planning”. Even for the smallest personal projects, we need to have a plan on “what to build” and “how to build”.
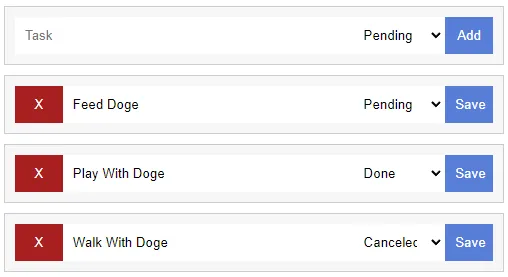
- We need to create a simple to-do list.
- The task list should be stored in a database.
- There should be flags to indicate if a task is still “pending”, “done”, or “canceled”.
- Have a page to manage (add, update, delete) the tasks.
PART 2) BUILD THE DATABASE
CREATE TABLE `todo` ( `todo_id` bigint(20) NOT NULL, `todo_task` text NOT NULL, `todo_status` tinyint(1) NOT NULL DEFAULT 0 ) ENGINE=InnoDB DEFAULT CHARSET=utf8mb4; ALTER TABLE `todo` ADD PRIMARY KEY (`todo_id`); ALTER TABLE `todo` MODIFY `todo_id` bigint(20) NOT NULL AUTO_INCREMENT;Now that we are done with the planning and have a rough idea of the system, let’s move on to deal with the foundation of the project – The database tables. This should be straightforward enough:
- todo_id The task ID, primary key.
- todo_task Description of the task itself.
- todo_status The current status of the task, 0 for pending, 1 for done, 2 for canceled.
Yep, that should be sufficient to cover the requirements of “keeping the tasks and tracking their status”.
PART 3) PHP LIBRARY
pdo = new PDO( "mysql:host=".DB_HOST.";dbname=".DB_NAME.";charset=".DB_CHARSET, DB_USER, DB_PASSWORD, [ PDO::ATTR_ERRMODE => PDO::ERRMODE_EXCEPTION, PDO::ATTR_DEFAULT_FETCH_MODE => PDO::FETCH_ASSOC ]); > // (B) DESTRUCTOR - CLOSE DATABASE CONNECTION function __destruct () < if ($this->stmt!==null) < $this->stmt = null; > if ($this->pdo!==null) < $this->pdo = null; > > // (C) HELPER - RUN SQL QUERY function query ($sql, $data) :void < $this->stmt = $this->pdo->prepare($sql); $this->stmt->execute($data); > // (D) SAVE TO-DO TASK function save ($task, $status, $id=null) < if ($id===null) < $sql = "INSERT INTO `todo` (`todo_task`, `todo_status`) VALUES (. )"; $data = [$task, $status]; >else < $sql = "UPDATE `todo` SET `todo_task`=?, `todo_status`=? WHERE `todo_id`=?"; $data = [$task, $status, $id]; >$this->query($sql, $data); return true; > // (E) GET ALL TASKS function getAll () < $this->query("SELECT * FROM `todo`"); return $this->stmt->fetchAll(); > // (F) DELETE TASK function del ($id) < $this->query("DELETE FROM `todo` WHERE `todo_id`=?", [$id]); return true; > > // (G) DATABASE SETTINGS - CHANGE TO YOUR OWN! define("DB_HOST", "localhost"); define("DB_NAME", "test"); define("DB_CHARSET", "utf8mb4"); define("DB_USER", "root"); define("DB_PASSWORD", ""); // (H) NEW TO-DO OBJECT $TODO = new ToDo();With the database in place, we can now build a library to work with it. This looks complicated, but keep calm and study closely:
- (A, B, H) When $TODO = new ToDo() is created, the constructor automatically connects to the database. The destructor closes the connection.
- (C) query() A simple helper function to run SQL queries.
- (D to F) There are only 3 essential functions to cover the “manage to-do tasks”.
- save() Add or update a task.
- getAll() Get all to-do tasks.
- del() Delete a task.
Long story short, this library is quite literally just a collection of INSERT UPDATE DELETE SELECT SQL.
PART 4) USER INTERFACE
4A) HTML PAGE
save($_POST["task"], $_POST["status"], (isset($_POST["id"])?$_POST["id"]:null)); > // (A2) DELETE TASK else < $pass = $TODO->del($_POST["id"]); > // (A3) SHOW RESULT echo "error ; echo ""; > ?> getAll(); if (count($tasks)!=0) < foreach ($tasks as $t) < ?> > ?>