- Всплывающая подсказка на CSS
- CSS по теме
- How to create hover text using HTML and CSS
- Create hover text by adding the title attribute
- Create a hover text using HTML and CSS :before selector
- Learn JavaScript for Beginners 🔥
- About
- Search
- Tags
- How to create a mouse hover HTML tooltip text?
- How to create an HTML hover text using the title attribute?
- Output
- Where to use this title attribute
- How to add a custom style to the tooltip or title attribute?
- Example 1
- HTML
- CSS
- Output
- Example 2
- HTML
- CSS
- Related questions to the tooltip text
- How to display alt text on hover?
- Build HTML CSS projects
- Popular posts
- About Shihab
- Categories
- Recent comments
- Shihab Ul Haque
Всплывающая подсказка на CSS
В HTML уже есть глобальный атрибут title , который можно добавить к любому элементу веб-страницы. Наличие этого атрибута добавляет всплывающую подсказку, которая появляется при наведении курсора мыши на элемент. Шрифт текста, размер подсказки и её вид в целом зависит от операционной системы и не может быть изменён с помощью стилей. К тому же многих разработчиков не устраивает, что такая подсказка довольно быстро исчезает. Это заставляет искать способы сделать свою всплывающую подсказку, которая была бы оформлена желаемым образом. Конечно, самый универсальный способ заключается в использовании JavaScript, но в некоторых случаях вполне достаточно обойтись и одним CSS.
В качестве примера я выбрал фотографии, при наведении на них курсора мыши показывается название фотографии. Сам вывод текста будем делать при помощи свойства content и брать значение текста из какого-либо атрибута через attr() . К сожалению, content не будет работать желаемым образом в сочетании с img , поэтому фотографии вставляются в элемент , к которому добавляем атрибут data-title с текстом всплывающей подсказки. Есть соблазн вставить атрибут title и задействовать его, но в таком случае будет выводиться одновременно две подсказки: одна «родная», а вторая наша. Так что мы используем свой собственный атрибут data-title , благо HTML5 позволяет это делать. Таким образом получим следующий код (пример 1).


Переходим к стилю нашей подсказки. Вначале надо сделать, чтобы она вообще появлялась. Для этого воспользуемся псевдоэлементом ::after , к которому добавляем content: attr(data-title) .
Получится, что после содержимого элемента с классом photo будет выводиться текст из атрибута data-title , что нам и требовалось. Но поскольку всплывающая подсказка должна появляться только при наведении на фотографию курсора мыши, добавим ещё псевдокласс :hover .
Остаётся только задать желаемый стиль нашей подсказки, в частности, положение, цвет фона, текста, рамку и др. (пример 2).
HTML5 CSS3 IE Cr Op Sa Fx
Результат данного примера показан на рис. 1.
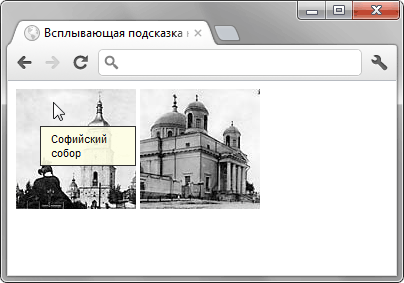
Рис. 1. Вид всплывающей подсказки
Положение подсказки не зависит от позиции курсора, она появляется в одном и том же месте при наведении курсора на изображение. Можно сделать, чтобы подсказка выводилась в нижней части фотографии, так она не будет закрывать большую часть картинки. Стиль при этом поменяется незначительно (пример 3).
Пример 3. Вывод подсказки внизу фотографии
HTML5 CSS3 IE Cr Op Sa Fx
Результат данного примера показан на рис. 2.
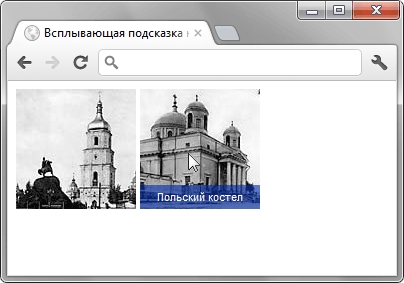
Рис. 2. Вид всплывающей подсказки
К сожалению, свойство transition , с помощью которого можно сделать анимацию подсказки, не работает с псевдоэлементами. Поэтому придётся довольствоваться резким появлением нашей всплывающей подсказки. Также не будет никакого эффекта в браузере IE8 и младше, эта версия не поддерживает ::after . Впрочем, если заменить этот псевдоэлемент на :after , то можно получить более-менее работающий вариант.
CSS по теме
How to create hover text using HTML and CSS

Last Updated Jul 03, 2022
A hover text (also known as a tooltip text) is used to display additional descriptions over an HTML element. The text only appears when the mouse cursor hovers over an object.
- Adding the global title attribute for your HTML tags
- Creating a tooltip CSS effect using :before selector
This tutorial will show you how to use both methods.
Let’s start with learning how to create a hover text by adding the title attribute to your HTML elements.
Create hover text by adding the title attribute
The global title attribute is an attribute that you can add to any valid HTML tag to provide extra information about the element being rendered by the tag.
For example, the following title attribute is being added to both and tags:
You can see a small hover text shown when the mouse hovers over the elements below: As you can see from the example above, the title attribute will be shown when the user hovers over the rendered elements using the mouse. You can add the title attribute to any valid HTML element.
The hover text created from the title attribute is set by the browser, which means you can’t customize the style of the display.
If you want a better looking hover text, then you need to create your own using CSS.
Create a hover text using HTML and CSS :before selector
The CSS :before selector creates and inserts a pseudo-element before the content of the selected element, which is perfect for adding a hover text effect for your HTML elements.
To create a hover text using HTML and CSS, you need to group the display text and the hover text in one container element first:
The example above puts the hover text inside the data-hover attribute, replacing the need to use the title attribute to store the hover text.
Now you need to add CSS style to hide the hover text. The following CSS will do the trick:
The content of the hovertext:before element will be derived from the data-hover attribute as specified in the selected element.
First, the position property of the .hovertext:before selector is set to absolute so that it can be displayed outside of the document flow.
The absolute element will be positioned relative to the closest container tag with the position:relative value.
This is why the .hovertext position property is changed to relative so that the .hovertext:before will be placed relative to the .hovertext element.
Next, the visibility of the .hovertext:before is set to hidden to hide the text. The visibility will be changed to visible when the user hovers over the .hovertext element.
- A one second transition for the opacity of the .hovertext element is added to improve the aesthetic of the hover text
- The z-index is set to 1 so that the hover text appears above the other text
- The top and left property displays the edges of the hover text element
The resulting hover text will be as shown below:
By wrapping the hover text using the tag, you can place the element inside a
or a tag:
Finally, you can also dynamically resize the hover text label according to the size of your content.
To do so, you need to use max-content as the value of the width property in the .hovertext:before rule.
And that’s how you can create hover text using CSS and HTML. You can customize the CSS style above as you need.
Learn JavaScript for Beginners 🔥
Get the JS Basics Handbook, understand how JavaScript works and be a confident software developer.
A practical and fun way to learn JavaScript and build an application using Node.js.
About
Hello! This website is dedicated to help you learn tech and data science skills with its step-by-step, beginner-friendly tutorials.
Learn statistics, JavaScript and other programming languages using clear examples written for people.
Search
Type the keyword below and hit enter
Tags
Click to see all tutorials tagged with:
How to create a mouse hover HTML tooltip text?
Using the “title” attribute, you can show a mouse hover text in your HTML document. Sometimes it’s known as a tooltip, mouseover & help text.
Once you hover your mouse over a certain text or link or button, a piece of additional information pops up . And it disappears after you leave your mouse. This is something that I will show you in this post.
However, the title attribute has a default style. But you can add a custom style to the tooltip using HTML data-attribute and some additional CSS. See an example of a custom tooltip below:
Aside from the above example, I will also show you different types of tooltips . Some of them are easy to implement and some of them take a little effort.
Let’s see how you can create these hover HTML text and style it.
How to create an HTML hover text using the title attribute?
Output
To see the output, hover your mouse over each element below:
Hover over me Hover over me
The tooltip or the title text is generally used on links, buttons, and images. But it’s not limited to these three elements. You can use it in more places on your HTML documents.
Where to use this title attribute
In some situations, you may need to show this hover text in paragraphs. But you don’t want to show it for the entire text block. Instead, you may want to display the mouseover text on certain words .
So you can wrap those specific words in a tag and use the title attribute. Please see the following example:
Lorem ipsum dolor sit amet consectetur.
But the problem with this approach is the bad user experience. If you wrap the text with a tag, you have to write additional CSS to highlight the mouseover text . Otherwise, people won’t understand that it has additional information.
How to use title attributes in paragraphs?
To get around this, you can wrap it using an (abbreviation) tag as you see below.
Lorem ipsum dolor sit amet consectetur.
See the output below.
Lorem ipsum dolor sit amet consectetur.
This is how you can use the HTML title attribute to create hover text.
But how to add a custom style to those title attributes? Keep reading.
How to add a custom style to the tooltip or title attribute?
Now you know how to make additional text appear on hover using the default HTML title attribute and tag. In this section, you’ll learn how to add custom style to these tooltip texts.
Let’s explore them one by one.
Example 1
The mouseover text or tooltip gets default styles based on the browsers. You can’t change its appearance only by targeting the “title” attribute.
Every browser has its own style for this mouse hover text. And this style is different on each browser and operating system.
However, still you can add a custom style to these tooltips using a custom data attribute. For example, “ data-title ” or “ data-tooltip .”
The second part of the custom attribute can be anything you like . And it does not require to be exact title or tooltip. The first part “data” is mandatory and you can make any name for the second part.
Let’s go with “data-title” so we are on the same page and your CSS matches mine.
HTML
In the above code, you see that I have a custom data attribute named “ data-title ” and it contains the additional help text.
To style this tooltip, I wrote the following CSS:
CSS
[data-title] < position: relative; >[data-title]:after < content: attr(data-title); color: #FFFFFF; background-color: rgba(0, 0, 0, 0.9); padding: 3px 5px 7px; white-space: nowrap; z-index: 99999; visibility: hidden; position: absolute; left: 0%; bottom: 120%; border-radius: 4px 4px 4px 0; font-size: 0.875rem; -webkit-box-shadow: rgba(0, 0, 0, 0.15) 1.95px 1.95px 2.6px; box-shadow: rgba(0, 0, 0, 0.15) 1.95px 1.95px 2.6px; >[data-title]:hover:after
Output
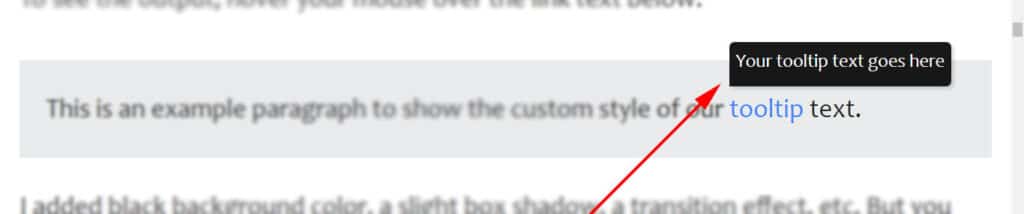
To see the output, hover your mouse over the link text below.
This is an example paragraph to show the custom style of our tooltip text.
I added black background color, a slight box shadow, a transition effect, etc. But you can change the style as you see fit.
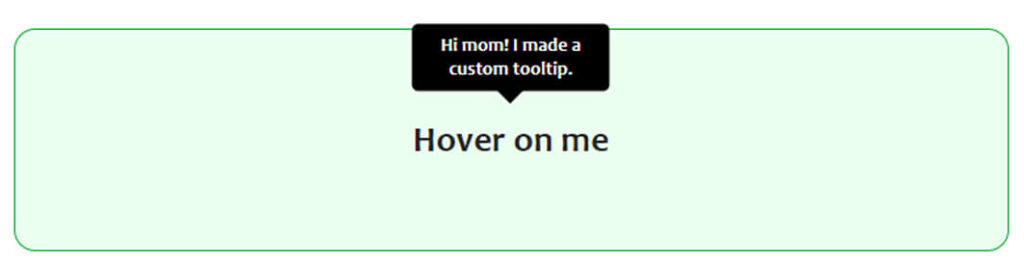
Example 2
To create this custom tooltip, you’ll only need HTML & CSS. See my code for the above example.
HTML
CSS
:root < --scale: 0; --arrow-size: 10px; --tooltip-color: #000000; >*, *::before, *::after < -webkit-box-sizing: border-box; box-sizing: border-box; >#custooltip < font-size: 1.7rem; position: relative; margin: 0; font-weight: 700; cursor: pointer; >#custooltip::before, #custooltip::after < position: absolute; top: -.25rem; left: 50%; -webkit-transform: translateX(-50%) translateY(var(--translate-y, 0)) scale(var(--scale)); transform: translateX(-50%) translateY(var(--translate-y, 0)) scale(var(--scale)); -webkit-transform-origin: bottom center; transform-origin: bottom center; -webkit-transition: 100ms -webkit-transform ease-in-out; transition: 100ms -webkit-transform ease-in-out; transition: 100ms transform ease-in-out; transition: 100ms transform ease-in-out, 100ms -webkit-transform ease-in-out; >#custooltip::before < --translate-y: calc(-100% - var(--arrow-size)); content: attr(data-tooltip); color: white; padding: .5rem; border-radius: .3rem; text-align: center; font-size: .90rem; width: -webkit-max-content; width: -moz-max-content; width: max-content; max-width: 100%; background: var(--tooltip-color); line-height: 1.2; >#custooltip:hover::before, #custooltip:hover::after < --scale: 1; >#custooltip::after
That’s all you need to create a custom tooltip just like the example (2).
Related questions to the tooltip text
How to display alt text on hover?
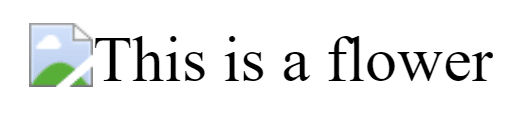
An alt text or alternative text is not implemented or designed to display on hover. Its purpose is different than displaying on hover. For example, showing the text when the image failed to load or helping search engines to better understand the image.
To display certain text on hover, you have to add an additional title attribute to the image that I showed you in the above example (in the bulb image). You can follow the following HTML markup:
This is how you can display the text on hover. Don’t feel shy to add the same text to the title & alt attributes.
Build HTML CSS projects
Popular posts
About Shihab
With over 20K monthly readers, my goal is to help small businesses to create a stunning online presence.
At the same time, I've been creating resources for web developers, designers & freelancers in general.
Categories
Recent comments
Yes, you can edit the code to make them center aligned. You can contact me on Skype to get customized/extra…
Hi, thank you for this. It almost helped me to achieve what I wanted. Only one problem left: I want…
Thank you, that was so helpful! Especially the 'Extra help for non-techies and newbies' part 🙂
You have crafted an amazing guide about the best Fiverr gig image size guide. I found it helpful while doing…
Wow great it worked like a charm. Thanks buddy
Disclosure: I accept suggestions to make improvements to any content & user experience. So if you have any, please feel free to reach out. You will find a few different contact methods on the contact page. But, I may not respond to those persons who intend to get links.
Shihab Ul Haque
You can call me Shihab. I am a web developer and have been working with PHP & WordPress a lot.
I have a master's degree and left my regular job to fully engage with the field that I love working in. I live in Bangladesh and help business owners to create a stunning online presence.