How to Create Visual Applications in Java?
Join the DZone community and get the full member experience.
My excellent colleague Java evangelist Chuk Munn Lee wrote me an e-mail in response to my description yesterday of how to create JConsole plugins: «I did not know that the visual library can be used outside of NetBeans. Do you need a special build of the library? Do I need to build it myself or is there a standalone version that I can download?»
This is a good question and the answer is illustrative of how interwoven NetBeans IDE is with the NetBeans Platform. Look in your NetBeans installation folder and you’ll find a folder called «platform7», with this content:

In other words, literally, the content of the folder above is the NetBeans Platform. Many of the JARs that make up the NetBeans Platform can be used outside a NetBeans Platform application. Last October I wrote about this, in a blog entry entitled NetBeans APIs Outside of the NetBeans Platform. Follow the steps in that tutorial and you’ll have a standard Java application that makes use of some of the typical JARs from the NetBeans Platform.
In other words, several typical scenarios developed on the NetBeans Platform can also be developed outside of it. Another similar scenario is illustrated in the article I wrote yesterday, How to Get Started with JConsole Plugins, where the Visual Library API is used to inject some graph functionality into the JConsole. And so, in response to Chuk’s questions «Do you need a special build of the library? Do I need to build it myself or is there a standalone version that I can download?», the answer is: «No, you don’t.» Download NetBeans IDE, take the two JARs that are highlighted in the screenshot above, put them on your app’s classpath, and you’re ready to create visual Java applications:

Let’s get started for real now. To create visual applications, you need some kind of Swing container within which you need a JScrollPane. Then you create your visual «scene» within that JScrollPane. There are several interesting classes that you can extend to make your visual application. Have a look at the Javadoc or take a stroll through the tutorial, though not all of the tutorial is intended for use outside of the NetBeans Platform.
Now that you have a Swing container with a JScrollPane, create a new Java class that extends GraphScene. Fill it out as follows:
package demo; import java.awt.Image; import java.awt.Point; import java.util.Random; import javax.swing.ImageIcon; import org.netbeans.api.visual.graph.GraphScene; import org.netbeans.api.visual.widget.LayerWidget; import org.netbeans.api.visual.widget.Widget; import org.netbeans.api.visual.widget.general.IconNodeWidget; import org.openide.util.Utilities; public class DemoGraphScene extends GraphScene < private LayerWidget mainLayer; private Image image; private Random r = new Random(); public DemoGraphScene() < mainLayer = new LayerWidget(this); addChild(mainLayer); image = Utilities.icon2Image( new ImageIcon(getClass().getResource("/demo/chuk.png"))); addNode("Chuk"); >@Override protected Widget attachNodeWidget(Object arg0) < IconNodeWidget widget = new IconNodeWidget(this); widget.setImage(image); widget.setPreferredLocation(new Point(10, 20)); mainLayer.addChild(widget); return widget; >@Override protected Widget attachEdgeWidget(Object arg0) < return null; >@Override protected void attachEdgeSourceAnchor(Object arg0, Object arg1, Object arg2) < >@Override protected void attachEdgeTargetAnchor(Object arg0, Object arg1, Object arg2) < >>Most of the above code is self-explanatory, I believe. You have a LayerWidget which you add to the scene. Then you add an IconWidget, which you add to the layer. One interesting thing to note is how the icon is converted to an image, via a utility method from the NetBeans Utilities API, which you have already put on your classpath, together with the Visual Library API. In other words, there’s a bunch of stuff that NetBeans Platform developers use that can also be used in your own smaller Java applications, as is the case here.
To wrap up, we need to instantiate the GraphScene class from our JFrame and then set the JScrollPane so that its port view will contain the «scene». Here’s how we do that, nice and easy via the JFrame constructor:
private DemoGraphScene scene = new DemoGraphScene(); public DemoVisualFrame()
Next, I added a pic of Chuk to my app’s source structure and then ran the application. And here’s the result:

Next, let’s turn Chuk into a movable object. The user should be able to drag and drop him with their mouse. Hmmm. That will mean a lot of coding, right? Wrong. Here’s all I needed to add, i.e., just line 6 below:
protected Widget attachNodeWidget(Object arg0) < IconNodeWidget widget = new IconNodeWidget(this); widget.setImage(image); widget.setPreferredLocation(new Point(10, 20)); //I only needed to add this line: widget.getActions().addAction(ActionFactory.createMoveAction()); mainLayer.addChild(widget); return widget; >And now, when I run my app, I can use my mouse to drag Chuk to a different location:

A MoveAction can only mean one thing, i.e., it can only mean that you want to move the widget. However, other actions could be implemented in a variety of ways, hence there is no default. You need to provide the content of the action yourself, as in the case of the LabelTextFieldEditor. Here, we begin by defining a class-level LabelTextFieldEditor:
private WidgetAction editorAction = ActionFactory.createInplaceEditorAction(new LabelTextFieldEditor());Next, we define out LabelTextFieldEditor, extending the TextFieldInplaceEditor class:
private class LabelTextFieldEditor implements TextFieldInplaceEditor < public boolean isEnabled(Widget widget) < return true; >public String getText(Widget widget) < return ((LabelWidget) widget).getLabel(); >public void setText(Widget widget, String text) < ((LabelWidget) widget).setLabel(text); >>Finally, we add a label to our widget. We also assign the editor action defined above to our widget. Here we go, just line 7 and 8 below:
@Override protected Widget attachNodeWidget(Object arg0) < IconNodeWidget widget = new IconNodeWidget(this); widget.setImage(image); widget.setPreferredLocation(new Point(10, 20)); //I added the following two lines: widget.setLabel("Chuk"); widget.getLabelWidget().getActions().addAction(editorAction); widget.getActions().addAction(ActionFactory.createMoveAction()); mainLayer.addChild(widget); return widget; >That’s it. Let’s run our app again. You now have a label which you can click and then it is editable:

When you press Enter, the label is changed.
But what’s the point of having just Chuk in our application? Let’s add another evangelist, Gregg Sporar:
private Image CHUK = Utilities.icon2Image(new ImageIcon(getClass().getResource("/demo/chuk.png"))); private Image GREGG = Utilities.icon2Image(new ImageIcon(getClass().getResource("/demo/gregg.png")));Next, we’ll create a hash table, so that we can manipulate them more effectively:
private final Hashtable mapping;
Then, we’ll add them both, rather than just one:
We’ll need to rewrite our earlier method just a bit, so that it is more generic, because now it will have to handle both Chuk and Gregg:
@Override protected Widget attachNodeWidget(Object node) < Image image = (Image) mapping.get(node); if (image != null) < return createNewWidget(node, image); >throw new IllegalArgumentException(node.toString()); >And we move all the code from the previous implementation of the above method to a new one:
protected Widget createNewWidget(Object label, Image image)
Run the app again and now you’ll have two evangelists in your «scene», instead of just one, with the same properties because they’re both the same widget, as you can see from the code above:

You might now think about connecting them together, which we can look at in a future article. In general, there’s a lot more that can be done, of course, and the documentation on all of this goes into it all. Here’s the homepage of the library. I also highly recommend Fabrizio Giudici’s Creative use of the NetBeans Visual Library: the Light Table.
In summary, you don’t even need to like NetBeans IDE to benefit from its graph library. Just download the IDE, get the two JARs specified above, and then add them to your classpath. That’s all. And then code in whatever IDE has your preference.
Opinions expressed by DZone contributors are their own.
Java Swing Tutorial: How to Create a GUI Application in Java
Swing in Java is a Graphical User Interface (GUI) toolkit that includes the GUI components. Swing provides a rich set of widgets and packages to make sophisticated GUI components for Java applications. Swing is a part of Java Foundation Classes(JFC), which is an API for Java GUI programing that provide GUI.
The Java Swing library is built on top of the Java Abstract Widget Toolkit (AWT), an older, platform dependent GUI toolkit. You can use the Java simple GUI programming components like button, textbox, etc., from the library and do not have to create the components from scratch.
In this Java Swing tutorial, you will learn Java GUI basics like-
Java Swing class Hierarchy Diagram
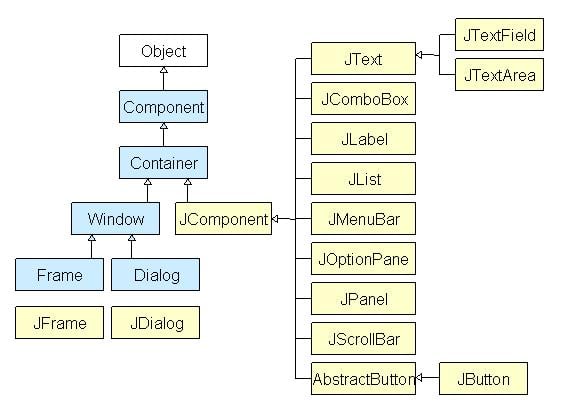
All components in Java Swing are JComponent which can be added to container classes.
What is a Container Class?
Container classes are classes that can have other components on it. So for creating a Java Swing GUI, we need at least one container object. There are 3 types of Java Swing containers.
- Panel: It is a pure container and is not a window in itself. The sole purpose of a Panel is to organize the components on to a window.
- Frame: It is a fully functioning window with its title and icons.
- Dialog: It can be thought of like a pop-up window that pops out when a message has to be displayed. It is not a fully functioning window like the Frame.
What is GUI in Java?
GUI (Graphical User Interface) in Java is an easy-to-use visual experience builder for Java applications. It is mainly made of graphical components like buttons, labels, windows, etc. through which the user can interact with an application. GUI plays an important role to build easy interfaces for Java applications.
How to Make a GUI in Java with Example
Now in this Java GUI Tutorial, let’s understand how to create a GUI in Java with Swings in Java examples.
Step 1) Copy code into an editor
In first step Copy the following code into an editor.
import javax.swing.*; class gui < public static void main(String args[])< JFrame frame = new JFrame("My First GUI"); frame.setDefaultCloseOperation(JFrame.EXIT_ON_CLOSE); frame.setSize(300,300); JButton button = new JButton("Press"); frame.getContentPane().add(button); // Adds Button to content pane of frame frame.setVisible(true); >> Step 2) Run the code
Next step, Save, Compile, and Run the code
Step 3) Copy following code into an editor
Now let’s Add a Button to our frame. Copy following code into an editor from given Java UI Example
import javax.swing.*; class gui < public static void main(String args[])< JFrame frame = new JFrame("My First GUI"); frame.setDefaultCloseOperation(JFrame.EXIT_ON_CLOSE); frame.setSize(300,300); JButton button1 = new JButton("Press"); frame.getContentPane().add(button1); frame.setVisible(true); >> 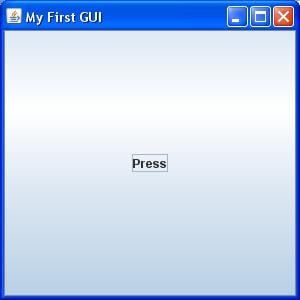
Step 5) Add two buttons
How about adding two buttons? Copy the following code into an editor.
import javax.swing.*; class gui < public static void main(String args[])< JFrame frame = new JFrame("My First GUI"); frame.setDefaultCloseOperation(JFrame.EXIT_ON_CLOSE); frame.setSize(300,300); JButton button1 = new JButton("Button 1"); JButton button2 = new JButton("Button 2"); frame.getContentPane().add(button1); frame.getContentPane().add(button2); frame.setVisible(true); >> Step 6) Save & Run the program
Next, Save, Compile, and Run the program.
Step 7) Check output
Unexpected output =? Buttons are getting overlapped.
Java Layout Manager
The Layout manager is used to layout (or arrange) the GUI Java components inside a container. There are many layout managers, but the most frequently used are-
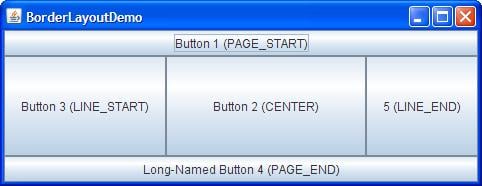
Java BorderLayout
A BorderLayout places components in up to five areas: top, bottom, left, right, and center. It is the default layout manager for every java JFrame
Java FlowLayout
FlowLayout is the default layout manager for every JPanel . It simply lays out components in a single row one after the other.

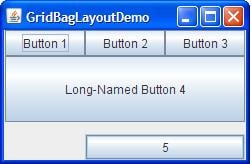
Java GridBagLayout
It is the more sophisticated of all layouts. It aligns components by placing them within a grid of cells, allowing components to span more than one cell.
Step 8) Create chat frame
How about creating a chat frame like below?

Try to code yourself before looking at the program below.
//Usually you will require both swing and awt packages // even if you are working with just swings. import javax.swing.*; import java.awt.*; class gui < public static void main(String args[]) < //Creating the Frame JFrame frame = new JFrame("Chat Frame"); frame.setDefaultCloseOperation(JFrame.EXIT_ON_CLOSE); frame.setSize(400, 400); //Creating the MenuBar and adding components JMenuBar mb = new JMenuBar(); JMenu m1 = new JMenu("FILE"); JMenu m2 = new JMenu("Help"); mb.add(m1); mb.add(m2); JMenuItem m11 = new JMenuItem("Open"); JMenuItem m22 = new JMenuItem("Save as"); m1.add(m11); m1.add(m22); //Creating the panel at bottom and adding components JPanel panel = new JPanel(); // the panel is not visible in output JLabel label = new JLabel("Enter Text"); JTextField tf = new JTextField(10); // accepts upto 10 characters JButton send = new JButton("Send"); JButton reset = new JButton("Reset"); panel.add(label); // Components Added using Flow Layout panel.add(tf); panel.add(send); panel.add(reset); // Text Area at the Center JTextArea ta = new JTextArea(); //Adding Components to the frame. frame.getContentPane().add(BorderLayout.SOUTH, panel); frame.getContentPane().add(BorderLayout.NORTH, mb); frame.getContentPane().add(BorderLayout.CENTER, ta); frame.setVisible(true); >>