- How to Verify Java Versions and See Available Updates
- Contents
- What is a Java version?
- How to verify Java versions?
- Through the verification page
- Using Command Prompt (for Windows)
- Using the Java Control Panel (for Windows)
- Verify Java through the Windows Start menu
- An option for Mac users
- Verify Java: useful tips
- The Ultimate Guide to Java Update Check
- Java Update on Windows 10
- How to check Java version
- How Do I Check for a Java Update?
- Why is it Important to Check Java Updates?
- How to Turn off Java Automatic Update?
- Conclusion
- How to Check and Update Java Version on Ubuntu 22.04?
- How to check Java version on Ubuntu 22.04
- How to Update Java version on Ubuntu 22.04
- Conclusion
- About the author
- Anees Asghar
How to Verify Java Versions and See Available Updates
TL;DR – The Java version verification helps you identify the version of Java installed on your device. Additionally, you will be able to run the Java update check to confirm whether you can install a new version.
Contents
What is a Java version?
Java version numbers indicate the releases of the Java software. The newer versions have more sophisticated features, improved performance, and better security measures.
Being up to date is necessary for preventing unwanted issues that can impact stability and security. In many cases, some applications and websites are unable to run unless you install the latest version of Java. For instance, it lets you play small online games, view 3D images, and chat with people.
The Java software is available for multiple operating systems, including Windows, Mac, Linux, and Solaris.
How to verify Java versions?
There are multiple methods you can use to verify the Java version: accessing the verification page, using the Command Prompt, and utilizing the Java Control Panel.
Through the verification page
The simplest way is to use the special Java page. Here are the steps to follow:
- Access the Java Verification Page.
- Click on the Verify Java version.
- Click the Agree and Continue button.
- Select Run to continue.
- The page will display the Java version currently installed along with the latest version available.
- Download the recommended update.
- Restart the browser once the installation process is completed.
- Reopen your browser and enable Java.
To successfully use this method, you need to make sure that:
- Your browser supports NPAPI plug-ins.
- Your browser version is compatible with Java.
Using Command Prompt (for Windows)
Here are the steps to verify the Java version by using the Command Prompt:
- Open the Command Prompt.
- Insert the following code: java -version .
- The output will highlight the Java version installed on your Windows device.
Note: if the response shows java is not recognized, head to Windows System Properties to add the Java variable value.
- Easy to use with a learn-by-doing approach
- Offers quality content
- Gamified in-browser coding experience
- The price matches the quality
- Suitable for learners ranging from beginner to advanced
- Free certificates of completion
- Focused on data science skills
- Flexible learning timetable
- Simplistic design (no unnecessary information)
- High-quality courses (even the free ones)
- Variety of features
- Nanodegree programs
- Suitable for enterprises
- Paid Certificates of completion
Using the Java Control Panel (for Windows)
Let’s dig into the Java Control Panel to verify the Java version:
- Navigate to the Java folder.
- Choose Configure Java to open the Java Control Panel window.
- In the General tab, click the About button.
- The About Java window will appear and display your Java version.
Verify Java through the Windows Start menu
It is also possible to check Java version through the Windows Start menu. Follow these steps:
- Open the Windows Start menu.
- Select Programs.
- Find the Java program.
- Click About Java to learn which Java version you are using.
An option for Mac users
- Select the Apple icon on the upper left side of the screen.
- Navigate to System Preferences.
- Click on the Java icon to launch the Java Control Panel.
- In the General tab in the Java Control Panel, you should find About. Click on it to see the version you are using.
Verify Java: useful tips
- Mac users can also use the following command in the Terminal to verify the Java version: java -version . The same code works for the Linux operating system through its Command Prompt.
- You can check out the system requirements of every Java version available and pick the one that is compatible with your operating system and browser.
The Ultimate Guide to Java Update Check
In this quick tutorial, we’ll take a close look at how to check for Java updates.
We’ll get started with some insight into how to check the Java version. Then, we’ll explain in detail how to perform a Java update check. Lastly, we’ll shed light on how to disable Java automatic updates.
Java Update on Windows 10
In general, when we install Java on Windows 10, another small program that checks and tracks Java updates get installed too.
As a matter of fact, there are many simple methods that we can use to check whether there is a new Java update.
However, before checking for Java updates, we may need to know which version is installed on our machine. So, let’s see together how to do that!
How to check Java version
The most simple way to check the current installed Java version is to use the command prompt.
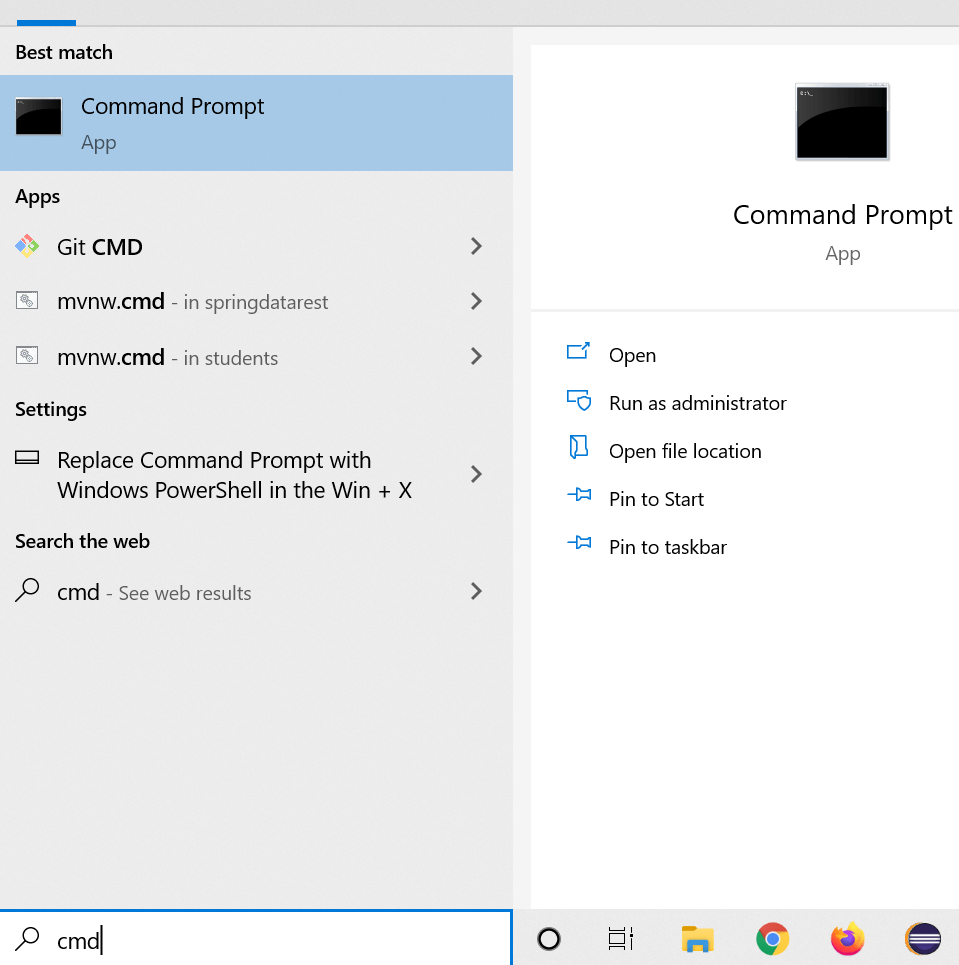
First, we need to open the command prompt. To do that, we need to type cmd in the search bar:
Then, we have to type: java -version in the command prompt:
Microsoft Windows [Version 10.0.19041.572] (c) 2020 Microsoft Corporation. All rights reserved. C:\Users\Asus>java -version java version "1.8.0_261" Java(TM) SE Runtime Environment (build 1.8.0_261-b12) Java HotSpot(TM) 64-Bit Server VM (build 25.261-b12, mixed mode) C:\Users\Asus> As we can see, the command line java -version displays the current Java version that is installed on our computers.
Now, let’s dig deeper to see how to perform a Java update check.
How Do I Check for a Java Update?
The process of checking Java update on windows 10 is pretty simple. All we need to do is follow the following steps:
First, we need to click on Show hidden icons — a special icon that we can find in the bottom right corner of the window.
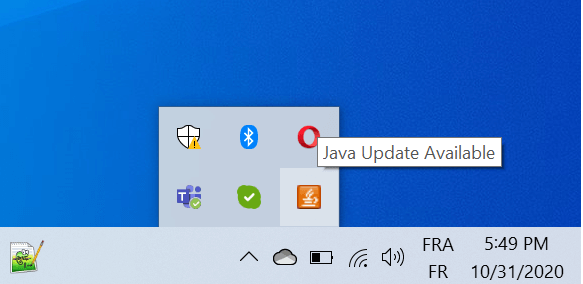
Then, we need to click on Java Update Available – This will open the following window:

Furthermore, as shown above, the windows will tell us everything we need to know. We can click on the update button to continue and get more information about the available Java update.
Now, let’s see how we can use another method to accomplish the same thing.
Firstly, we can type Check For Updates on the search bar. Then a new window named Java Control Panel will open for us.
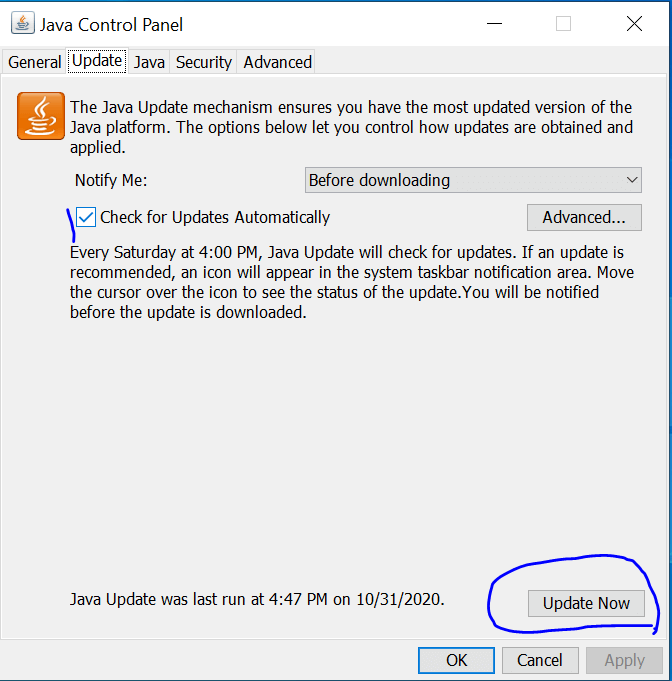
Then, we can go to the update tab to check if there is a new Java update. Easy, peasy right?
We can click on the update button if we want to start the process of updating Java. Once done, our Java will be upgraded to a new version.
Next, we’re going to explain a third method that we can use to check Java updates.
First thing we need to do is open the https://www.java.com/en/ URL in our favorite browser.
Then, we click on the big Java Download button. This will redirect us to a new page where we can find all the information about the last Java version and its release date.
We can also visit the following URL: https://www.java.com/en/download/uninstalltool.jsp to check for Java versions and updates on our computer.
Why is it Important to Check Java Updates?
In general, software updates are important because they provide fixes and improvements, and even patches to security vulnerabilities.
Since Java can be a critical component for many applications that we may install on our computers, then we need to make sure to update it continuously.
Fortunately to us, Java Update is a handy feature that tracks new Java releases. It periodically checks for new versions to keep your Windows computer up-to-date.
Bear in mind that we need to update Java to the newer version to prevent unwanted security issues and enhance performance.
You can refer to this URL https://java.com/en/download/help/java_update.html to explore more about how Java auto-update works.
How to Turn off Java Automatic Update?
Sometimes we may need to disable Java updates — I know what you’re going to say: WHY? This can generate security issues 🙂 — Yes and you’re right!
Keep in mind that it’s highly recommended that you do not turn off automatic updates. However, if you want that do it at your own risk.
Java provides a convenient and simple way to disable automatic periodic Java update checks.
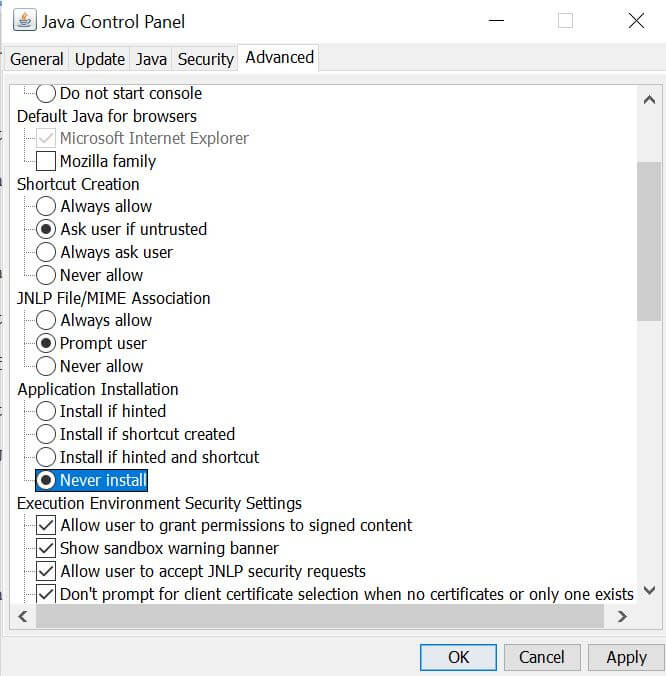
First, we need to open the Java Control Panel window, then navigate to the Update tab, and make sure that Automatically check for updates checkbox is unchecked:
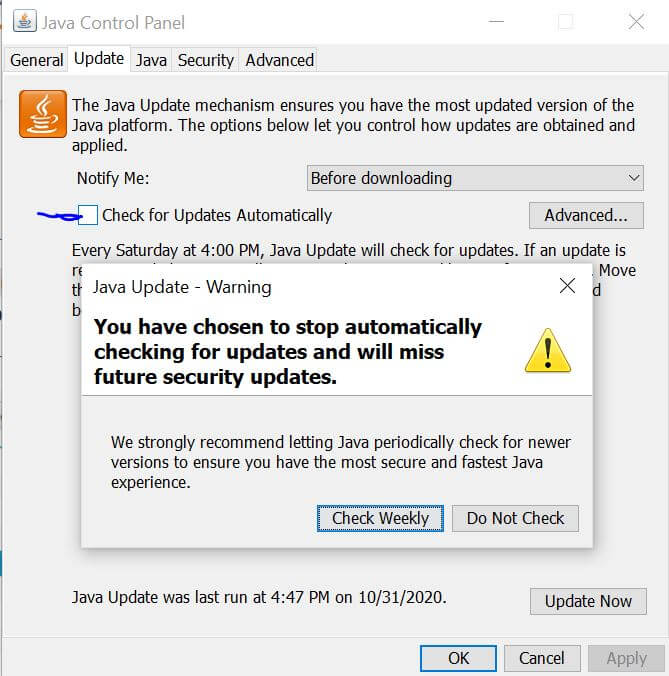
Next, we navigate to the Advanced tab and search for the Application Installation. We need to make sure that the Never install value is selected.
Conclusion
To sum it up, we have explained how to perform a Java update check step by step. Along the way, we have showcased how to check the Java version on Windows 10.
We hope you enjoyed reading this article and learned something new from it.
Liked the Article? Share it on Social media!
How to Check and Update Java Version on Ubuntu 22.04?
![]()
Java is a general-purpose client-side programming language that serves several functionalities like android application development, game development, web applications development, and many other software products. To build any application, first, we have to install Java on our computer systems. However, some applications are not capable to run on java’s outdated version. So, it’s essential to know which Java version is installed on our operating system and if our machine is running an outdated version of java, then how to update it.
This post will explain how to check and upgrade the Java version on Ubuntu 22.04. So, let’s begin!
How to check Java version on Ubuntu 22.04
Open the terminal on your ubuntu 22.04 operating system and type the below-mentioned command to check which Java version is installed on your machine:
Once you typed the above-given command on the terminal, it will produce the following outcome:
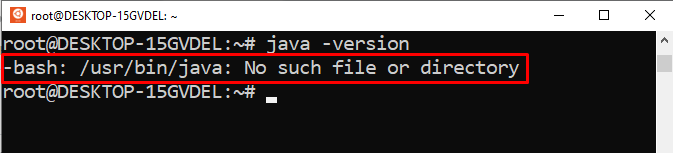
The above snippet shows that Java is not installed on our machine. Now, let’s move one step further to learn how to install/upgrade the Java version on Ubuntu 22.04.
How to Update Java version on Ubuntu 22.04
To update the java version or to install the latest java version, firstly you have to upgrade the apt repository. To do so, type the below-given command on the terminal:
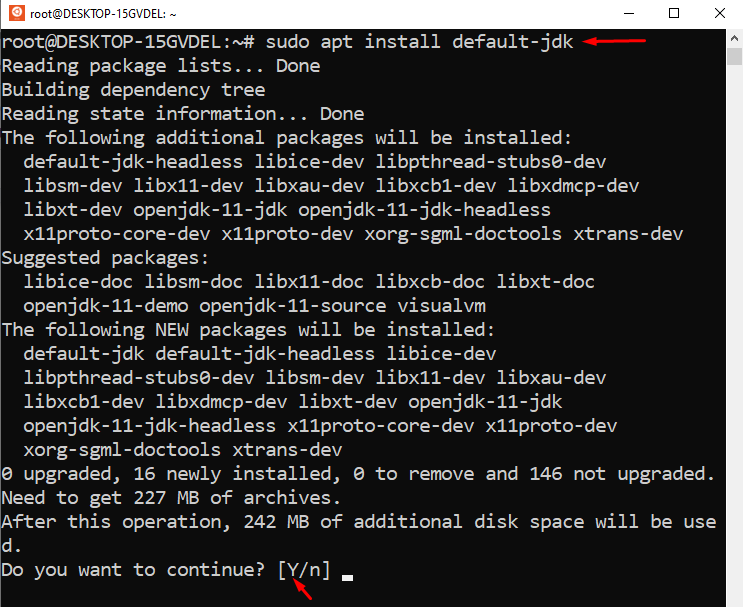
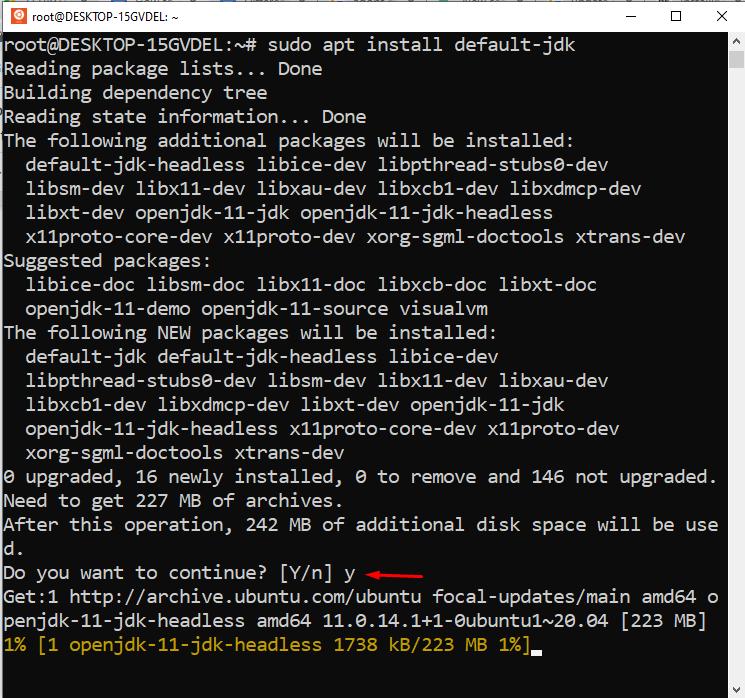
Next, run the below-enlisted command to install the default Java Runtime Environment(JRE) on your operating system:
When you execute the above-given command, it will work like this:
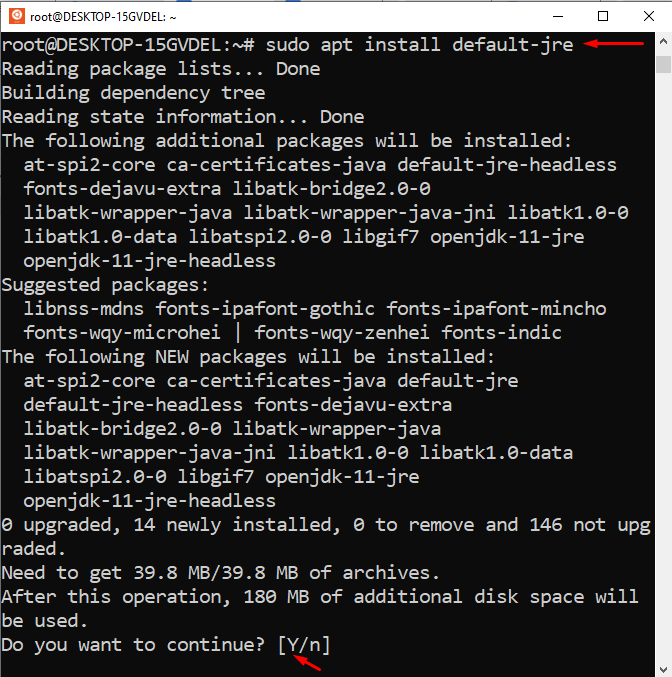
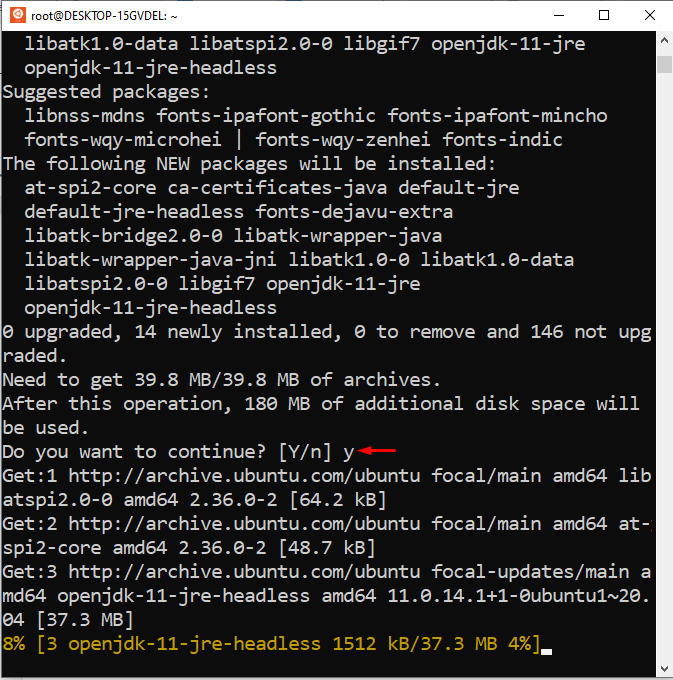
Type “Y” to continue the installation process:
The whole installation process will take a few minutes to install JRE on your system. You can verify the JRE’s installation by typing the following command:
If JRE is successfully installed on your Ubuntu 22.04, then you will witness the result something like this:
Congratulations! You have successfully installed the latest and updated version of Java on Ubuntu 22.04.
As the JRE’s installation is done, now you can run almost every java software on your machine. However, some java-oriented software may require the Java Development Kit(JDK) to compile/run some particular tasks. In such cases, you can install the JDK by typing the below-given command:
The above-given command will work something like this:
Type “Y” to continue the JDK’s installation process:
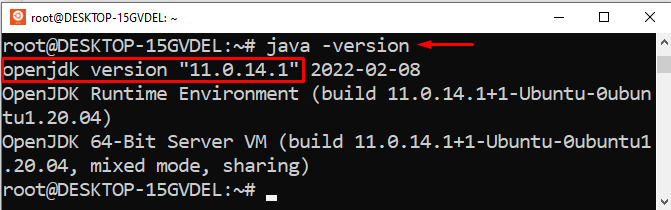
Type the below-given command on the terminal of ubuntu 22.04 to verify whether the updated JDK is installed on your machine or not:
You will witness the below-given output:

Congrats! You are running an updated Java version on your ubuntu 22.04.
Conclusion
Open the terminal and type “sudo apt install default-jre” to install JRE, and type “sudo apt install default-jdk” to install JDK on ubuntu 22.04. To check or verify the java version type “java -version” on the terminal of Ubuntu 22.04. This write-up provided a step-by-step guide on how to check, update, and verify the java version on ubuntu 22.04.
About the author
Anees Asghar
I am a self-motivated IT professional having more than one year of industry experience in technical writing. I am passionate about writing on the topics related to web development.