- PHP MySQL Create Table
- Create a MySQL Table Using MySQLi and PDO
- Example (MySQLi Object-oriented)
- Example (MySQLi Procedural)
- Example (PDO)
- Displaying Data with HTML Tables in PHP
- Introduction:
- Step 1: MySQL Query Creation
- Step 2: Create PHP files
- Step 3: Test the Application
- Conclusion:
- Related Post
- ABOUT THE AUTHOR
- Display Data in an HTML Table Using PHP & MySQL
- Steps to Display Data From MySQL Database with PHP
- 1. Connect PHP to MySQL Database
- 2. Insert Data Into PHPMyAdmin Table
- 3. Fetch Data From MySQL Table
- 4. Display Data in HTML Table
- 5. Test Yourself to insert data
- More Methods to display Data in HTML Table with PHP
- Display Data using MySQLi Procedure
- Display Data Using MySQLi Object-Oriented
- Display Data Using PDO
- Display Data Using Prepared Statement
- Related posts:
PHP MySQL Create Table
A database table has its own unique name and consists of columns and rows.
Create a MySQL Table Using MySQLi and PDO
The CREATE TABLE statement is used to create a table in MySQL.
We will create a table named «MyGuests», with five columns: «id», «firstname», «lastname», «email» and «reg_date»:
CREATE TABLE MyGuests (
id INT(6) UNSIGNED AUTO_INCREMENT PRIMARY KEY,
firstname VARCHAR(30) NOT NULL,
lastname VARCHAR(30) NOT NULL,
email VARCHAR(50),
reg_date TIMESTAMP DEFAULT CURRENT_TIMESTAMP ON UPDATE CURRENT_TIMESTAMP
)
Notes on the table above:
The data type specifies what type of data the column can hold. For a complete reference of all the available data types, go to our Data Types reference.
After the data type, you can specify other optional attributes for each column:
- NOT NULL — Each row must contain a value for that column, null values are not allowed
- DEFAULT value — Set a default value that is added when no other value is passed
- UNSIGNED — Used for number types, limits the stored data to positive numbers and zero
- AUTO INCREMENT — MySQL automatically increases the value of the field by 1 each time a new record is added
- PRIMARY KEY — Used to uniquely identify the rows in a table. The column with PRIMARY KEY setting is often an ID number, and is often used with AUTO_INCREMENT
Each table should have a primary key column (in this case: the «id» column). Its value must be unique for each record in the table.
The following examples shows how to create the table in PHP:
Example (MySQLi Object-oriented)
$servername = «localhost»;
$username = «username»;
$password = «password»;
$dbname = «myDB»;
// Create connection
$conn = new mysqli($servername, $username, $password, $dbname);
// Check connection
if ($conn->connect_error) die(«Connection failed: » . $conn->connect_error);
>
// sql to create table
$sql = «CREATE TABLE MyGuests (
id INT(6) UNSIGNED AUTO_INCREMENT PRIMARY KEY,
firstname VARCHAR(30) NOT NULL,
lastname VARCHAR(30) NOT NULL,
email VARCHAR(50),
reg_date TIMESTAMP DEFAULT CURRENT_TIMESTAMP ON UPDATE CURRENT_TIMESTAMP
)»;
if ($conn->query($sql) === TRUE) echo «Table MyGuests created successfully»;
> else echo «Error creating table: » . $conn->error;
>
Example (MySQLi Procedural)
$servername = «localhost»;
$username = «username»;
$password = «password»;
$dbname = «myDB»;
// Create connection
$conn = mysqli_connect($servername, $username, $password, $dbname);
// Check connection
if (!$conn) die(«Connection failed: » . mysqli_connect_error());
>
// sql to create table
$sql = «CREATE TABLE MyGuests (
id INT(6) UNSIGNED AUTO_INCREMENT PRIMARY KEY,
firstname VARCHAR(30) NOT NULL,
lastname VARCHAR(30) NOT NULL,
email VARCHAR(50),
reg_date TIMESTAMP DEFAULT CURRENT_TIMESTAMP ON UPDATE CURRENT_TIMESTAMP
)»;
if (mysqli_query($conn, $sql)) echo «Table MyGuests created successfully»;
> else echo «Error creating table: » . mysqli_error($conn);
>
Example (PDO)
$servername = «localhost»;
$username = «username»;
$password = «password»;
$dbname = «myDBPDO»;
try $conn = new PDO(«mysql:host=$servername;dbname=$dbname», $username, $password);
// set the PDO error mode to exception
$conn->setAttribute(PDO::ATTR_ERRMODE, PDO::ERRMODE_EXCEPTION);
// sql to create table
$sql = «CREATE TABLE MyGuests (
id INT(6) UNSIGNED AUTO_INCREMENT PRIMARY KEY,
firstname VARCHAR(30) NOT NULL,
lastname VARCHAR(30) NOT NULL,
email VARCHAR(50),
reg_date TIMESTAMP DEFAULT CURRENT_TIMESTAMP ON UPDATE CURRENT_TIMESTAMP
)»;
// use exec() because no results are returned
$conn->exec($sql);
echo «Table MyGuests created successfully»;
> catch(PDOException $e) echo $sql . «
» . $e->getMessage();
>
Displaying Data with HTML Tables in PHP
In this article, we will explore how to display data in an HTML table using PHP. This step-by-step tutorial covers creating a MySQL query, writing PHP code to generate an HTML table, and populating it with data from a database.
Introduction:
HTML tables are a powerful tool for organizing and presenting data on web pages. When combined with PHP, you can dynamically generate tables and populate them with data from a MySQL database. In this article, we will walk through the process of creating an HTML table using PHP and MySQL, step by step.
Step 1: MySQL Query Creation
Before we start displaying data in an HTML table, we need to establish a connection to the MySQL database and retrieve the necessary data using SQL queries.
We have a table named «users» with columns such as «id«, «name,» and «email.»
CREATE TABLE users ( id INT AUTO_INCREMENT PRIMARY KEY, name VARCHAR(255) NOT NULL, email VARCHAR(255) NOT NULL );Insert some sample records into the table for testing.
Step 2: Create PHP files
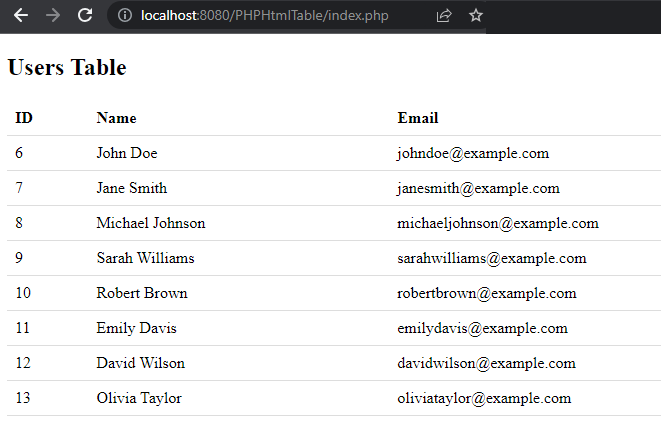
Create a file «index.php» and insert the below code,
table < border-collapse: collapse; width: 100%; >th, td Users Table
Create a file called «display_data.php» and insert the code as shown below,
connect_error) < die("Connection failed: " . $conn->connect_error); > // SQL query to retrieve users data $sql = "SELECT * FROM users"; // Execute the query $result = $conn->query($sql); // Close the connection $conn->close(); ?> num_rows > 0): ?> ID Name Email No users found.
In this example, we assume there is a MySQL database with a table named users that contains columns for id , name , and email . Make sure to replace your_username , your_password , your_database , and users with your actual database credentials and table name in the PHP code.
When you run the PHP file ( index.php ) in a web browser, the PHP code will execute, establish a connection to the database, retrieve the user data, and generate an HTML table dynamically. If no users are found, it will display a «No users found» message.
Step 3: Test the Application
To test the application and see the output, follow these steps:
Start your local development server (e.g., Apache in XAMPP). Open a web browser and navigate to the project e.g. .
If everything is set up correctly, when you access the «index.php» file through a web browser, you will see an HTML table displaying the user data retrieved from the database. The table will have columns for ID, name, and email, and each row will represent a user record.

Conclusion:
In this article, we have learned how to display data with an HTML table in PHP. By connecting to a MySQL database, executing SQL queries, and using PHP to generate HTML code, we can dynamically present data in a tabular format. This approach allows for flexibility in displaying data from various database tables and is widely used in web development.
Related Post
ABOUT THE AUTHOR
I specialize in creating and sharing insightful content encompassing various programming languages and technologies. My expertise extends to Python, PHP, Java, . For more detailed information, please check out the user profile
Display Data in an HTML Table Using PHP & MySQL
Hello Developer, In this tutorial, You will learn to display data in an HTML table using PHP and MySQL. Even You will know more to fetch new records from the database and show them in the tabular format using MySQLi procedure, MySQLi Object-oriented, PDO & prepared statement with a new concept & an example.

Steps to Display Data From MySQL Database with PHP
In this step, you will learn to display data from the database dynamically with an advanced coding concept that will help you to improve your coding skills for writing smart & standard code in PHP.
Before getting started, make sure that the local server (xamp/wamp) must be installed in your system and start it if it is not being started already.
Learn Also –
You can test yourself to display data with the following folder structure –
codingstatus/ |__database.php |__table.php |__developers.php |
1. Connect PHP to MySQL Database
You can use the following database connection query to connect PHP to the MySQL database
- $hostName – It contains host name
- $userName – It contains database username
- $password – It contains database password
- $databaseName – It contains database name.
connect_error) < die("Connection failed: " . $conn->connect_error); > ?> 2. Insert Data Into PHPMyAdmin Table
Before displaying data, you have to insert data into the Database. If you have not already done it and don’t know about it, then you can learn it through the following URL –

3. Fetch Data From MySQL Table
Now, You have to fetch data from the MySQL table. So, just follow these points –
- First of all, include a database connection file database.php
- assign $conn to a new variable $db and table name to another variable $table
- Define columns name in an indexed array and assign them to the $columns
- Also, assign fetch_data() function to the $fetchData
fetch_data() – This function accepts three parameters like $db, $table & $column and It contains MySQLi SELECT query that will return records in an array format by fetching from the database
elseif (empty($columns) || !is_array($columns)) < $msg="columns Name must be defined in an indexed array"; >elseif(empty($tableName))< $msg= "Table Name is empty"; >else< $columnName = implode(", ", $columns); $query = "SELECT ".$columnName." FROM $tableName"." ORDER BY id DESC"; $result = $db->query($query); if($result== true)< if ($result->num_rows > 0) < $row= mysqli_fetch_all($result, MYSQLI_ASSOC); $msg= $row; >else < $msg= "No Data Found"; >>else < $msg= mysqli_error($db); >> return $msg; > ?> 4. Display Data in HTML Table
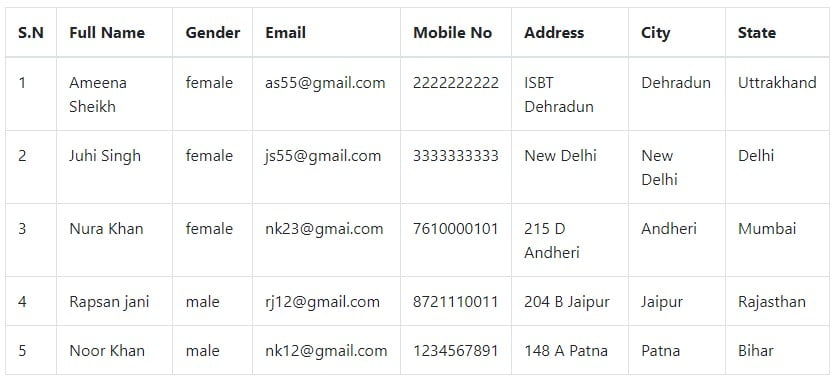
Now, You have to display data in the HTML table. So, you have to follow these points –
- First of all, Include PHP script file developers.php
- Create an HTML table using Bootsrap 4
- Check $fetchData is an array or not with if & else condition
- Then apply foreach loop to the $fetchData
- After that print the required data in the table
S.N Full Name Gender Email Mobile Number Address City State >else < ?> ?>
5. Test Yourself to insert data
After Implementing previous steps, You can test it yourself to open the following URL in your web browser
https://localhost/codingstatus/table.php
More Methods to display Data in HTML Table with PHP
Now, You should know more methods to display data in the database from the next step. After learning those methods, you can use one of them in your project.
From the next step, I have shared only the source code without a custom function. So that you can directly paste it into your project where you need to implement it.
Display Data using MySQLi Procedure
Display data with MySQLi Procedure
S.N Full Name Gender Email Mobile No Address City State > else < ?> No data found Display Data Using MySQLi Object-Oriented
Display data with MySQLi Object-Oriented
query($query); ?> S.N Full Name Gender Email Mobile No Address City State > else < ?> No data found Display Data Using PDO
Connect Database with PDO
setAttribute(PDO::ATTR_ERRMODE, PDO::ERRMODE_EXCEPTION); try < $query = "SELECT fullName, gender, email, mobile, address, city, state FROM developers"; $result = $conn->query($query); ?>
fetch(PDO::FETCH_ASSOC)) < ?> ?>
catch(PDOException $e) < echo "Error: " . $e->getMessage(); > Display Data Using Prepared Statement
Display data using Prepared Statement with MySQLi –
prepare($query); $prepared->execute(); $result = $prepared->get_result(); ?> S.N Full Name Gender Email Mobile No Address City State > else < ?> No data found Display data using Prepared Statement with PDO –
setAttribute(PDO::ATTR_ERRMODE, PDO::ERRMODE_EXCEPTION); try < $query = "SELECT fullName, gender, email, mobile, address, city, state FROM developers"; $prepared = $conn->prepare($query); $prepared->execute(); $result = $prepared -> fetchAll(PDO::FETCH_ASSOC); ?>
?>
catch(PDOException $e) < echo "Error: " . $e->getMessage(); > ?> Related posts: