- Spring Quickstart Guide
- What you’ll need
- Step 1: Start a new Spring Boot project
- Step 2: Add your code
- Step 3: Try it
- Pop quiz
- Next, try these popular guides
- Building an Application with Spring Boot
- What You Will build
- What You Need
- How to complete this guide
- Learn What You Can Do with Spring Boot
- Starting with Spring Initializr
- Create a Simple Web Application
- Create an Application class
- Run the Application
Spring Quickstart Guide
You will build a classic “Hello World!” endpoint which any browser can connect to. You can even tell it your name, and it will respond in a more friendly way.
What you’ll need
An Integrated Developer Environment (IDE)
Popular choices include IntelliJ IDEA, Spring Tools, Visual Studio Code, or Eclipse, and many more.
A Java™ Development Kit (JDK)
We recommend BellSoft Liberica JDK version 17.
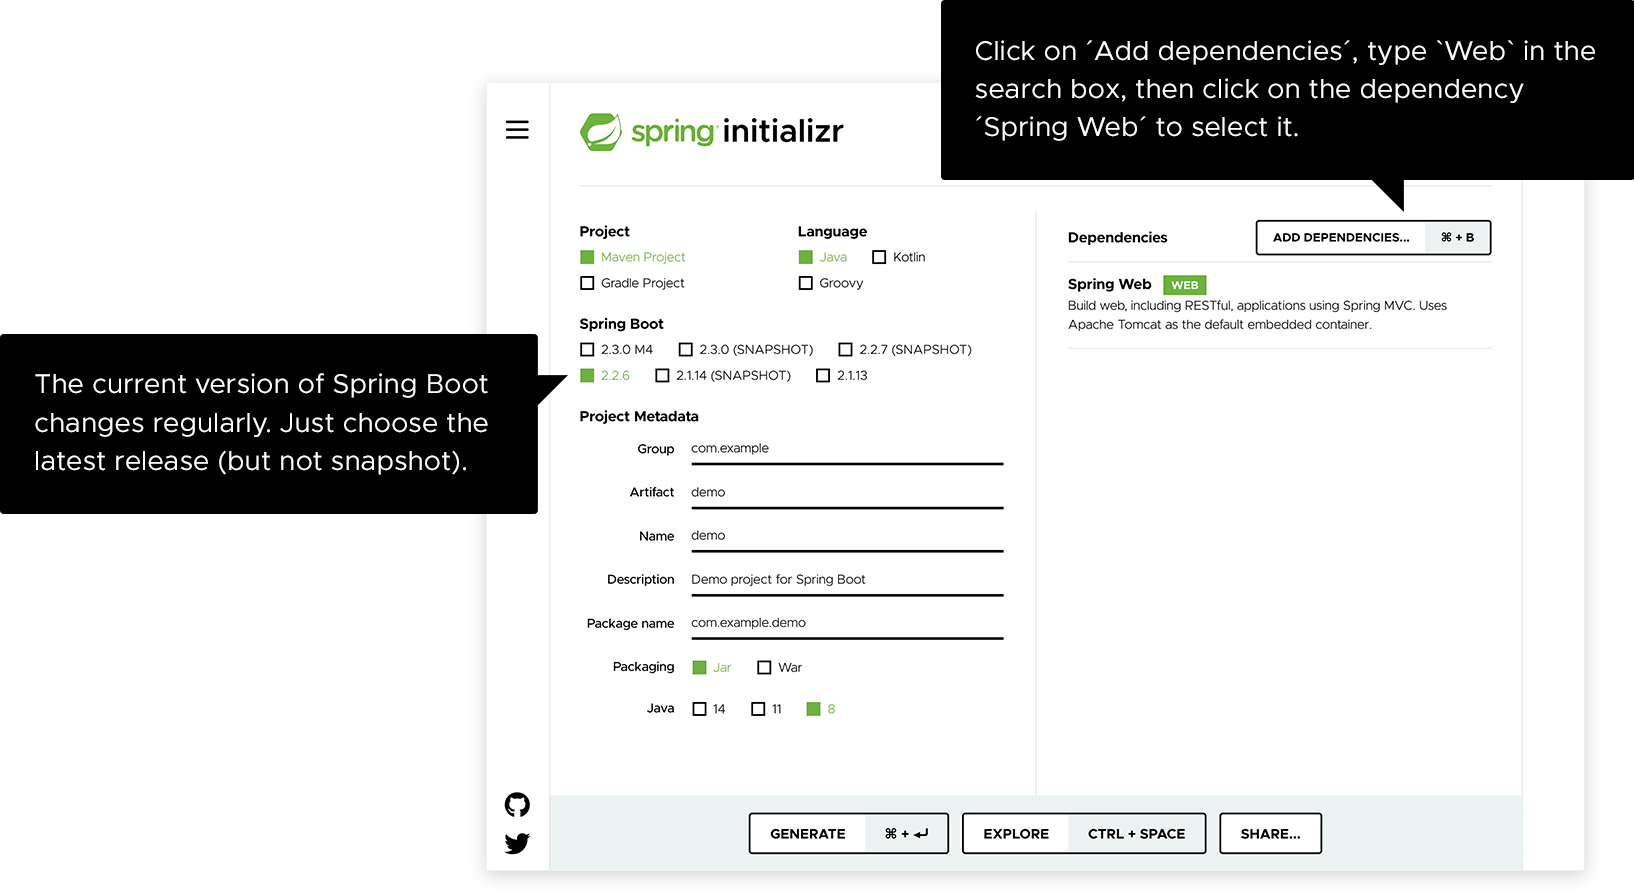
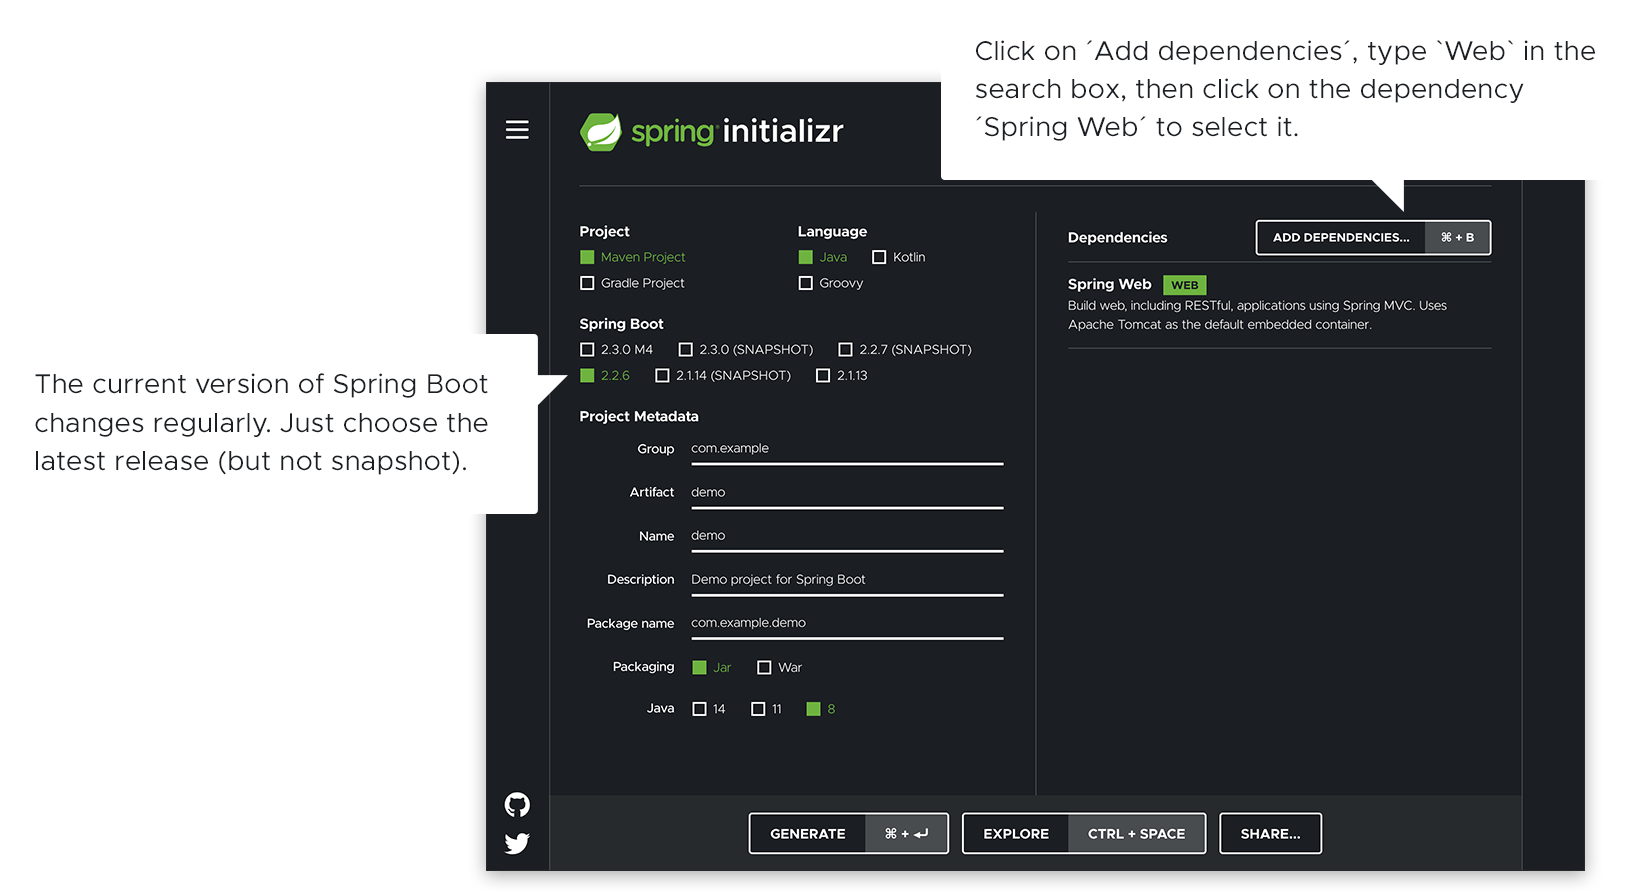
Step 1: Start a new Spring Boot project
Use start.spring.io to create a “web” project. In the “Dependencies” dialog search for and add the “web” dependency as shown in the screenshot. Hit the “Generate” button, download the zip, and unpack it into a folder on your computer.
Projects created by start.spring.io contain Spring Boot , a framework that makes Spring ready to work inside your app, but without much code or configuration required. Spring Boot is the quickest and most popular way to start Spring projects.
Step 2: Add your code
Open up the project in your IDE and locate the DemoApplication.java file in the src/main/java/com/example/demo folder. Now change the contents of the file by adding the extra method and annotations shown in the code below. You can copy and paste the code or just type it.
package com.example.demo; import org.springframework.boot.SpringApplication; import org.springframework.boot.autoconfigure.SpringBootApplication; import org.springframework.web.bind.annotation.GetMapping; import org.springframework.web.bind.annotation.RequestParam; import org.springframework.web.bind.annotation.RestController; @SpringBootApplication @RestController public class DemoApplication < public static void main(String[] args) < SpringApplication.run(DemoApplication.class, args); >@GetMapping("/hello") public String hello(@RequestParam(value = "name", defaultValue = "World") String name) < return String.format("Hello %s!", name); >> This is all the code required to create a simple “Hello World” web service in Spring Boot.
The hello() method we’ve added is designed to take a String parameter called name, and then combine this parameter with the word «Hello» in the code. This means that if you set your name to «Amy» in the request, the response would be “Hello Amy”.
The @RestController annotation tells Spring that this code describes an endpoint that should be made available over the web. The @GetMapping(“/hello”) tells Spring to use our hello() method to answer requests that get sent to the http://localhost:8080/hello address. Finally, the @RequestParam is telling Spring to expect a name value in the request, but if it’s not there, it will use the word «World» by default.
Step 3: Try it
Let’s build and run the program. Open a command line (or terminal) and navigate to the folder where you have the project files. We can build and run the application by issuing the following command:
You should see some output that looks very similar to this:
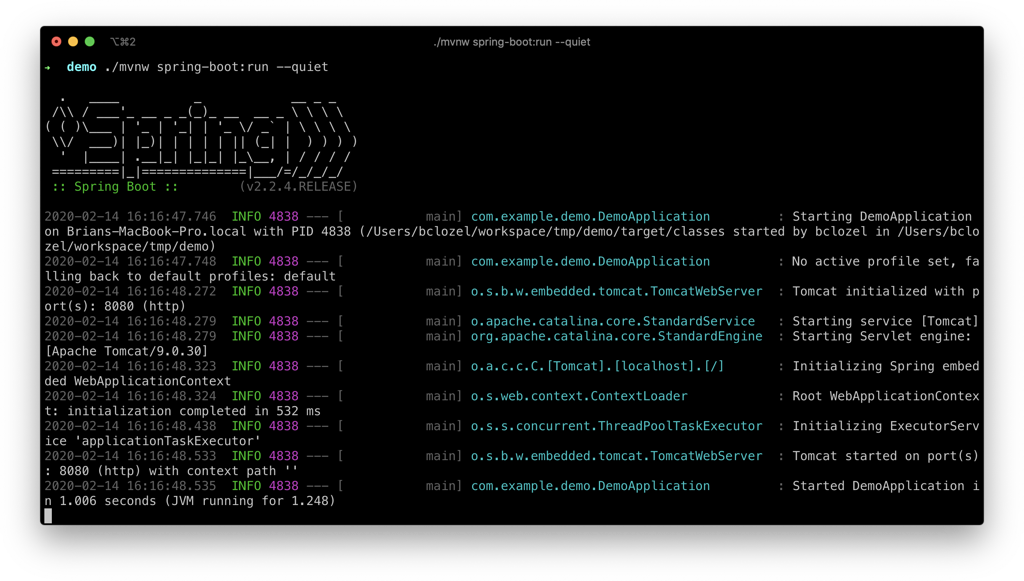
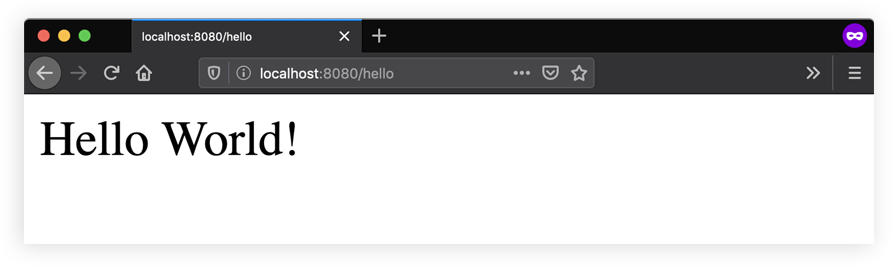
The last couple of lines here tell us that Spring has started. Spring Boot’s embedded Apache Tomcat server is acting as a webserver and is listening for requests on localhost port 8080 . Open your browser and in the address bar at the top enter http://localhost:8080/hello . You should get a nice friendly response like this:
Pop quiz
What should happen if you add ?name=Amy to the end of the URL?
Next, try these popular guides
You’ve already seen how simple Spring can be, but it’s also very flexible. There are thousands of things you can do with Spring, and we have lots of guides available to take you through the most popular choices. Why not keep on learning and try one of these additional guides?
Building an Application with Spring Boot
This guide provides a sampling of how Spring Boot helps you accelerate application development. As you read more Spring Getting Started guides, you will see more use cases for Spring Boot. This guide is meant to give you a quick taste of Spring Boot. If you want to create your own Spring Boot-based project, visit Spring Initializr, fill in your project details, pick your options, and download a bundled up project as a zip file.
What You Will build
You will build a simple web application with Spring Boot and add some useful services to it.
What You Need
- About 15 minutes
- A favorite text editor or IDE
- Java 1.8 or later
- Gradle 7.5+ or Maven 3.5+
- You can also import the code straight into your IDE:
How to complete this guide
Like most Spring Getting Started guides, you can start from scratch and complete each step or you can bypass basic setup steps that are already familiar to you. Either way, you end up with working code.
To start from scratch, move on to Starting with Spring Initializr.
To skip the basics, do the following:
- Download and unzip the source repository for this guide, or clone it using Git: git clone https://github.com/spring-guides/gs-spring-boot.git
- cd into gs-spring-boot/initial
- Jump ahead to Create a Simple Web Application.
When you finish, you can check your results against the code in gs-spring-boot/complete .
Learn What You Can Do with Spring Boot
Spring Boot offers a fast way to build applications. It looks at your classpath and at the beans you have configured, makes reasonable assumptions about what you are missing, and adds those items. With Spring Boot, you can focus more on business features and less on infrastructure.
The following examples show what Spring Boot can do for you:
- Is Spring MVC on the classpath? There are several specific beans you almost always need, and Spring Boot adds them automatically. A Spring MVC application also needs a servlet container, so Spring Boot automatically configures embedded Tomcat.
- Is Jetty on the classpath? If so, you probably do NOT want Tomcat but instead want embedded Jetty. Spring Boot handles that for you.
- Is Thymeleaf on the classpath? If so, there are a few beans that must always be added to your application context. Spring Boot adds them for you.
These are just a few examples of the automatic configuration Spring Boot provides. At the same time, Spring Boot does not get in your way. For example, if Thymeleaf is on your path, Spring Boot automatically adds a SpringTemplateEngine to your application context. But if you define your own SpringTemplateEngine with your own settings, Spring Boot does not add one. This leaves you in control with little effort on your part.
| Spring Boot does not generate code or make edits to your files. Instead, when you start your application, Spring Boot dynamically wires up beans and settings and applies them to your application context. |
Starting with Spring Initializr
You can use this pre-initialized project and click Generate to download a ZIP file. This project is configured to fit the examples in this tutorial.
To manually initialize the project:
- Navigate to https://start.spring.io. This service pulls in all the dependencies you need for an application and does most of the setup for you.
- Choose either Gradle or Maven and the language you want to use. This guide assumes that you chose Java.
- Click Dependencies and select Spring Web.
- Click Generate.
- Download the resulting ZIP file, which is an archive of a web application that is configured with your choices.
Create a Simple Web Application
Now you can create a web controller for a simple web application, as the following listing (from src/main/java/com/example/springboot/HelloController.java ) shows:
package com.example.springboot; import org.springframework.web.bind.annotation.GetMapping; import org.springframework.web.bind.annotation.RestController; @RestController public class HelloController < @GetMapping("/") public String index() < return "Greetings from Spring Boot!"; >>The class is flagged as a @RestController , meaning it is ready for use by Spring MVC to handle web requests. @GetMapping maps / to the index() method. When invoked from a browser or by using curl on the command line, the method returns pure text. That is because @RestController combines @Controller and @ResponseBody , two annotations that results in web requests returning data rather than a view.
Create an Application class
The Spring Initializr creates a simple application class for you. However, in this case, it is too simple. You need to modify the application class to match the following listing (from src/main/java/com/example/springboot/Application.java ):
package com.example.springboot; import java.util.Arrays; import org.springframework.boot.CommandLineRunner; import org.springframework.boot.SpringApplication; import org.springframework.boot.autoconfigure.SpringBootApplication; import org.springframework.context.ApplicationContext; import org.springframework.context.annotation.Bean; @SpringBootApplication public class Application < public static void main(String[] args) < SpringApplication.run(Application.class, args); >@Bean public CommandLineRunner commandLineRunner(ApplicationContext ctx) < return args -> < System.out.println("Let's inspect the beans provided by Spring Boot:"); String[] beanNames = ctx.getBeanDefinitionNames(); Arrays.sort(beanNames); for (String beanName : beanNames) < System.out.println(beanName); >>; > >@SpringBootApplication is a convenience annotation that adds all of the following:
- @Configuration : Tags the class as a source of bean definitions for the application context.
- @EnableAutoConfiguration : Tells Spring Boot to start adding beans based on classpath settings, other beans, and various property settings. For example, if spring-webmvc is on the classpath, this annotation flags the application as a web application and activates key behaviors, such as setting up a DispatcherServlet .
- @ComponentScan : Tells Spring to look for other components, configurations, and services in the com/example package, letting it find the controllers.
The main() method uses Spring Boot’s SpringApplication.run() method to launch an application. Did you notice that there was not a single line of XML? There is no web.xml file, either. This web application is 100% pure Java and you did not have to deal with configuring any plumbing or infrastructure.
There is also a CommandLineRunner method marked as a @Bean , and this runs on start up. It retrieves all the beans that were created by your application or that were automatically added by Spring Boot. It sorts them and prints them out.
Run the Application
To run the application, run the following command in a terminal window (in the complete ) directory:
If you use Maven, run the following command in a terminal window (in the complete ) directory:
You should see output similar to the following:
Let's inspect the beans provided by Spring Boot: application beanNameHandlerMapping defaultServletHandlerMapping dispatcherServlet embeddedServletContainerCustomizerBeanPostProcessor handlerExceptionResolver helloController httpRequestHandlerAdapter messageSource mvcContentNegotiationManager mvcConversionService mvcValidator org.springframework.boot.autoconfigure.MessageSourceAutoConfiguration org.springframework.boot.autoconfigure.PropertyPlaceholderAutoConfiguration org.springframework.boot.autoconfigure.web.EmbeddedServletContainerAutoConfiguration org.springframework.boot.autoconfigure.web.EmbeddedServletContainerAutoConfiguration$DispatcherServletConfiguration org.springframework.boot.autoconfigure.web.EmbeddedServletContainerAutoConfiguration$EmbeddedTomcat org.springframework.boot.autoconfigure.web.ServerPropertiesAutoConfiguration org.springframework.boot.context.embedded.properties.ServerProperties org.springframework.context.annotation.ConfigurationClassPostProcessor.enhancedConfigurationProcessor org.springframework.context.annotation.ConfigurationClassPostProcessor.importAwareProcessor org.springframework.context.annotation.internalAutowiredAnnotationProcessor org.springframework.context.annotation.internalCommonAnnotationProcessor org.springframework.context.annotation.internalConfigurationAnnotationProcessor org.springframework.context.annotation.internalRequiredAnnotationProcessor org.springframework.web.servlet.config.annotation.DelegatingWebMvcConfiguration propertySourcesBinder propertySourcesPlaceholderConfigurer requestMappingHandlerAdapter requestMappingHandlerMapping resourceHandlerMapping simpleControllerHandlerAdapter tomcatEmbeddedServletContainerFactory viewControllerHandlerMappingYou can clearly see org.springframework.boot.autoconfigure beans. There is also a tomcatEmbeddedServletContainerFactory .
Now run the service with curl (in a separate terminal window), by running the following command (shown with its output):
$ curl localhost:8080 Greetings from Spring Boot!