Программирование на C# в Unity — бесплатные видеоуроки для детей и подростков от 10 лет
Мы подготовили короткие пошаговые уроки, чтобы научить детей и подростков создавать скрипты на C# для Unity.
Unity (Юнити) — это платформа, которая предназначена для создания игр, приложений и программ для компьютеров и мобильных устройств. С её помощью были написаны такие известные игры, как Pokémon Go, Bad Piggies и многие другие. Среда Unity отличается тем, что с её помощью можно создавать программы и игры для более чем 25 платформ: компьютеров, консолей, смартфонов, планшетов и т.д. Для создания игр и приложений на Юнити используется язык программирования С# (Си Шарп).
Школа программирования для детей PIXEL подготовила специальные видеоуроки, с помощью которых вы сможете научиться создавать игры на Юнити. Все уроки абсолютно бесплатные и находятся в открытом доступе. Обучение программированию детей начинается с самых азов, что позволяет подготовить необходимую базу для дальнейшего, более глубокого изучения языка C#. Занятия подходят для детей от 10 лет и тех, кто решил заняться разработкой игр с нуля.
Первый урок — вводный. В нём мы научимся устанавливать все необходимые программы (для работы нам понадобится Visual Studio), изучим интерфейс Си Шарп, познакомимся со структурой языка, рассмотрим, как правильно объявлять переменные. В конце занятия мы ответим на самые популярные вопросы, которые могут возникать у учеников в самом начале обучения.
Следующий этап более сложный. Во время второго урока мы изучим спецобъекты UI. Они позволяют взаимодействовать с программой. Из этих спецобъектов мы выберем кнопку, разместим её на экране и подготовим несколько скриптов для вывода текста на монитор. В самом конце занятия мы, как обычно, подведём итоги.
Третий урок мы посвятим изучению массивов и List. Мы рассмотрим, что это такое, чем они отличаются от переменной и друг от друга. В конце занятия мы научимся объявлять массив и Лист.
Четвёртый урок посвящён изучению операторов. Особое внимание мы уделим оператору if. Это один из самых важных операторов, без которого практически невозможно написать ни одну программу или игру на Си Шарп. В конце урока мы ответим на самые популярные вопросы по теме и напишем 2-3 простых скрипта с оператором if.
Пятый урок посвящён изучению компонентов в Юнити. Мы детально рассмотрим, что такое компоненты и научимся добавлять их на объекты. В конце занятия мы закрепим материал: повторим его ещё раз и напишем несколько скриптов.
Шестой урок посвящён изучению циклов. Особое внимание мы уделим циклу for, так как он считается одним из самых важных в языке Си Шарп. В конце урока мы перейдём к практике и напишем несколько скриптов с этим циклом.
Корутина — это простой и удобный способ запускать функции, которые должны работать параллельно некоторое время. В конце урока мы пропишем несколько скриптов, которые будут запускать и останавливать Coroutine.
Ни одна современная игра не обходится без музыкального сопровождения. Музыка придаёт сюжету остроты или наоборот — помогает расслабиться во время игровых сессий. Во время восьмого урока мы научимся добавлять музыку в игры.
Мы сделали уроки, которые будут интересны ребёнку и заинтересуют его. Весь материал подготовлен с учётом возраста детей и максимально понятен каждому ученику.
Обучение программированию детей — это отличная возможность дать своему ребёнку ещё больше знаний и новый уровень развития. Дети, которые изучают разработку игр на Юнити, развивают целый комплекс навыков, которые будут полезны в будущем в любой сфере.
Материал подготовлен школой программирования для детей PIXEL. Мы учим детей от 5 до 17 лет программировать, создавать игры и анимацию, разрабатывать сайты и др. Приходите к нам учиться создавать игры на Unity.
Coding in C# in Unity for beginners
You want to start learning to code in Unity so you can get going on your first game, but you don’t know where to begin. We get the struggle. Here’s a breakdown of the scripting elements in Unity and some learning material that you can use to go through more advanced projects like «Space Shooter». This should get you covered in the following areas: the very basics of coding, like variables, functions and classes, and how to use them.
Scripting tells our GameObjects how to behave; it’s the scripts and components attached to the GameObjects, and how they interact with each other, that creates your gameplay. Now, scripting in Unity is different from pure programming. If you’ve done some pure programming, e.g. you created a running app, you should realize that in Unity you don’t need to create the code that runs the application, because Unity does it for you. Instead, you focus on the gameplay in your scripts.
Unity runs in a big loop. It reads all of the data that’s in a game scene. For example, it reads through the lights, the meshes, what the behaviors are, and it processes all of this information for you.
If you think about television, where, for example in North America, you have 29.5 frame/sec, Unity needs to do the same thing. It’s running single discrete frames, one after another. You direct Unity with the instructions that you write in your scripts, and Unity executes them frame after frame as fast as it can.
Achieving a high frame rate means not only your game will look more fluid, but your scripts will also be executed more often, making controls more responsive.
A script must be attached to a GameObject in the scene in order to be called by Unity. Scripts are written in a special language that Unity can understand. And, it’s through this language that we can talk to the engine and give it our instructions.
The language that’s used in Unity is called C# (pronounced C-sharp). All the languages that Unity operates with are object-oriented scripting languages. Like any language, scripting languages have syntax, or parts of speech, and the primary parts are called variables, functions, and classes.
If you’re using a version of Unity until 2017.3, you’ll notice that it has a text editor called MonoDevelop: it can help us complete our code, it’ll let us know if we’re writing a wrong piece of code, and allows us to take shortcuts. Starting with 2018.1, you can also use Visual Studio for Unity Community, or other text editors such as Visual Studio, Notepad, or Sublime text.
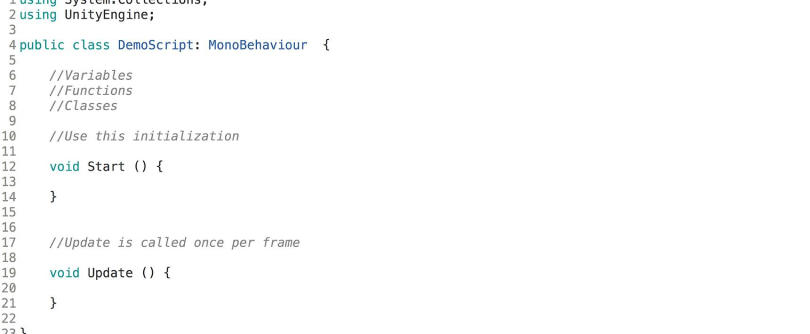
Here’s a script with some sample code in it (based on the Coding in Unity for the Absolute Beginner tutorial):
As you can see, there are variables, functions, and classes.
Variables hold values and references to objects (you can see objects as “bigger” variables). They’re like a box that holds something for us to use. Variables start with a lowercase letter.
Functions are collections of code that compare and manipulate these variables. Functions start with an uppercase letter. We organise code in functions so that they can be easily reused multiple times in different parts of the program.
Classes are a way to structure code to wrap collections of variables and functions together to create a template that defines the properties of an object.
Scripting is primarily comparing these objects and their current states and values. It’s based on logic determining an outcome or resolution.
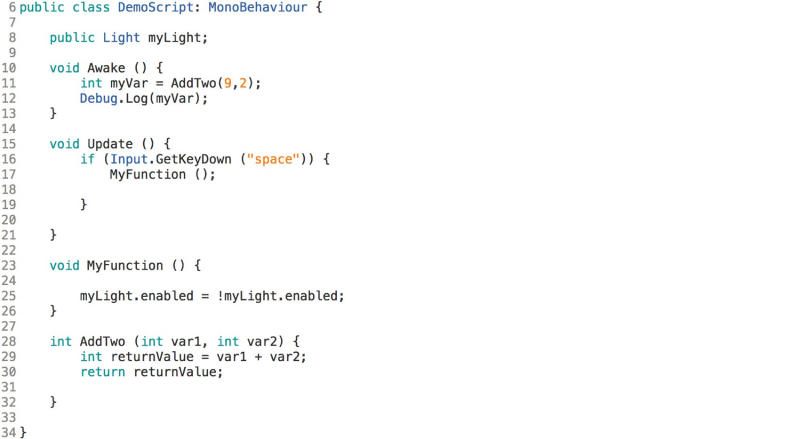
In Unity, the scripts start by laying out the tools that you need at the top, and this is usually by declaring variables. You can see the declared variables here with the visibility keyword “public” or «private» at the front, followed by a type, and a name.
When we’re declaring your variables there are several visibility types, but the two most important ones are public and private.
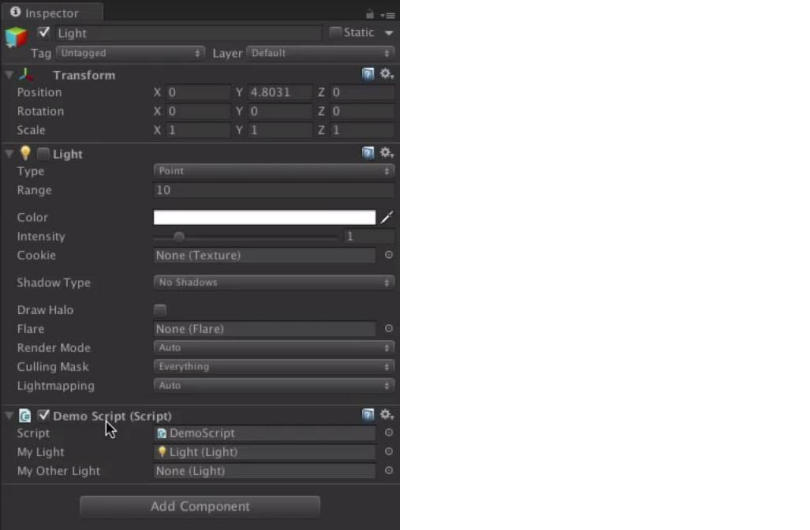
If you create a script with the above text in your code editor and then come back to Unity and assign the script to a GameObject, you’ll see that you can access and see the light variable declared as public in the Inspector, but you can’t see the private one. And that’s because what’s defined as “private” can only be accessed within this particular script, within this particular class.
If you make this public, then it’s accessible to other scripts and other classes, and can be changed in the Inspector from the Unity editor. So, that means other people can access it and change its value.
There are many reasons to choose between private or public. Private variables allow your code to be cleaner, since you know that the value of those variables can be changed only inside that class. This makes debugging and maintaining the code easier.
If you choose “public” , and you experience an issue, you need to look inside your whole codebase in order to track the source because any other object has access to that variable. However, if you want objects to communicate between themselves you need some variables (or functions) to be public.
Another important aspect of variables is the type. A type defines what kind of value is the variable holding in memory, e.g. it can be a number, text, or more complex types, like the ones in the image below: Transform, Light and Demo Script in the image below are in fact references to Components. Unity needs to know what type of object it is so that it knows how to handle it.
Another important thing about variables is the name. The main thing that you need to remember about naming variables is that it can’t start with a number, and it can’t contain spaces. Therefore, there’s a style of writing the names. In C#, the naming convention is camelCase: you start with a lowercase letter and add words, without spaces, starting with a capital letter, e.g. «myLight».
When Unity compiles the script, it makes public variables visible in the editor. See the image below from the inspector.
Scripts manipulate the variables by using functions. There are a number of functions that run automatically inside Unity. See below:
Awake is called only once when the GameObject with that component is instantiated. If a GameObject is inactive, then it will not be called until it is made active. However, Awake is called even if the GameObject is active but the component is not enabled (with the little checkbox next to its name). You can use Awake to initialize all the variables that you need to assign a value to.
Start – like Awake, Start will be called if a GameObject is active, but only if the component is enabled. For more information on the differences with Awake, see this video.
Update is called once per frame. This is where you put code to define the logic that runs continuously, like animations, AI, and other parts of the game that have to be constantly updated.
FixedUpdate is when you want to do physics work.
As you can see, there’s Fixed Update and Update and in our Scripting tutorials section, you can learn how to effect changes every frame with the Update and FixedUpdate functions, and their differences.
LateUpdate is a function that’s similar to Update, but LateUpdate is called at the end of the frame. Unity will look at all of the game objects, find all of the Updates, and call the LateUpdates. This is good for things like the camera. Let’s say you want to move a character in your game. And then he’s bumped into by another character and ends up in a different position. If we move the camera at the same time as the character, there would be a jiggle, and the camera wouldn’t be where it needs to be. So, basically, it’s a second loop that comes in very handy.
When writing a function, remember that functions start with the returned type of the function at the beginning, followed by the name of the function, and then the parameters in the parentheses (if any). Function names start with a capital letter and the body of the function goes between the curly brackets. Here’s an example on how to write a function:
How do we call this function?
Functions can do calculations and then return a value. You can ask a function to do something, process the information, then return an answer. If you use the type «void», then they are not returning anything.
Classes are collections of these variables and functions. For example, this script is a class:
Bear in mind that the class name must match the file name of the C# script for it to work. And then to be attached to a GameObject, it has to derive from another class called MonoBehaviour which is automatically put there for you when you first create a script. Classes can also be public or private.
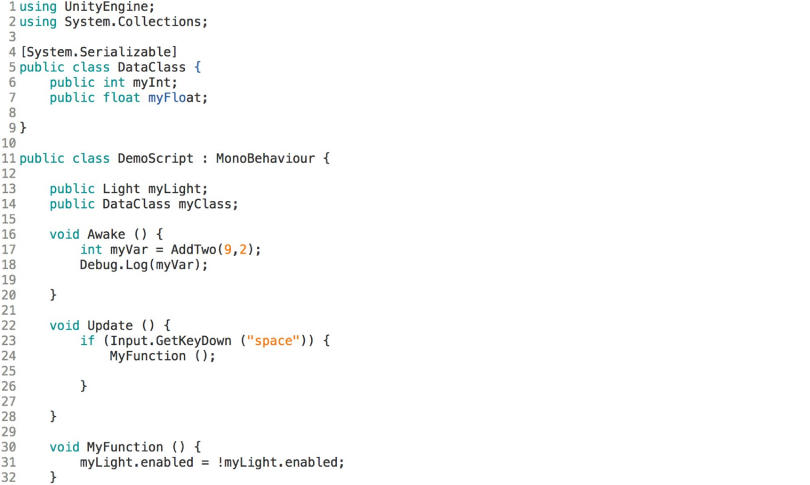
In Unity, if you create a custom class, like in the example below, you have to ask it to serialize it. This means that it will be converted into simple data that Unity can look at in the inspector. When you do that, it’ll see that you have the class will appear in the inspector.
Variables, functions, and classes are just the basics of starting with coding in Unity. Check out the Learn section, you can find a bunch of useful scripting tutorials that will help you go learn about programming from scratch, then progress to create detailed code for your projects.


