- Upgrade Python to latest version (3.10) on Ubuntu Linux
- Updating Python to the latest version
- Step 1: Check if Python3.10 is available for install
- Step 2: Install Python 3.10
- Step 3: Set Python 3.10 as default
- Fix pip and disutils errors
- Fix Python3-apt
- Install pip & distutils
- Fix pip-env errors when using venv
- Extra
- Upgrade python in a virtualenv
- Upgrade python version in visual studio code python workspace
- Caution
- Prerequisites
- Steps to upgrade Python in workspace
- Tools & Technologies Used
Upgrade Python to latest version (3.10) on Ubuntu Linux
Linux systems come with Python install by default, but, they are usually not the latest. Python also cannot be updated by a typical apt upgrade command as well.
To check the version of Python installed on your system run
python keyword is used for Python 2.x versions which has been deprecated
- Update Python to the latest version
- Fix pip & other Python related issues
- While doing the above two, ensure your Ubuntu which is heavily dependent on Python does not break
Updating Python to the latest version
Ubuntu’s default repositories do not contain the latest version of Python, but an open source repository named deadsnakes does.
Python3.10 is not officially available on Ubuntu 20.04, ensure you backup your system before upgrading.
Step 1: Check if Python3.10 is available for install
sudo add-apt-repository ppa:deadsnakes/ppa sudo apt update Check if Python 3.10 is available by running
This will produce the below result, if you see python3.10 it means you can install it
Step 2: Install Python 3.10
Now you can install Python 3.10 by running
sudo apt install python3.10 Now though Python 3.10 is installed, if you check the version of your python by running python3 —version you will still see an older version. This is because you have two versions of Python installed and you need to choose Python 3.10 as the default.
Step 3: Set Python 3.10 as default
Steps beyond here are tested on Ubuntu 20.04 in VM & WSL2, but are experimental , proceed at your own risk.
Changing the default alternatives for Python will break your Gnome terminal. To avoid this, you need to edit the gnome-terminal configuration file.
Open the terminal and run:
sudo nano /usr/bin/gnome-terminal In first line, change #!/usr/bin/python3 to #!/usr/bin/python3.8 . Press Ctrl +X followed by enter to save and exit.
Then save and close the file.
Next, update the default Python by adding both versions to an alternatives by running the below
sudo update-alternatives --install /usr/bin/python3 python3 /usr/bin/python3.9 Now run
sudo update-alternatives --config python3 Choose the selection corresponding to Python3.10 (if not selected by default).
Now run python3 —version again and you should see the latest Python as the output.
Fix pip and disutils errors
Installing the new version of Python will break pip as the distutils for Python3.10 is not installed yet.
Fix Python3-apt
Running pip in terminal will not work, as the current pip is not compatible with Python3.10 and python3-apt will be broken, that will generate an error like
Traceback (most recent call last): File "/usr/lib/command-not-found", line 28, in <module> from CommandNotFound import CommandNotFound File "/usr/lib/python3/dist-packages/CommandNotFound/CommandNotFound.py", line 19, in <module> from CommandNotFound.db.db import SqliteDatabase File "/usr/lib/python3/dist-packages/CommandNotFound/db/db.py", line 5, in <module> import apt_pkg ModuleNotFoundError: No module named 'apt_pkg' To fix this first remove the current version of python3-apt by running
sudo apt remove --purge python3-apt DO NOT RUN sudo apt autoremove as it will remove several packages that are required. This may break your system if you’re using GUI, if you’re on WSL2 you can proceed.
Finally, reinstall python3-apt by running
sudo apt install python3-apt Install pip & distutils
Running pip will still throw an error pip: command not found . We need to install the latest version of pip compatible with Python 3.10.
Also, if try to manually install the latest version of pip, it will throw an error like
ImportError: cannot import name 'sysconfig' from 'distutils' (/usr/lib/python3.10/distutils/__init__.py) Or you might also see an error stating No module named ‘distutils.util’ . This is because the distutils module is not installed yet, to install run the below command
sudo apt install python3.10-distutils Now you can install pip by running
curl https://bootstrap.pypa.io/get-pip.py -o get-pip.py sudo python3.10 get-pip.py If you get an error like bash: curl: command not found then you need to install curl first by running sudo apt install curl
Now you can run pip and you should see the output of pip —version
Fix pip-env errors when using venv
When you try to create a new virtual environment using python -m venv env , you may into the following error.
Error: Command -Imensurepip--upgrade--default-pipYou can fix this by reinstalling venv by running sudo apt install python3.10-venv All should be done now. It is complicated, but this is how you update Python to latest version.
Extra
If you have oh-my-zsh installed, you can avoid typing out python3 by running
Now you can run your files with py or python .
Upgrade python in a virtualenv
If you happen to be using the venv module that comes with Python 3.3+, it supports an —upgrade option. Per the docs:
Upgrade the environment directory to use this version of Python, assuming Python has been upgraded in-place
python3 -m venv --upgrade ENV_DIR Did you see this? If I haven’t misunderstand that answer, you may try to create a new virtualenv on top of the old one. You just need to know which python is going to use your virtualenv (you will need to see your virtualenv version).
If your virtualenv is installed with the same python version of the old one and upgrading your virtualenv package is not an option, you may want to read this in order to install a virtualenv with the python version you want.
I’ve tested this approach (the one that create a new virtualenv on top of the old one) and it worked fine for me. I think you may have some problems if you change from python 2.6 to 2.7 or 2.7 to 3.x but if you just upgrade inside the same version (staying at 2.7 as you want) you shouldn’t have any problem, as all the packages are held in the same folders for both python versions (2.7.x and 2.7.y packages are inside your_env/lib/python2.7/).
If you change your virtualenv python version, you will need to install all your packages again for that version (or just link the packages you need into the new version packages folder, i.e: your_env/lib/python_newversion/site-packages)
Upgrade python version in visual studio code python workspace
In my earlier article, I have explained how to upgrade Python on macOS and setup Visual Studio Code project for Python development. Now we will see how to upgrade the already setup Python environment in VS Code workspace.
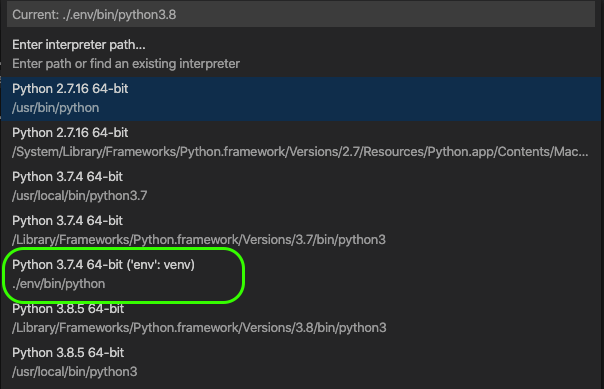
In my current Python workspace, the interpreter is pointing to a virtual environment with Python 3.7.4. To upgrade this to version 3.8.5, I’ve followed these steps.
Caution
When upgrading the python interpreter version in python workspace, you may encounter errors or warnings while running the project because of incompatible usage of methods or objects. So please review the release documents from python.org before upgrading and prepare an action plan to migrate the code to new version of Python.
Prerequisites
- VS Code should be setup to use Python.
- A Python virtual environment should be created for the VS Code workspace.
- Python should be upgraded on macOS to the desired version which you want to use in the VS Code workspace. Here in my case it’s 3.8.5.
Steps to upgrade Python in workspace
- Launch the Visual Studio Code python workspace.
- Check the current python virtual environment version. You can check this by opening the Command Palette (by pressing Shift, Command and P keys) and select Python: Select Interpreter. This will show you the list of interpreters, both global and virtual. In my case Python 3.7.4 64-bit is the current virtual environment and 3.8.5 is listed as global environment.
- Go back to Command Palette and search and start Terminal: Create New Integrated Terminal. The terminal panel will open at the bottom.
- In the terminal run the below comment. In this comment python3.8 is important to upgrade the environment with Python 3.8.x. env is the existing name of the virtual environment.
python3.8 -m venv --upgrade env source env/bin/activate
- Restart VS Code and open the workspace.
- Now go back to the Command Palette and type in and select Python: Select Interpreter again.
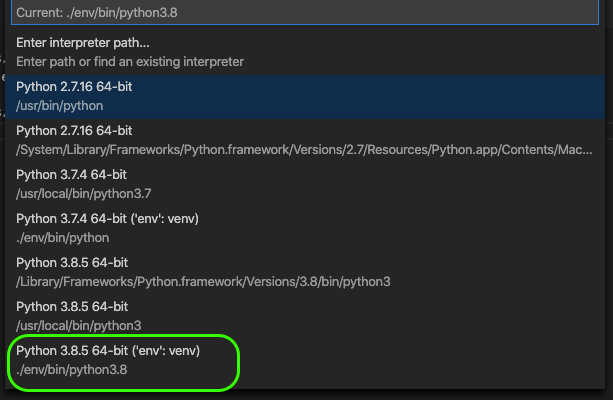
- You can see the newly upgraded version (3.8.5) of python virtual environment listed.
- Select the virtual environment Python 3.8.5 64-bit (‘env’: venv).
- From now on, the VS Code workspace will use the environment with the new version of Python.


