- Introduction
- Note
- Telegram API support
- Installing
- Verifying Releases
- Dependencies & Their Versions
- Optional Dependencies
- Quick Start
- Resources
- Getting help
- Concurrency
- Contributing
- Donating
- License
- Доступ к linux серверу с помощью Telegram-бота на Python
- Регистрация бота
- Подготовка питона
- Запуск бота
- Повторение команд
- Вместо заключения
Introduction
This library provides a pure Python, asynchronous interface for the Telegram Bot API. It’s compatible with Python versions 3.8+. In addition to the pure API implementation, this library features a number of high-level classes to make the development of bots easy and straightforward. These classes are contained in the telegram.ext submodule. A pure API implementation without telegram.ext is available as the standalone package python-telegram-bot-raw . See here for details.
Note
Installing both python-telegram-bot and python-telegram-bot-raw in conjunction will result in undesired side-effects, so only install one of both.
Telegram API support
Installing
$ pip install python-telegram-bot --upgrade
To install a pre-release, use the —pre flag in addition. You can also install python-telegram-bot from source, though this is usually not necessary.
$ git clone https://github.com/python-telegram-bot/python-telegram-bot $ cd python-telegram-bot $ python setup.py install Verifying Releases
We sign all the releases with a GPG key. The signatures are uploaded to both the GitHub releases page and the PyPI project and end with a suffix .asc . Please find the public keys here. The keys are named in the format -.gpg or -current.gpg if the key is currently being used for new releases. In addition, the GitHub release page also contains the sha1 hashes of the release files in the files with the suffix .sha1 . This allows you to verify that a release file that you downloaded was indeed provided by the python-telegram-bot team.
Dependencies & Their Versions
python-telegram-bot tries to use as few 3rd party dependencies as possible. However, for some features using a 3rd party library is more sane than implementing the functionality again. As these features are optional, the corresponding 3rd party dependencies are not installed by default. Instead, they are listed as optional dependencies. This allows to avoid unnecessary dependency conflicts for users who don’t need the optional features. The only required dependency is httpx ~= 0.24.1 for telegram.request.HTTPXRequest , the default networking backend. python-telegram-bot is most useful when used along with additional libraries. To minimize dependency conflicts, we try to be liberal in terms of version requirements on the (optional) dependencies. On the other hand, we have to ensure stability of python-telegram-bot , which is why we do apply version bounds. If you encounter dependency conflicts due to these bounds, feel free to reach out.
Optional Dependencies
- pip install «python-telegram-bot[passport]» installs the cryptography>=39.0.1 library. Use this, if you want to use Telegram Passport related functionality.
- pip install «python-telegram-bot[socks]» installs httpx[socks]. Use this, if you want to work behind a Socks5 server.
- pip install «python-telegram-bot[http2]» installs httpx[http2]. Use this, if you want to use HTTP/2.
- pip install «python-telegram-bot[rate-limiter]» installs aiolimiter~=1.1.0. Use this, if you want to use telegram.ext.AIORateLimiter .
- pip install «python-telegram-bot[webhooks]» installs the tornado~=6.2 library. Use this, if you want to use telegram.ext.Updater.start_webhook / telegram.ext.Application.run_webhook .
- pip install «python-telegram-bot[callback-data]» installs the cachetools~=5.3.1 library. Use this, if you want to use arbitrary callback_data.
- pip install «python-telegram-bot[job-queue]» installs the APScheduler~=3.10.1 library and enforces pytz>=2018.6, where pytz is a dependency of APScheduler . Use this, if you want to use the telegram.ext.JobQueue .
To install multiple optional dependencies, separate them by commas, e.g. pip install «python-telegram-bot[socks,webhooks]» .
Additionally, two shortcuts are provided:
- pip install «python-telegram-bot[all]» installs all optional dependencies.
- pip install «python-telegram-bot[ext]» installs all optional dependencies that are related to telegram.ext , i.e. [rate-limiter, webhooks, callback-data, job-queue] .
Quick Start
Our Wiki contains an Introduction to the API explaining how the pure Bot API can be accessed via python-telegram-bot . Moreover, the Tutorial: Your first Bot gives an introduction on how chatbots can be easily programmed with the help of the telegram.ext module.
Resources
- The package documentation is the technical reference for python-telegram-bot . It contains descriptions of all available classes, modules, methods and arguments as well as the changelog.
- The wiki is home to number of more elaborate introductions of the different features of python-telegram-bot and other useful resources that go beyond the technical documentation.
- Our examples section contains several examples that showcase the different features of both the Bot API and python-telegram-bot . Even if it is not your approach for learning, please take a look at echobot.py . It is the de facto base for most of the bots out there. The code for these examples is released to the public domain, so you can start by grabbing the code and building on top of it.
- The official Telegram Bot API documentation is of course always worth a read.
Getting help
If the resources mentioned above don’t answer your questions or simply overwhelm you, there are several ways of getting help.
- We have a vibrant community of developers helping each other in our Telegram group. Join us! Asking a question here is often the quickest way to get a pointer in the right direction.
- Ask questions by opening a discussion.
- You can even ask for help on Stack Overflow using the python-telegram-bot tag.
Concurrency
Since v20.0, python-telegram-bot is built on top of Pythons asyncio module. Because asyncio is in general single-threaded, python-telegram-bot does currently not aim to be thread-safe. Noteworthy parts of python-telegram-bots API that are likely to cause issues (e.g. race conditions) when used in a multi-threaded setting include:
- telegram.ext.Application/Updater.update_queue
- telegram.ext.ConversationHandler.check/handle_update
- telegram.ext.CallbackDataCache
- telegram.ext.BasePersistence
- all classes in the telegram.ext.filters module that allow to add/remove allowed users/chats at runtime
Contributing
Contributions of all sizes are welcome. Please review our contribution guidelines to get started. You can also help by reporting bugs or feature requests.
Donating
Occasionally we are asked if we accept donations to support the development. While we appreciate the thought, maintaining PTB is our hobby, and we have almost no running costs for it. We therefore have nothing set up to accept donations. If you still want to donate, we kindly ask you to donate to another open source project/initiative of your choice instead.
License
You may copy, distribute and modify the software provided that modifications are described and licensed for free under LGPL-3. Derivatives works (including modifications or anything statically linked to the library) can only be redistributed under LGPL-3, but applications that use the library don’t have to be.
Доступ к linux серверу с помощью Telegram-бота на Python
Довольно часто происходят ситуации, когда доступ к серверу нужен здесь и сейчас. Однако, не всегда подключение по SSH является наиболее удобным способом, потому что под рукой может не оказаться SSH клиента, адреса сервера или связки «пользователь/пароль». Конечно, есть Webmin, который упрощает администрирование, но он также не даёт моментальный доступ.
Поэтому я решил реализовать простое, но любопытное решение. А именно — написать Telegram-бота, который, запускаясь на самом сервере, будет выполнять присылаемые ему команды и возвращать результат. Изучив несколько статей на эту тему, я понял, что подобных реализаций ещё никто не описывал.
Данный проект я реализовывал на Ubuntu 16.04, но для беспроблемного запуска на других дистрибутивах я постарался сделать всё в общем виде.
Регистрация бота
Регистрируем нового бота у BotFather. Отправляем ему /newbot и далее по тексту. Нам понадобятся токен нового бота и ваш id (получить его можно, например, у @userinfobot).
Подготовка питона
Для запуска бота будем использовать библиотеку telebot ( pip install pytelegrambotapi ). С помощью библиотеки subprocess будем выполнять команды на сервере.
Запуск бота
На сервере создаем файл bot.py:
nano bot.py
from subprocess import check_output import telebot import time bot = telebot.TeleBot("XXXXXXXXX:AAAAAAAAAAAAAAAAAAAAAAAAAAAAAAAAA")#токен бота user_id = 0 #id вашего аккаунта @bot.message_handler(content_types=["text"]) def main(message): if (user_id == message.chat.id): #проверяем, что пишет именно владелец comand = message.text #текст сообщения try: #если команда невыполняемая - check_output выдаст exception bot.send_message(message.chat.id, check_output(comand, shell = True)) except: bot.send_message(message.chat.id, "Invalid input") #если команда некорректна if __name__ == '__main__': while True: try:#добавляем try для бесперебойной работы bot.polling(none_stop=True)#запуск бота except: time.sleep(10)#в случае падения Заменяем в нём токен бота на тот, который выдал BotFather, и user_id — на значение id вашего аккаунта. Проверка id юзера нужна для того, чтобы бот предоставлял доступ к вашему серверу только вам. Функция check_output() выполняет переданную команду и возвращает результат.
Осталось только запустить бота. Для запуска процессов на сервере я предпочитаю использовать screen ( sudo apt-get install screen ):
screen -dmS ServerBot python3 bot.py(где «ServerBot» — идентификатор процесса)
Процесс автоматически запустится в фоном режиме. Перейдем в диалог с ботом и проверим, что всё работает, как надо:

Сongratulations! Бот выполняет присылаемые ему команды. Теперь, чтобы получить доступ к серверу, вам достаточно открыть диалог с ботом.
Повторение команд
Зачастую, для мониторинга состояния сервера приходится выполнять одни и те же команды. Поэтому реализация повтора команд без их повторного отправления будет очень к месту.
Реализовывать будем при помощи inline кнопок под сообщениями:
from subprocess import check_output import telebot from telebot import types #Добавляем импорт кнопок import time bot = telebot.TeleBot("XXXXXXXXX:AAAAAAAAAAAAAAAAAAAAAAAAAAAAAAAAA")#Токен бота user_id = 0 #id вашего аккаунта @bot.message_handler(content_types=["text"]) def main(message): if (user_id == message.chat.id): #проверяем, что пишет именно владелец comand = message.text #текст сообщения markup = types.InlineKeyboardMarkup() #создаем клавиатуру button = types.InlineKeyboardButton(text="Повторить", callback_data=comand) #создаем кнопку markup.add(button) #добавляем кнопку в клавиатуру try: #если команда невыполняемая - check_output выдаст exception bot.send_message(user_id, check_output(comand, shell = True, reply_markup = markup)) #вызываем команду и отправляем сообщение с результатом except: bot.send_message(user_id, "Invalid input") #если команда некорректна @bot.callback_query_handler(func=lambda call: True) def callback(call): comand = call.data #считываем команду из поля кнопки data try:#если команда не выполняемая - check_output выдаст exception markup = types.InlineKeyboardMarkup() #создаем клавиатуру button = types.InlineKeyboardButton(text="Повторить", callback_data=comand) #создаем кнопку и в data передаём команду markup.add(button) #добавляем кнопку в клавиатуру bot.send_message(user_id, check_output(comand, shell = True), reply_markup = markup) #вызываем команду и отправляем сообщение с результатом except: bot.send_message(user_id, "Invalid input") #если команда некорректна if __name__ == '__main__': while True: try:#добавляем try для бесперебойной работы bot.polling(none_stop=True)#запуск бота except: time.sleep(10)#в случае падения screen -S ServerBot -X quit screen -dmS ServerBot python3 bot.py Снова проверим, что всё работает корректно:
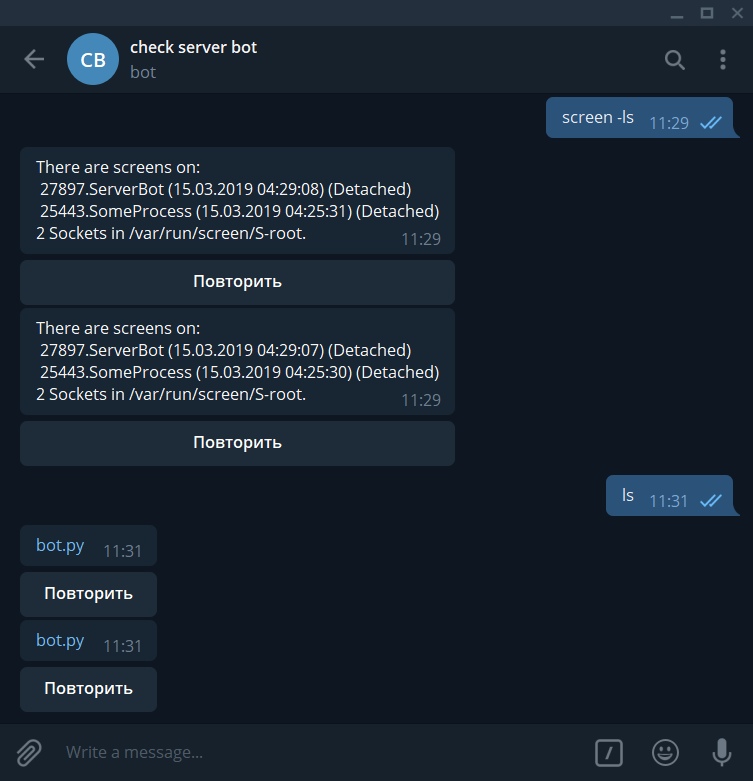
По нажатию кнопки под сообщением бот должен повторять команду, от которой было прислано данное сообщение.
Вместо заключения
Безусловно, такой метод не претендует стать заменой классическим способам подключения, однако, он позволяет достаточно быстро узнать о состоянии сервера и отправить ему команды, не требующие сложного вывода.