- How To Install ionCube with PHP in Ubuntu 20.04
- Pre-Requisites
- Step 1 – Download Ioncube Loader
- Step 2 – Find Correct PHP.ini
- Step 3 – Configure ionCube Loader in PHP
- Step 4 – Test Configuration
- Conclusion
- How to Install ionCube Loader in Ubuntu 18.04 & 16.04
- Step 1 – Download Ioncube Loaders
- Step 2 – Enable ionCube Loader in PHP
- Step 3 – Restart Apache & PHP-FPM Service
- Step 4 – Verify ionCube Loader
- How to Install IonCube Loader on Ubuntu
- Step 1: Download IonCube Loader
- You might also like
- How to Install Git on Linux
- DataStax Enhances Astra DB on Google Cloud with Vector Search Capability
- Step 2: Install IonCube Loader
- Installation for PHP with Apache
- Installation for PHP-FPM with Nginx
- Installation for PHP-CLI
- Conclusion
How To Install ionCube with PHP in Ubuntu 20.04
The ionCube loader is the library used to load ionCube encoded files on the server. It is required to installed on the webserver to decode any ionCube encoded files before running. The ionCube provides a feature to encrypt your PHP script to keep them secure. It also keeps them secure from unauthorized uses.
This tutorial will help you to configure the ionCube loader with PHP on Ubuntu 20.04 Linux system.
Pre-Requisites
We assume you already have PHP installed on your Ubuntu system. If not, you can follow these instructions to install required PHP version.
Step 1 – Download Ioncube Loader
First of all download the latest ioncube loaders php modules from ioncube from ioncube download page. Alternatively you can also use following command to download ioncube loaders. Also extract the downloaded archive under /usr/local directory.
Step 2 – Find Correct PHP.ini
It is important to find the correct php configuration file (php.ini) to enable ionCube for that only. The php -i command provides you the details information about the active php version on command line interface.
You can grep the php.ini location by running command:
php -i | grep php.ini Configuration File (php.ini) Path => /etc/php/7.4/cli Loaded Configuration File => /etc/php/7.4/cli/php.ini
But, might be Apache have been configured with the another version of the PHP. To find that you need to put a phpinfo(); file on server web server document root.
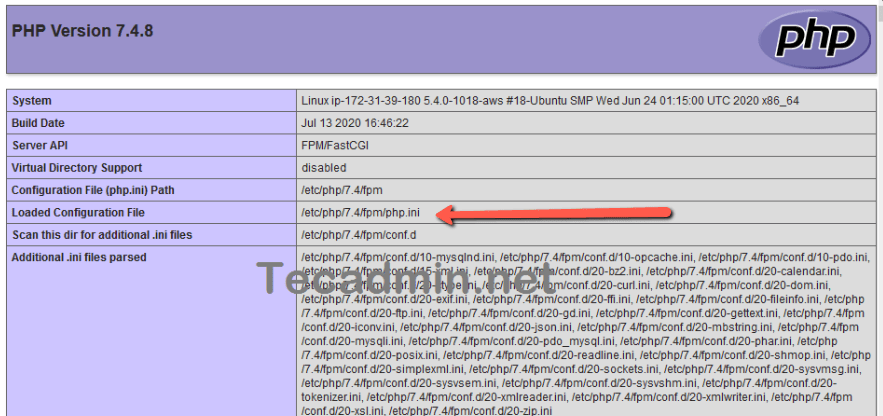
By default PHP stored configuration files at the following location. For example, the configuration files for the PHP 7.4 are stored at below location
- /etc/php/7.3/cli/php.ini #for PHP CLI
- /etc/php/7.3/fpm/php.ini #for PHP FPM
- /etc/php/7.3/apache/php.ini #for PHP with Apache
Step 3 – Configure ionCube Loader in PHP
Now, edit the required PHP configuration files or you may update in all the configuration files found above. Append the below code to the end of the files based on your PHP version.
zend_extension = /usr/local/ioncube/ioncube_loader_lin_7.4.so
Make sure to replace /usr/local/ioncube/ioncube_loader_lin_7.23.so file path with your matching PHP version file.
Step 4 – Test Configuration
All done. You have added ionCube settings to your php configuration. To verify the configuration, type:
PHP 7.4.8 (cli) (built: Jul 13 2020 16:46:22) ( NTS ) Copyright (c) The PHP Group Zend Engine v3.4.0, Copyright (c) Zend Technologies with the ionCube PHP Loader + ionCube24 v10.4.1, Copyright (c) 2002-2020, by ionCube Ltd. with Zend OPcache v7.4.8, Copyright (c), by Zend Technologies You will see that ionCube PHP loader has been configured with your PHP version. Similarly, to view configuration for Apache use phpinfo() file.
Conclusion
In this tutorial, you have learned to install and configure ionCube PHP Loader on Ubuntu 20.04 Linux system.
How to Install ionCube Loader in Ubuntu 18.04 & 16.04
Install PHP Ioncube Loaders in Ubuntu & Debian . Ioncube is used as the encryption and decryption utility for PHP applications by which we can keep safe our data. It also can restrict PHP application to execute unauthorized. It also assists in speeding up the pages that are served. IonCube loaders are used for decoding encoded files while running on the webserver. read more details on official site. This tutorial will help you to install PHP Ioncube Loaders module in Ubuntu 19.10, 18.04 and 16.04 systems.
Step 1 – Download Ioncube Loaders
First of all download the latest ioncube loaders php modules from ioncube from ioncube download page. Alternatively you can also use following command to download ioncube loaders.
wget http://downloads3.ioncube.com/loader_downloads/ioncube_loaders_lin_x86-64.tar.gz
Then, extract the downloaded archive under /usr/local directory.
tar xzf ioncube_loaders_lin_x86-64.tar.gz -C /usr/local
Step 2 – Enable ionCube Loader in PHP
Find out the PHP configuration files for the PHP version you need to install ionCube loader. The below command will show the PHP CLI configuration file location for the current active PHP version.
php -i | grep php.ini Configuration File (php.ini) Path => /etc/php/7.3/cli Loaded Configuration File =>/etc/php/7.3/cli/php.ini
As per the result of above command, PHP 7.3 is the active version for PHP CLI. Generally, the same version will be active for Apache too, but you can check it by phpinfo(); function in web browser.
For PHP 7.3, the default the configuration file locations are:
sudo vim /etc/php/7.3/cli/php.ini#for PHP CLI sudo vim /etc/php/7.3/fpm/php.ini#for PHP FPM sudo vim /etc/php/7.3/apache/php.ini#for PHP with Apache
Edit all the above configuration files and append the below code to the end of the files.
zend_extension = /usr/local/ioncube/ioncube_loader_lin_7.3.so
Replace /usr/local/ioncube/ioncube_loader_lin_7.23.so file with your matching PHP version file.
Step 3 – Restart Apache & PHP-FPM Service
After making changes in php.ini for Apache or PHP-FPM, you need to restart the following services.
sudo systemctl restart apache2#for PHP with Apache sudo systemctl restart php7.3-fpm#for PHP FPM
Step 4 – Verify ionCube Loader
Let’s verify the installation and configuration of Ioncube PHP module. Run php -m command on shell.
php -v PHP 7.3.14-6+ubuntu16.04.1+deb.sury.org+1 (cli) (built: Feb 5 2020 16:51:13) ( NTS ) Copyright (c) 1997-2018 The PHP Group Zend Engine v3.3.14, Copyright (c) 1998-2018 Zend Technologies with the ionCube PHP Loader + ionCube24 v10.3.9, Copyright (c) 2002-2019, by ionCube Ltd. with Zend OPcache v7.3.14-6+ubuntu16.04.1+deb.sury.org+1, Copyright (c) 1999-2018, by Zend Technologies
Alternatively, you can also put an phpinfo.php file on your web server document root with the following content and check the status by access info.php in a web browser.
How to Install IonCube Loader on Ubuntu

How to Install IonCube Loader on Ubuntu. IonCube Loader is a PHP extension used when you are using a PHP script that is encrypted using ionCube. IonCube needs to be installed in your webserver and made accessible to your PHP to use it.
In this guide you are going to learn how to install ionCube loader on Ubuntu or Debian and configure your PHP or PHP-FPM and PHP-CLI to use it.
Step 1: Download IonCube Loader
You can download the latest ionCube loader from the official website. Copy the link from the packages and download it to your server using wget.
sudo wget http://downloads3.ioncube.com/loader_downloads/ioncube_
loaders_lin_x86-64.tar.gz
This will download the latest version of ionCube loader.
You might also like
How to Install Git on Linux
DataStax Enhances Astra DB on Google Cloud with Vector Search Capability
Once downloaded extract it to /usr/local directory using the following command.
sudo tar xzf ioncube_loaders_lin_x86-64.tar.gz -C /usr/local
Delete the downloaded file.
sudo rm -rf ioncube_loaders_lin_x86-64.tar.gz
Step 2: Install IonCube Loader
Here you will see how to install this extension for PHP 7.4. If you see the extracted files you can see the loaders for each PHP version.
You will see something similar to this.
. . . ioncube_loader_lin_7.4.so ioncube_loader_lin_7.4_ts.so . .
This is the file that needs to be added to your php.ini .
Installation for PHP with Apache
For Apache the php.ini is located here /etc/php/7.4/apache2/php.ini .
Open your php.ini file using the following command.
sudo nano /etc/php/7.4/apache2/php.ini
Add the following line to the bottom of the file.
zend_extension = /usr/local/ioncube/ioncube_loader_lin_7.4.so
Hit CTRL+X followed by Y and Enter to save and exit the file.
Restart Apache for the changes to take effect.
sudo service apache2 restart
Installation for PHP-FPM with Nginx
For PHP-FPM the php.ini is located here /etc/php/7.4/fpm/php.ini .
Open your php.ini file using the following command.
sudo nano /etc/php/7.4/fpm/php.ini
Add the following line to the bottom of the file.
zend_extension = /usr/local/ioncube/ioncube_loader_lin_7.4.so
Hit CTRL+X followed by Y and Enter to save and exit the file.
Restart PHP-FPM for the changes to take effect.
sudo service php7.4-fpm restart
Installation for PHP-CLI
For PHP-FPM the php.ini is located here /etc/php/7.4/cli/php.ini .
Open your php.ini file using the following command.
sudo nano /etc/php/7.4/cli/php.ini
Add the following line to the bottom of the file.
zend_extension = /usr/local/ioncube/ioncube_loader_lin_7.4.so
Hit CTRL+X followed by Y and Enter to save and exit the file.
Now if you check the installed PHP version from your command line interface, you will see PHP is loaded with IonCube loader.
PHP 7.4.3 (cli) (built: Oct 6 2020 15:47:56) ( NTS ) Copyright (c) The PHP Group Zend Engine v3.4.0, Copyright (c) Zend Technologies with the ionCube PHP Loader + ionCube24 v10.4.5, Copyright (c) 2002-2020, by ionCube Ltd. with Zend OPcache v7.4.3, Copyright (c), by Zend Technologies
Conclusion
Now you have learned how to install IonCube Loader on Ubuntu/Debian and configure it for Apache or Nginx or CLI.
Thanks for your time. If you face any problem or any feedback, please leave a comment below.