Using Webpack with TypeScript
In this lesson, we will learn how to use Webpack to bundle and minify a TypeScript app.
You will need the following installed on your computer for this lesson:
- Node.js and npm. You can download these from https://nodejs.org/en/download/. If you already have these installed, make sure that Node.js is at least version 8.2, and that npm is at least version 5.
- Code editor such as Visual Studio Code. This can be installed from https://code.visualstudio.com/.
- The starter project which can be found here.
- After the starter project has been downloaded. Open it in a code editor and execute the following command in a Terminal window:
This will install the project dependencies.
Understanding the need for Webpack.
Webpack is a popular tool that we can use to bundle all our JavaScript code into a single minified file. It is capable of running plugins during the bundling process. This means we can use a Babel plugin to transpile code and an ESLint plugin to check for code quality. So, Webpack allows us to execute a single command to produce the build artifacts in a modern project.
Webpack also has a handy development server capable of serving an HTML, JavaScript, and CSS app.
Adding Webpack to the project.
The starter project is a continuation from the last lesson. The app we are building will add numbers from two inputs together.
A difference to the TypeScript code is that the add function has been extracted into a separate file. This will allow us to experience Webpack bundling code from multiple files.
- In a Terminal window, let’s install the core webpack library, its command-line interface, and its development server:
npm install --save-dev webpack webpack-cli webpack-dev-server @types/webpack-dev-server- We need a webpack plugin, babel-loader , to allow Babel to transpile the TypeScript code into JavaScript. Let’s install this:
npm install --save-dev babel-loader- The Webpack configuration file is JavaScript based as standard. However, we can use TypeScript if we install a package called ts-node . Let’s install this:
npm install --save-dev ts-nodeWebpack is configured using a file called webpack.config.ts .
import path from "path"; import Configuration > from "webpack"; const config: Configuration = entry: "./src/index.ts", module: rules: [ test: /\.(ts|js)?$/, exclude: /node_modules/, use: loader: "babel-loader", options: presets: ["@babel/preset-env", "@babel/preset-typescript"], >, >, >, ], >, resolve: extensions: [".ts", ".js"], >, output: path: path.resolve(__dirname, "dist"), filename: "bundle.js", >, devServer: static: path.join(__dirname, "dist"), compress: true, port: 4000, >, >; export default config;Here are the critical bits in this configuration file:
- The entry field tells Webpack where to start looking for modules to bundle. In our project, this is index.ts .
- The module field tells Webpack how different modules will be treated. Our project is telling Webpack to use the babel-loader plugin to process files with .js and .ts extensions.
- The resolve.extensions field tells Webpack what file types to look for in which order during module resolution.
- The output field tells Webpack where to bundle our code. In our project, this is the file called bundle.js in the dist folder.
- The devServer field configures the Webpack development server. We are telling it that the root of the web server is the dist folder, and to serve files on port 4000.
Creating scripts to run Webpack
We will leverage npm scripts to start our app in development mode and build a production version of our app.
"scripts": . "start": "webpack-dev-server --mode development", "build": "webpack --mode production" >,After a few seconds, the Webpack development server will start.
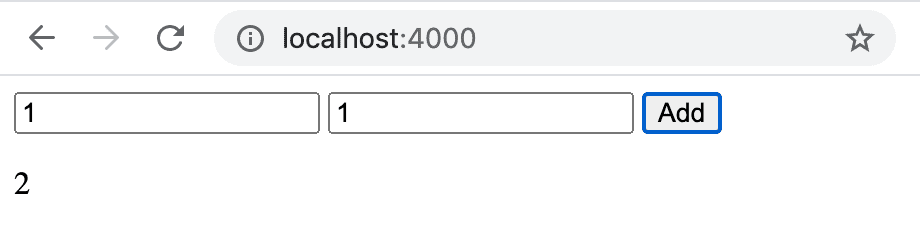
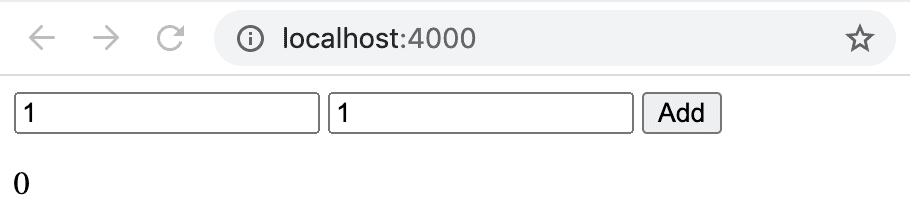
export function add(a: number, b: number): number return a - b; >The app will automatically refresh. If the Add button is clicked, our modified code will be executed, and a subtraction will occur:
Notice that bundle.js hasn’t been generated in the dist folder. This is because the Webpack development server bundles the code on the fly and serves it from memory rather than the file system.
A bundle.js file has been generated and placed in the dist folder. This contains minified code from index.ts and utils.ts .
Adding type checking into the Webpack process
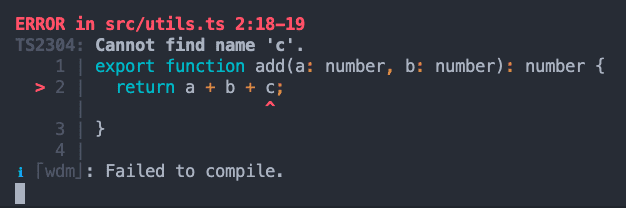
export function add(a: number, b: number): number return a + b + c; >Webpack successfully processes the update. Unfortunately, Webpack doesn’t report a type error. This is because we haven’t told Webpack to do any type checking yet.
We can use a package called fork-ts-checker-webpack-plugin to enable the Webpack process to type check the code. This means that Webpack will inform us of any type errors.
npm install --save-dev fork-ts-checker-webpack-plugin @types/fork-ts-checker-webpack-plugin. import ForkTsCheckerWebpackPlugin from 'fork-ts-checker-webpack-plugin'; const config: webpack.Configuration = . , plugins: [ new ForkTsCheckerWebpackPlugin( async: false, eslint: files: "./src/**/*", >, >), ], >;Here’s an explanation of these ForkTsCheckerWebpackPlugin settings:
- async : We have set this to false so that Webpack waits for the type checking process to finish before it emits any code.
- eslint : We have set this to point to the source files so that Webpack informs us of any linting errors.
- Rerun the Webpack development server:
This time Webpack reports the type error:
export function add(a: number, b: number): number return a + b; >Webpack automatically reruns and completes successfully.
Webpack allows TypeScript, Babel, and ESLint to work together, allowing us to develop a modern project. The ForkTsCheckerWebpackPlugin Webpack plugin allows code to be type-checked during the bundling process.
Next up is a quiz to test our knowledge of this module.
TypeScript
This guide stems from the Getting Started guide.
TypeScript is a typed superset of JavaScript that compiles to plain JavaScript. In this guide we will learn how to integrate TypeScript with webpack.
Basic Setup
First install the TypeScript compiler and loader by running:
npm install --save-dev typescript ts-loaderNow we’ll modify the directory structure & the configuration files:
webpack-demo |- package.json |- package-lock.json + |- tsconfig.json |- webpack.config.js |- /dist |- bundle.js |- index.html |- /src |- index.js + |- index.ts |- /node_modulestsconfig.json
Let’s set up a configuration to support JSX and compile TypeScript down to ES5.
"compilerOptions": "outDir": "./dist/", "noImplicitAny": true, "module": "es6", "target": "es5", "jsx": "react", "allowJs": true, "moduleResolution": "node" > >See TypeScript’s documentation to learn more about tsconfig.json configuration options.
To learn more about webpack configuration, see the configuration concepts.
Now let’s configure webpack to handle TypeScript:
webpack.config.js
const path = require('path'); module.exports = entry: './src/index.ts', module: rules: [ test: /\.tsx?$/, use: 'ts-loader', exclude: /node_modules/, >, ], >, resolve: extensions: ['.tsx', '.ts', '.js'], >, output: filename: 'bundle.js', path: path.resolve(__dirname, 'dist'), >, >;This will direct webpack to enter through ./index.ts , load all .ts and .tsx files through the ts-loader , and output a bundle.js file in our current directory.
Now lets change the import of lodash in our ./index.ts due to the fact that there is no default export present in lodash definitions.
- import _ from 'lodash'; + import * as _ from 'lodash'; function component() const element = document.createElement('div'); element.innerHTML = _.join(['Hello', 'webpack'], ' '); return element; > document.body.appendChild(component());tip
To make imports do this by default and keep import _ from ‘lodash’; syntax in TypeScript, set «allowSyntheticDefaultImports» : true and «esModuleInterop» : true in your tsconfig.json file. This is related to TypeScript configuration and mentioned in our guide only for your information.
Loader
We use ts-loader in this guide as it makes enabling additional webpack features, such as importing other web assets, a bit easier.
warning
ts-loader uses tsc , the TypeScript compiler, and relies on your tsconfig.json configuration. Make sure to avoid setting module to «CommonJS», or webpack won’t be able to tree-shake your code.
Note that if you’re already using babel-loader to transpile your code, you can use @babel/preset-typescript and let Babel handle both your JavaScript and TypeScript files instead of using an additional loader. Keep in mind that, contrary to ts-loader , the underlying @babel/plugin-transform-typescript plugin does not perform any type checking.
Source Maps
To learn more about source maps, see the development guide.
To enable source maps, we must configure TypeScript to output inline source maps to our compiled JavaScript files. The following line must be added to our TypeScript configuration:
tsconfig.json
"compilerOptions": "outDir": "./dist/", + "sourceMap": true, "noImplicitAny": true, "module": "commonjs", "target": "es5", "jsx": "react", "allowJs": true, "moduleResolution": "node", > >Now we need to tell webpack to extract these source maps and include in our final bundle:
webpack.config.js
const path = require('path'); module.exports = entry: './src/index.ts', + devtool: 'inline-source-map', module: rules: [ test: /\.tsx?$/, use: 'ts-loader', exclude: /node_modules/, >, ], >, resolve: extensions: [ '.tsx', '.ts', '.js' ], >, output: filename: 'bundle.js', path: path.resolve(__dirname, 'dist'), >, >;See the devtool documentation for more information.
Client types
It’s possible to use webpack specific features in your TypeScript code, such as import.meta.webpack . And webpack provides types for them as well, just add a TypeScript reference directive to declare it:
/// console.log(import.meta.webpack); // without reference declared above, TypeScript will throw an errorUsing Third Party Libraries
When installing third party libraries from npm, it is important to remember to install the typing definition for that library. These definitions can be found at TypeSearch.
For example if we want to install lodash we can run the following command to get the typings for it:
npm install --save-dev @types/lodashImporting Other Assets
To use non-code assets with TypeScript, we need to defer the type for these imports. This requires a custom.d.ts file which signifies custom definitions for TypeScript in our project. Let’s set up a declaration for .svg files:
declare module '*.svg' const content: any; export default content; >Here we declare a new module for SVGs by specifying any import that ends in .svg and defining the module’s content as any . We could be more explicit about it being a url by defining the type as string. The same concept applies to other assets including CSS, SCSS, JSON and more.
Build Performance
warning
This may degrade build performance.
See the Build Performance guide on build tooling.