The Ultimate Guide to Java Update Check
In this quick tutorial, we’ll take a close look at how to check for Java updates.
We’ll get started with some insight into how to check the Java version. Then, we’ll explain in detail how to perform a Java update check. Lastly, we’ll shed light on how to disable Java automatic updates.
Java Update on Windows 10
In general, when we install Java on Windows 10, another small program that checks and tracks Java updates get installed too.
As a matter of fact, there are many simple methods that we can use to check whether there is a new Java update.
However, before checking for Java updates, we may need to know which version is installed on our machine. So, let’s see together how to do that!
How to check Java version
The most simple way to check the current installed Java version is to use the command prompt.
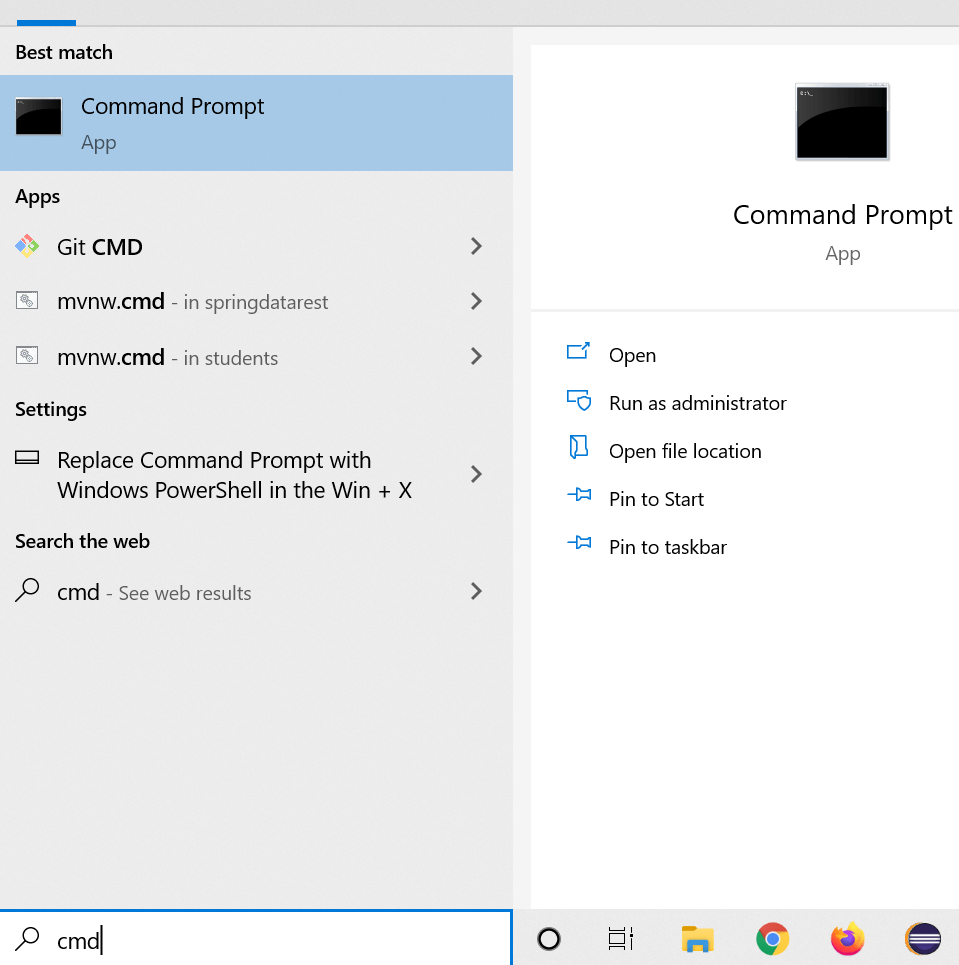
First, we need to open the command prompt. To do that, we need to type cmd in the search bar:
Then, we have to type: java -version in the command prompt:
Microsoft Windows [Version 10.0.19041.572] (c) 2020 Microsoft Corporation. All rights reserved. C:\Users\Asus>java -version java version "1.8.0_261" Java(TM) SE Runtime Environment (build 1.8.0_261-b12) Java HotSpot(TM) 64-Bit Server VM (build 25.261-b12, mixed mode) C:\Users\Asus> As we can see, the command line java -version displays the current Java version that is installed on our computers.
Now, let’s dig deeper to see how to perform a Java update check.
How Do I Check for a Java Update?
The process of checking Java update on windows 10 is pretty simple. All we need to do is follow the following steps:
First, we need to click on Show hidden icons — a special icon that we can find in the bottom right corner of the window.
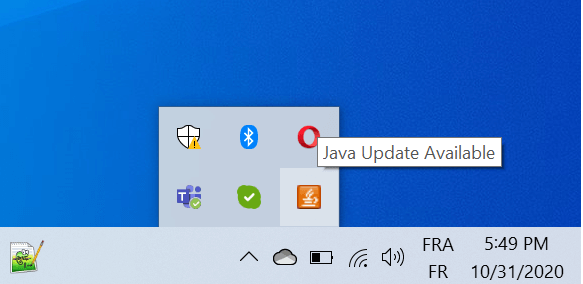
Then, we need to click on Java Update Available – This will open the following window:

Furthermore, as shown above, the windows will tell us everything we need to know. We can click on the update button to continue and get more information about the available Java update.
Now, let’s see how we can use another method to accomplish the same thing.
Firstly, we can type Check For Updates on the search bar. Then a new window named Java Control Panel will open for us.
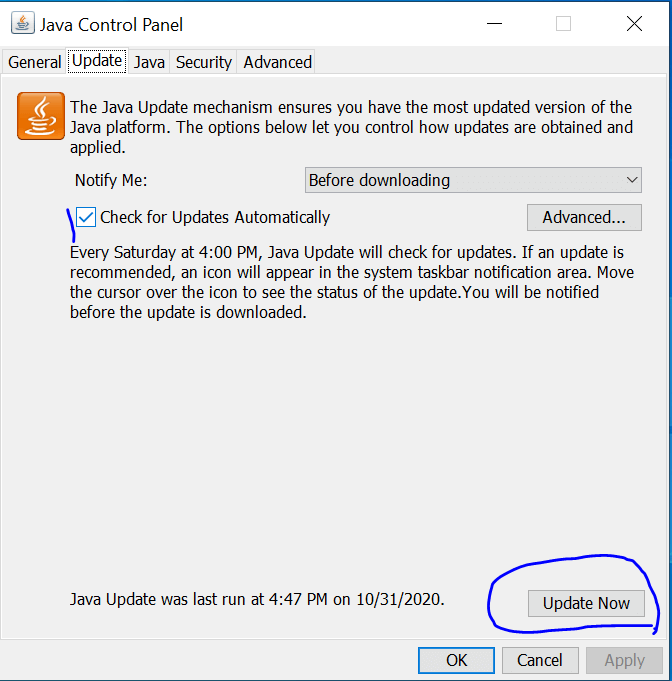
Then, we can go to the update tab to check if there is a new Java update. Easy, peasy right?
We can click on the update button if we want to start the process of updating Java. Once done, our Java will be upgraded to a new version.
Next, we’re going to explain a third method that we can use to check Java updates.
First thing we need to do is open the https://www.java.com/en/ URL in our favorite browser.
Then, we click on the big Java Download button. This will redirect us to a new page where we can find all the information about the last Java version and its release date.
We can also visit the following URL: https://www.java.com/en/download/uninstalltool.jsp to check for Java versions and updates on our computer.
Why is it Important to Check Java Updates?
In general, software updates are important because they provide fixes and improvements, and even patches to security vulnerabilities.
Since Java can be a critical component for many applications that we may install on our computers, then we need to make sure to update it continuously.
Fortunately to us, Java Update is a handy feature that tracks new Java releases. It periodically checks for new versions to keep your Windows computer up-to-date.
Bear in mind that we need to update Java to the newer version to prevent unwanted security issues and enhance performance.
You can refer to this URL https://java.com/en/download/help/java_update.html to explore more about how Java auto-update works.
How to Turn off Java Automatic Update?
Sometimes we may need to disable Java updates — I know what you’re going to say: WHY? This can generate security issues 🙂 — Yes and you’re right!
Keep in mind that it’s highly recommended that you do not turn off automatic updates. However, if you want that do it at your own risk.
Java provides a convenient and simple way to disable automatic periodic Java update checks.
First, we need to open the Java Control Panel window, then navigate to the Update tab, and make sure that Automatically check for updates checkbox is unchecked:
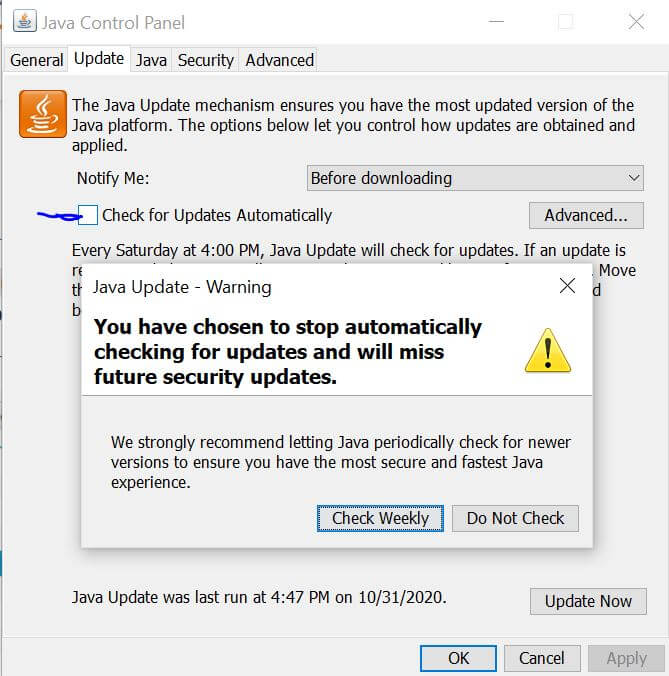
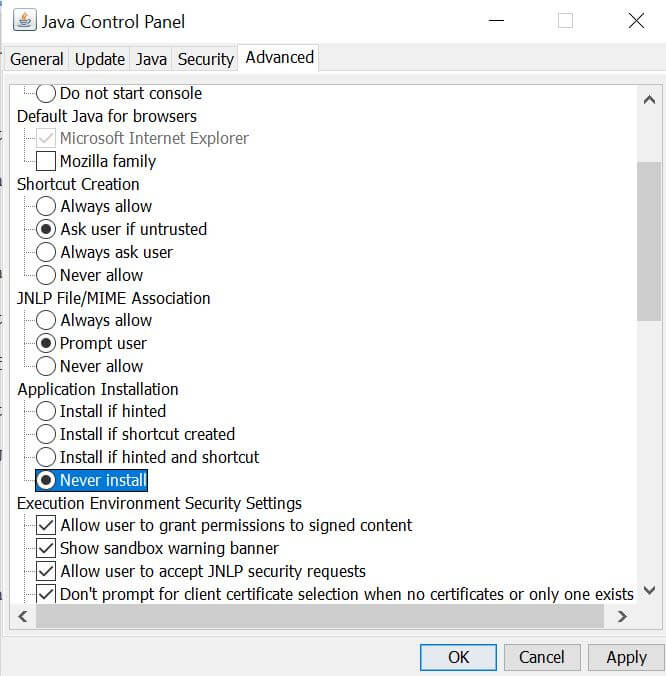
Next, we navigate to the Advanced tab and search for the Application Installation. We need to make sure that the Never install value is selected.
Conclusion
To sum it up, we have explained how to perform a Java update check step by step. Along the way, we have showcased how to check the Java version on Windows 10.
We hope you enjoyed reading this article and learned something new from it.
Liked the Article? Share it on Social media!
Turn off java update
I have some machines that are on Windows 7 that have java version 1.5.0.11 installed. With this the java updates are turned on. Now, I need to turn them off. Is there a vbscript or something that will reinstall java without it being removed first and turn the updates off? Sorry if this post is in the wrong spot.
Answers
you can create a scipt and update below reg entries to stop auto update.
[HKEY_LOCAL_MACHINE\SOFTWARE\JavaSoft\Java Update\Policy] «EnableJavaUpdate»=dword:00000000
«EnableAutoUpdateCheck»=dword:00000000 [HKEY_LOCAL_MACHINE\SOFTWARE\JavaSoft\Java Runtime Environment\1.6.0_24\MSI]
«JAVAUPDATE»=»0»
«AUTOUPDATECHECK»=»0»
- Proposed as answer by Kanojia Wednesday, June 20, 2012 7:15 PM
- Marked as answer by Garth Jones MVP Sunday, January 10, 2016 10:46 PM
All replies
I don’t think, this query is not related to configmgr or SCCM. please post this on correct forum? Try Win7 forum http://social.technet.microsoft.com/Forums/en/category/w7itpro Anoop C Nair — Twitter @anoopmannur MY BLOG: http://anoopmannur.wordpress.com SCCM Professionals This posting is provided AS-IS with no warranties/guarantees and confers no rights.
I place these two files in %programfiles%/Java/jre6/lib/ deployment.config and deployment.properties deployment.config contains this line:deployment.system.config=file\:C\:/Programfiles/Java/jre6/lib/deployment.properties deployment.properties contains these two lines: deployment.javaws.autodownload=NEVER
deployment.javaws.autodownload.locked Kent Agerlund | My blogs: http://blog.coretech.dk/author/kea/ and http://scug.dk/ | Twitter @Agerlund | Linkedin: /kentagerlund
@Anoop, I think it is highly relevant to this forum to explain how you use ConfigMgr. to help you solve a daily problem. @SCCM Newbe, you can create a package that deploys the two files. I can be a vb script or CMD/bat file. Create a folder and the two files to the folder. Create a cmd file like this, and call it disablejava.cmd COPY /Y «%~dps0*.*» «C:\Program Files\Java\jre6\lib\» Create a new package in ConfigMgr. with a program that has this command line disablejava.cmd. Kent Agerlund | My blogs: http://blog.coretech.dk/author/kea/ and http://scug.dk/ | Twitter @Agerlund | Linkedin: /kentagerlund
That is great, thank you. however the real question is since the software is installed already with updates on and then your method to turn them off. how can I have one package or one command line that does a reinstall (so like an overlay of what is there already) but to turn the updates off stil?
Yes I Agree with you Kent. But the initial post didn’t had that info. Anoop C Nair — Twitter @anoopmannur MY BLOG: http://anoopmannur.wordpress.com SCCM Professionals This posting is provided AS-IS with no warranties/guarantees and confers no rights.
You can create a custom MSI package if you know your way around MSI files (for instance with a custom action in the end of the MSI) or you can have a wrapper script (bat, vb etc) that first runs the MSI/EXE and then copies the files. Please do note that you do not have to reinstall the Java client just to disable the auto update feature you simply need to copy over these two files. Tim Nilimaa | IT Expert at Knowledge Factory | Please remember to mark this answer as helpful if it helped you.
Hi Newbe, Here is a simple vbs script which is running your install command string and if it’s finished it will copy your files to the neccessary location: Set WshShell = CreateObject(«WScript.Shell»)
Set objFSO = CreateObject(«Scripting.FileSystemObject») Const OverwriteExisting = True
InstString = «Put here your installation command line» WshShell.Run InstString, , TRUE
objFSO.CopyFile «Source location» , «Destination location», OverwriteExisting
objFSO.CopyFile «Test.txt» , «C:\Temp\», OverwriteExisting wscript.quit(0) The installation files and the files you want to copy must be in the same folder and your install package must be this vbs script. I hope i can help to you. Brgds. Tamas
you can create a scipt and update below reg entries to stop auto update.
[HKEY_LOCAL_MACHINE\SOFTWARE\JavaSoft\Java Update\Policy] «EnableJavaUpdate»=dword:00000000
«EnableAutoUpdateCheck»=dword:00000000 [HKEY_LOCAL_MACHINE\SOFTWARE\JavaSoft\Java Runtime Environment\1.6.0_24\MSI]
«JAVAUPDATE»=»0»
«AUTOUPDATECHECK»=»0»
- Proposed as answer by Kanojia Wednesday, June 20, 2012 7:15 PM
- Marked as answer by Garth Jones MVP Sunday, January 10, 2016 10:46 PM
'Build Updates.vbs v1.0 Farzan Dim wshShell, fso Set wshShell = CreateObject("WScript.Shell") Set fso = CreateObject("Scripting.FileSystemObject") on error resume next Allusersprofile = WshShell.ExpandEnvironmentStrings("%AllUsersProfile%") Const OverwriteExisting = True PublicProfile = WshShell.ExpandEnvironmentStrings("%Public%") Defaultusersprofile = WshShell.ExpandEnvironmentStrings("%DEFAULTUSERPROFILE%") ProgramData = WshShell.ExpandEnvironmentStrings("%ProgramData%") strCurrentPath = Left(WScript.ScriptFullName,InstrRev(WScript.ScriptFullName,"\") - 1) '========================================================================================================== 'Turn off Updates '================================================= '1. turn off Java updates WshShell.RegWrite "HKEY_LOCAL_MACHINE\SOFTWARE\JavaSoft\Java Update\Policy\EnableAutoUpdateCheck","0","REG_DWORD" WshShell.RegWrite "HKEY_LOCAL_MACHINE\SOFTWARE\JavaSoft\Java Update\Policy\EnableJavaUpdate","0","REG_DWORD"