- How to install APC (Alternative PHP Cache) in Linux
- To Install APC (Alternative PHP Cache) in Linux
- Installation of Dependency Packages for APC
- Installating APC Using PECL
- Restart Apache Service for APC
- Verifing APC
- Enabling PHP administration
- To view cache entries, click System Cache Entries tab.3
- To Upgrade using PECL
- To Uninstall
- Установка Alternative PHP Cache (APC) на сервер Ubuntu 12.04
- Установка APC
- Настройка APC
- Заключение
- Alternative PHP cache (APC)
- Information and advice on using APC within Moodle
- Installation of APC
- Installation within Moodle
- Making use of APC within Moodle
How to install APC (Alternative PHP Cache) in Linux
To Install APC (Alternative PHP Cache) in Linux
APC -Alternate PHP Cache is an open source cache for PHP code . It provides robust framework for caching and optimizing PHP code . The procedures to install and enable APC caching for PHP in Linux is explained.
Installation of Dependency Packages for APC
Firstly install required packages namely pecl , phpize and apxs commands, in order to install APC using YUM package manager tool.
[[email protected] ~]# yum install php-pear php-devel httpd-devel pcre-devel gcc make -y Loaded plugins: aliases, changelog, fastestmirror, kabi, presto, refresh-packagekit, security, tmprepo, verify, versionlock Loading support for CentOS kernel ABI Setting up Install Process Loading mirror speeds from cached hostfile * base: centos.excellmedia.net * extras: centos.excellmedia.net * updates: centos.excellmedia.net Package pcre-devel-7.8-7.el6.x86_64 already installed and latest version Resolving Dependencies --> Running transaction check ---> Package gcc.x86_64 0:4.4.7-16.el6 will be updated --> Processing Dependency: gcc = 4.4.7-16.el6 for package: gcc-java-4.4.7-16.el6.x86_64 --> Processing Dependency: gcc = 4.4.7-16.el6 for package: gcc-gfortran-4.4.7-16.el6.x86_64 --> Processing Dependency: gcc = 4.4.7-16.el6 for package: gcc-c++-4.4.7-16.el6.x86_64 --> Processing Dependency: gcc = 4.4.7-16.el6 for package: gcc-objc-4.4.7-16.el6.x86_64 --> Processing Dependency: gcc = 4.4.7-16.el6 for package: gcc-gnat-4.4.7-16.el6.x86_64 . . . Installed: php-devel.x86_64 0:5.3.3-47.el6 Updated: gcc.x86_64 0:4.4.7-17.el6 httpd-devel.x86_64 0:2.2.15-53.el6.centos make.x86_64 1:3.81-23.el6 php-pear.noarch 1:1.9.4-5.el6 Dependency Updated: cpp.x86_64 0:4.4.7-17.el6 gcc-c++.x86_64 0:4.4.7-17.el6 gcc-gfortran.x86_64 0:4.4.7-17.el6 gcc-gnat.x86_64 0:4.4.7-17.el6 gcc-java.x86_64 0:4.4.7-17.el6 gcc-objc.x86_64 0:4.4.7-17.el6 gcc-objc++.x86_64 0:4.4.7-17.el6 httpd.x86_64 0:2.2.15-53.el6.centos httpd-manual.noarch 0:2.2.15-53.el6.centos httpd-tools.x86_64 0:2.2.15-53.el6.centos libgcc.i686 0:4.4.7-17.el6 libgcc.x86_64 0:4.4.7-17.el6 libgcj.x86_64 0:4.4.7-17.el6 libgcj-devel.x86_64 0:4.4.7-17.el6 libgfortran.x86_64 0:4.4.7-17.el6 libgnat.x86_64 0:4.4.7-17.el6 libgnat-devel.x86_64 0:4.4.7-17.el6 libgomp.x86_64 0:4.4.7-17.el6 libobjc.x86_64 0:4.4.7-17.el6 libstdc++.x86_64 0:4.4.7-17.el6 libstdc++-devel.x86_64 0:4.4.7-17.el6 mod_ssl.x86_64 1:2.2.15-53.el6.centos php.x86_64 0:5.3.3-47.el6 php-cli.x86_64 0:5.3.3-47.el6 php-common.x86_64 0:5.3.3-47.el6 php-gd.x86_64 0:5.3.3-47.el6 php-ldap.x86_64 0:5.3.3-47.el6 php-mysql.x86_64 0:5.3.3-47.el6 php-odbc.x86_64 0:5.3.3-47.el6 php-pdo.x86_64 0:5.3.3-47.el6 php-pgsql.x86_64 0:5.3.3-47.el6 php-soap.x86_64 0:5.3.3-47.el6 php-xml.x86_64 0:5.3.3-47.el6 php-xmlrpc.x86_64 0:5.3.3-47.el6 Complete! Installating APC Using PECL
Use PECL command to install it and ensure to select default settings when asked.
[[email protected] ~]# pecl install apc downloading APC-3.1.13.tgz . Starting to download APC-3.1.13.tgz (171,591 bytes) . done: 171,591 bytes 55 source files, building running: phpize Configuring for: PHP Api Version: 20090626 Zend Module Api No: 20090626 Zend Extension Api No: 220090626 Enable internal debugging in APC [no] : Enable per request file info about files used from the APC cache [no] : Enable spin locks (EXPERIMENTAL) [no] : Enable memory protection (EXPERIMENTAL) [no] : Enable pthread mutexes (default) [no] : Enable pthread read/write locks (EXPERIMENTAL) [yes] : building in /var/tmp/pear-build-rootF4pGGV/APC-3.1.13 . . . Build process completed successfully Installing ' /usr/include/php/ext/apc/apc_serializer.h' Installing ' /usr/lib64/php/modules/apc.so' install ok: channel://pecl.php.net/APC-3.1.13 configuration option " php_ini" is not set to php.ini location You should add " extension=apc.so" to php.ini The following command enables APC extension in Apache configuration.
[[email protected] ~]# echo " extension=apc.so" > /etc/php.d/apc.ini Restart Apache Service for APC
Restart the Apache service to bring new changes.
[[email protected] ~]# service httpd restart Stopping httpd: [ OK ] Starting httpd: [ OK ] Verifing APC
Now you have to create a file info.php in Apache web root directory. For instance, /var/www/html/info.php
Next add the following code to it, then save and close.
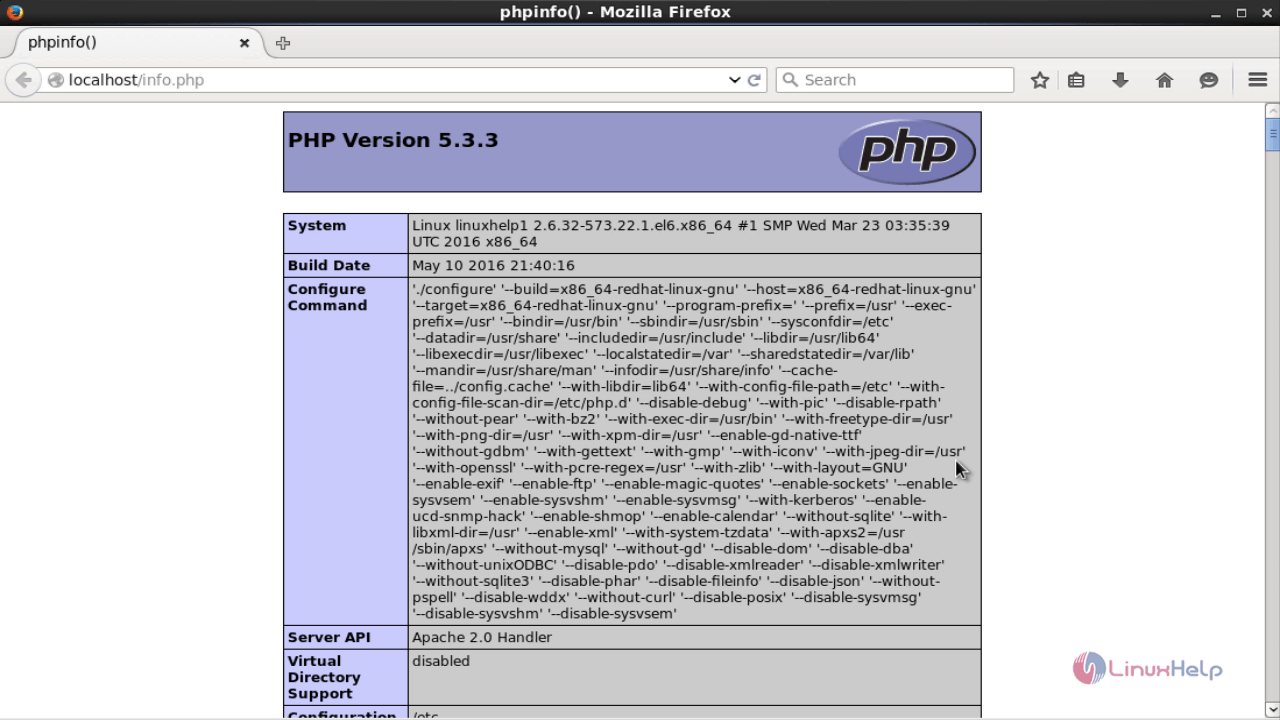
Navigate to http://localhost/info.php
Enabling PHP administration
In order to enable APC administration panel, copy the following file.
[[email protected] ~]# cp /usr/share/pear/apc.php /var/www/html/ Open the file apc.php with VI editor.
Set your username and password in the file apc.php .
defaults(' ADMIN_USERNAME' ,' admin' ) // Admin Username defaults(' ADMIN_PASSWORD' ,' linuxc' ) // Admin Password - CHANGE THIS TO ENABLE. 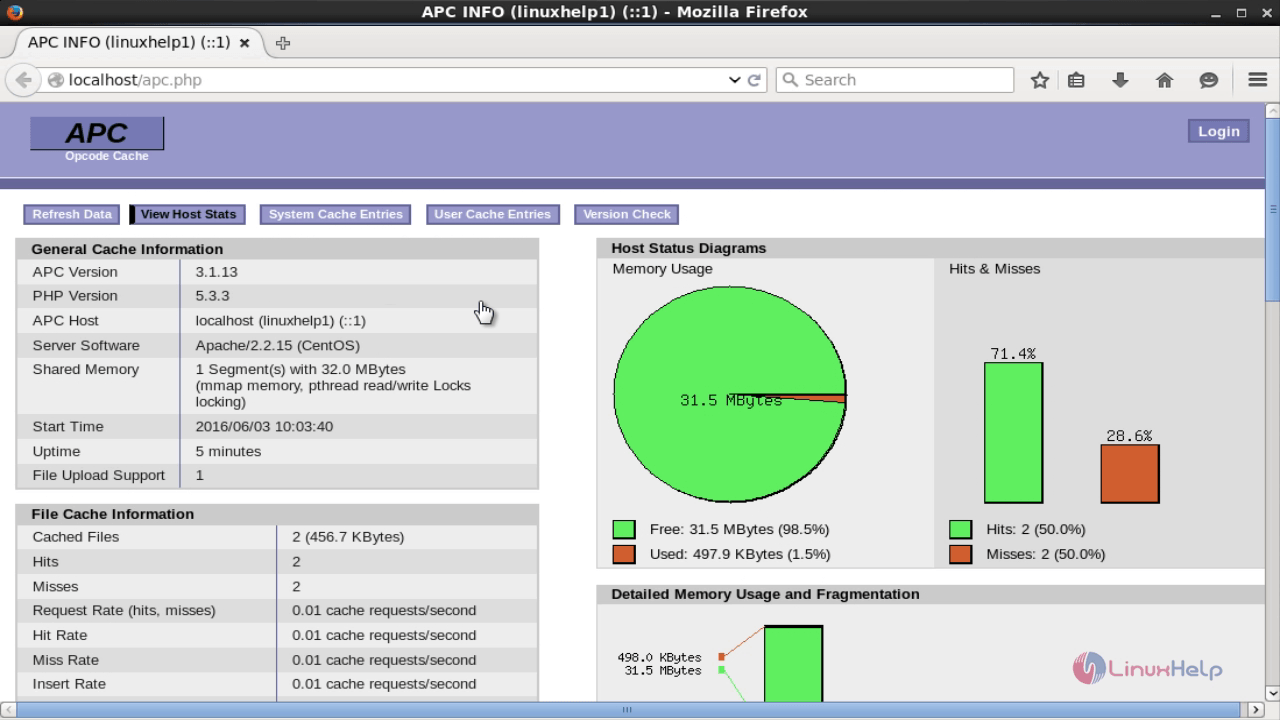
To View Host information status, click View Host Stats tab.
To view cache entries, click System Cache Entries tab.3
Click User Cache Entries. 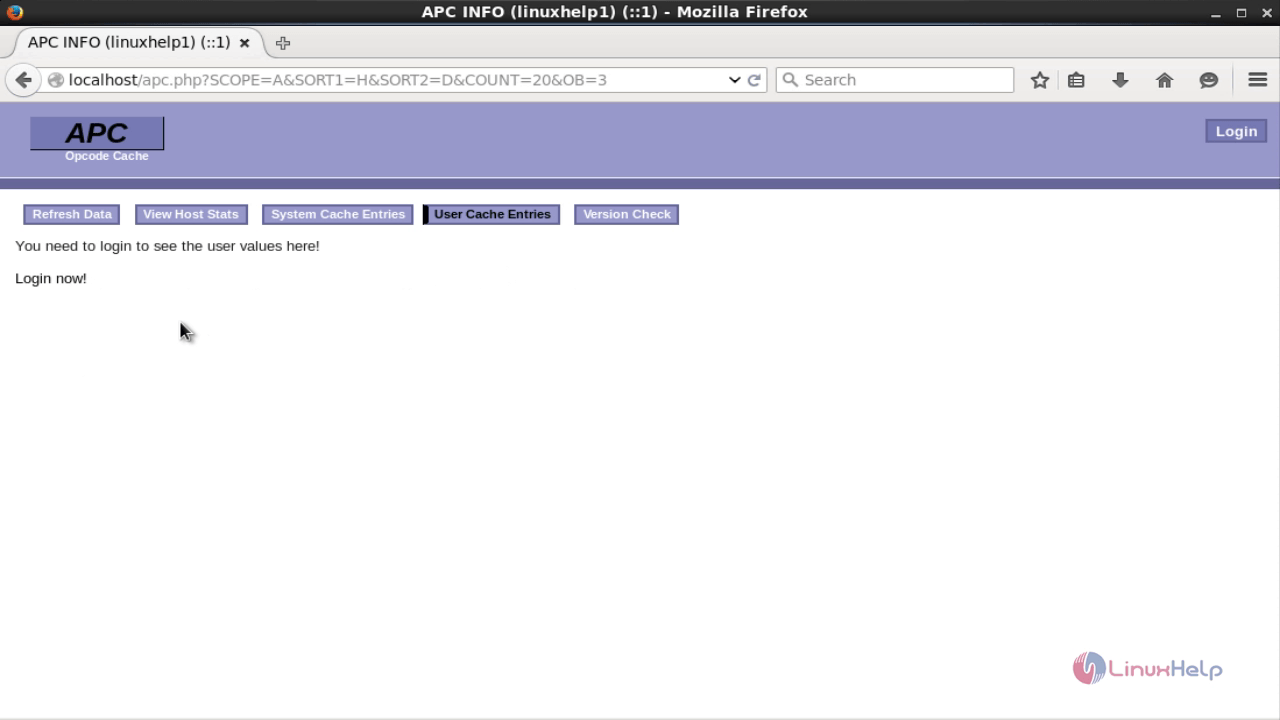
APC Login Screen prompts. Type the user credentials to authenticate. 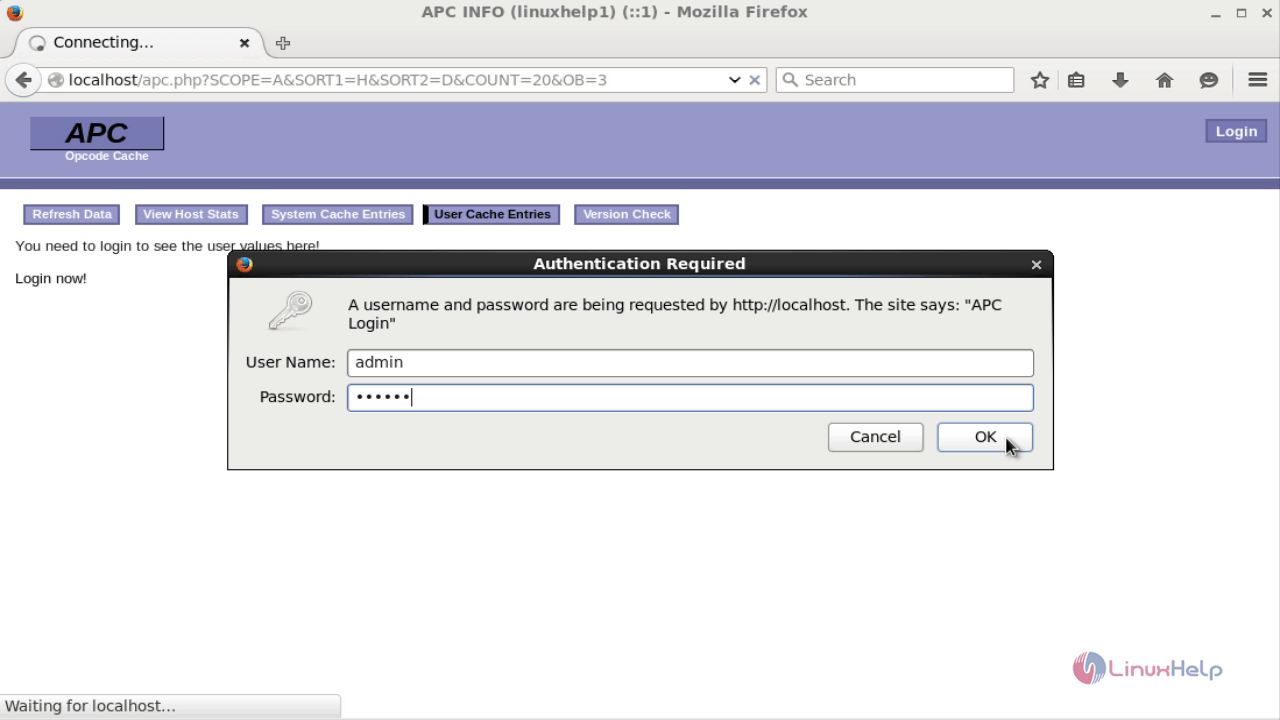
Now enter the cache entries. 
Click APC Version Check, to know your APC version. 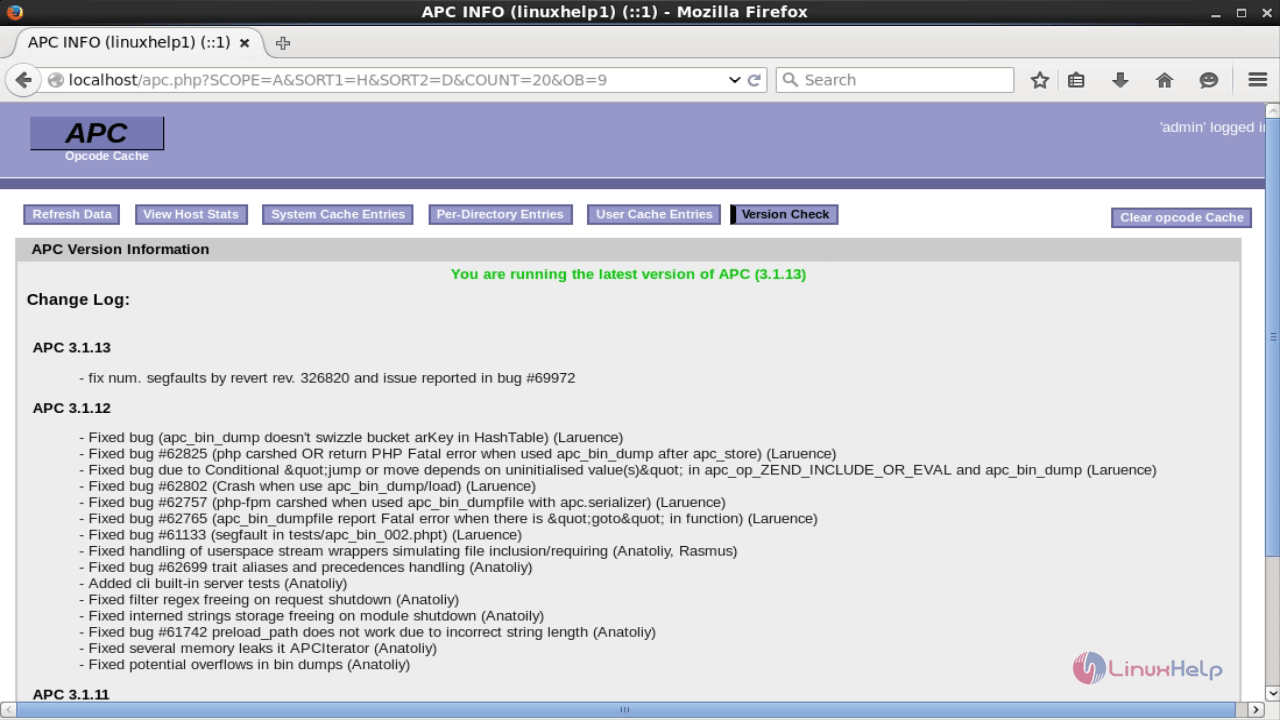
To Upgrade using PECL
Execute following command to upgrade it. It will download and then upgrade APC .
To Uninstall
Type the following command to uninstall APC completely from your machine.
Установка Alternative PHP Cache (APC) на сервер Ubuntu 12.04
APC – это система кэширования кодов PHP, которая позволяет ускорить сайт. PHP – это динамический серверный язык сценариев, который нужно анализировать, компилировать и запускать на сервере при каждом запросе страницы. Однако во многих случаях запросы повторяются, а потому облачному серверу приходится повторно обрабатывать каждый из них.
В этом случае на помощь приходит APC, или Alternative PHP Cache. Этот инструмент сохраняет код PHP в операционной памяти и при необходимости извлекает его. В сущности, он обходит обработку и компиляцию кода, что позволяет свести к минимуму нагрузку на сервер.
Данное руководство продемонстрирует установку и настройку APC.
Примечание: Для выполнения руководства нужен предварительно настроенный сервер Ubuntu 12.04 с привилегиями root, а также стек LAMP.
Установка APC
Прежде чем устанавливать кэшер APC, нужно установить некоторые его зависимости. Для этого используйте следующую команду:
sudo apt-get install php-pear php5-dev make libpcre3-dev
Затем можно установить APC при помощи команды pecl:
При этом появится ряд вопросов; рекомендуется просто нажать Enter, чтобы установить стандартные настройки.
В завершение установки нужно отредактировать файл php.ini:
sudo nano /etc/php5/apache2/php.ini
добавив в конец следующую строку:
Сохраните и закройте файл, а затем перезапустите Apache:
sudo service apache2 restart
Чтобы узнать, включён ли APC, откройте info-страницу PHP. Если таковой нет, создайте пустой php-файл в папке /var/www:
И внесите в него такой код:
Сохраните и закройте файл, а затем откройте браузер. На экране появится вся информация о текущей установке PHP. Если APC включён, страница сообщит об этом. В целом, оставлять этот файл не рекомендуется, так как он может предоставить доступ к конфиденциальным данным посторонним пользователям. Удалите его после выполнения проверки.
Настройка APC
После установки кэшер APC запускается с настройками по умолчанию. В его конфигурациях есть две очень важные настройки. Итак, откройте файл php.ini:
sudo nano /etc/php5/apache2/php.ini
Под ранее добавленной строкой, которая включает APC, внесите следующую строку:
Это выделит 64MB оперативной памяти для кэширования APC. В зависимости от требований или ограничений виртуального выделенного сервера это значение может изменяться.
Ниже нужно добавить ещё одну строку:
Настройка apc.stat проверяет скрипт при каждом запросе, чтобы проверить его на изменения. Если он был изменён, она повторно скомпилирует его и кэширует новую версию. Это стандартное поведение APC. Значение 0 в этой строке скажет APC не проверять скрипт на наличие изменений. Это улучшает производительность, но есть и обратная сторона: если в скрипте PHP появились изменения, они не будут внесены до перезапуска облачного сервера. Поэтому устанавливать значение 0 рекомендуется только на сайтах, которые находятся на стадии производства.
Теперь, когда кэшер APC установлен и запущен, можно проверить его состояние и производительность. Найдите файл apc.php в папке /usr/share/php/ и переместите его в папку, доступную для браузера – к примеру, в www:
cp /usr/share/php/apc.php /var/www
Откройте этот файл в браузере:
На экране появится статистика APC. Обратите внимание: APC располагает достаточным объёмом памяти для хранения своих данных.
Кроме того, хорошим показателем работы APC является то, что Hits rate значительно выше, чем Misses rate; в противном случае нужно выполнить дополнительную настройку кэшера.
Заключение
Акселератор APC очень прост в установке и использовании. Чтобы повысить производительность сайта, установите Memcache или Varnish.
Alternative PHP cache (APC)
The alternative PHP cache (APC) is an opcode cache for PHP that provides a persistent application data store cache to PHP applications. This plugin allows the use of that APC data store as a Moodle cache store. In turn allowing you to use APC within Moodle.
Information and advice on using APC within Moodle
APC provides a shared application cache that is usually very limited in size but provides excellent performance. It doesn’t provide the ability to configure multiple instances of itself and as such within Moodle you are only able to create a single APC cache store instance. Because of its incredible performance but very limited size it is strongly suggested that you map only small, crucial caches to the APC store.
Another important thing to understand about the APC store is that it provides no garbage cleaning, or storage reclamation facilities. As such cache data will persist there until APC is restarted or the store is purged. On top of that once the store is full requests to store information within the cache fail until there is once more sufficient space. Because of this it is recommended that you regularly purge or restart APC. Also recommended is to map a secondary application cache instance to any definition with the APC mapped. This ensures that if it does indeed full up that an alternative cache is available.
Installation of APC
It is recommended that you read through the APC documentation http://www.php.net/manual/en/book.apc.php before beginning with this plugin. The above documentation recommends installing the PECL APC extension that can be found at http://pecl.php.net/package/apc. http://www.php.net/manual/en/install.pecl.php contains information on installing PECL extensions.
Its also worth noting for this those using Linux that there is usually a php5-apc package that can be installed very easily. If you have installed PHP under Linux through a package manager then this will be by far the easiest way to proceed.
Once installed ensure you restart your web server before proceeding.
Installation within Moodle
Browse to your site and log in as an administrator. Moodle should detect that a new plugin has been added and will proceed to prompt you through an upgrade process to install it. The installation of this plugin is very minimal. Once installed you will need to need to create an APC cache store instance within the Moodle administration interfaces.
Making use of APC within Moodle
Installing this plugin makes APC available to use within Moodle however it does not put it into use. The first thing you will need to do is create an APC cache store instance. This is done through the Cache configuration interface.
- Log in as an Administrator.
- In the settings block browse to Site Administration > Plugins > Caching > Configuration.
- Once the page loads locate the APC row within the Installed cache stores table.
- You should see an «Add instance» link within that row. If not then the APC extension has not being installed correctly.
- Click «Add instance».
- Give the new instance a name and click «Save changes». You should be directed back to the configuration page.
- Locate the Configured cache store instances table and ensure there is now a row for you APC instance and that it has a green tick in the ready column.
Once done you have an APC instance that is ready to be used. The next step is to map definitions to make use of the APC instance.
Locate the known cache definitions table. This table lists the caches being used within Moodle at the moment. For each cache you should be able to Edit mappings. Find a cache that you would like to map to the APC instance and click Edit mappings. One the next screen proceed to select your APC instance as the primary cache and save changes. Back in the known cache definitions table you should now see your APC instance listed under the store mappings for the cache you had selected. You can proceed to map as many or as few cache definitions to the APC instance as you see fit.
That is it! you are now using APC within Moodle.