- Html button web page
- Button without a value
- Using buttons
- A simple button
- Adding keyboard shortcuts to buttons
- Disabling and enabling a button
- Setting the disabled attribute
- Inheriting the disabled state
- Validation
- Examples
- Technical summary
- Specifications
- Html button web page
- Синтаксис
- Атрибуты
- Закрывающий тег
- Браузеры
- HTML Tag
- Browser Support
- Attributes
- Global Attributes
- Event Attributes
- More Examples
- Example
- Example
- Related Pages
Html button web page
An elements’ value attribute contains a string that is used as the button’s label.
input type="button" value="Click Me" /> Button without a value
If you don’t specify a value , you get an empty button:
Using buttons
A simple button
We’ll begin by creating a simple button with a click event handler that starts our machine (well, it toggles the value of the button and the text content of the following paragraph):
form> input type="button" value="Start machine" /> form> p>The machine is stopped.p>
const button = document.querySelector("input"); const paragraph = document.querySelector("p"); button.addEventListener("click", updateButton); function updateButton() if (button.value === "Start machine") button.value = "Stop machine"; paragraph.textContent = "The machine has started!"; > else button.value = "Start machine"; paragraph.textContent = "The machine is stopped."; > >
The script gets a reference to the HTMLInputElement object representing the in the DOM, saving this reference in the variable button . addEventListener() is then used to establish a function that will be run when click events occur on the button.
Adding keyboard shortcuts to buttons
Keyboard shortcuts, also known as access keys and keyboard equivalents, let the user trigger a button using a key or combination of keys on the keyboard. To add a keyboard shortcut to a button — just as you would with any for which it makes sense — you use the accesskey global attribute.
In this example, s is specified as the access key (you’ll need to press s plus the particular modifier keys for your browser/OS combination; see accesskey for a useful list of those).
form> input type="button" value="Start machine" accesskey="s" /> form> p>The machine is stopped.p>
const button = document.querySelector("input"); const paragraph = document.querySelector("p"); button.addEventListener("click", updateButton); function updateButton() if (button.value === "Start machine") button.value = "Stop machine"; paragraph.textContent = "The machine has started!"; > else button.value = "Start machine"; paragraph.textContent = "The machine is stopped."; > >
Note: The problem with the above example of course is that the user will not know what the access key is! In a real site, you’d have to provide this information in a way that doesn’t interfere with the site design (for example by providing an easily accessible link that points to information on what the site accesskeys are).
Disabling and enabling a button
To disable a button, specify the disabled global attribute on it, like so:
input type="button" value="Disable me" disabled /> Setting the disabled attribute
You can enable and disable buttons at run time by setting disabled to true or false . In this example our button starts off enabled, but if you press it, it is disabled using button.disabled = true . A setTimeout() function is then used to reset the button back to its enabled state after two seconds.
input type="button" value="Enabled" /> const button = document.querySelector("input"); button.addEventListener("click", disableButton); function disableButton() button.disabled = true; button.value = "Disabled"; setTimeout(() => button.disabled = false; button.value = "Enabled"; >, 2000); >
Inheriting the disabled state
If the disabled attribute isn’t specified, the button inherits its disabled state from its parent element. This makes it possible to enable and disable groups of elements all at once by enclosing them in a container such as a element, and then setting disabled on the container.
The example below shows this in action. This is very similar to the previous example, except that the disabled attribute is set on the when the first button is pressed — this causes all three buttons to be disabled until the two second timeout has passed.
fieldset> legend>Button grouplegend> input type="button" value="Button 1" /> input type="button" value="Button 2" /> input type="button" value="Button 3" /> fieldset>
const button = document.querySelector("input"); const fieldset = document.querySelector("fieldset"); button.addEventListener("click", disableButton); function disableButton() fieldset.disabled = true; setTimeout(() => fieldset.disabled = false; >, 2000); >
Note: Firefox will, unlike other browsers, by default, persist the dynamic disabled state of a across page loads. Use the autocomplete attribute to control this feature.
Validation
Buttons don’t participate in constraint validation; they have no real value to be constrained.
Examples
div class="toolbar"> input type="color" aria-label="select pen color" /> input type="range" min="2" max="50" value="30" aria-label="select pen size" />span class="output">30span> input type="button" value="Clear canvas" /> div> canvas class="myCanvas"> p>Add suitable fallback here.p> canvas>
body background: #ccc; margin: 0; overflow: hidden; > .toolbar background: #ccc; width: 150px; height: 75px; padding: 5px; > input[type="color"], input[type="button"] width: 90%; margin: 0 auto; display: block; > input[type="range"] width: 70%; > span position: relative; bottom: 5px; > const canvas = document.querySelector(".myCanvas"); const width = (canvas.width = window.innerWidth); const height = (canvas.height = window.innerHeight - 85); const ctx = canvas.getContext("2d"); ctx.fillStyle = "rgb(0,0,0)"; ctx.fillRect(0, 0, width, height); const colorPicker = document.querySelector('input[type="color"]'); const sizePicker = document.querySelector('input[type="range"]'); const output = document.querySelector(".output"); const clearBtn = document.querySelector('input[type="button"]'); // covert degrees to radians function degToRad(degrees) return (degrees * Math.PI) / 180; > // update sizepicker output value sizePicker.oninput = () => output.textContent = sizePicker.value; >; // store mouse pointer coordinates, and whether the button is pressed let curX; let curY; let pressed = false; // update mouse pointer coordinates document.onmousemove = (e) => curX = e.pageX; curY = e.pageY; >; canvas.onmousedown = () => pressed = true; >; canvas.onmouseup = () => pressed = false; >; clearBtn.onclick = () => ctx.fillStyle = "rgb(0,0,0)"; ctx.fillRect(0, 0, width, height); >; function draw() if (pressed) ctx.fillStyle = colorPicker.value; ctx.beginPath(); ctx.arc( curX, curY - 85, sizePicker.value, degToRad(0), degToRad(360), false, ); ctx.fill(); > requestAnimationFrame(draw); > draw();
Technical summary
Specifications
Html button web page
Тег создает на веб-странице кнопки и по своему действию напоминает результат, получаемый с помощью тега (с атрибутом type=»button | reset | submit» ). В отличие от этого тега, предлагает расширенные возможности по созданию кнопок. Например, на подобной кнопке можно размещать любые элементы HTML, в том числе изображения. Используя стили можно определить вид кнопки путем изменения шрифта, цвета фона, размеров и других параметров.
Теоретически, тег должен располагаться внутри формы, устанавливаемой элементом . Тем не менее, браузеры не выводят сообщение об ошибке и корректно работают с тегом , если он встречается самостоятельно. Однако, если необходимо результат нажатия на кнопку отправить на сервер, помещать в контейнер обязательно.
Синтаксис
Атрибуты
accesskey Доступ к элементам формы с помощью горячих клавиш. autofocus Устанавливает, что кнопка получает фокус после загрузки страницы. disabled Блокирует доступ и изменение элемента. form Связывает между собой форму и кнопку. formaction Задаёт адрес, на который пересылаются данные формы при нажатии на кнопку. formenctype Способ кодирования данных формы. formmethod Указывает метод пересылки данных формы. formnovalidate Отменяет проверку формы на корректность. formtarget Открывает результат отправки формы в новом окне или фрейме. name Определяет уникальное имя кнопки. type Тип кнопки — обычная, для отправки данных формы на сервер или для очистки формы. value Значение кнопки, которое будет отправлено на сервер или прочитано с помощью скриптов.
Также для этого тега доступны универсальные атрибуты и события.
Закрывающий тег
Результат данного примера показан на рис. 1.
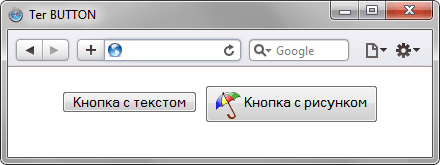
Рис. 1. Вид кнопок в браузере Safari
Браузеры
Internet Explorer до версии 7.0 включительно не поддерживает атрибут value .
HTML Tag
Inside a element you can put text (and tags like , , ,
, , etc.). That is not possible with a button created with the element!
Tip: Always specify the type attribute for a element, to tell browsers what type of button it is.
Tip: You can easily style buttons with CSS! Look at the examples below or visit our CSS Buttons tutorial.
Browser Support
Attributes
| Attribute | Value | Description |
|---|---|---|
| autofocus | autofocus | Specifies that a button should automatically get focus when the page loads |
| disabled | disabled | Specifies that a button should be disabled |
| form | form_id | Specifies which form the button belongs to |
| formaction | URL | Specifies where to send the form-data when a form is submitted. Only for type=»submit» |
| formenctype | application/x-www-form-urlencoded multipart/form-data text/plain | Specifies how form-data should be encoded before sending it to a server. Only for type=»submit» |
| formmethod | get post | Specifies how to send the form-data (which HTTP method to use). Only for type=»submit» |
| formnovalidate | formnovalidate | Specifies that the form-data should not be validated on submission. Only for type=»submit» |
| formtarget | _blank _self _parent _top framename | Specifies where to display the response after submitting the form. Only for type=»submit» |
| name | name | Specifies a name for the button |
| type | button reset submit | Specifies the type of button |
| value | text | Specifies an initial value for the button |
Global Attributes
Event Attributes
More Examples
Example
.button border: none;
color: white;
padding: 15px 32px;
text-align: center;
text-decoration: none;
display: inline-block;
font-size: 16px;
margin: 4px 2px;
cursor: pointer;
>
Example
Use CSS to style buttons (with hover effect):
.button border: none;
color: white;
padding: 16px 32px;
text-align: center;
text-decoration: none;
display: inline-block;
font-size: 16px;
margin: 4px 2px;
transition-duration: 0.4s;
cursor: pointer;
>
.button1 background-color: white;
color: black;
border: 2px solid #4CAF50;
>
.button1:hover background-color: #4CAF50;
color: white;
>
.button2 background-color: white;
color: black;
border: 2px solid #008CBA;
>
.button2:hover background-color: #008CBA;
color: white;
>