- table-layout
- Синтаксис
- Значения
- Браузеры
- How to Create a Fixed-Width Layout With CSS
- How to Create Fixed-Width Layout Using CSS?
- Conclusion
- About the author
- Sharqa Hameed
- How to Create a Fixed-Width Layout with CSS
- Related Articles
- Training Options
- Фиксированый стиль таблицы или Fixed Table Layouts
- CSS
- Режим table-layout: fixed
- Применение
- Скорость
- Почтовики
- Заключение
- table-layout
- Try it
- Syntax
- Values
- Formal definition
- Formal syntax
- Examples
- Fixed-width tables with text-overflow
- HTML
- CSS
- Result
- Specifications
- Browser compatibility
- See also
- Found a content problem with this page?
- MDN
- Support
- Our communities
- Developers
table-layout
Определяет, как браузер должен вычислять ширину ячеек таблицы, основываясь на ее содержимом.
Синтаксис
table-layout: auto | fixed | inherit
Значения
auto Браузер загружает всю таблицу, анализирует ее для определения размеров ячеек и только после этого отображает. fixed Ширина колонок в этом случае определяется либо с помощью тега
HTML5 CSS2.1 IE Cr Op Sa Fx
table < table-layout: fixed; /* Фиксированная ширина ячеек */ width: 100%; /* Ширина таблицы */ >.col1 < width: 160px; >.coln 2012 2013 2014 2015 2016 2017 2018 2019 2020 Нефть 5 7 2 8 3 34 62 74 57 Золото 3 6 4 6 4 69 72 56 47 Дерево 5 8 3 4 7 73 79 34 86
Браузеры
Internet Explorer до версии 7.0 включительно не поддерживает значение inherit .
How to Create a Fixed-Width Layout With CSS
![]()
The “fixed layout” is also referred to as a static layout and it is measured in “pixels”. This type of layout makes the width of the element fixed. Moreover, the fixed layout is programmed in a way that no matter the screen size or resolution, the element’s width will not change. It is beneficial for users who want to present consistent corporate images to all visitors.
This blog will demonstrate the procedure of creating a fixed-width layout with CSS.
How to Create Fixed-Width Layout Using CSS?
For the purpose of creating a fixed-width layout, firstly, inside the body element of the HTML, add a div element with a class name “fixed-width”. Then, add and
elements to add some content.
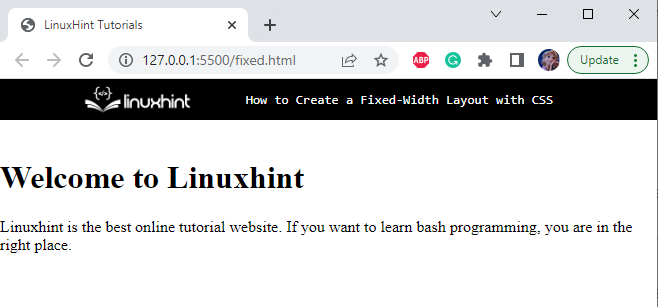
Welcome to Linuxhint < / h1 >
Linuxhint is the best online tutorial website. If you want to learn bash programming, you are in the right place. < / p >
< / div >
The markup structure has been completed and can be seen in the below-given image:
Now, let’s apply CSS styling properties to the above HTML elements.
Style All Elements
As we know, the fixed-width layouts use exact pixel width, so, the width property will be set in “pixels”. It defines that the element’s width will remain the same as in every screen size.
Style fixed-width div
.fixed- width {
background- color : rgb ( 238 , 238 , 238 ) ;
margin: auto;
max- width : 400px;
height : 100vh;
}
The “.fixed-width” is referring to the div class fixed-width. The following properties are applied to the div fixed-width:
- “background-color” specifies the color of the element’s background.
- “margin” specifies the space around the element.
- “max-width” sets the maximum width of the element.
- “height” property sets the element’s height.
The output of the mentioned code is displayed below:
It can be observed that the width of the div fixed-width is fixed. It does not change according to the screen sizes.
That’s how the fixed-width layout is created in CSS.
Conclusion
The fixed-width layouts set the width of the element fixed. They remain the same in every screen size. If the browser window’s width is less than the layout’s width, a horizontal scroll bar will appear, and the element’s width will not change. To make the layout fixed, the width of the element must be specified in “pixels”. With the help of a practical example, this blog has demonstrated how to create a fixed-width layout in CSS.
About the author
Sharqa Hameed
I am a Linux enthusiast, I love to read Every Linux blog on the internet. I hold masters degree in computer science and am passionate about learning and teaching.
How to Create a Fixed-Width Layout with CSS
A «fixed-width» layout is one in which the layout of the page is contained within a wrapper that doesn’t adjust its size when the width of the browser changes.
In this how to, you’ll learn how to create a 2-column fixed-width layout.
- Start with the following simple web page containing four content areas: header, footer, menu, and content.
Two-column fixed layout
Menu
This column is fixed.
This column is fixed.
This column is fixed.
This column is fixed.
This column is fixed.
Content
This column is fixed.
footer * < margin:0; padding:0; border:0; >#wrapper < border: 1px solid #000; width: 950px; margin: auto; >#header < border-bottom: 1px solid #000; padding: 10px; background-color: #eee; >#menu < width: 180px; float: left; padding: 10px; border-right: 1px solid #000; >#content < margin-left: 200px; border-left: 1px solid #000; padding: 10px; line-height: 2em; >.clearer

Open the HTML page in a browser. This code renders the following:
Related Articles
- Learn the Very Basics of CSS in One Minute
- How to Create a CSS External Style Sheet
- How to Align Text with CSS
- How to Create a Horizontal Navigation Menu with CSS
- How to Create a Fixed-Width Layout with CSS (this article)
- How to Remove Spacing Between Table Borders with CSS
- How to Set a Background Image with CSS
- How to Set Text Spacing and Placement in CSS
- How to Style a Table with CSS
- How to Create Boxes with Rounded Corners in CSS
- How to Create a Vertical Navigation Menu with CSS
- How to Use the CSS Opacity Property
- How to Use Multiple Background Images with CSS
- Absolute Positioning with CSS
- How to Use the CSS Border Shorthand Property
- How to Create CSS Button Links
- How to Create a Fluid-Width Layout with CSS
- How to Set Text and Background Color with CSS
- How to Create a CSS Embedded Style Sheet
- How to Add Inline Styles to CSS
- How to Create a Border with CSS
- How to Use the CSS Padding Shorthand Property
- How to Create a Fly-Out Menu with CSS
- How to Use CSS Media Queries in Responsive Design
- How to Adjust Margins with CSS
- How to Use the CSS Background Shorthand Property
- How to Create a Form without Tables Using CSS
- How to Modify Fonts in CSS
- How to Create a Drop-Down Menu with CSS
- How to Apply Padding with CSS
- Fixed Positioning with CSS
- How to Use CSS Transitions
- How to Use the CSS list-style Shorthand Property
- How to Change Text Style in CSS
- How to Create CSS Sprites
- How to Use CSS with Different Media Types
- How to Import Style Sheets with @import in CSS
- How to Use the CSS White-Space Property
- How to Use the CSS Z-index Property
- How to Create Drop Shadows with the box-shadow Property in CSS3
Training Options
Фиксированый стиль таблицы или Fixed Table Layouts
Как вы наверняка знаете, CSS свойство table-layout предназначено для управления режимом формирования ширины столбцов в таблице. Оно может принимать следующие значения: авто, фиксировано или наследственно. По умолчанию в браузерах для отображения таблицы используется стандартное поведение: браузер рассчитывает ширину строки как сумму ширины всех ячеек. Следом, по тому же принципу рассчитывает ширину 2-й строки, и если размеры какой-либо ячейки превышают размеры вышестоящей ячейки, перестраивает всю таблицу. Далее определяет ширину 3-й ячейки, 4-й и т.д. В случае если таблица имеет много, очень много рядов, расчет ширины может немного затянуться…
Однако можно (я бы даже сказал нужно) задействовать упрощенный режим который выражается в том, что браузер при определении ширины не берет в расчет содержимое последующих ячеек, а опирается на значение свойств width таблицы, столбцов и ячеек из первой строки.
CSS
В CSS (таблицы каскадных стилей) с помощью свойства table-layout мы можем управлять какой режим формирования таблицы нам нужен. Речь идет собственно об этом:
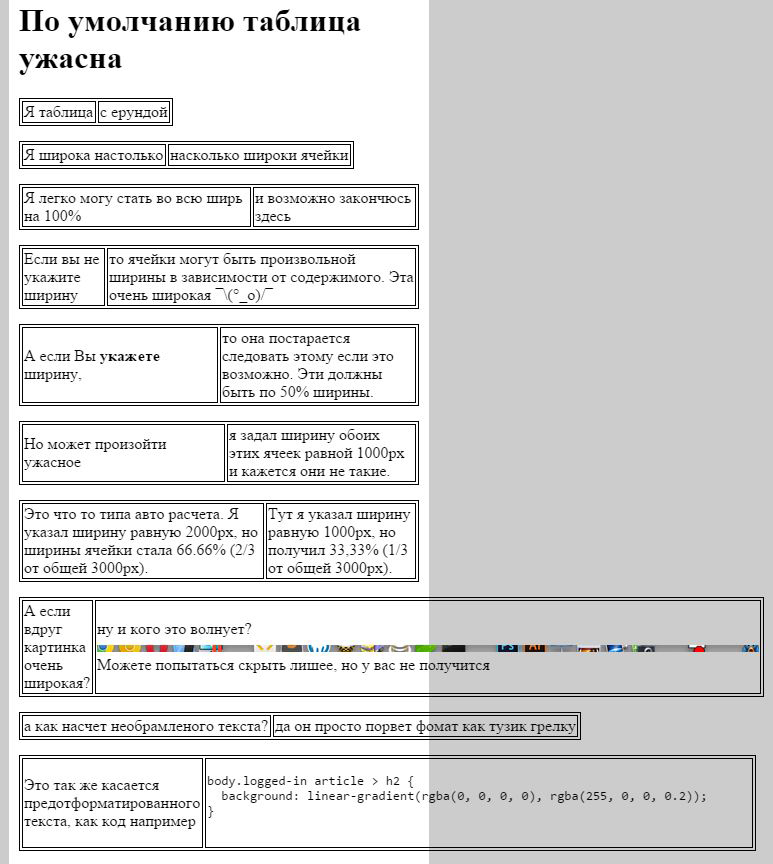
Это свойство очень хорошо поддерживается и очень даже полезно, так как позволяет вам создавать более предсказуемую разметку под вашу таблицу. По умолчанию, это свойство установлено в значение авто, и это, наверно, известно большинству из вас. Но этот режим как по мне так очень ненадежный и непредсказуемый. Приведем пример:
Режим table-layout: fixed
Если теперь задействовать режим table-layout: fixed то можно уверенно получить вполне себе предсказуемый результат по месту.
В случае применения этого режима, расчет ширины столбцов идет по первой строчке и все последующие используют это значение. Может и звучит странновато для понимания, но на самом деле все просто, приведем пример:

Применение
Крис озадачился этим вопросом, так как ему хотелось. что бы его «Pen»ы (в переводе еще смешнея звучит) в лист вью на CodePen отображались в столбиках с унифицированой шириной и не портили ему всю картину, вот что у него получилось:
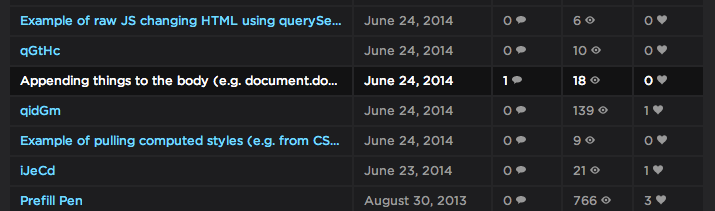
Он остался очень доволен этим.
Надеюсь, все помнят, что таблицы нужны для табулированных значений и емайлов, а не для задания разметки страниц.
Посмотрите на этот практический пример (предполагаю, что почти всем понравится это):
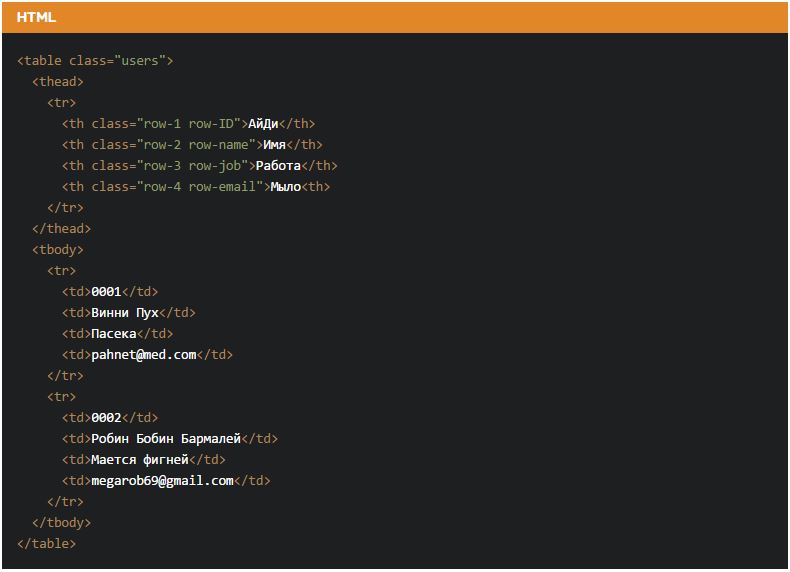

Для лучшего примера вы можете попробовать использовать элемент , чтобы так же задать ширину столбцов, так как остальное будет рассчитано в зависимости от значений в первой строчке.
Скорость
Что касается скорости, то говорят, что такой стиль формирования таблицы быстрейший, и это очевидно — бо остальные строки не анализируются и следовательно время генерации не зависит от длины таблицы как таковой.
Почтовики
Что касается использования в разных почтовых клиентах, то это свойство, согласно сервису мониторинга поддержки свойств CSS в почтовых клиентах, прекрасно поддерживается.
Заключение
Надеюсь, этот перевод кому-то действительно поможет лучше понять, как работает table-layout: fixed и подбросит идей по его использованию в своих проектах.
Кстати, у кого нибудь есть идеи, почему это свойство не используется по умолчанию?
table-layout
The table-layout CSS property sets the algorithm used to lay out cells, rows, and columns.
Try it
Syntax
/* Keyword values */ table-layout: auto; table-layout: fixed; /* Global values */ table-layout: inherit; table-layout: initial; table-layout: revert; table-layout: revert-layer; table-layout: unset;
Values
The automatic table layout algorithm is used. The widths of the table and its cells are adjusted to fit the content. Most browsers use this algorithm by default.
The fixed table layout algorithm is used. When using this keyword, the table’s width needs to be specified explicitly using the width property. If the value of the width property is set to auto or is not specified, the browser uses the automatic table layout algorithm, in which case the fixed value has no effect.
The fixed table layout algorithm is faster than the automatic layout algorithm because the horizontal layout of the table depends only on the table’s width, the width of the columns, and borders or cell spacing. The horizontal layout doesn’t depend on the contents of the cells because it depends only on explicitly set widths.
In the fixed table layout algorithm, the width of each column is determined as follows:
- A column element with explicit width sets the width for that column.
- Otherwise, a cell in the first row with explicit width determines the width for that column.
- Otherwise, the column gets the width from the shared remaining horizontal space.
With this algorithm the entire table can be rendered once the first table row has been downloaded and analyzed. This can speed up rendering time over the «automatic» layout method, but subsequent cell content might not fit in the column widths provided. Cells use the overflow property to determine whether to clip any overflowing content, but only if the table has a known width; otherwise, they won’t overflow the cells.
Formal definition
Formal syntax
Examples
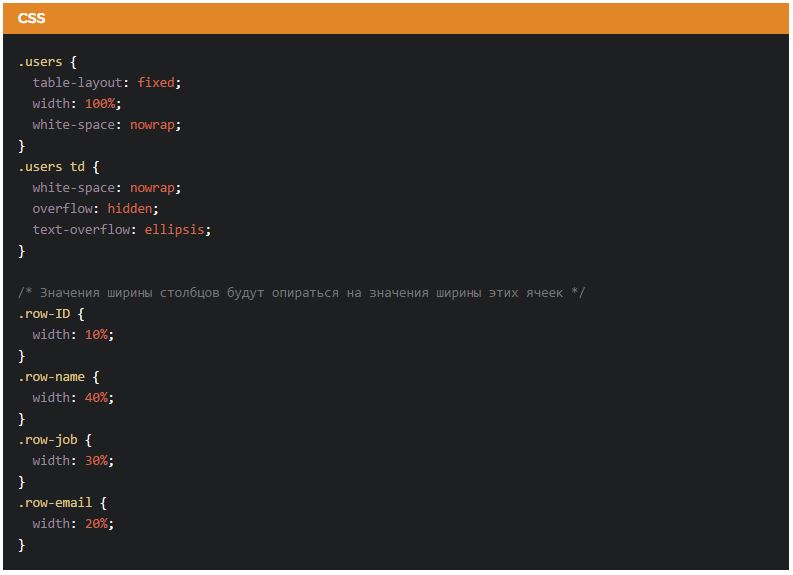
Fixed-width tables with text-overflow
This example uses a fixed table layout, combined with the width property, to restrict the table’s width. The text-overflow property is used to apply an ellipsis to words that are too long to fit. If the table layout were auto , the table would grow to accommodate its contents, despite the specified width .
HTML
table> tr> td>Edtd> td>Woodtd> tr> tr> td>Alberttd> td>Schweitzertd> tr> tr> td>Janetd> td>Fondatd> tr> tr> td>Williamtd> td>Shakespearetd> tr> table>
CSS
table table-layout: fixed; width: 120px; border: 1px solid red; > td border: 1px solid blue; overflow: hidden; white-space: nowrap; text-overflow: ellipsis; > Result
Specifications
Browser compatibility
BCD tables only load in the browser
See also
Found a content problem with this page?
This page was last modified on Jul 6, 2023 by MDN contributors.
Your blueprint for a better internet.
MDN
Support
Our communities
Developers
Visit Mozilla Corporation’s not-for-profit parent, the Mozilla Foundation.
Portions of this content are ©1998– 2023 by individual mozilla.org contributors. Content available under a Creative Commons license.