Динамическая работа с таблицами
Часто при использовании html таблиц с помощью JavaScript можно избежать лишних перезагрузок страницы, улучшить юзабилити и упростить работу пользователей.
Под динамической работой понимается:
- создание;
- управление атрибутами;
- добавление/удаление столбцов и строк;
- перемещение строк;
- заполнение ячеек
1. создание таблицы
Для того, чтобы создать новую таблицу на странице нужно сгенерировать элемент TABLE (createElement()) и добавить его в иерархическую структуру документа с помощью метода appendChild():
var newElem=document.createElement('table'); document.body.appendChild(newElem); 2. управление атрибутами
Есть два способа присвоения атрибутов элементу: использование метода setAttribute()
var newElem=document.createElement('table'); newElem.setAttribute('id','tl'); newElem.setAttribute('width','500'); newElem.setAttribute('border','1'); document.body.appendChild(newElem); и прямое обращение к свойствам объекта
var newElem=document.createElement('table'); newElem.id='tl'; newElem.width=500; newElem.border=1; document.body.appendChild(newElem); Есть и более простой способ добавления в документ таблицы с определенными атрибутами:
3. добавление/удаление столбцов и строк и 4. перемещение строк
Для вставки строк используется метод insertRow(), ячеек — insertCell():
var newElem=document.createElement("table"); var newRow=newElem.insertRow(0); var newCell = newRow.insertCell(0); newCell.width="200"; newCell.innerHTML ; var newCell = newRow.insertCell(1); newCell.width="400"; newCell.innerHTML ; var newRow=newElem.insertRow(1); var newCell = newRow.insertCell(0); newCell.width="200"; newCell.innerHTML ; var newCell = newRow.insertCell(1); newCell.width="400"; newCell.innerHTML ; document.body.appendChild(newElem); Для удаления строк используется метод deleteRow(), по своей конструкции аналогичный методу insertRow(), ячейки — deleteCell(). Для перемещения строк существует функция moveRow(индекс_источника, индекс_приёмника), но она пока работает только в IE (по крайней мере мне не удалось заставить ее работать в других браузерах).
Следующий пример работает только в IE:
var dt = document.getElementById(«t1»); function delete_tr(obj) < var num_tr=obj.parentNode.sectionRowIndex; dt.deleteRow(num_tr) >function up_tr(obj) < var num_tr=obj.parentNode.sectionRowIndex; if (num_tr!=0) dt.moveRow(num_tr, num_tr-1); >function down_tr(obj)
| 0 | удалить строку | поднять строку | опустить |
| 1 | удалить строку | поднять строку | опустить строку |
| 2 | удалить строку | поднять строку | опустить строку |
5. заполнение ячеек
Заполнение ячеек возможно с помощью свойств innerHTML и innerTEXT (их отличия, думаю, понятны из названия):
document.getElementById('идентификатор').innerHTML = 'something'; дополнительно
Как перебрать в цикле все таблицы на странице:
var tables = document.getElementsByTagName(«table»); for ( var t = 0; t
Как перебрать в цикле все ячейки таблицы:
var td_cells=document.getElementById("tl").cells; for (var i=0; i < td_cells.length; i++) alert(td_cells[i].innerHTML); как закрасить строки таблицы через одну:
var t = document.getElementsById('t1'); var rows = t.getElementsByTagName("tr"); for ( var i = 1; i < rows.length; i += 2 ) rows[i].className = "odd"; Create Table Using JavaScript
- Various Tags Used to Create a Table in HTML
- Create a Table Using JavaScript
The JavaScript programming language allows us to create and manipulate DOM (Document Object Model) elements. It gives us much more flexibility and makes it a lot easier for everyone to work with DOM, especially if you are a backend developer.
There are two ways of adding HTML elements like tables to an HTML document, the first is by adding the HTML table tag directly into our HTML webpage, and the second way is by creating the entire table inside our JavaScript code. The second option is the most popular way of creating and adding the table to the DOM.
But before diving deep into how the table is created with JavaScript, let’s first visually understand the various table tags used to create a table and what each of those tags exactly means. This will give you a visual representation of the table, making it much easier for you to understand the code part later in this article.
Various Tags Used to Create a Table in HTML
Below is the list of tags that are used to create a table in HTML.
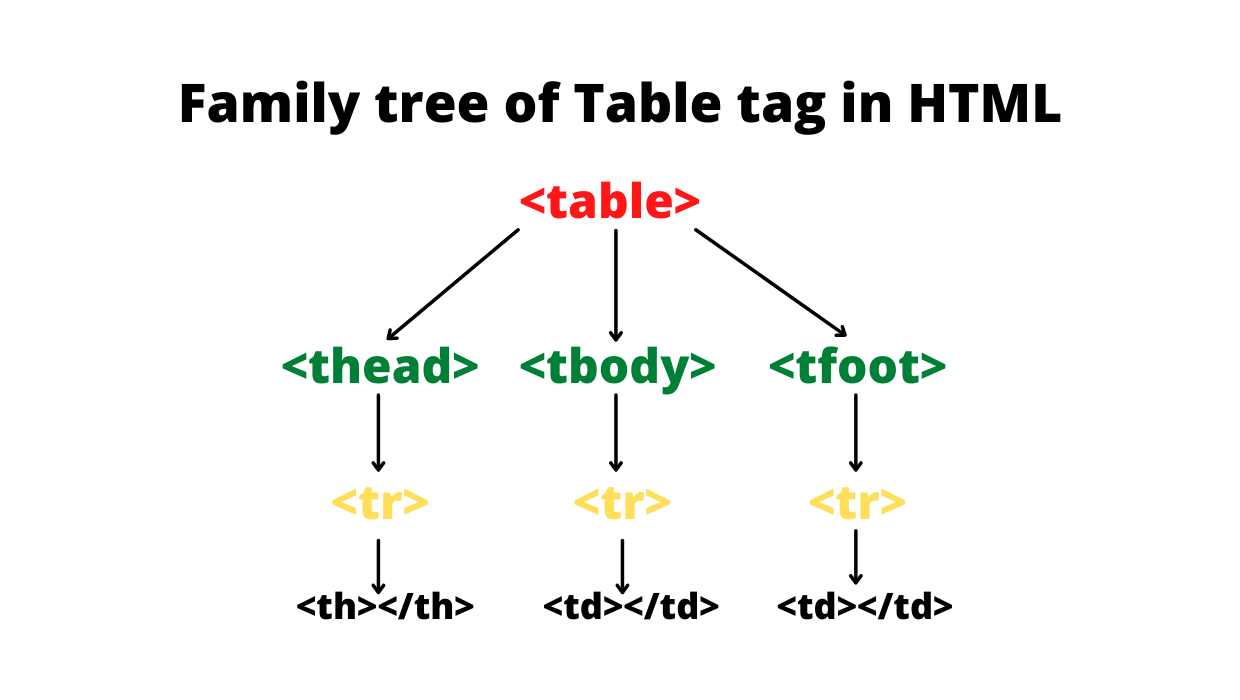
- table : The table HTML tag represents the entire table in HTML. This is the starting tag of the table inside which all the other tags related to the table (like thead , tr , td , etc) will be used depending upon how you want to structure the table.
- thead : The thead stands for table heading. This tag is used to add heading to the tables. It usually represents the first row of the table. To add data inside the thead tag, we use the th tag. If you don’t want to add a heading to your tables, you can skip the thead tag.
- tbody : The tbody stands for table body. This tag represents the entire body or contents of the table.
- tfoot : The tfoot stands for table footer. It usually represents the last row of the table. This tag is optional. We don’t use this tag that often.
- tr : The tr stands for table row. This represents the entire row of the table. To insert data into the table either inside the heading, body, or footer of the table, we first have to create a row, and then inside that row, we can insert the data with the help of the td tag.
- th : The th is only used inside the thead tag. It represents the single cell of the heading row. It makes the headings of the table in bold format.
- td : The td stands for table data. It represents the single cell of the table. It is similar to th , but the only difference is that th is used only inside the thead tag, and td is used elsewhere. The td tag can be used with the tbody and tfoot tags.
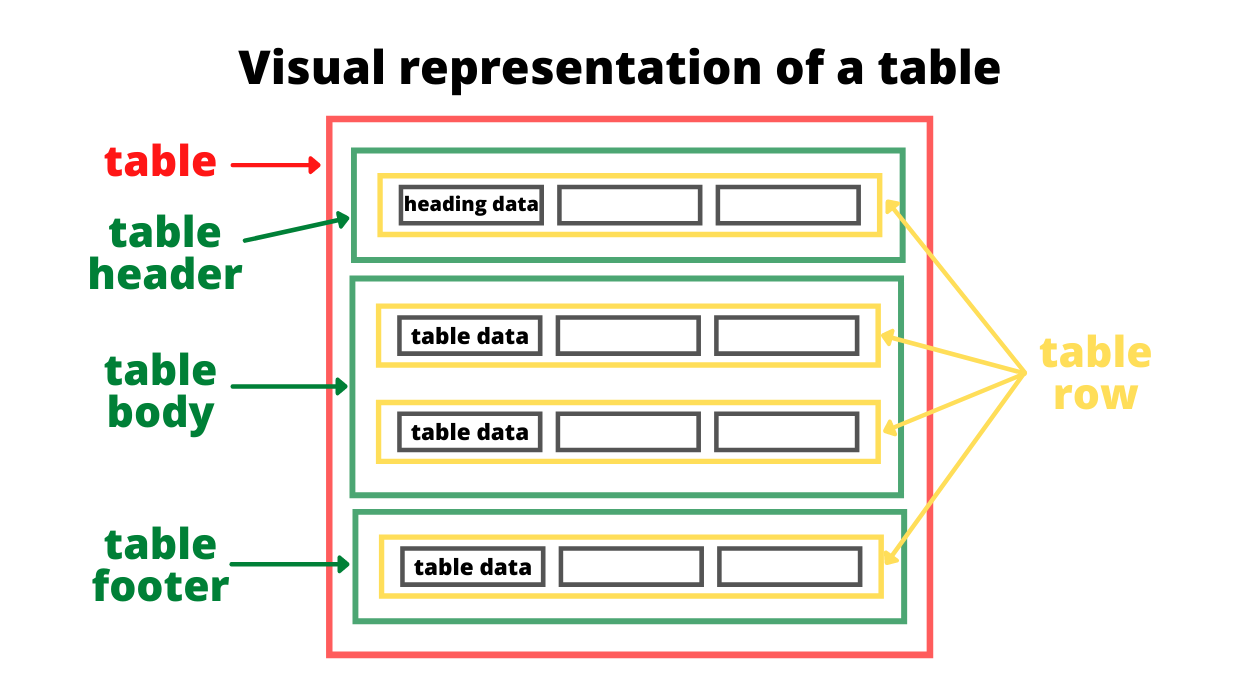
If you combine all of these tags in nested form i.e, one inside another, then this is how the table will look like after it is created.
The red border represents the entire table. Inside this, we have 3 tags, table header ( thead ), table body ( tbody ), and table footer ( tfoot ), which are represented with the green border. To insert data inside these three tags we first have to create a row with the help of the tr tag. This row is represented with the yellow border. And then, to insert data into the table header, we use the th tag, and to insert data within the table body or table footer, we use the td tags. It is shown with the help of grey color.


