- — элемент выделения важного текста
- Атрибуты
- Замечания по использованию
- против
- против
- Примеры
- Основной пример
- HTML Tag
- Browser Support
- Global Attributes
- Event Attributes
- Related Pages
- Default CSS Settings
- Example
- COLOR PICKER
- Report Error
- Thank You For Helping Us!
- Жирный текст с помощью HTML и CSS
- Жирный текст на HTML
- Жирный текст на CSS
- HTML tag
- Syntax
- Example of the HTML tag:
- Result
- Attributes
- How to style tag?
- Common properties to alter the visual weight/emphasis/size of text in tag:
- Coloring text in tag:
- Text layout styles for tag:
- Other properties worth looking at for tag:
- Bold Font in HTML – Font Weight for Letters
- How to Make Text Bold With the Tag in HTML
- How to Make Text Bold With the Tag in HTML
- How to Make Text Bold with the CSS font-weight Property
- Should You Use , or font-weight to Make Text Bold?
- Conclusion
— элемент выделения важного текста
Элемент сильной значимости ( ) указывает на то, что его содержание имеет большое значение, серьёзность или срочность. Браузеры обычно отображают содержимое жирным шрифтом.
| Категории контента | Потоковой контент, Фразовый контент, явный контент. |
|---|---|
| Допустимый контент | Фразовый контент. |
| Опускание тегов | Нет, должен иметь как начальный тег, так и конечный тег. |
| Допустимые родители | Любой элемент, который принимает фразовый контент, или любой другой элемент, который принимает потоковой контент. |
| Допустимые ARIA-роли | Любые |
| DOM-интерфейс | HTMLElement |
Атрибуты
Этот элемент включает в себя глобальные атрибуты.
Замечания по использованию
Элемент предназначен для контента, который имеет «большое значение», включая вещи большой серьёзности или срочности (например, предупреждения). Это может быть предложение, которое имеет большое значение для всей страницы, или вы можете просто попытаться указать, что некоторые слова имеют большее значение по сравнению с соседним контентом.
Обычно этот элемент отображается по умолчанию с использованием жирного шрифта. Однако, он не должен быть использован просто для применения жирного стиля; используйте свойство CSS font-weight для этой цели. Используйте элемент , чтобы привлечь внимание к определённому тексту без указания более высокого уровня важности. Используйте элемент element для выделения текста, который имеет выраженный акцент.
Другим приемлемым использованием для является обозначение ярлыков абзацев, которые представляют заметки или предупреждения в тексте страницы.
против
Не совсем. Элемент для контента, который имеет большее значение, в то время как элемент используется для привлечения внимания к тексту, не указывая на то, что это более важно.
Это может помочь понять, что оба являются правильным и семантическими элементами в HTML5, и это совпадение, что оба они имеют одинаковый стиль (полужирный) в большинстве браузеров (хотя некоторые старые браузеры фактически подчёркивают ). Каждый элемент предназначен для использования в определённых типах сценариев, и если вы хотите жирный шрифт просто для украшения, вместо этого вы должные использовать свойства CSS font-weight .
Предполагаемое значение или цель прилагаемого текста должно быть тем, что определяет, какой элемент вы используете. Значение общения — вот что такое семантика.
против
Добавление к путанице заключается в том, что, хотя HTML 4 определяет как просто указывающий на более сильный акцент, HTML 5 определяет как представляющий «большое значение для его содержимого». Это важное различие.
В то время, как используется для изменения значения предложения, поскольку делается устный акцент («Я люблю морковь» против «Я люблюморковь«), используется, для придания предложению порции особого значения (например, «Предупреждение! Это очень опасно.«) Оба элемента и могут быть вложены для увеличения относительной степени важности или усиленного акцента, соответственно.
Примеры
Основной пример
p>Прежде чем продолжить, strong>убедитесь, что вы надели защитные очкиstrong>.p>
HTML Tag
The tag is used to define text with strong importance. The content inside is typically displayed in bold.
Browser Support
Global Attributes
The tag also supports the Global Attributes in HTML.
Event Attributes
The tag also supports the Event Attributes in HTML.
Related Pages
Default CSS Settings
Most browsers will display the element with the following default values:
Example

COLOR PICKER


Report Error
If you want to report an error, or if you want to make a suggestion, do not hesitate to send us an e-mail:
Thank You For Helping Us!
Your message has been sent to W3Schools.
Top Tutorials
Top References
Top Examples
Get Certified
W3Schools is optimized for learning and training. Examples might be simplified to improve reading and learning. Tutorials, references, and examples are constantly reviewed to avoid errors, but we cannot warrant full correctness of all content. While using W3Schools, you agree to have read and accepted our terms of use, cookie and privacy policy.
Жирный текст с помощью HTML и CSS
Сегодняшней публикацией начинаю цикл статей про жирные шрифты. Изначально думал разместить все нюансы и вопросы по теме в одном месте, но информации оказалось слишком много. Лучше воспринимать ее постепенно. Поэтому перед тем, как перейти к разным обзорам шрифтов для создания фотошоп иллюстраций рассмотрю вопросы, связанные с версткой. Подборки фонтов найдете тут: интересные жирные, разные bold и русские толстые шрифты.
Сегодня расскажу как сделать слова жирным шрифтом на сайте с помощью HTML и CSS. Такое оформление используется когда вам нужно выделить определенную информацию на странице. Причем речь идет не только о заголовках, но и о простых словах, фразах в тексте. Реализовывается это достаточно просто.
Жирный текст на HTML
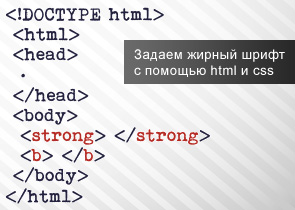
Для выделения определенного текста жирным используются специальные HTML теги — и . Например следующий код:
Обычный текст.
Жирный текст.
Жирный текст strong.
Обычный текст.
Жирный текст.
Жирный текст strong.
На выходе дает такую картинку:
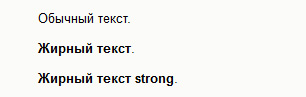
Последние два варианта визуально выглядят одинаково, однако они между собой немного отличаются. Тег задает простое стилистическое выделение слова жирным шрифтом, тогда как добавляет при этом некое семантическое «усиленное» (важное) значение. То есть последняя строка — это не просто жирный текст, а какая-то важная информация. В принципе, для поисковиков рекомендуют использовать именно .
Вы также можете встретить прописанный в HTML жирный шрифт с помощью стилей:
Пример жирного текста.
Пример текста с жирным словом.
На сайте это отображается так:
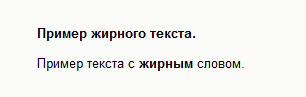
Не смотря на то, что код жирного текста для HTML работает корректно, так делать не следует. Все стили оформления должны быть вынесены в CSS файл. Поэтому в примере выше вы должны были для тегов
и указать соответствующий класс, а затем прописать его оформление в таблице стилей. Такие вот правила оформления кода. Поэтому для жирного шрифта в HTML используйте тег .
Жирный текст на CSS
Дабы сделать в CSS жирный шрифт используется свойство font-weight. С его помощью указывается «насыщенность» фрагмента текста. Значения могут быть от 100 до 900, но наиболее часто используемые это:
Есть также варианты значений bolder и lighter, которые меняют шрифт в зависимости от родителя на более или менее жирный соответственно.
Чтобы задать жирный текст в CSS нужно тому или иному элементу задать какой-то стиль, например:
Обычный текст с по центру.
Далее в CSS стилях вы определяете для него жирность вместе с другими свойствами по типу подчеркивания текста и т.п.:
. my-bold-font { color: black; font-weight: 700; }
. my-bold-font { color: black; font-weight: bold; }
Разницы нет никакой. Кстати, если говорить о HTML теге , то для него по умолчанию прописан такой стиль:
Тут хотелось отметить один небольшой нюанс, который мне рассказали на курсах верстки — если вы создаете для какого-то элемента новый класс, то желательно использовать более-менее «понятное название». Например, в примере выше стиль выглядит логичнее чем т.к. можно отчасти понять его назначение. Это плюс для тех, кто будет смотреть и использовать вашу верстку в дальнейшем.
В следующей статье расскажу про интересные жирные шрифты, которые мне удалось найти.
HTML tag
The tag highlights an important part of a text. It can be used for such important contents, as warnings. This can be one sentence that gives importance to the whole page, or it may be needed if you want to highlight some words that are of greater importance compared to the rest of the content. The content of the tag has higher weight for the search engines and the devices, while reading emphasizes the content only with special intonation.
The tag is a phrase tag indicating that a text section has structural meaning.
HTML4 defined the tag as implying a stronger emphasis. Unlike it, HTML5 defines it as representing strong importance of the content.
To differentiate the text in bold without taking into account its importance use the tag or the CSS font-weight property.
Syntax
The tag comes in pairs. The content is written between the opening () and closing () tags.
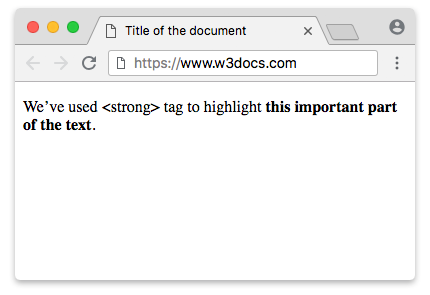
Example of the HTML tag:
html> html> head> title>Title of the document title> head> body> p>We’ve used <strong> tag to highlight strong> this important part of the text strong>. p> body> html>Result
Attributes
How to style tag?
Common properties to alter the visual weight/emphasis/size of text in tag:
- CSS font-style property sets the style of the font. normal | italic | oblique | initial | inherit.
- CSS font-family property specifies a prioritized list of one or more font family names and/or generic family names for the selected element.
- CSS font-size property sets the size of the font.
- CSS font-weight property defines whether the font should be bold or thick.
- CSS text-transform property controls text case and capitalization.
- CSS text-decoration property specifies the decoration added to text, and is a shorthand property for text-decoration-line, text-decoration-color, text-decoration-style.
Coloring text in tag:
- CSS color property describes the color of the text content and text decorations.
- CSS background-color property sets the background color of an element.
Text layout styles for tag:
- CSS text-indent property specifies the indentation of the first line in a text block.
- CSS text-overflow property specifies how overflowed content that is not displayed should be signalled to the user.
- CSS white-space property specifies how white-space inside an element is handled.
- CSS word-break property specifies where the lines should be broken.
Other properties worth looking at for tag:
- CSS text-shadow property adds shadow to text.
- CSS text-align-last property sets the alignment of the last line of the text.
- CSS line-height property specifies the height of a line.
- CSS letter-spacing property defines the spaces between letters/characters in a text.
- CSS word-spacing property sets the spacing between words.
Bold Font in HTML – Font Weight for Letters

Kolade Chris
When you’re building a website, you may want to place particular emphasis on certain text to let users know that it’s important.
And you can do this in HTML with various text formatting tags.
In this article, I will take you through how to emphasize certain text by making it bold.
In HTML, there are three major ways that you can use to make text bold. You can use the tag, the tag, or you can do it in CSS with the font-weight property. Let’s look at each method in more detail.
How to Make Text Bold With the Tag in HTML
HTML gives us the tag for making text bold. To make text bold with this tag, you need to wrap it around the text like this:
This text is bold, but this text is not.
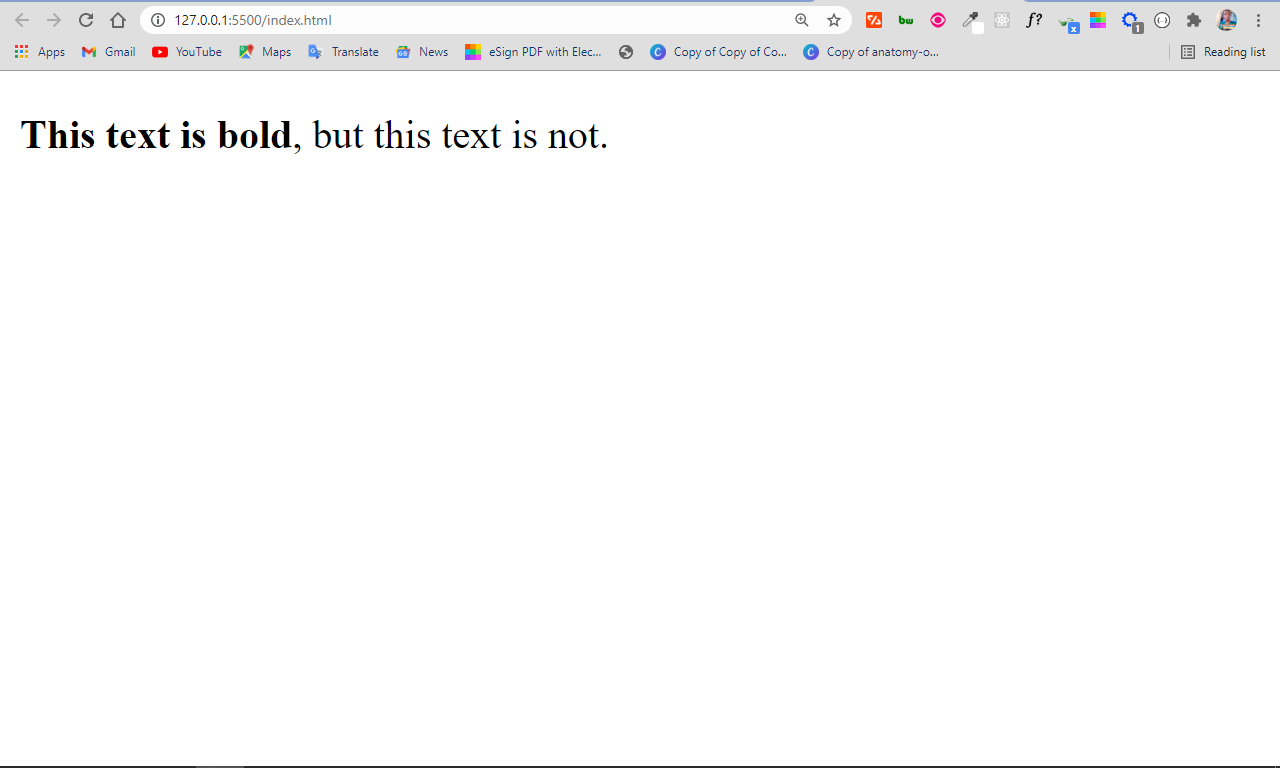
As you can see in the image, the tag makes part of the text stand out.
How to Make Text Bold With the Tag in HTML
With the tag, you are not just making the text bold – you are calling special attention to it.
also makes text bold just like the tag, but there is a slight difference between the two. I’ll discuss this later in the article.
Just like the tag, you need to wrap the tag around the text to make the text bold with it.
Before paying to learn programming, check out freeCodeCamp.
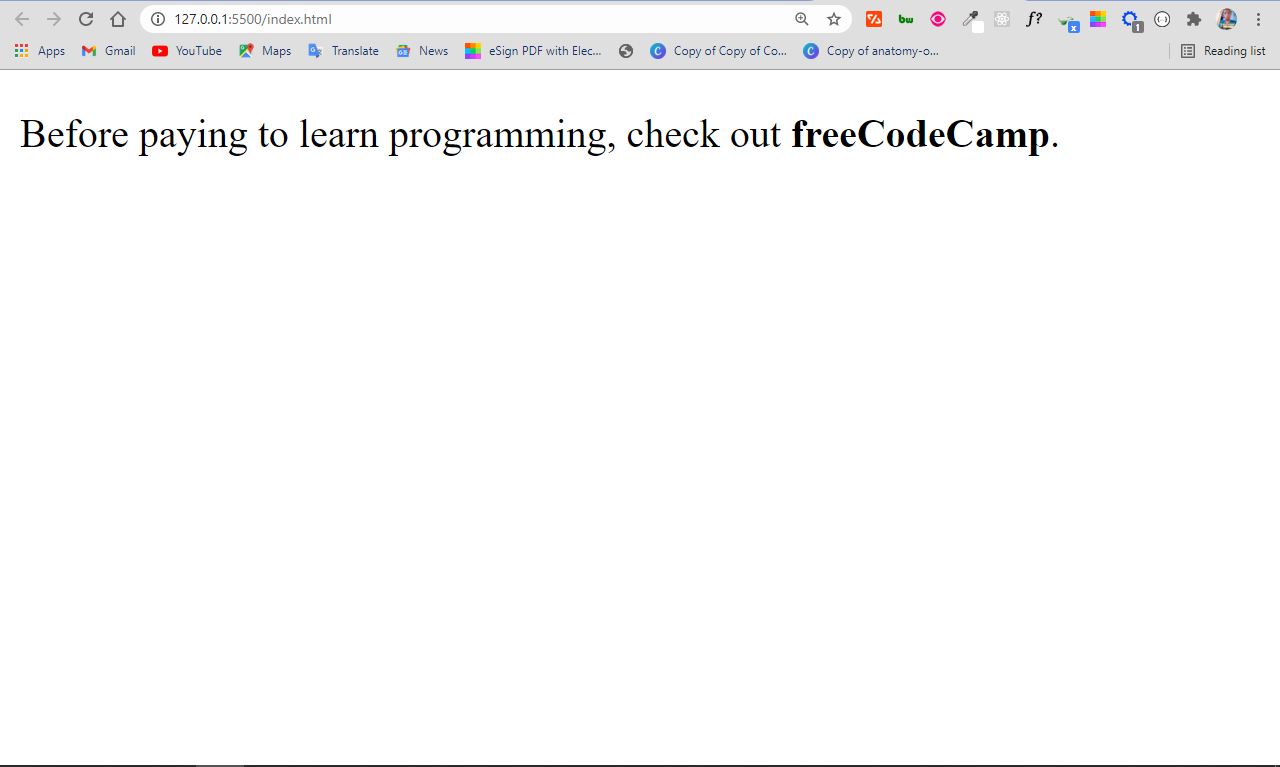
With the tag, the freeCodeCamp text isn’t just bold, it has a semantic meaning and emphasis.
How to Make Text Bold with the CSS font-weight Property
The font-weight property takes lighter , bold , and bolder as values. It also takes numbers from 100 to 900. So, with it, you don’t just make text bold, you can also make it lighter than its surrounding text.
To make some text bold with the font-weight weight property, you need to select the text with its class, id (if any), or element and then apply the values you want. Here’s how it works:
This is a lighter text.
This is a bold text.
This is a bolder text.

Should You Use , or font-weight to Make Text Bold?
You might be wondering which to use for making text bold – , , or the CSS font-weight property.
You should generally avoid using because it’s already a style. When you make text bold with the tag, you’re explicitly telling the browser to make the text bold right from the HTML.
also makes the text appear bold, but it is semantic. With it, you’re not styling from the HTML (which HTML was never meant for originally), but rather you’re telling the browser to make the text appear stronger in appearance than other surrounding text.
The CSS font-weight property gives you more control over how light or bold the text should be. The values lighter , bold , and bolder are a start, but you can take things a step further by applying numbers/weights like 100 200 , 300 , 400 , 500 , 600 , 700 , 800 , and 900 as values, which gives different variations of lightness and boldness.
Conclusion
Bold font helps you place emphasis on certain words in HTML. In this article, you’ve learned about the 3 different ways you can make text bold, as well as which of them is best to use.
Thank you for reading, and keep coding.