- CSS Tables
- Table Styling Properties
- Example of styling a table:
- Result
- Table color
- Collapse Borders
- Table Width and Height
- Table Text Alignment
- Table Padding
- Horizontal alignment with the text-align property
- Example of aligning the content of and elements to the right:
- Vertical alignment with the vertical align-property
- Example of the vertical alignment of elements’ content to bottom:
- Horizontal dividers
- Example of creating horizontal dividers:
- Hoverable tables
- Example of creating a hoverable table:
- Zebra-striped table
- Example of creating a zebra striped table:
- Responsive tables
- Example of creating a responsive table:
- CSS Tables
- Table Borders
- Example
- Full-Width Table
- Example
- Double Borders
- Collapse Table Borders
- Example
- Как сделать таблицу при помощи DIVов
CSS Tables
Some of the CSS properties are widely used to apply style on HTML tables. Each of them is described below.
In this chapter, we will talk about how to give styles to tables. We can change the color of headings and rows that we want.
Table Styling Properties
Here are CSS properties that we use for applying a style to the table. The background-color and color properties set the background color and the color of the text, respectively. The border-collapse property makes the table borders collapse. The text-align property sets the text position. Also, we should use the height, width and padding properties for styling.
Example of styling a table:
html> html> head> title>Title of the document title> style> table < width: 100%; border-collapse: collapse; > table, th, td < border: 1px solid black; > thead < background-color: #1c87c9; color: #ffffff; > th < text-align: center; height: 50px; > tbody tr:nth-child(odd) < background: #ffffff; > tbody tr:nth-child(even) < background: #f4f4f4; > style> head> body> table> thead> tr> th>Heading th> th>Heading th> tr> thead> tbody> tr> td>Some text td> td>Some text td> tr> tr> td>Some text td> td>Some text td> tr> tr> td>Some text td> td>Some text td> tr> tr> td>Some text td> td>Some text td> tr> tbody> table> body> html>Result
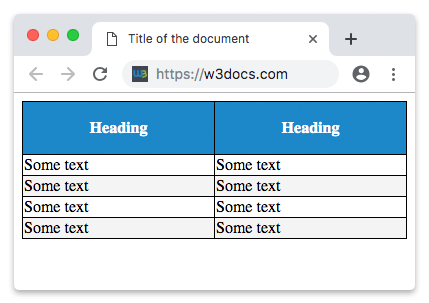
Let’s explain the above code.
As you see our table has 2 parts: the first is the part where we have written headings, which is our part and the second part is the part where we have written some text. The table has black borders, for which we use border property. We can use any color we want as well as we can choose the style of borders.
Table color
As you see the part of our table is blue and wherever we write some text is in white. For the blue background, we use the background-color property, and for the white text, we use the color property. The other texts are written with black.
Collapse Borders
The border-collapse property specifies whether the borders of a table are collapsed into a single border or separated.
Table Width and Height
The table also has width and height properties. As you see we use these properties in our style. We use the width property for the whole table and the height property for the headings. We can use these properties with pixels and percents.
Table Text Alignment
Now about the table text alignment. As you know earlier we used the text-align property for the text position. In our example, as you see, we use the text-align property for the heading. For that, we use «text-align: center». You can read our previous chapter to know how to use it.
Table Padding
To control the space between the border and content in a table, use the padding property on and elements:
Horizontal alignment with the text-align property
Example of aligning the content of and elements to the right:
html> html> head> title>Title of the document title> style> table, td, th < border: 1px solid black; > table < border-collapse: collapse; width: 100%; > th, td < text-align: right; > style> head> body> h2>Horizontal alignment example h2> table> tbody> tr> th>Firstname th> th>Lastname th> th>Money th> tr> tr> td>Sherlock td> td>Holmes td> td>$200 td> tr> tr> td>John td> td>Watson td> td>$250 td> tr> tr> td>Mary td> td>Whatson td> td>$500 td> tr> tbody> table> body> html>Vertical alignment with the vertical align-property
Example of the vertical alignment of elements’ content to bottom:
html> html> head> style> table, td, th < border: 1px solid black; > table < border-collapse: collapse; width: 100%; > td < height: 50px; vertical-align: bottom; text-align: right; padding-right: 10px; > style> head> body> h2>Vertical alignment example h2> table> tr> th>Firstname th> th>Lastname th> th>Money th> tr> tr> td>Sherlock td> td>Holmes td> td>$300 td> tr> tr> td>John td> td>Watson td> td>$250 td> tr> tr> td>Mary td> td>Watson td> td>$500 td> tr> table> body> html>Horizontal dividers
Example of creating horizontal dividers:
html> html> head> title>Title of the document title> style> table < border-collapse: collapse; width: 100%; > th, td < padding: 10px; text-align: left; border-bottom: 1px solid #cccccc; > style> head> body> h2>Horizontal dividers example h2> table> tr> th>Firstname th> th>Lastname th> th>Money th> tr> tr> td>Sherlock td> td>Holmes td> td>$200 td> tr> tr> td>John td> td>Watson td> td>$350 td> tr> tr> td>Mary td> td>Watson td> td>$500 td> tr> table> body> html>Hoverable tables
Example of creating a hoverable table:
html> html> head> title>Title of the document title> style> table < border-collapse: collapse; width: 100%; > tr < background-color: #f5f5f5; > th, td < padding: 15px; text-align: left; border-bottom: 1px solid #ccc; > tr:hover < background-color: #cdcdcd; > style> head> body> h2>Hoverable table example h2> table> tr> th>First Name th> th>Last Name th> th>Money th> tr> tr> td>Sherlock td> td>Holmes td> td>$200 td> tr> tr> td>John td> td>Watson td> td>$350 td> tr> tr> td>Mary td> td>Watson td> td>$500 td> tr> table> body> html>Zebra-striped table
Using the nth-child() selector and adding the CSS background-color property to the odd (even) table rows, you can create a zebra-striped table.
Example of creating a zebra striped table:
html> html> head> title>Title of the document title> style> table < border-collapse: collapse; width: 100%; > th, td < text-align: left; padding: 10px; > tr:nth-child(even) < background-color: #6eeccf; > tr:nth-child(odd) < background-color: #2d7f88; > style> head> body> h2>Striped table example h2> table> tr> th>First name th> th>Last name th> th>Points th> tr> tr> td>Sherlock td> td>Holmes td> td>$250 td> tr> tr> td>John td> td>Watson td> td>$350 td> tr> tr> td>Mary td> td>Watson td> td>$500 td> tr> table> body> html>Responsive tables
Example of creating a responsive table:
html> html> head> title>Title of the document title> style> div < overflow-x: auto; > table < border-collapse: collapse; width: 100%; > th, td < text-align: left; padding: 8px 5px; > tr:nth-child(even) < background-color: #6eeccf; > tr:nth-child(odd) < background-color: #2d7f88; > style> head> body> h2>Responsive table example h2> div> table> tr> th>First Name th> th>Last Name th> th>Money th> th>Money th> th>Money th> th>Money th> th>Money th> th>Money th> th>Money th> th>Money th> th>Money th> th>Money th> tr> tr> td>Sherlock td> td>Holmes td> td>$150 td> td>$150 td> td>$150 td> td>$150 td> td>$150 td> td>$150 td> td>$150 td> td>$150 td> td>$150 td> td>$150 td> tr> tr> td>John td> td>Watson td> td>$350 td> td>$350 td> td>$350 td> td>$350 td> td>$350 td> td>$350 td> td>$350 td> td>$350 td> td>$350 td> td>$350 td> tr> tr> td>Mary td> td>Watson td> td>$500 td> td>$500 td> td>$500 td> td>$500 td> td>$500 td> td>$500 td> td>$500 td> td>$500 td> td>$500 td> td>$500 td> tr> table> div> body> html>CSS Tables
The look of an HTML table can be greatly improved with CSS:
| Company | Contact | Country |
|---|---|---|
| Alfreds Futterkiste | Maria Anders | Germany |
| Berglunds snabbköp | Christina Berglund | Sweden |
| Centro comercial Moctezuma | Francisco Chang | Mexico |
| Ernst Handel | Roland Mendel | Austria |
| Island Trading | Helen Bennett | UK |
| Königlich Essen | Philip Cramer | Germany |
| Laughing Bacchus Winecellars | Yoshi Tannamuri | Canada |
| Magazzini Alimentari Riuniti | Giovanni Rovelli | Italy |
Try it Yourself »
Table Borders
To specify table borders in CSS, use the border property.
| Firstname | Lastname |
|---|---|
| Peter | Griffin |
| Lois | Griffin |
Example
Full-Width Table
| Firstname | Lastname |
|---|---|
| Peter | Griffin |
| Lois | Griffin |
Example
Double Borders
To remove double borders, take a look at the example below.
Collapse Table Borders
The border-collapse property sets whether the table borders should be collapsed into a single border:
| Firstname | Lastname |
|---|---|
| Peter | Griffin |
| Lois | Griffin |
Example
| Firstname | Lastname |
|---|---|
| Peter | Griffin |
| Lois | Griffin |
Как сделать таблицу при помощи DIVов
Довольно часто на различных сайтах надо вывести ту или иную информацию в виде таблице, причём не виде стандартной таблице где в первой колонке будет находится название чего либо а во всех остальных его параметры, а виде таблице когда вся информации по тому или иному объекту находится в одной ячейки, яркий пример такого это интернет-магазины и вывод товаров.

Каким образом можно сделать подобную разметку? Для того что бы получить такую вот картину

div id="content"> div> div>1 div/div> div>2 div/div> div>3 div/div> /div> div> div>1 div/div> div>2 div/div> div>3 div/div> /div> div> div>1 div/div> div>2 div/div> div>3 div/div> /div> /div>
Здесь всё очень просто, есть один главный див, его а также есть три дива в нём, в каждом из трёх дивов есть ещё три дива. Главное в этом случае это css, который выглядит следующим образом:
#content margin: 0 auto; display: table; border-spacing: 15px; border: solid 3px red; width: 50%; > #content div display: table-row; border: solid 1px green; > #content div div display: table-cell; border: solid 1px navy; >
Главный див с id = content, центрирован при помощи margin:0 auto, также он имеет display:table, что позволяет ему использоваться как блочной таблице, то есть в этом случае див чем-то напоминает тег , при помощи команды border-spacing можно задать расстояние между ячейками в таблице, команда border задает цвет и размер границы дива.
Дальше работает с вложенными дивами в главный див, у нас их три, на самом деле может быть любое количество но в данном случае три, главное что надо отметить это display:table-row, который позволяет этой группе дивов отображаться подобно строке таблицы.
Дальше работаем с уже вложенными дивами во вложенные дивы главного дива с id = content, ему мы устанавливаем display: cell , что позволяет ему выглядеть как ячейка таблицы. В итоге получаем результат как на картинке выше.
Конечно для того что бы это имело смисл следует выводить из базы данных какую-либо информацию в эти дивы, но как это сделать уже в следующем посте.