- How to develop a website using HTML, CSS PHP and MySQL?
- Step-by-Step guide to create dynamic web pages using HTML, CSS, PHP & MySQL.
- Steps to create a website:
- Step 1: Download a code editor
- Step 2: Download XAMPP
- Step 3: Start Apache and MySQL
- Step 4: Write HTML, CSS, PHP, SQL code
- Step 5: Test your website locally on your computer
- Step 6: Deploy your website
- Step by step html to php
- 3 Steps To Save HTML Form Into Database In PHP MySQL
- TLDR – QUICK SLIDES
- TABLE OF CONTENTS
- SAVE HTML FORM INTO DATABASE
- STEP 1) CREATE THE DATABASE TABLE
- STEP 2) CREATE THE HTML FORM
- STEP 3) PHP SAVE FORM INTO DATABASE
- EXTRA) SEND EMAIL NOTIFICATION
- DOWNLOAD & NOTES
- SUPPORT
- EXAMPLE CODE DOWNLOAD
- EXTRA BITS & LINKS
- LINKS & REFERENCES
- TUTORIAL VIDEO
- INFOGRAPHIC CHEAT SHEET
- THE END
How to develop a website using HTML, CSS PHP and MySQL?
Step-by-Step guide to create dynamic web pages using HTML, CSS, PHP & MySQL.
This post is for the persons who are beginners in the web development field.
In this post, I will cover everything step by step starting from designing and development. At the last we will see how to deploy the website online.
Steps to create a website:
- Download and install a code editor on your computer for writing HTML, PHP etc. code.
- Download and install XAMPP Server on your computer.
- Start Apache and MySQL server.
- Start designing and developing your website with SQL queries.
- Test your website on your computer.
- Deploy your website on online server.
Step 1: Download a code editor
There are very code editors available for free like visual code, notepad++, Sublime etc. Download and install any one of them.
Step 2: Download XAMPP
Download and install XAMPP Server on your computer. XAMPP is the most popular PHP development environment. XAMPP is a completely free, easy to install Apache distribution containing MariaDB, PHP, and Perl.
XAMPP is an abbreviation for cross-platform, Apache, MySQL, PHP and Perl, and it allows you to build and run PHP offline, on a local web server on your computer. This simple and lightweight solution works on Windows, Linux, and Mac – hence the “cross-platform” part.
Step 3: Start Apache and MySQL
After installing the XAMPP, you have to run it on your computer. Also make sure you start Apache and MySQL Server. If your Apache and MySQL Server, it will show as the image below.

Step 4: Write HTML, CSS, PHP, SQL code
Now it is the time to write your HTML and PHP files.
Create a separate folder for your website in htdocs folder of XAMPP. You can find your XAMPP in c. (C:\xampp\htdocs). Inside this folder, you have to keep your coding files.
Tip: Your homepage will be known by name: index.html or index.php.
You can create the database for your website through phpmyadmin.
Step 5: Test your website locally on your computer
Keep testing your code in your browser through local host. This is XAMPP comes into handy for this purpose.
Step 6: Deploy your website
When your website is complete. You have to purchase a hosting and a domain for your website. Hosting provider allocates space on a web server for a website to store its files
When to use index.php instead of index.html?
you will have to choose the PHP extension (.php) when you want php code to be executed in the file. PHP code is code between the opening tags.
When no PHP code should be executed you can use the .html extension.
Usually when using the .php extension you are telling the web server, that it should use a PHP interpreter to process the file before it will be delivered to the browser. The PHP interpreter will then replace all content between the by the output of the PHP code. Just as if you wrote it manually. The processed file will then be delivered to the browser.
Step by step html to php
This is a simple Tutorial to teach how to convert HTML website in to PHP website. HTML is time consuming when you edit the website. For e.g., if you want to add an extra menu in a navigation menu you have to edit in all HTML webpage’s of your website. By converting a HTML website in to PHP website this task can be made easier and we need not to edit each and every page for effect to take place.
Note: PHP is a server side scripting language. It requires WAMP or AMPPS to run your website in local machine.
Dreamweaver or Editplus or Araneae (Freeware) – (Edit you files – Generally mentioned as Text or Code editor)
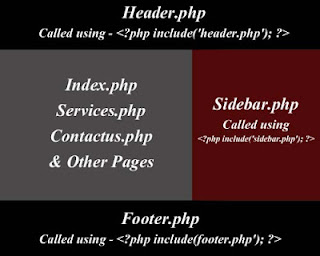
- Header.php — It contains the header part of the website like header image, navigation menu etc…
- Index.php — It contains the content part of the website.
- Sidebar — It contains the sidebar part of the website.
- Footer.php — It contains the footer part of the website.
Create 4 text files or PHP files using text editor in a folder e.g. website and rename it as header.php, index.php, sidebar.php and footer.php respectively.
Open all the four files in text editor. To the header.php add code to declare the website as PHP file.
Then divide your HTML template or website in to four standard part of PHP website. i.e. header part, index part, sidebar part and footer part using comment code in the HTML code of the template, then copy paste the divided codes in to the corresponding PHP files. All files should be placed inside the same folder. If your HTML template consist of folder like images, js, css etc place all the folder also inside the folder where the PHP files are saved.
Typical header file consist of codes for logo, search box based on template, navigation menu, header image or slider.
Note: By default index.php is consider as home page by the browser. So in order to view comple website we have to call header, sidebar and footer PHP files.
— Assign title for the index page and this title will be called in the header page as instead of default title.
You can replace the index.php with services.php, contactus.php etc and link to navigation menu of your website. E.g. services.php is the services page of the website and it can be link to the navigation menu in the header.php file as . All the files should be placed in the same folder. Like you called header, sidebar and footer in index.php file in every file you have to call them.
FYI: index.php file is your homepage and services.php, contactus.php are the other separate pages. In those pages you can use different content corresponding to the purpose of the page. Make sure you changed the title of the page in the PHP code. Like this you can create n number of pages and link in your website. Once you edited the header or footer or sidebar it will effect in all the pages thet you need not to edit each and every pages you do with HTML.
Then check your site in localhost of the WAMP server or any server bundle you use. The output should same to that of the original HTML template.
Images not appear – This may be due to the incorrect path of the image files in the CSS file. You can correct that by adding .. in front of the image folder. E.gin the Url /images/image.jpg will be replaced as ../images/image.jpg in your CSS file.
Assign current page menu highlight on the main navigation menu – Normally header file ids one file that appear in all pages so it remains default for every page. So all ways home menu is highlight by default. This can be overcome by tweaking your navigation menu codes using the below mentioned code.
3 Steps To Save HTML Form Into Database In PHP MySQL
Welcome to a beginner’s tutorial on how to save an HTML form into the database with PHP and MySQL. So you have finally come to fight the boss stage of full-stack programming – Combining HTML, PHP, and MySQL to save a submitted form into the database.
Saving an HTML form into the database is a simple 3-step process.
- Create a database table with the fields you want to capture.
- Create the corresponding HTML form, that submits to a PHP script.
- In the PHP script, open a database connection and insert the submitted fields.
Yep, it’s really that simple but read on for an actual example!
TLDR – QUICK SLIDES

TABLE OF CONTENTS
SAVE HTML FORM INTO DATABASE
All right, let us now get started on an example of saving an HTML form into the database.

STEP 1) CREATE THE DATABASE TABLE
CREATE TABLE `survey` ( `email` varchar(255) NOT NULL, `name` varchar(255) NOT NULL, `color` varchar(128) NOT NULL ) ENGINE=InnoDB DEFAULT CHARSET=utf8mb4; ALTER TABLE `survey` ADD PRIMARY KEY (`email`);For this example, we will be doing a simple “survey” on the favorite color that the users like; We will be capturing 3 fields – The email, name, and the color itself.
STEP 2) CREATE THE HTML FORM
?>
Shouldn’t have any trouble with this one too. This is an HTML form with exactly what we want to capture – The email, name, and favorite color. Take note of that if (isset($_POST[«email»])) though, we will only include the “save to database” PHP script only when the form is submitted.
STEP 3) PHP SAVE FORM INTO DATABASE
PDO::ERRMODE_EXCEPTION, PDO::ATTR_DEFAULT_FETCH_MODE => PDO::FETCH_ASSOC ]); // (C) INSERT $stmt = $pdo->prepare("INSERT INTO `survey` (`email`, `name`, `color`) VALUES (?, ?, ?)"); $stmt->execute([$_POST["email"], $_POST["name"], $_POST["color"]]); // (D) RESULTS echo "OK";I don’t think this one needs a lot of explanation either – Connect to the database and do an SQL INSERT . That’s all, really.
EXTRA) SEND EMAIL NOTIFICATION
/* (X) SEND EMAIL $message = ""; foreach ($_POST as $k=>$v) < $message .= "$k : $v\r\n"; >mail("admin@site.com", "Survey Received", $message); */Need to send out an email? Just add a few more lines after the database insert is done.
DOWNLOAD & NOTES
Here is the download link to the example code, so you don’t have to copy-paste everything.
SUPPORT
600+ free tutorials & projects on Code Boxx and still growing. I insist on not turning Code Boxx into a «paid scripts and courses» business, so every little bit of support helps.
EXAMPLE CODE DOWNLOAD
Click here for the source code on GitHub gist, just click on “download zip” or do a git clone. I have released it under the MIT license, so feel free to build on top of it or use it in your own project.
EXTRA BITS & LINKS
That’s all for this guide, and here is a small section on some extras and links that may be useful to you.
LINKS & REFERENCES
TUTORIAL VIDEO
INFOGRAPHIC CHEAT SHEET

THE END
Thank you for reading, and we have come to the end of this guide. I hope that it has helped you with your project, and if you want to share anything with this guide, please feel free to comment below. Good luck and happy coding!