- Starting Python
- Install Python
- Interactively learning Python
- Using Mu
- Saving Python scripts and running them
- Your first Python program
- Code blocks and indentation
- Chapter review: chapters 1 and 2
- Chapter 1
- Chapter 2
- 2. Using the Python Interpreter
- 2.1.1. Argument Passing
- 2.1.2. Interactive Mode
- 2.2. The Interpreter and Its Environment
- 2.2.1. Source Code Encoding
- Table of Contents
Starting Python
To begin learning Python, read chapters 1 and 2 in Sweigart’s Automate the Boring Stuff with Python (second edition). Some scripts in this folder are based on Sweigart’s — naturally, he has more examples than only these. At his website, there’s a link to download files used in the book.
Install Python
If you haven’t installed Python yet, I made a Google doc for that:
Two other helpful docs are linked on the CONTENTS page (under “Outside Resources”):
Interactively learning Python
Start by running simple expressions and statements in the interactive Python interpreter (interactive shell). Open Terminal (Mac) or Command Prompt (Windows). Type python3 (Mac) or python (Windows) at the prompt to start the interpreter. When you see >>> , you’re in the shell. This will help you get comfortable with variables and basic math operators:
>>> fruit = 'apple' >>> print(fruit) apple >>> fruit = 'pear' >>> print(fruit) pear >>> 5 + 2 7 >>> sum = 5 + 2 >>> print(sum) 7
It’s very important to play with these simple statements and try things. Do not only type what is in the book or what you see here. Make up your own examples and try them. Type to understand how things work. If you don’t type the code yourself, you will not learn it.
Using Mu
In his Introduction, Sweigart recommends using the Mu editing program, which you can download (free) for Mac or Windows.
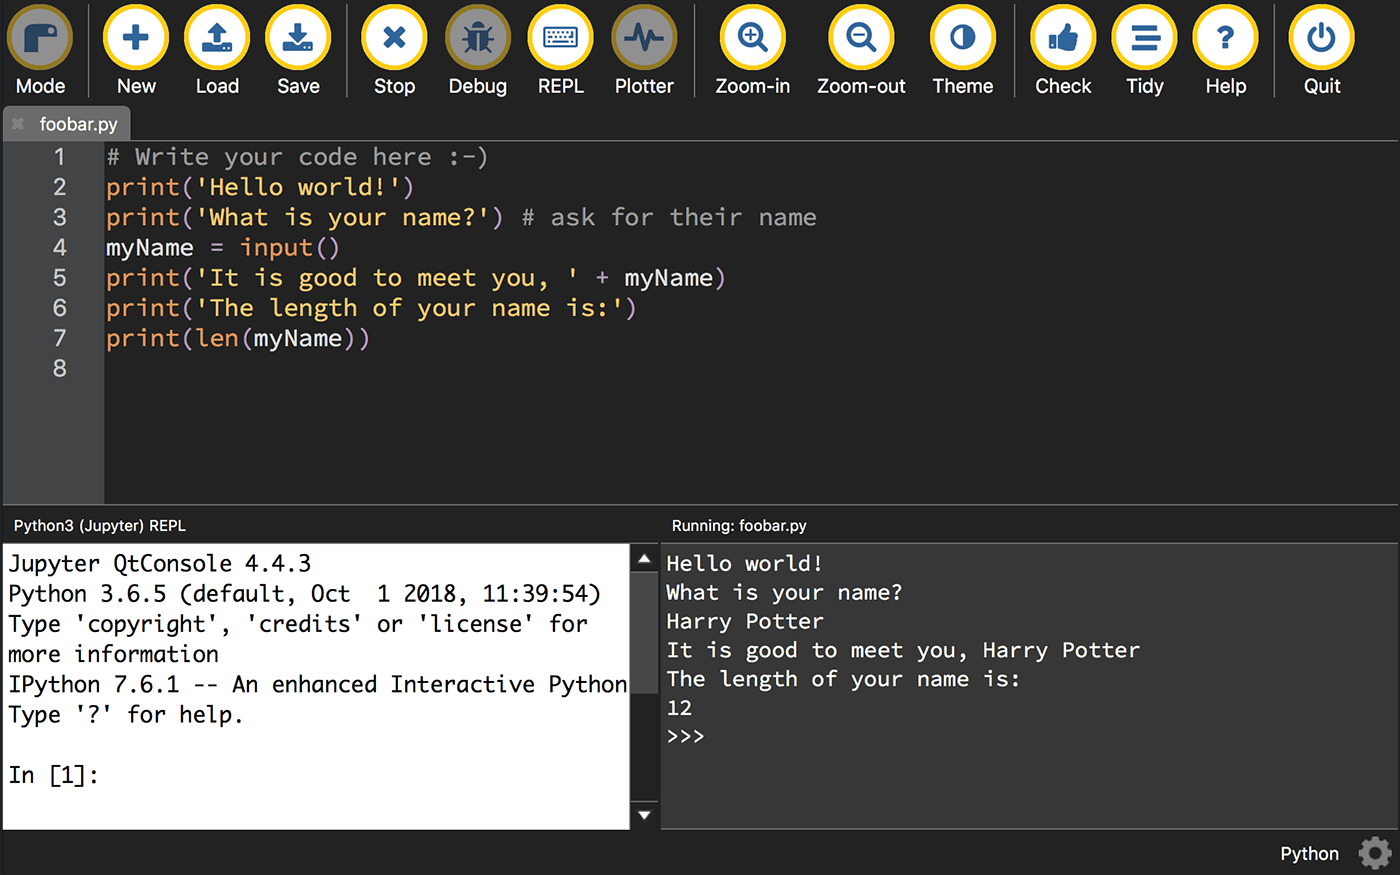
If you are using Mu, you can type Python code interactively into the segment labeled “Python3 (Jupyter) REPL” instead of using Terminal or Command Prompt.
Saving Python scripts and running them
If you use Mu, you can write and save your Python scripts in the upper segment. When you run the script, the results will appear in the segment labeled “Running: filename.py.” Python scripts must end with a .py extension.
Instead of Mu, you can use Atom, our trusted code editor, to write and save your Python scripts. Code is code. You can write any code in Atom. Instead of saving the file with a .html or .js extension, just save it with a .py extension when it is a Python file.
If you write and save the file in Atom, how do you run it?
It’s easiest if you are in the same directory where the .py file was saved. Use the cd command (Command Line Tips) to get there.
At the command prompt ( $ in Mac, C:\Users\yourname> in Windows), type this (using your actual filename, of course):
And it runs! (Mac users: If not in a virtualenv, type python3 instead of python .)
Never try to run a file at the >>> Python shell prompt. You need to be at the command prompt to run a file.
Your first Python program
This is from Sweigart’s chapter 1 (pp. 11–13). After you’ve practiced basic expressions and variables in the interactive shell, you need to learn how to save a script as a file and run it.
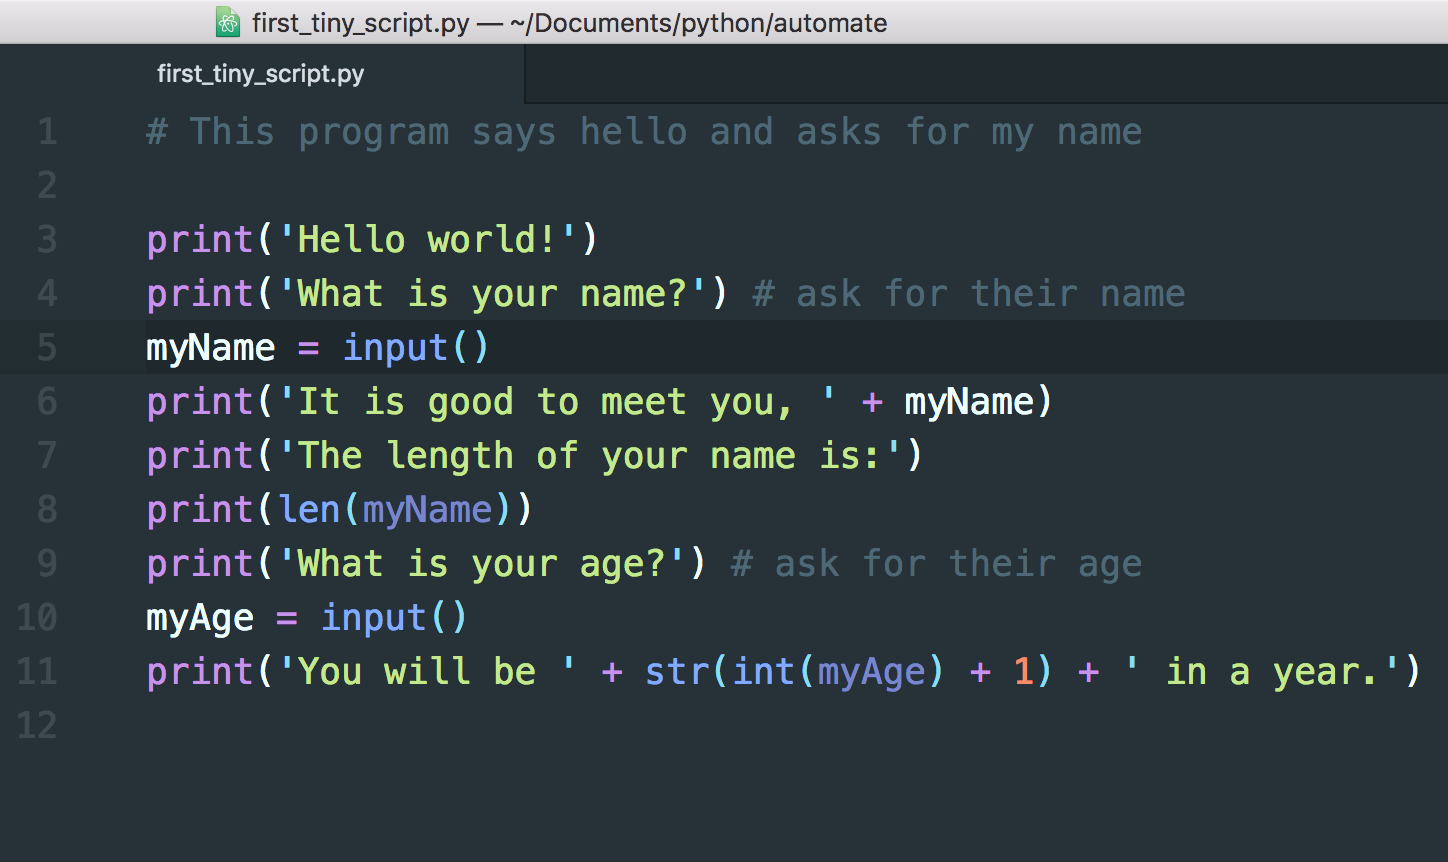
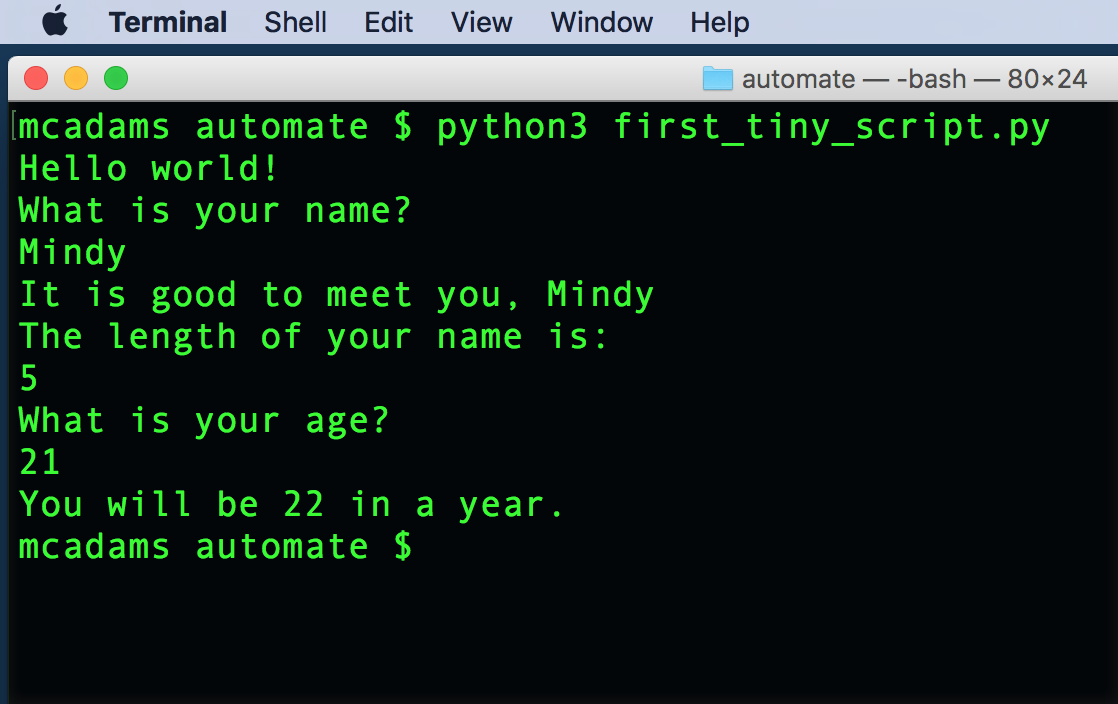
print('Hello world!') print('What is your name?') # ask for their name myName = input() print('It is good to meet you, ' + myName) print('The length of your name is:') print(len(myName)) print('What is your age?') # ask for their age myAge = input() print('You will be ' + str(int(myAge) + 1) + ' in a year.')
You can use Mu, or you can write the script in Atom and run it in the Terminal.
Make sure to note exactly where you save the .py file. You need to know where it is on your computer so that you can run it!
This interactive program says hello and asks for your name and age. It assigns your name and age to variables. It then uses the variables to print out strings, which will differ depending on what you responded.
These Python built-in functions are demonstrated in the interactive program:
All the code in the program is explained in Sweigart’s chapter 1.
Here’s what the program looks like in Atom:
Here’s how I ran it in Terminal (note, I made a folder named automate for my files from the book):
Code blocks and indentation
Python relies on consistent indentation of all code blocks. You need to pick a number of spaces (or use only tabs) and stick with it. Your code will throw errors if you are inconsistent.
print("What is your name?") name = input() print("How old are you?") age = input() if name == 'Alice' and int(age) 13: print("How's Wonderland?") elif name == 'Alice': print("You are too old to enter through the looking glass, Alice.") elif int(age) 13: print('This is only for Alice, kiddo.') else: print('You are not Alice, and you are 13 or older.')
Note how the indents are exactly the same for each code block.
When you run the code for an example, try entering many combinations and try to understand each result. For the script above, enter a name other than Alice and an age above 13, as well as Alice and an age below 13. By entering different name and age values, you should be able to figure out how conditional statements work together.
Chapter review: chapters 1 and 2
These are the takeaways from the first two chapters.
Chapter 1
- Use the interactive Python shell to enter basic math expressions and get results (using the math operators)
- Compare the output from 23 / 7 and 23 // 7
- Exponents, e.g. 2 ** 4
- Order of operations: PEMDAS
- Main data types: string, float, integer
- String concatenation, e.g. ‘Alice’ + ‘Bob’
- String replication, e.g. ‘Alice’ * 5
- Assign a value to a variable with =
- Rules for variable names: No spaces. Use only letters, numbers, and the underscore ( _ ) character. Cannot begin with a number. Case sensitive. (p. 11)
- Comments start with #
- print() function
- input() function — assign user input to a variable: answer = input()
- len() function
- str() , int() , and float() functions — when we insert a numeral into a string, for example (pp. 15–18)
Chapter 2
- The Boolean data type: True , False
- Comparison operators, e.g. greater than, less than
- Difference between == and = (what do they do?)
- Boolean operators: and , or , not
- Conditions and blocks (pp. 27-28)
- Flow control statements
- if statements — they will evaluate to True or False
- else and elif statements
- while loops
- break statements
- continue statements
- for loops with range()
- Press Control-C to break out of an infinite loop
- What is an infinite loop?
- “When used in conditions, 0 , 0.0 , and » (the empty string) are considered False, while all other values are considered True.” (Truthiness, p. 43)
- The random module, from Python’s standard library
- Use of the import statement
- Use of random.randint()
2. Using the Python Interpreter
The Python interpreter is usually installed as /usr/local/bin/python3.11 on those machines where it is available; putting /usr/local/bin in your Unix shell’s search path makes it possible to start it by typing the command:
to the shell. 1 Since the choice of the directory where the interpreter lives is an installation option, other places are possible; check with your local Python guru or system administrator. (E.g., /usr/local/python is a popular alternative location.)
On Windows machines where you have installed Python from the Microsoft Store , the python3.11 command will be available. If you have the py.exe launcher installed, you can use the py command. See Excursus: Setting environment variables for other ways to launch Python.
Typing an end-of-file character ( Control — D on Unix, Control — Z on Windows) at the primary prompt causes the interpreter to exit with a zero exit status. If that doesn’t work, you can exit the interpreter by typing the following command: quit() .
The interpreter’s line-editing features include interactive editing, history substitution and code completion on systems that support the GNU Readline library. Perhaps the quickest check to see whether command line editing is supported is typing Control — P to the first Python prompt you get. If it beeps, you have command line editing; see Appendix Interactive Input Editing and History Substitution for an introduction to the keys. If nothing appears to happen, or if ^P is echoed, command line editing isn’t available; you’ll only be able to use backspace to remove characters from the current line.
The interpreter operates somewhat like the Unix shell: when called with standard input connected to a tty device, it reads and executes commands interactively; when called with a file name argument or with a file as standard input, it reads and executes a script from that file.
A second way of starting the interpreter is python -c command [arg] . , which executes the statement(s) in command, analogous to the shell’s -c option. Since Python statements often contain spaces or other characters that are special to the shell, it is usually advised to quote command in its entirety.
Some Python modules are also useful as scripts. These can be invoked using python -m module [arg] . , which executes the source file for module as if you had spelled out its full name on the command line.
When a script file is used, it is sometimes useful to be able to run the script and enter interactive mode afterwards. This can be done by passing -i before the script.
All command line options are described in Command line and environment .
2.1.1. Argument Passing
When known to the interpreter, the script name and additional arguments thereafter are turned into a list of strings and assigned to the argv variable in the sys module. You can access this list by executing import sys . The length of the list is at least one; when no script and no arguments are given, sys.argv[0] is an empty string. When the script name is given as ‘-‘ (meaning standard input), sys.argv[0] is set to ‘-‘ . When -c command is used, sys.argv[0] is set to ‘-c’ . When -m module is used, sys.argv[0] is set to the full name of the located module. Options found after -c command or -m module are not consumed by the Python interpreter’s option processing but left in sys.argv for the command or module to handle.
2.1.2. Interactive Mode
When commands are read from a tty, the interpreter is said to be in interactive mode. In this mode it prompts for the next command with the primary prompt, usually three greater-than signs ( >>> ); for continuation lines it prompts with the secondary prompt, by default three dots ( . ). The interpreter prints a welcome message stating its version number and a copyright notice before printing the first prompt:
$ python3.11 Python 3.11 (default, April 4 2021, 09:25:04) [GCC 10.2.0] on linux Type "help", "copyright", "credits" or "license" for more information. >>>
Continuation lines are needed when entering a multi-line construct. As an example, take a look at this if statement:
>>> the_world_is_flat = True >>> if the_world_is_flat: . print("Be careful not to fall off!") . Be careful not to fall off!
For more on interactive mode, see Interactive Mode .
2.2. The Interpreter and Its Environment
2.2.1. Source Code Encoding
By default, Python source files are treated as encoded in UTF-8. In that encoding, characters of most languages in the world can be used simultaneously in string literals, identifiers and comments — although the standard library only uses ASCII characters for identifiers, a convention that any portable code should follow. To display all these characters properly, your editor must recognize that the file is UTF-8, and it must use a font that supports all the characters in the file.
To declare an encoding other than the default one, a special comment line should be added as the first line of the file. The syntax is as follows:
where encoding is one of the valid codecs supported by Python.
For example, to declare that Windows-1252 encoding is to be used, the first line of your source code file should be:
One exception to the first line rule is when the source code starts with a UNIX “shebang” line . In this case, the encoding declaration should be added as the second line of the file. For example:
#!/usr/bin/env python3 # -*- coding: cp1252 -*-
On Unix, the Python 3.x interpreter is by default not installed with the executable named python , so that it does not conflict with a simultaneously installed Python 2.x executable.