- HTML Input Types
- HTML Input Types
- Input Type Text
- Example
- Input Type Password
- Example
- Input Type Submit
- Example
- Example
- Input Type Reset
- Example
- Input Type Radio
- Example
- Input Type Checkbox
- Example
- Input Type Button
- Example
- Input Type Color
- Example
- Input Type Date
- Example
- Example
- Input Type Datetime-local
- Example
- Input Type Email
- Example
- Input Type Image
- Example
- Input Type File
- Example
- Input Type Hidden
- Example
- Input Type Month
- Example
- Input Type Number
- Example
- Input Restrictions
- Example
- Input Type Range
- Example
- Input Type Search
- Example
- Input Type Tel
- Example
- Input Type Time
- Example
- Input Type Url
- Example
- Input Type Week
- Поле со списком
- multiple
- name
- size
- selected
- value
- label
- Группирование элементов списка
- Атрибут list
- Синтаксис
- Значение
- Типы тегов
HTML Input Types
This chapter describes the different types for the HTML element.
HTML Input Types
Here are the different input types you can use in HTML:
Tip: The default value of the type attribute is «text».
Input Type Text
defines a single-line text input field:
Example
This is how the HTML code above will be displayed in a browser:
Input Type Password
defines a password field:
Example
This is how the HTML code above will be displayed in a browser:
The characters in a password field are masked (shown as asterisks or circles).
Input Type Submit
defines a button for submitting form data to a form-handler.
The form-handler is typically a server page with a script for processing input data.
The form-handler is specified in the form’s action attribute:
Example
This is how the HTML code above will be displayed in a browser:
If you omit the submit button’s value attribute, the button will get a default text:
Example
Input Type Reset
defines a reset button that will reset all form values to their default values:
Example
This is how the HTML code above will be displayed in a browser:
If you change the input values and then click the «Reset» button, the form-data will be reset to the default values.
Input Type Radio
defines a radio button.
Radio buttons let a user select ONLY ONE of a limited number of choices:
Example
Choose your favorite Web language:
This is how the HTML code above will be displayed in a browser:
Input Type Checkbox
defines a checkbox.
Checkboxes let a user select ZERO or MORE options of a limited number of choices.
Example
This is how the HTML code above will be displayed in a browser:
I have a bike
I have a car
I have a boat
Input Type Button
defines a button:
Example
This is how the HTML code above will be displayed in a browser:
Input Type Color
The is used for input fields that should contain a color.
Depending on browser support, a color picker can show up in the input field.
Example
Input Type Date
The is used for input fields that should contain a date.
Depending on browser support, a date picker can show up in the input field.
Example
You can also use the min and max attributes to add restrictions to dates:
Example
Input Type Datetime-local
The specifies a date and time input field, with no time zone.
Depending on browser support, a date picker can show up in the input field.
Example
Input Type Email
The is used for input fields that should contain an e-mail address.
Depending on browser support, the e-mail address can be automatically validated when submitted.
Some smartphones recognize the email type, and add «.com» to the keyboard to match email input.
Example
Input Type Image
The defines an image as a submit button.
The path to the image is specified in the src attribute.
Example
Input Type File
The defines a file-select field and a «Browse» button for file uploads.
Example
Input Type Hidden
The defines a hidden input field (not visible to a user).
A hidden field lets web developers include data that cannot be seen or modified by users when a form is submitted.
A hidden field often stores what database record that needs to be updated when the form is submitted.
Note: While the value is not displayed to the user in the page’s content, it is visible (and can be edited) using any browser’s developer tools or «View Source» functionality. Do not use hidden inputs as a form of security!
Example
Input Type Month
The allows the user to select a month and year.
Depending on browser support, a date picker can show up in the input field.
Example
Input Type Number
The defines a numeric input field.
You can also set restrictions on what numbers are accepted.
The following example displays a numeric input field, where you can enter a value from 1 to 5:
Example
Input Restrictions
Here is a list of some common input restrictions:
| Attribute | Description |
|---|---|
| checked | Specifies that an input field should be pre-selected when the page loads (for type=»checkbox» or type=»radio») |
| disabled | Specifies that an input field should be disabled |
| max | Specifies the maximum value for an input field |
| maxlength | Specifies the maximum number of character for an input field |
| min | Specifies the minimum value for an input field |
| pattern | Specifies a regular expression to check the input value against |
| readonly | Specifies that an input field is read only (cannot be changed) |
| required | Specifies that an input field is required (must be filled out) |
| size | Specifies the width (in characters) of an input field |
| step | Specifies the legal number intervals for an input field |
| value | Specifies the default value for an input field |
You will learn more about input restrictions in the next chapter.
The following example displays a numeric input field, where you can enter a value from 0 to 100, in steps of 10. The default value is 30:
Example
Input Type Range
The defines a control for entering a number whose exact value is not important (like a slider control). Default range is 0 to 100. However, you can set restrictions on what numbers are accepted with the min , max , and step attributes:
Example
Input Type Search
The is used for search fields (a search field behaves like a regular text field).
Example
Input Type Tel
The is used for input fields that should contain a telephone number.
Example
Input Type Time
The allows the user to select a time (no time zone).
Depending on browser support, a time picker can show up in the input field.
Example
Input Type Url
The is used for input fields that should contain a URL address.
Depending on browser support, the url field can be automatically validated when submitted.
Some smartphones recognize the url type, and adds «.com» to the keyboard to match url input.
Example
Input Type Week
The allows the user to select a week and year.
Depending on browser support, a date picker can show up in the input field.
Поле со списком
Поле со списком, называемое еще ниспадающее меню, один из гибких и удобных элементов формы. В зависимости от настроек, в списке можно выбирать одно или несколько значений. Преимущество списка в его компактности и универсальности, список может занимать одну или несколько строк, в нём можно выбирать одно или несколько значений. Поле со списком создается следующим образом.
Тег выступает контейнером для пунктов списка и определяет его вид, будет ли это раскрывающийся список или же список с одним или множественным выбором. Вид зависит от использования атрибута size тега , который устанавливает высоту списка, ширина списка при этом определяется автоматически исходя из длины текста внутри . Ниже представлен список множественного выбора, в котором пункты выделяются с помощью клавиши Ctrl и Shift и раскрывающийся список.
| Список множественного выбора | Раскрывающийся список |
Атрибуты тега
Рассмотрим атрибуты тега , с помощью которых можно изменять представление списка.
multiple
Наличие multiple сообщает браузеру отображать содержимое элемента как список множественного выбора. Конечный вид списка зависит от используемого атрибута size . Если он отсутствует, то высота списка равна количеству пунктов, если значение size меньше числа пунктов, то появляется вертикальная полоса прокрутки.
| Атрибут size отсутствует | Атрибут size равен 2 |
Для выбора нескольких значений списка применяются клавиши Ctrl и Shift совместно с курсором мыши.
В примере 1 показано создание списка множественного выбора.
Пример 1. Список множественного выбора
name
Определяет уникальное имя элемента . Как правило, это имя используется для доступа к данным через скрипты или для получения выбранного значения серверным обработчиком.
size
Устанавливает высоту списка. Если значение size равно единице, то список превращается в раскрывающийся. Значение по умолчанию зависит от атрибута multiple . Если он присутствует, то размер списка равен числу элементов. Когда multiple нет, то значение атрибута size равно 1.
Атрибуты тега
Тег также имеет атрибуты, влияющие на вид списка, они представлены далее.
selected
Делает текущий пункт списка выделенным. Если у тега добавлен атрибут multiple , то можно выделять более одного пункта.
value
Определяет значение пункта списка, которое будет отправлено на сервер. На сервер отправляется пара «имя/значение», где имя задаётся атрибутом name тега , а значение — атрибутом value выделенных пунктов списка. Значение может как совпадать с текстом пункта, так быть и самостоятельным.
label
Предназначен для указания метки пункта списка, сокращённой по сравнению с текстом внутри . Если атрибут label присутствует, то текст внутри тега игнорируется и в списке выводится значение label . Браузер Firefox не поддерживает этот атрибут.
Создание списка показано в примере 2.
Пример 2. Использование списка
Группирование элементов списка
При достаточно обширном списке имеет смысл сгруппировать его элементы по блокам, чтобы обеспечить наглядность списка и удобство работы с ним. Для этой цели применяется тег . Он представляет собой контейнер, внутри которого располагаются теги объединённые в одну группу. Особенностью тега является то, что он не выделяется как обычный элемент списка, акцентируется с помощью жирного начертания, а все элементы, входящие в этот контейнер, смещаются вправо от своего исходного положения. Для добавления заголовка группы используется атрибут label , как показано в примере 3.
Пример 3. Группирование элементов списка
Результат примера показан на рис. 1.
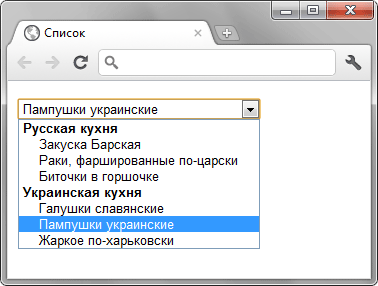
Рис. 1. Группированный список
Атрибут list
Указывает на список вариантов, созданный с помощью тега , которые можно выбирать при наборе текста. Изначально этот список скрыт и становится доступным при получении полем фокуса.
Синтаксис
Значение
Вид текстового поля при наборе текста показан на рис. 1.
Рис. 1. Выбор текста из списка
Не выкладывайте свой код напрямую в комментариях, он отображается некорректно. Воспользуйтесь сервисом cssdeck.com или jsfiddle.net, сохраните код и в комментариях дайте на него ссылку. Так и результат сразу увидят.
Типы тегов

HTML5

Блочные элементы

Строчные элементы

Универсальные элементы

Нестандартные теги

Осуждаемые теги

Видео

Документ

Звук

Изображения

Объекты

Скрипты

Списки

Ссылки

Таблицы

Текст

Форматирование

Формы

Фреймы