Данный курс научит Вас созданию игр на C++ в Unreal Engine 5. Курс состоит из 12 разделов, в которых Вас ждёт теория и практика. Причём, в качестве практики будет создан весьма крупный проект объёмом свыше 5000 строк качественного кода, который уже на практике познакомит Вас с принципами создания игр на C++ в Unreal Engine 5.
Параллельно с курсом Вы также будете получать домашние задания, результатом которых станет, в том числе, полноценная серьёзная работа для портфолио.
Помимо самого курса Вас ждёт ещё и очень ценный Бонус: «Тестирование Unreal-проектов на Python», в рамках которого Вы научитесь писать очень полезные тесты для тестирования самых разных аспектов разработки игр.
Подпишитесь на мой канал на YouTube, где я регулярно публикую новые видео.
Подписаться
Подписавшись по E-mail, Вы будете получать уведомления о новых статьях.
Подписаться
Добавляйтесь ко мне в друзья ВКонтакте! Отзывы о сайте и обо мне оставляйте в моей группе.
Мой аккаунт Моя группа
Какая тема Вас интересует больше?
— Вы получите необходимую базу по Unreal Engine 5
— Вы познакомитесь с множеством инструментов в движке
— Вы научитесь создавать несложные игры
Общая продолжительность курса 4 часа, плюс множество упражнений и поддержка!
Чтобы получить Видеокурс, заполните форму
5 шагов и профессиональный сайт готов
— Вы будете иметь чёткий план действий.
— Вы сможете начать создавать сайт.
— Вы сможете легко ориентироваться в информации по созданию сайтов.
How to create a contact us page in HTML & CSS? (source code)
In this post, you’ll see how to create a mobile responsive “Contact Us” page design using HTML & CSS. I will give you all the source code for the template.
Before you dive in, let’s see the demo of the finished page you will build.
In this template (live preview), I also have two optional parts such as the header navigation & footer. But you can ignore that if you already have them in your existing template.
I commented out both in HTML & CSS files so you can easily understand which code does what specific things.
Let’s start building the contact page together.
Contact page source code
I will give you the HTML & CSS for the contact page template in this section. However, to keep this post concise and short, I will ignore the header & footer parts. But don’t worry if you need them. Because I will also give the link to my GitHub repository so you can download the entire project as you saw in the live demo.
HTML
Contact us
Get in Touch and Let's Build Something Great Together
Welcome to the contact page! I'm excited to hear from you and explore the possibilities of working together. If you have any questions, comments, or ideas, please don't hesitate to reach out. I'm here to help and eager to start a conversation.
Instead of a boring contact form, let's contact directly & using any ways you prefer.
Contact options
Email me (hello@domain.com)
Call me: +1 (234) 567-8900
Contact me on WhatsApp
Lorem ipsum, dolor sit amet consectetur adipisicing elit. Neque fugit vel quae ab beatae blanditiis aspernatur corporis ex nesciunt. Distinctio deserunt consequuntur culpa ea quisquam quibusdam iure enim, dolorum quos.
John Doe, Fitness Instructor, California.
Dolor sit amet consectetur adipisicing elit. Neque fugit velquae abbeatae blanditiis aspernatur corporis exnesciunt. Distinctio deserunt consequuntur quibusdam iure enimculpa eaquisquam.
Jane Lave, Therapist, Vancouver, CA.
Consectetur dolor sit amet adipisicing elit. Neque fugit vel quae ab beatae blanditiis aspernatur corporis ex nesciunt. Distinctio deserunt consequuntur culpa ea quisquam quibusdam iure enim, dolorum quos ipsumorem aspernatur blanditiis.
Vladimir Putin, Doctor, California.
Lorem ipsum, dolor sit amet consectetur adipisicing elit. Neque fugit vel quae ab beatae blanditiis aspernatur corporis ex nesciunt. Distinctio deserunt consequuntur culpa ea quisquam quibusdam iure enim, dolorum quos.
Valeriya, Lawyer, California.
Take your technology to the next level with my expertise
Whether you're interested in hiring me for a project, seeking advice, or just want to connect, I'm always happy to hear from you. So go ahead, send me a message and let's build something great together. I look forward to hearing from you!
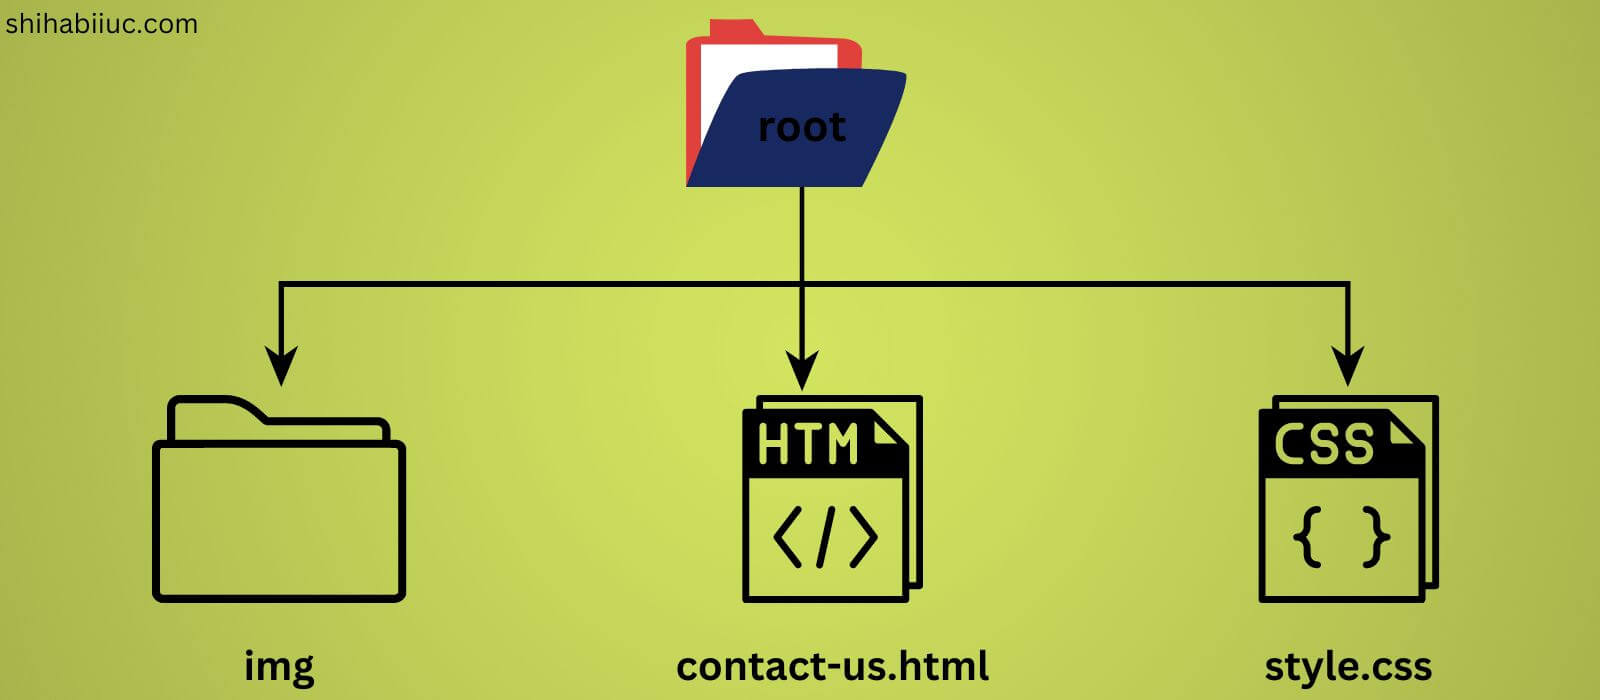
As you see in the above HTML, I have some images. If you look into the file paths, you’ll see that I have an “img” folder in the project root.
So make sure you also have this “img” folder in your project. Otherwise, update the file paths based on your existing setup.
See my project files & folder structure in the infographic below:
If you want to get all the demo pictures , please go to this link to download them.
In the CSS above, I have some media queries to make the page responsive. Mostly, I used Flexbox to create the layouts and align items. If you want to learn more about Flexbox, see this post after.
That’s all! After you save your files, you’ll have a nice & mobile responsive contact page like mine (except for the header & footer).
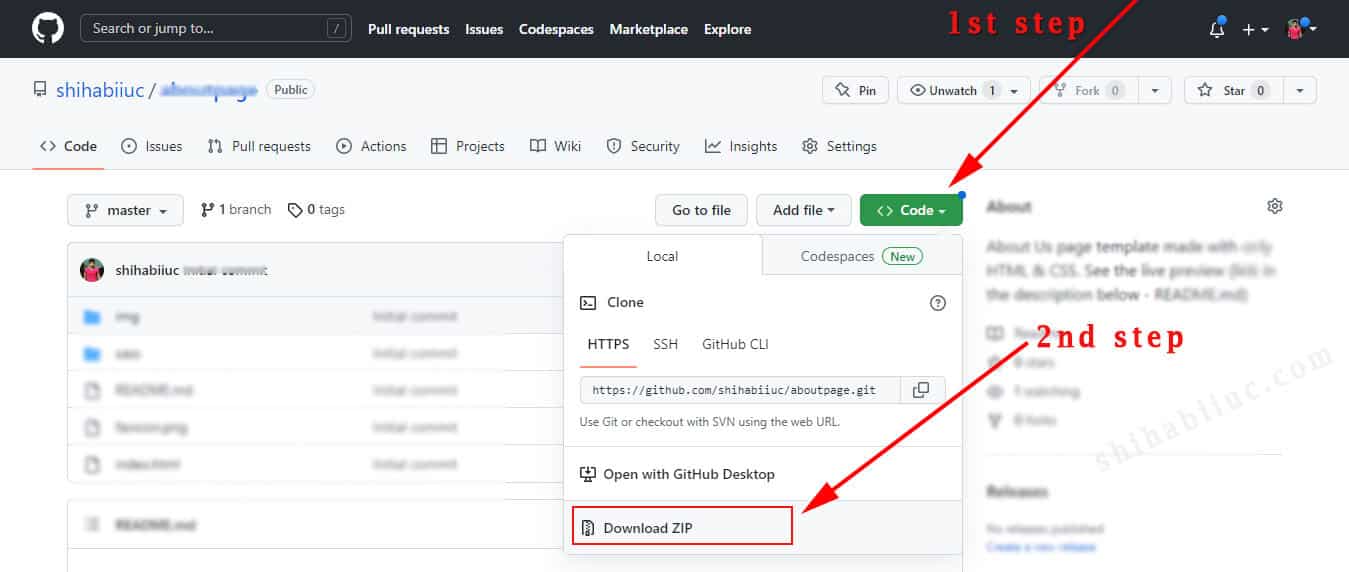
Download the entire project from GitHub
If you want to get the whole template including the header & footer and as you saw in the demo, please download my entire project from GitHub.
If you’re familiar with Git, you can download the entire project directly from your command line (without going to my GitHub account). To do that use the following command: git clone https://github.com/shihabiiuc/contact-page.git
A few words about this template
As you already know that I have created this template using only HTML & CSS. So there is no contact form. To make a working contact form, you need serverside programming such as PHP, Node, Ruby/Rails, etc.
However, the good news is you do not need a contact form on the contact page. The form is not mandatory to have.
Most importantly, contact form data also goes to an email. So why not use directly an email address instead of a boring contact form? A contact form also needs many different validation and it has security vulnerabilities. Moreover, there is a chance to receive a huge number of spam through the form. Although, there are fixes to those problems.
In a nutshell, having a contact page without a form is totally okay as long as you have an email address there.
Why testimonials are there in the contact page?
As you see in the demo, I have a couple of testimonials on the page. But why?
So the contact page is a kind of money-making page and has a great impact on your online business.
In this context, the testimonials play a vital role. You should put some genuine reviews from your past clients (if you have them). They inspire your future clients & visitors to contact you. And this is why I put the testimonials section on the contact page.
Call to action on the page
Finally, at the very bottom of the page, I also have a CTA (call to action). Some people need additional pushing and this CTA will do this job (if needed).
It’s not mandatory to have a button or link on every CTA since the visitors are already visiting a contact page. And they can go back to the top and find your email or other contact methods.
Build HTML CSS projects
Conclusion
I built this contact page from scratch and gave you all the code & images you need to build it properly. Additionally, I shared the GitHub repository URL with you. Therefore, if you still have any questions or feedback, please let me know.
If you’re familiar with SCSS(SASS), you can use this file instead of the plain CSS.
Popular posts
About Shihab
With over 20K monthly readers, my goal is to help small businesses to create a stunning online presence.
At the same time, I’ve been creating resources for web developers, designers & freelancers in general.
– Научиться добавлять Google-карту на веб-страницу. – Научиться изменять координаты. – Научиться искать местоположение.
В результате выполнения данного урока у вас должна получиться такая веб-страница (рисунок 6.1):
6.1 — Предварительный просмотр веб-страницы
Создание страницы «Контакты».
В начале шестого урока вы создадите страницу contact.html, которая будет являться страницей «Контакты» сайта.
В этом упражнении вы создадите веб-страницу «Контакты».
– Запустите Visual Studio Code. Автоматически должен открыться ваш проект. Если этого не произошло, то воспользуйтесь первым уроком и откройте проект. – Кликните на файл design.html правой кнопкой мыши и выберите пункт «Копировать». – Кликните правой кнопкой мыши в пустой области под файлом design.html и выберите в открывшемся меню пункт «Вставить». – Кликните на появившийся файл design copy.html правой кнопкой мыши и выберите в открывшемся меню пункт «Переименовать». – Задайте имя файла contact.html и нажмите кнопку «Enter».
В результате выполнения всех пунктов упражнения у вас должен появиться в списке файлов, файл contact.html, а так же он должен быть открыт в рабочей области Visual Studio Code (рисунок 6.2).
6.2 — Результат создания файла contact.html
Оформление страницы «Контакты».
В этом упражнении вы укажите, что contact.html это страница «Контакты».
– Перейдите в рабочую область Visual Studio Code. – Переместите курсор мыши к тегу Title. – Добавьте через тире к тексту ЮК Советник текст «Контакты» (рисунок 6.3).
6.3 — Cтраница «Вопросы-ответы» в теге Title
Добавление заголовка страницы.
В этом упражнении вы добавите заголовок страницы.
– Для того, чтобы у контента сайта были отступы по сторонам оберните контентную часть страницы в div «featured» (рисунок 6.4).
– Добавьте заголовок «Контакты» заключив его в теги h3 (рисунок 6.5).
6.5 — Код заголовка страницы
– Результат добавления заголовка виден на рисунке 6.6.
Добавление текста.
В этом упражнении вы добавите текст на страницу
– Удалите абзац «контент». – Добавьте текст из файла contact.txt который находится в папке work_files. – Добавьте теги переноса строки br (рисунок 6.1).
Добавление карты.
В данном упражнении вы добавите карту Google Карты.
– Откройте Google Карты в браузере https://www.google.com/maps (рисунок 6.8).
6.8 — Google Карты – Найдите город Екатеринбург, улица Машиностроителей дом 11 (рисунок 6.9).
– Нажмите на значок меню «Бутерброд» в левом верхнем углу экрана. – Выберите пункт Ссылка/код (рисунок 6.10).
– В верхней части появившегося окна откройте вкладку Код.
– Выберите размер карты. Затем скопируйте текст в поле и вставьте его в contact.html, после текста (рисунок 6.12).
Добавление формы обратного звонка.
В этом упражнении вы форму для звонка компании клиенту.
– После тега закрывающего ссылку на увеличенную карту добавьте пустой тег div (рисунок 6.13).
– Между тегами div добавьте тег form с атрибутами «id=»form2″ action=»/» method=»post» role=»form» onsubmit=» return submitForm();»» (рисунок 6.14).
– После тега form добавьте тег label с атрибутом for=»name» и названием «Введите Ваше имя» (рисунок 6.15).
– После тега label вставьте тег input с атрибутами «id=»name» name=»name» size=»15″ type=»text» Placeholder=»Алексей» title=»Имя» required» (рисунок 6.16).
6.16 — Добавления тега Input
– Добавьте тег label с аттрибутом for=»tel» и названием «Введите номер телефона». – Добавьте тег input с атрибутами «id=»tel» name=»tel» size=»11″ type=»text» Placeholder=»+71234567890″ required» (рисунок 6.17).
6.17 — Добавления тегов Label, Input для tel
– Ниже добавьте тег button с атрибутом type=»submit» и текстом на кнопке «Заказать звонок» (рисунок 6.18). Формы добавлены. (рисунок 6.19)
6.18 — Добавления тега Button
В результате выполнения всех упражнений у вас получилась страница «Контакты», на которой есть абзацы текста, карта, формы (рисунок 6.20).
Контрольные вопросы
1. Какой сервис по добавлению карты на сайт был использован в уроке? 2. Какой тег использовался для втсавки карты на сайт? 3. Какой тип формы используется для написания в нем номера телефона?


 Lorem ipsum, dolor sit amet consectetur adipisicing elit. Neque fugit vel quae ab beatae blanditiis aspernatur corporis ex nesciunt. Distinctio deserunt consequuntur culpa ea quisquam quibusdam iure enim, dolorum quos.