Python Quicksort Algorithm
In this article, we will be discussing the Python Quicksort Algorithm in complete detail. We will start with it’s explanation, followed by a complete solution which is then explained by breaking it down into steps and explaining each of them separately.
At the end we have also included a small comparison of the Python Quicksort with others similar algorithms. As a bonus, we also have a video explanation of the Python Quicksort Algorithm, which is included at the very end of the article.
Methodology
As the name implies, it’s a way of quickly sorting a list of values. Typically done with a recursive solution, Quick sort uses the concept of a pivot around which the values are sorted. The pivot is any arbitrary value picked out from the list of values (usually the first value).
We then divide the list of values around the pivot into two smaller lists, and then call the Quick sort function on each list. The break case is when the length of the list reaches one.
Quicksort can be a little unstable (worst case scenario), but this can be mostly avoided using Randomized Quicksort which minimizes the change of encountering the worst case. The idea behind Randomized Quicksort is to pick random pivots, which can reduce the change of picking a pivot which is very far from the median value.
Another common technique along the same lines, is to shuffle the array first. This helps if the array is already sorted, or partially sorted. The ideal pivot is always the median value, as it results in the creation of two equal halves.
(Average) Big O notation: n * log(n)
Worst Case: n 2 (When values are already sorted)
QuickSort Algorithm Solution
Below is our solution to the Python Quicksort Algorithm. There are many different variants that you’ll find online (same concept though), but I like this one alot as it translates perfectly into other languages. If you do it this way, you can do the same thing in any other programming language. (sometimes the solutions utilize a language specific technique or function).
If you are new to the Quicksort Algorithm, pay close attention to the explanation that follows.
def Qsort(array, low, high): if (low < high): pivot = low i = low j = high while (i < j): # Main While Loop while array[i] array[pivot]: # While Loop "j" j -= 1 if (i < j): array[i], array[j] = array[j], array[i] array[pivot], array[j] = array[j], array[pivot] Qsort(array, low, j - 1) Qsort(array, j + 1, high) return array else: return array
QuickSort Algorithm – Worked Example
The following key is (generally) observed in below images.
Red for the pivot and related numbers
Blue for numbers to be swapped
Green for numbers that have been swapped
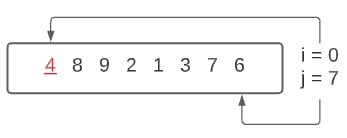
In the below images, we are using some random data of 8 numbers, and assuming the pivot to be the first number.
I the first image, we can clearly see that 4 has been selected as the pivot. The value of i is equal to low (the lower index of the array), and the value of j is equal to high (the upper index of the array).
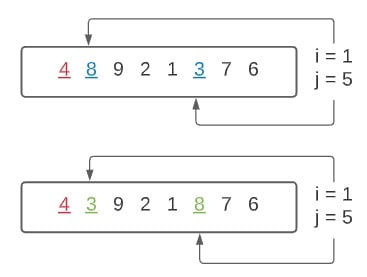
The first thing that’s going to happen is that the “i” while loop will run, until it finds a number greater than the pivot, or it reaches the end of the array. In this case, it stops index 1, a.k.a number 8. The value of “i” increments until it finds a larger value, so it’s currently “ 1 “.
The same thing happens with the “j” while loop, which runs until if finds a smaller value than the pivot, which it does so at index 5, a.k.a number 3. In the “j’ while loop, the value of j decrements from it’s “high” value until the large value is found. It’s currently at value “ 5 “.
The next step is two swap both of these numbers, which is shown in the second diagram in the image above.
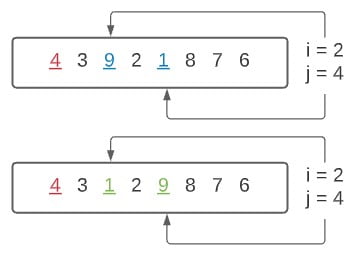
We then continue on, looking for the next set of numbers to be swapped. The “i” and “j” while loops run once again, and another set of numbers is found.
The same process from earlier repeats itself, and the same thing happens with number 9 and 1 (index 2 and 4). Both numbers are swapped.
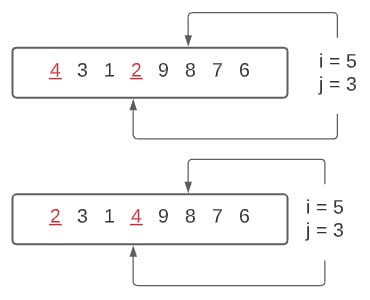
Once the second swap is completed, we once again run the “i” and “j” while loops. This time the value of i becomes greater than j . Hence, the swap between the i th and j th index does not take place.
Instead, we break out of the main while loop, and swap the j th with the pivot. And so, we complete one major step in the process of completing the quicksort algorithm.
You will now notice, that the value of the left side of the pivot (4), are all smaller than the pivot, and the values on the right side, are all greater. We will now begin our recursive calls on each side of the array (excluding the pivot).
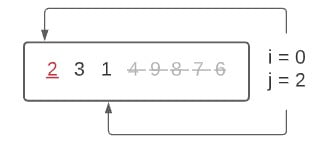
We’ll begin with the left side of the array first. We do not split the array or anything, we just change the low and high values when passing it to the Qsort() function. Previously, the low and high values were, 0 and 7. Now they are 0 and 2. We can basically ignore the last 5 values.
Once again, we pick the first value as the new pivot (2).
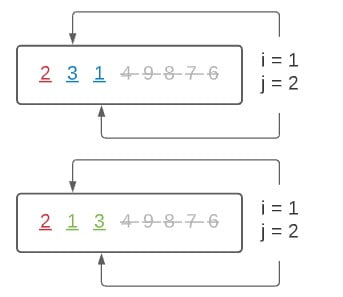
We repeat the same process from before, swapping 3 and 1. Remember, 3 is greater than 2, and 1 is less than 2. Hence, the i th and j th are swapped.
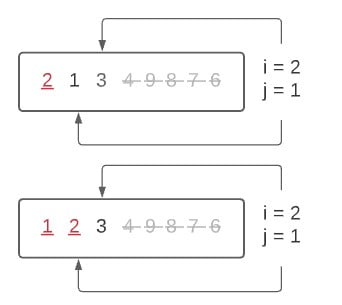
Once again, the value of i exceeds that of j. Hence we skip the i th and j th swapping, and swap the pivot with the j th position once again.
We now have a perfectly sorted array on the left side (including the pivot). The length of the array is still not 1 though, hence it will perform recursive calls on the left side and right side again. Luckily, the left array is just a single number, hence it will return immediately, and the same goes for the right.
This is actually a weakness in the Quicksort algorithm, where it will continue “sorting” even if the array is already sorted.
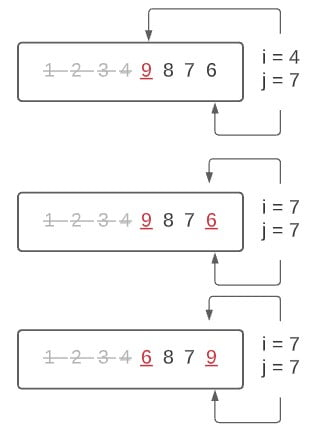
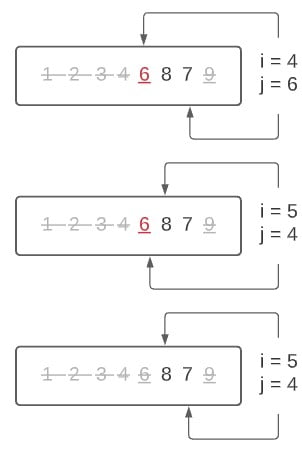
We’ll now pick up some speed, since we’ve covered most of the concepts. The above image shows the three steps for the right hand side of the original array.
We have a slightly unique case here as both i and j point to the same index. This is because i could not find a number greater than the pivot, and j found a smaller number at the same index it started out as (the high index).
In any case, the main while loop only runs if i is less than j , which it is not. We then exit the main while loop once again, and swap the j th position with the pivot.
Since there is no “right” side of the pivot, (remember, pivot is 9) we only have to call the recursive function on the left hand side ( [6, 8, 7] ).
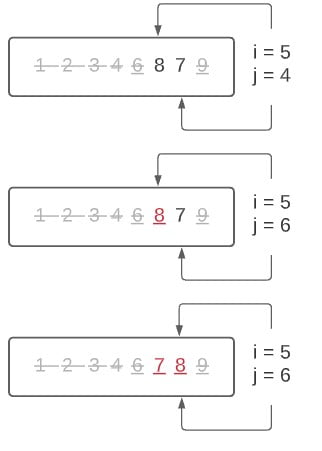
We have another unique case here, as there is no value that is less than the pivot. Due to the reason, the jth counter keeps decrementing until it reaches the pivot, which satisfies its conditions (less than or equal to pivot). In short, we basically swap the pivot with itself in the second step of the above diagram.
In the third step of he above diagram, we once again call the recursive on the only existing side (the right side). The first step in the image below shows what we are left with (8 and 7).
And finally, you can see that we have a completely sorted array.
Alternative Solution
Here is another, Python specific solution to the quicksort algorithm. It’s very similar, (same concept) but it’s more simplified due the use of the append() function, which normally isn’t available in most languages. Although this is simpler, the other method I would more, as it can be easily duplicated in other languages as well.
def Qsort(array): lesser = [] greater = [] equal = [] if len(array) > 1: pivot = array[0] for x in array: if x < pivot: lesser.append(x) if x >pivot: greater.append(x) if x == pivot: equal.append(x) return Qsort(lesser) + equal + Qsort(greater) else: return array
The reason why this is Python specific, is due to the append() method, which isn’t normally available. Also notice above how we never call the recursive function on the pivot. The equal list contains numbers that are the same as the pivot. (The reason why it’s a list is because there can be multiple numbers that have the same number as the pivot).
Video Tutorial
Here we you can watch the video version of the Python QuickSort Algorithm. If you are having trouble understanding, or still have some doubts, be sure to check this out. It’s a more interactive experience which will definitely help you.
This marks the end of the Python Quicksort Algorithm Tutorial. Any suggestions or contributions for CodersLegacy are more than welcome. Questions regarding the tutorial content can be asked in the comments section below.
