- Saved searches
- Use saved searches to filter your results more quickly
- License
- Fraaq/simplediscordbot
- Name already in use
- Sign In Required
- Launching GitHub Desktop
- Launching GitHub Desktop
- Launching Xcode
- Launching Visual Studio Code
- Latest commit
- Git stats
- Files
- README.md
- About
- Quickstart
- A Minimal Bot
- Создание Discord-бота на Python. Часть 1
- Создание бота и получение токена
- Написание кода
- Бонусный туториал!
- Конец
Saved searches
Use saved searches to filter your results more quickly
You signed in with another tab or window. Reload to refresh your session. You signed out in another tab or window. Reload to refresh your session. You switched accounts on another tab or window. Reload to refresh your session.
Simple python discord bot. This bot can send random text from txt file or random image from directory and it can delete message if the message contains word that you banned
License
Fraaq/simplediscordbot
This commit does not belong to any branch on this repository, and may belong to a fork outside of the repository.
Name already in use
A tag already exists with the provided branch name. Many Git commands accept both tag and branch names, so creating this branch may cause unexpected behavior. Are you sure you want to create this branch?
Sign In Required
Please sign in to use Codespaces.
Launching GitHub Desktop
If nothing happens, download GitHub Desktop and try again.
Launching GitHub Desktop
If nothing happens, download GitHub Desktop and try again.
Launching Xcode
If nothing happens, download Xcode and try again.
Launching Visual Studio Code
Your codespace will open once ready.
There was a problem preparing your codespace, please try again.
Latest commit
Git stats
Files
Failed to load latest commit information.
README.md
Simple Discord Bot in Python
This bot can send random text from txt file or random image from directory and it can delete message if the message contains word that you banned. It can also send and article from wikipedia based on user input. Users can create their own qrcode. And simple chat system (bot can response if someone write his name).
- Random text from file
- Random images from folder
- Banned words from txt file
- Send wikipedia article based on user input
- Create qr code based on user input
- Send 3 news
- Rock Paper and Scissors game
- Random number in range, based on user input
- Guess the number game
- Convert currency to another currency
- Simple chat system
- Install python and pip
- Download and unzip this repository
- Open unziped folder
- Install modules (open cmd or powershell in unziped folder)
pip install -r requirements.txt - Get a Discord Bot Token
-When adding a discord bot to your server give him permissions : Read Messages/View Channels, Send Messages, Manage Messages, Embed Links, Attach Files, Read Message History - Enable intent for bot
-Enable only message content intent - Create file named .env in main unziped folder and open it with notepad. Add DISCORD_TOKEN=’YOURSUPERSECRETTOKEN’ replace the YOURSUPERSECRETTOKEN with your bot token (keep the quotation marks)
- Run bot.py with python
Change random images (!image)
- Add or remove images inside images directory
- Supported file extensions are : png, jpg, jpeg, gif
Customize banned words in chat
- Find function async def chat_with_bot(msg) in bot.py
- Inside function you can find variables like greetings or name_to_react and more.
greetings = ("hi", "hello", "was-sup", "sup") name_to_react = ("bot", "robot")
greetings = ("aloha", "Bonjour", "Hola") name_to_react = ("superbot", "bestrobot")
Change bot command prefix (default is !)
bot = commands.Bot(command_prefix='!', intents=intents, help_command=help_command)
bot = commands.Bot(command_prefix='your_command_prefix', intents=intents, help_command=help_command)
Change name or help of command
@bot.command(name='image', help='Send random image to chat') @bot.command(name='your_command_name', help='your_help_message') Change messages (embeds) output of commands
- Find command that you want to change (For example I choose !text)
- After that find function that handle the embed in
await emb.send_embed(ctx, title=random_text)
await emb.send_embed(ctx, title=f"Your random text is random_text>", description="This is a description", color=discord.Color.orange())
- Remember that you need to always include argument ctx
- If you don’t write argument description, the description would be empty
- Or if you don’t write argument color default color will be blue
- Argument color can be hex color code like 0xe0ab76 (0xhex_color_code) or discord Class Color like discord.Color.orange() (discord.Color.yourcolor()) or color can be None
!text (random text from text.txt file)
!image (random image from images folder)
!whatis (Send wikipedia article based on user input)
!qrcode «what do you want in qrcode» (Send qrcode based on user input)
!news (Send 3 news)
!rpas «you can choice rock,paper,scissors» (Rock Paper and Scissors game)
!random from «your number» to «your number» (Random number)
!gtn (Guess the number game)
!convert (Convert currency to another currency)


About
Simple python discord bot. This bot can send random text from txt file or random image from directory and it can delete message if the message contains word that you banned
Quickstart
This page gives a brief introduction to the library. It assumes you have the library installed, if you don’t check the Installing portion.
A Minimal Bot
Let’s make a bot that responds to a specific message and walk you through it.
It looks something like this:
# This example requires the 'message_content' intent. import discord intents = discord.Intents.default() intents.message_content = True client = discord.Client(intents=intents) @client.event async def on_ready(): print(f'We have logged in as client.user>') @client.event async def on_message(message): if message.author == client.user: return if message.content.startswith('$hello'): await message.channel.send('Hello!') client.run('your token here')
Let’s name this file example_bot.py . Make sure not to name it discord.py as that’ll conflict with the library.
There’s a lot going on here, so let’s walk you through it step by step.
- The first line just imports the library, if this raises a ModuleNotFoundError or ImportError then head on over to Installing section to properly install.
- Next, we create an instance of a Client . This client is our connection to Discord.
- We then use the Client.event() decorator to register an event. This library has many events. Since this library is asynchronous, we do things in a “callback” style manner. A callback is essentially a function that is called when something happens. In our case, the on_ready() event is called when the bot has finished logging in and setting things up and the on_message() event is called when the bot has received a message.
- Since the on_message() event triggers for every message received, we have to make sure that we ignore messages from ourselves. We do this by checking if the Message.author is the same as the Client.user .
- Afterwards, we check if the Message.content starts with ‘$hello’ . If it does, then we send a message in the channel it was used in with ‘Hello!’ . This is a basic way of handling commands, which can be later automated with the discord.ext.commands – Bot commands framework framework.
- Finally, we run the bot with our login token. If you need help getting your token or creating a bot, look in the Creating a Bot Account section.
Now that we’ve made a bot, we have to run the bot. Luckily, this is simple since this is just a Python script, we can run it directly.
Now you can try playing around with your basic bot.
© Copyright 2015-present, Rapptz. Created using Sphinx 4.4.0.
Создание Discord-бота на Python. Часть 1
Приветствую, хабровчане и другие пользователи интернета. Сегодня я начну цикл статей, посвящённых созданию Discord-бота с помощью библиотеки discord.py. Мы рассмотрим создание как и примитивного бота, как и «продвинутого» бота с модулями. В этой статье мы сделаем стандартную команду и ещё одну небольшую команду. Начнём!
Создание бота и получение токена
Для того, чтобы добавить бота на сервер нужно создать свое приложение и во вкладке General Information скопировать Client ID.
Здесь заменяем CLID на ранее скопированный Client ID.
https://discordapp.com/oauth2/authorize?&client_id=CLID&scope=bot&permissions=8Во вкладке Bot создаём бота и копируем токен.
Написание кода
Устанавливаем саму библиотеку.
Создаём файл config.py (так удобнее), и создаём там словарь.
Создаём main-файл, название может быть любое.
Импортируем библиотеки и наш файл конфига:
import discord from discord.ext import commands from config import settingsСоздаём «тело» бота, название может быть любое:
bot = commands.Bot(command_prefix = settings['prefix']) # Так как мы указали префикс в settings, обращаемся к словарю с ключом prefix.Начинаем писать основной код.
@bot.command() # Не передаём аргумент pass_context, так как он был нужен в старых версиях. async def hello(ctx): # Создаём функцию и передаём аргумент ctx. author = ctx.message.author # Объявляем переменную author и записываем туда информацию об авторе. await ctx.send(f'Hello, !') # Выводим сообщение с упоминанием автора, обращаясь к переменной author.В конце запускаем бота с помощью:
bot.run(settings['token']) # Обращаемся к словарю settings с ключом token, для получения токенаimport discord from discord.ext import commands from config import settings bot = commands.Bot(command_prefix = settings['prefix']) @bot.command() # Не передаём аргумент pass_context, так как он был нужен в старых версиях. async def hello(ctx): # Создаём функцию и передаём аргумент ctx. author = ctx.message.author # Объявляем переменную author и записываем туда информацию об авторе. await ctx.send(f'Hello, !') # Выводим сообщение с упоминанием автора, обращаясь к переменной author. bot.run(settings['token']) # Обращаемся к словарю settings с ключом token, для получения токена
Бонусный туториал!
Сделаем вывод случайных картинок с лисами
Для этого импортируем еще пару библиотек:
import json import requestsПриступим к написанию команды.
@bot.command() async def fox(ctx): response = requests.get('https://some-random-api.ml/img/fox') # Get-запрос json_data = json.loads(response.text) # Извлекаем JSON embed = discord.Embed(color = 0xff9900, title = 'Random Fox') # Создание Embed'a embed.set_image(url = json_data['link']) # Устанавливаем картинку Embed'a await ctx.send(embed = embed) # Отправляем Embed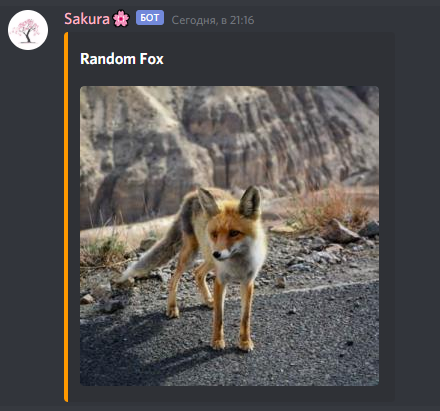
Конец
На этом 1 часть закончена. Скоро будет опубликована 2 часть.