- Password input with label and hide/show toggle eye svg — A simple tutorial
- Javascript
- CSS
- Показать/скрыть пароль
- Показать пароль по чекбоксу
- Результат:
- Показать пароль по ссылке
- Результат:
- Показать пароль по иконке
- Результат:
- Без jQuery
- Результат:
- Комментарии
- Другие публикации
- Show/Hide Password With Eye Icon using HTML And JavaScript
- Show/hide Password Eye Icon Html Code:-
- HTML Code
- CSS Code for Styling Eye Icon In Password Field:-
- JavaScript Code For Show Password Eye Icon:-
- Hide/Show Password using Eye icon in HTML and JavaScript
- 1. Create HTML Login form with Eye Icon
- 2. Add JavaScript to Toggle Show/Hide Password
- Show/Hide Password in Django
Password input with label and hide/show toggle eye svg — A simple tutorial
For HTML we need a container that will wrap everything. We’ll set «password_input_container» class to this element. Then we’ll need an input of type password. Type will be toggled later to text and back to password using javascript. We’ll also set placeholder of input to space (» «), which will allow us to detect with CSS when input has some value, so we can style it differently, because we want the label element to be both label and placeholder. Also, we need a label for password. And the button. Click on this element will fire the function called «toggle()». We’ll create it later in javascript section. Inside the button, we’ll place an eye svg.
class="password_input_container"> placeholder=" " name="password_input" type="password" id="password_input"> for="password_input">Password id="toggle_button" onclick="toggle()"> xmlns="http://www.w3.org/2000/svg" fill="none" viewBox="0 0 24 24" stroke-width="1.5" stroke="currentColor" width="15" height="15"> stroke-linecap="round" stroke-linejoin="round" d="M2.036 12.322a1.012 1.012 0 010-.639C3.423 7.51 7.36 4.5 12 4.5c4.638 0 8.573 3.007 9.963 7.178.07.207.07.431 0 .639C20.577 16.49 16.64 19.5 12 19.5c-4.638 0-8.573-3.007-9.963-7.178z" /> stroke-linecap="round" stroke-linejoin="round" d="M15 12a3 3 0 11-6 0 3 3 0 016 0z" /> Javascript
For javascript, we’ll create a function called «toggle». This function will change input’s type and button’s svg. First, we’ll select button and input by id. Then we’ll check input’s type. If it’s of type ‘password’, we’ll change it to ‘text’ (which means that input’s value will now be visible) and set button’s innerHTML to a crossed eye svg, to indicate that clicking on this button means hiding the input’s value. And if input’s type is ‘text’, we need to hide the password by setting type to ‘password’, and we also need to change button’s svg to an eye.
function toggle() let input_toggle = document.getElementById('toggle_button') let password_input = document.getElementById('password_input') if (password_input.type === 'password') password_input.type = 'text' toggle_button.innerHTML = ` ` > else password_input.type = 'password' toggle_button.innerHTML = ` ` > > CSS
Now the CSS. First, we’ll style the button. We’ll set cursor to pointer and position to absolute with top and right set to 0 with height of 100%, which means that this element will be placed at the end (near the right border, inside of our div element that wraps everything). Using flexbox, we’ll alight svg in the center and set button’s background to transparent. We’ll remove the default border and set color to grey.
.password_input_container button cursor: pointer; position: absolute; height: 100%; display: flex; justify-content: center; align-items: center; top: 0; right: 0; background-color: transparent; border: none; color: #777; > Now we’ll style the input. We’ll remove the outline and set font size to 9 pixels. We’ll add a little paddings and set width to 130 pixels. Also, we’ll set background color to transparent and border to soli grey (same as svg) 1 pixel wide with 4 pixels radius.
We’ll set text color to slightly darker color that the border.
.password_input_container input outline: none; font-size: 9px; padding: 8px; width: 130px; background-color: transparent; border: #777 solid 1px; border-radius: 4px; color: #555; > Now we’ll style the label. This element will also be a placeholder. We’ll add some margins and paddings, set position to absolute, left to 0 and top to 50% with translate Y to -50%, this will place the label in the center of the input. Now we’ll set z index to -1, because we want the input to be on top of this element so the user can click on it. I’ll set a background color to white, because I have white background (you simply set the same color as your background).
We’re doing this because this element will appear as label if input is in focus or has some value and will be moved on top of the input’s top border. Without background color, the input’s border would be seen behind the label. We’ll set color to light grey and font size to 12 pixels and a little transition.
.password_input_container label position: absolute; margin: 0 5px; left: 0; top: 50%; transform: translateY(-50%); z-index: -1; /* Put the same color as background here */ background-color: #fff; padding: 0 2px; color: #aaa; font-size: 12px; transition: .3s; > Now we’ll style the label when input is in focus or when it has some value (when placeholder » » isn’t shown). That’s why we needed an empty placeholder. We’ll set top to 0, to move this element on top of input’s top border, and we’ll set z index to 1, to place this element on top of input. Otherwise the input’s border would be on top of the label. And we’ll decrease a font size a bit.
/* Focus or containing value (placeholder not shown) */ .password_input_container input:focus + label, .password_input_container input:not(:placeholder-shown) + label top: 0; font-size: 8px; z-index: 1; > Lastly, we’ll style the label whe input is in focus. We’ll just set label’s text color and input’s border to green.
/* Only when focused */ .password_input_container input:focus + label color: rgb(15, 156, 116); font-size: 8px; > .password_input_container input:focus border-color: rgb(15, 156, 116); > Показать/скрыть пароль
Чтобы включить отображение пароля в поле password нужно заменить атрибут type=»password» на type=»text» , сделать это можно на jQuery или чистом JS.
Показать пароль по чекбоксу
$('body').on('click', '.password-checkbox', function() < if ($(this).is(':checked'))< $('#password-input').attr('type', 'text'); >else < $('#password-input').attr('type', 'password'); >>); Результат:
Показать пароль по ссылке
$('body').on('click', '.password-control', function() < if ($('#password-input').attr('type') == 'password')< $(this).html('Скрыть пароль'); $('#password-input').attr('type', 'text'); >else < $(this).html('Показать пароль'); $('#password-input').attr('type', 'password'); >return false; >); Результат:
Показать пароль по иконке
.password < position: relative; >.password-control < position: absolute; top: 11px; right: 6px; display: inline-block; width: 20px; height: 20px; background: url(/view.svg) 0 0 no-repeat; >.password-control.view < background: url(/no-view.svg) 0 0 no-repeat; >$('body').on('click', '.password-control', function() < if ($('#password-input').attr('type') == 'password')< $(this).addClass('view'); $('#password-input').attr('type', 'text'); >else < $(this).removeClass('view'); $('#password-input').attr('type', 'password'); >return false; >);Результат:
Без jQuery
function show_hide_password(target) < var input = document.getElementById('password-input'); if (input.getAttribute('type') == 'password') < target.classList.add('view'); input.setAttribute('type', 'text'); >else < target.classList.remove('view'); input.setAttribute('type', 'password'); >return false; >Результат:
Комментарии
Другие публикации
Если добавить атрибут contenteditable к элементу, его содержимое становится доступно для редактирования пользователю, а.
По спецификации HTML в option нельзя вставить ссылку, если все-таки её туда вставить, то работать она не будет. В таких случаях можно сделать перенаправление браузера по клику на JS или имитацию.
Show/Hide Password With Eye Icon using HTML And JavaScript
Welcome to the Codewithrandom blog. In this blog, We learn how to create Show and Hide a Password With an Eye Icon. We use HTML, CSS, and JavaScript for this Show And Hide Password With Eye Icon. We have an input field with a password tag and an eye icon for showing or hiding passwords in the input field using JavaScript. I hope you enjoy our blog so let’s start with a basic html structure for a Show and Hide Password With an Eye Icon.
Show/hide Password Eye Icon Html Code:-
Create your html file first, then paste this code into the html head area or add the Font Awesome CDN link to it. We need font awesome CDN in order for the eye icon in input to display conceal the password. CDN link with Link Tag
HTML Code
Now to add the structure for our show/hide password.Using the tag we will create the a password field and using the input tag with type as password we will create an input field for the password and using the font awesome tag we will add the eye icon for showing the password. There is all the html code for the Show and Hide Password With Eye Icon. Now, you can see output without Css and JavaScript. then we write Css for styling and add javascript code for the show to hide the password.
CSS Code for Styling Eye Icon In Password Field:-
* < padding: 0; margin: 0; box-sizing: border-box; >body < width: 100%; min-height: 100vh; display: flex; justify-content: center; align-items: center; background-color: #f4f4f4; flex-direction: column; >body .password-field < position: relative; >body .password-field input < width: 30rem; height: 4em; padding: 1em; border: 0; border-radius: 10px; box-shadow: 0px 10px 40px rgba(0, 0, 0, 0.5); font-size: 1rem; letter-spacing: 1px; >body .password-field input::placeholder < color: #000; font-weight: bold; >body .password-field #toggler
Step1: We will change the padding and margin to «zero» using the universal tag selector (*), and we will set the box size to border-box using the box-sizing property. Now that we have selected the body element, we will set the width to «100%» of the body, the display property to «flex,» the align item property to «centre,» the font-color property to «white,» and the display property to «flex.» We will also align all of the text using these properties.
Step2: The input area will now have styling added. Using the class selector, we will choose the input field. Then, using the width and height properties, we will fix the width to «30 rem» and the height to «4 em,» respectively. Additionally, we’ll change the border radius to «30 px» using the border-radius property.
body .password-field input < width: 30rem; height: 4em; padding: 1em; border: 0; border-radius: 10px; box-shadow: 0px 10px 40px rgba(0, 0, 0, 0.5); font-size: 1rem; letter-spacing: 1px; >body .password-field input::placeholder < color: #000; font-weight: bold; >body .password-field #toggler
Now we have completed our Styling Of Input and eye icon. Here is our updated output HTML+ CSS. Now add JavaScript to toggle Show and Hide Password On Click Eye Icon.
JavaScript Code For Show Password Eye Icon:-
var password = document.getElementById('fakePassword'); var toggler = document.getElementById('toggler'); showHidePassword = () => < if (password.type == 'password') < password.setAttribute('type', 'text'); toggler.classList.add('fa-eye-slash'); >else < toggler.classList.remove('fa-eye-slash'); password.setAttribute('type', 'password'); >>; toggler.addEventListener('click', showHidePassword); It’s just some basic JavaScript code. First, we use document.getelementById to take password input in javascript. Then, we use javascript code to build an if/else function that displays and hides passwords with a change in the eye icon. Toggle between the classes, we will build a function in javascript and use the add and remove methods of the classes to either add the display or show the class or else hide it. Now we have completed our Show and Hide Password With Eye Icon Using Html and JavaScript Code. you can see the output video and project screenshots. See our other blogs and gain knowledge in front-end development. Thank you! If we made a mistake or any confusion, please drop a comment to reply or help you in easy learning. Written by — Code With Random/Anki
Hide/Show Password using Eye icon in HTML and JavaScript
In this tutorial, I will learn how to hide and show password using eye icon in HTML and JavaScript. I implemented it for one of my projects as below.
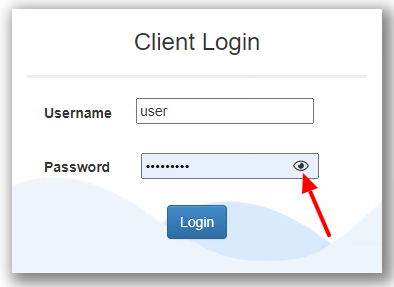
This very useful feature you should have on your login form.
There are simple two steps to follow. First, create the HTML login form. Secondly, show/hide password when the user clicks on the eye icon.
Watch live demo
Don’t miss any of such tips…
Let’s see it step-by-step. I will walk you through the complete code.
1. Create HTML Login form with Eye Icon
We are going to place the eye icon inside the password text field. We can use the eye icon from the awesome font script library.
First of all import the awesome font Stylesheet into your HTML form page.
Use the tag to display the eye icon. This icon is also known as the visibility eye icon.
Use the below CSS to put the eye icon at the end of the password text field.
margin-left: -30px; cursor: pointer;
If you are new to CSS, refer to how to add CSS in HTML.
Put this tag below the passwords input field. This is how the sample form will look like with the password field.
2. Add JavaScript to Toggle Show/Hide Password
Copy and paste the below code into your JavaScript. This code is self-explanatory if you are familiar with the JavaScript basics.
const togglePassword = document.querySelector('#togglePassword'); const password = document.querySelector('#id_password'); togglePassword.addEventListener('click', function (e) < // toggle the type attribute const type = password.getAttribute('type') === 'password' ? 'text' : 'password'; password.setAttribute('type', type); // toggle the eye slash icon this.classList.toggle('fa-eye-slash'); >); You can also insert this code in your HTML page with tag.
Show/Hide Password in Django
In the sample picture shown above, I have implemented it for one of my websites developed using the Django Python framework. If you are developing it for Django, refer registration and login form in Django.
That’s all. Now you can hide and show password using eye icon in HTML with simple JavaScript and CSS code.
If you find any difficulties or need any customization, let me know in the comment section below.