- All shopping php page
- 1. Creating Database & Table
- 2. Creating a Project Directory
- 3. Downloading Products Images
- 4. Connecting to the Database
- 5. Creating Home Page & Displaying All Products
- 6. Creating an action.php file
- 7. Creating Cart Page
- 8. Creating Checkout Page
- How to Create a Simple Shopping Cart in PHP 2022
- What are the features of PHP Shopping Cart Source Code?
- Let’s begin to write PHP Code for Shopping Cart System:
- Conclusion
All shopping php page

Today in this post, I’m going to develop a small web application that is Shopping Cart With Checkout System Using PHP, MySQLi & Ajax, In this application, I’ll show you how to display all the products from the database on the home page and I’ll show you how to add a product into the cart and then I’ll also show you how to checkout with cart products.
So, in this application, I’m using Bootstrap 4 for designing all the pages and I’m using PHP as a back-end language, I’m using MySQLi Prepared Statement for database operation like inserting, fetching, deleting items, I’m using jQuery — Ajax to send the HTTP request to the server and I’m also using Fontawesome library for icons.
Before proceeding, let me tell you what I’m using as a local server, I’m using Xampp Server in which PHP Version > 7.0, So if you are using an older version of PHP then first update your PHP version then start this tutorial.
Now, let’s start this tutorial, here I’ll post all the source codes of this application. So just follow all the steps carefully.
If you want to watch videos tutorials of this project then click here .
1. Creating Database & Table
First of all, We’ll create a Database and Tables for this project, so for this just open your phpmyadmin in the browser and create a new database with the name «cart_system». After creating the database We’ll now create some tables into it, so don’t worry I’m giving you the SQL file you just have to import this file into the created database. You can download the SQL file by clicking here. Once you download the SQL file then just click on your database and then click on the Import tab and then click on Choose File and select the downloaded SQL file and finally click on go. After that, you will see three tables have created the cart, orders and product.
2. Creating a Project Directory
In this step, We’ll create our project directory inside the htdocs folder, for this just open the htdocs folder and create a new folder with the name «shopping-cart» or anything you want. Now open this folder inside your favourite code editor.
3. Downloading Products Images
When you created a database and table then you can see a product table was there and some records are present in the table, like the below image.

You can see there is a column product_image in which I’ve written the path of product images. And I’ve kept the image folder inside my project root directory with all the images. So you can download all the images from here. Once you download this image.zip then extract this inside your project root directory. You can also add more product into the product table just enter all the details and also write the image path in the product_image column and keep the image in the image folder.
4. Connecting to the Database
In this step, We’ll create a new config.php file inside the root of the project directory. By using this file We’ll connect our application with the database. Just use the below codes.
connect_error)< die("Connection Failed!".$conn->connect_error); > ?>5. Creating Home Page & Displaying All Products
In this step, We’ll create a new home page index.php file inside the root of the project directory. In this file, We’ll design a navbar on the top and then We’ll fetch all the products from the database and display them on this page with some product details and an Add To Cart button. Just copy the below codes and paste them into your index.php file and save them.
prepare('SELECT * FROM product'); $stmt->execute(); $result = $stmt->get_result(); while ($row = $result->fetch_assoc()): ?>
/-
In the above coding, you can see I’ve used bootstrap 4 CDN links, font awesome CDN link and in the below, I’ve also included jQuery CDN link and Bootstrap 4 JS CDN link.
I’ve also sent some request to the server using jQuery — Ajax. Once you created this file and open your project in the browser then you’ll see something like the below image.

6. Creating an action.php file
Before going further 1st We’ll create a new action.php file in the root of the project directory. In this file, We’ll write all the actions like add item to the cart, remove items from the cart, checkout etc. So just copy all the below codes and paste into your action.php file and save them.
prepare('SELECT product_code FROM cart WHERE product_code=?'); $stmt->bind_param('s',$pcode); $stmt->execute(); $res = $stmt->get_result(); $r = $res->fetch_assoc(); $code = $r['product_code'] ?? ''; if (!$code) < $query = $conn->prepare('INSERT INTO cart (product_name,product_price,product_image,qty,total_price,product_code) VALUES (. )'); $query->bind_param('ssssss',$pname,$pprice,$pimage,$pqty,$total_price,$pcode); $query->execute(); echo ' Item added to your cart! '; > else < echo ' Item already added to your cart! '; > > // Get no.of items available in the cart table if (isset($_GET['cartItem']) && isset($_GET['cartItem']) == 'cart_item') < $stmt = $conn->prepare('SELECT * FROM cart'); $stmt->execute(); $stmt->store_result(); $rows = $stmt->num_rows; echo $rows; > // Remove single items from cart if (isset($_GET['remove'])) < $id = $_GET['remove']; $stmt = $conn->prepare('DELETE FROM cart WHERE $stmt->bind_param('i',$id); $stmt->execute(); $_SESSION['showAlert'] = 'block'; $_SESSION['message'] = 'Item removed from the cart!'; header('location:cart.php'); > // Remove all items at once from cart if (isset($_GET['clear'])) < $stmt = $conn->prepare('DELETE FROM cart'); $stmt->execute(); $_SESSION['showAlert'] = 'block'; $_SESSION['message'] = 'All Item removed from the cart!'; header('location:cart.php'); > // Set total price of the product in the cart table if (isset($_POST['qty'])) < $qty = $_POST['qty']; $pid = $_POST['pid']; $pprice = $_POST['pprice']; $tprice = $qty * $pprice; $stmt = $conn->prepare('UPDATE cart SET qty=?, total_price=? WHERE $stmt->bind_param('isi',$qty,$tprice,$pid); $stmt->execute(); > // Checkout and save customer info in the orders table if (isset($_POST['action']) && isset($_POST['action']) == 'order') < $name = $_POST['name']; $email = $_POST['email']; $phone = $_POST['phone']; $products = $_POST['products']; $grand_total = $_POST['grand_total']; $address = $_POST['address']; $pmode = $_POST['pmode']; $data = ''; $stmt = $conn->prepare('INSERT INTO orders (name,email,phone,address,pmode,products,amount_paid)VALUES(. )'); $stmt->bind_param('sssssss',$name,$email,$phone,$address,$pmode,$products,$grand_total); $stmt->execute(); $stmt2 = $conn->prepare('DELETE FROM cart'); $stmt2->execute(); $data .= ' Thank You! Your Order Placed Successfully!
Items Purchased : ' . $products . '
Your Name : ' . $name . '
Your E-mail : ' . $email . '
Your Phone : ' . $phone . '
Total Amount Paid : ' . number_format($grand_total,2) . '
Payment Mode : ' . $pmode . '
'; echo $data; > ?>
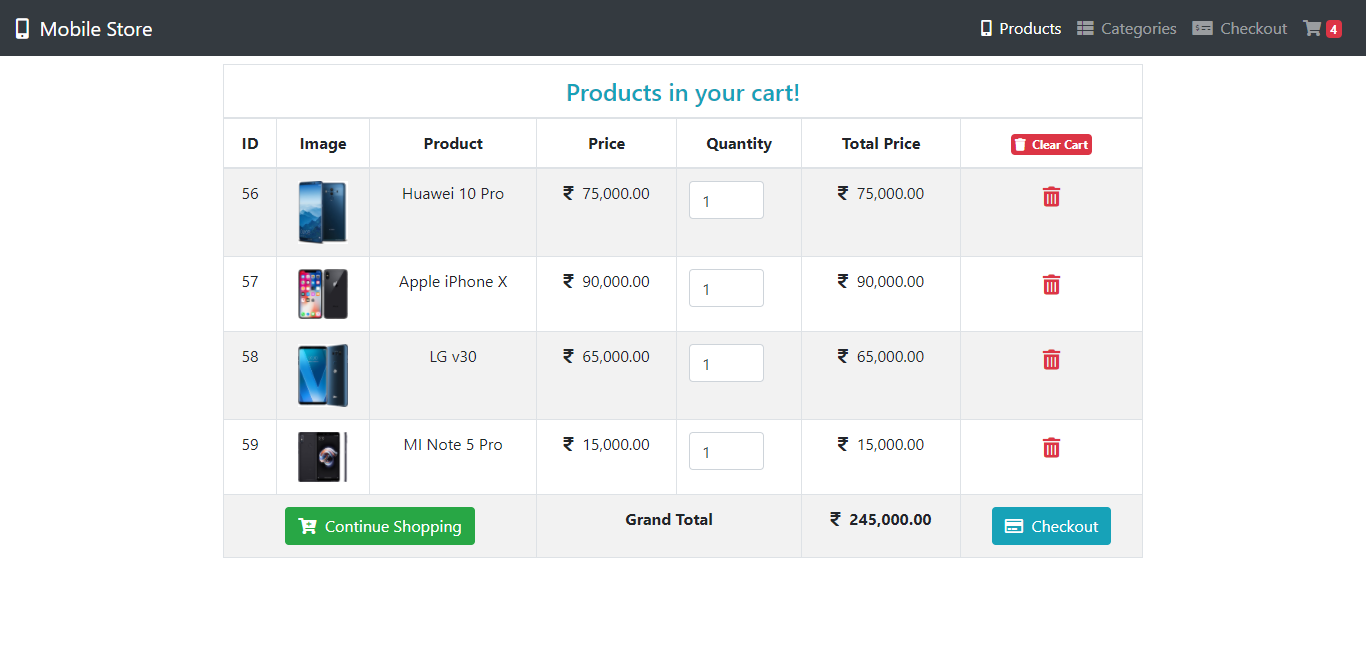
7. Creating Cart Page
In this step, We’ll design our cart page and display all the items present in the cart table. So for this just create a new file cart.php in the root of the project directory and just copy the below codes and paste in your cart.php file and save.
unset($_SESSION['showAlert']); ?>Products in your cart!
ID Image Product Price Quantity Total Price Clear Cart "> "> " style="width:75px;"> " onclick="return confirm('Are you sure want to remove this item?');"> Continue Shopping Grand Total Checkout
In this file also you can see I’ve designed the same navbar that was on the home page and then I’ve fetched all the products from the cart table and displayed them in the tabular format. and then you can also see I’m sending two ajax request 1st one is for changing the quantity of the item and 2nd one is for showing the number of items present in the cart table. Once you completed this file then you can see the output like the below image.
8. Creating Checkout Page
In this step, We’ll design our checkout page. So for this just create a new file checkout.php in the root of the project directory. In this file, We’ll design a form and We’ll also display some added products information with the total price. In this checkout system I’m not implementing any payment gateway I’m only showing you the concept. You can implement any payment gateway very easily. Just use the below codes and paste them into your checkout.php file and save.
In the above file, you can see I’m fetching some product information and displaying it on this page. You can also see I’m sending an ajax request to the server with form data. Once you have done this file then you can see something like the below image.
Once the customer enters his details in the above form and clicks on the place order then the customer’s information will be saved in the orders table. And customer sees something like the below image.
Now this project has been finished, try to add any item to the cart and then go to checkout fill out the form and place your order. All your data will be saved to the database.
If you have any issues regarding this project then you can comment down your issues, I’ll try to fix them as soon as possible. And If you liked this post then share this post with your friends.
If you want to learn advanced Web Design & Development by watching the video tutorial then you can visit my YouTube Channel.
How to Create a Simple Shopping Cart in PHP 2022
The Shopping Add to Cart Script is useful because it allows you to add multiple order products in a single transaction. You will also see here how powerful the functionality of the session.
What are the features of PHP Shopping Cart Source Code?
This PHP Shopping Cart Source Code contains the following features.
-
- Product Listing
- Adding of Products
- Product Updating
- PHP Cart Removing of item.
In this PHP code for shopping cart system, it advised that you will use Twitter Bootstrap templates for you to have a beautiful design.
Let’s begin to write PHP Code for Shopping Cart System:
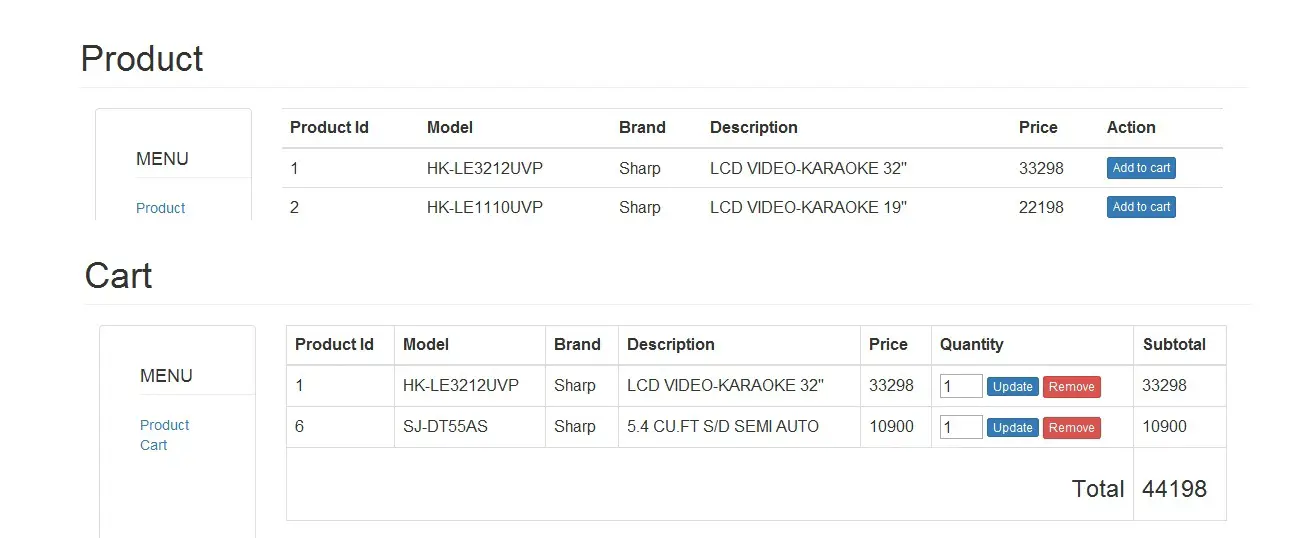
1. Create a MySQL Database and name it “productdb”.
Note: You can click here MySQL Database if you want to learn more about the database.
2. Execute the query for “add to cart database table” in the MySQL database.
CREATE TABLE IF NOT EXISTS `tblproduct` ( `PRODUCTID` int(11) NOT NULL AUTO_INCREMENT, `MODEL` varchar(30) NOT NULL, `BRAND` varchar(30) NOT NULL, `DESCRIPTION` varchar(99) NOT NULL, `PRICE` double NOT NULL, PRIMARY KEY (`PRODUCTID`) ) ENGINE=InnoDB DEFAULT CHARSET=latin1 AUTO_INCREMENT=7 ;
3. Populate the add to cart database table by executing the query below.
INSERT INTO `tblproduct` (`PRODUCTID`, `MODEL`, `BRAND`, `DESCRIPTION`, `PRICE`) VALUES (1, 'HK-LE3212UVP', 'Sharp', 'LCD VIDEO-KARAOKE 32''''', 33298), (2, 'HK-LE1110UVP', 'Sharp', 'LCD VIDEO-KARAOKE 19''''', 22198), (3, '21V-FS720S', 'Sharp', 'Pure Flat TV ', 7190), (4, 'ES-D708', 'Sharp', 'Spin Dryer 7kg ', 4998), (5, 'ES-D958', 'Sharp', 'Spin Dryer 9.5 KG', 5698), (6, 'SJ-DT55AS', 'Sharp', '5.4 CU.FT S/D SEMI AUTO ', 10900);
4. Create a connection between the PHP script and MySQL Database. Name it “config.php”
Note: You can follow the tutorial Connect PHP/MYSQL if you want to have another variation in connecting PHP/MySQL.
$server = ‘localhost’; $dbuser = ‘root’; $dbpass = »; $dbname = ‘productdb’; $con = mysql_connect($server, $dbuser, $dbpass); if (isset($con)) < # code. $dbSelect = mysql_select_db($dbname); if (!$dbSelect) < echo "Problem in selecting database! Please contact administraator"; die(mysql_error()); >> else
5. Create a PHP file called “index.php” for index PHP Cart.
6. Do the following code for the cart list. Name it “cart.php.”
7. Create a PHP file called “process.php” and add the following code for removing of adding and removing of an item in the cart.
if (!empty($_SESSION[‘janobecart’])) < // count the session array varible $max = count($_SESSION['janobecart']); if (!isset($exist))
/* */ alert(‘Item is already in the cart.’) /**/ $_SESSION[‘janobecart’] = array(); $_SESSION[‘janobecart’][0][‘PRODUCTID’] = $pid; $_SESSION[‘janobecart’][0][‘PRICE’] = $price; $_SESSION[‘janobecart’][0][‘QUANTITY’] = 1; > ?>
Note: The code below is a Pop-up Message Using Javascript. This pop-up message is used to display messages about the action of the user, whether successfully executed or not.
/* */ alert('Item has been added in the cart.') /* */ unset($_SESSION['tot']); ?> /* */ alert('Item has been removed in the cart.') /* redirect to main page.*/ window.location='cart.php' $_SESSION['janobecart'] = array_values($_SESSION['janobecart']); > ?> Conclusion
In this lesson, we learn how to make add to cart in PHP. Wherein, the output you have done here can be integrated later on to your website. I hope we can hear some feedback from you.