- 10 CSS & JavaScript Snippets for Creating eCommerce UIs
- Flat Cart
- Table-Free UI
- Delicious Shopping Cart
- Responsive Design
- jQuery Shopping Basket
- Challenge Cart
- Sliding Cart UI
- Dynamic Store & Cart
- Clean Shopping Cart
- Simple Cart with Vue.js
- Domain Cart
- Related Posts
- Related Topics
- How to Create a Shopping Cart UI using CSS & JavaScript
- HTML
- CSS
- JavaScript
10 CSS & JavaScript Snippets for Creating eCommerce UIs
eCommerce carts need to be usable and accessible for all visitors. Your goal is to increase conversions and keep people engaged during checkout, and the best way to do this is with a clean design that encourages user activity.
There are many free open source shopping carts you can restyle for any purpose. And we’ve taken the liberty of collecting our favorites in this collection.
Flat Cart
There’s no denying the popularity of flat design. It works for all types of websites, and it helps designers focus more on usability rather than aesthetics.
That’s why this flat cart makes an excellent resource for anyone building an eCommerce checkout page. The colors are easy to update and the interface features work the same regardless of layout style.
I don’t think flat design is the solution for every project, but in the right scenario this pen can work well as a starting template.
See the Pen Flat Cart [codepen comp] by Will Paige
Table-Free UI
Many checkout pages use tables to organize data but this example by Alex Rodrigues uses DIV s instead.
It is fully responsive, so the layout should look great no matter what device you’re using. Each row holds enough data to restyle properly and keep everything organized, even on super small screens. And the CSS code uses Compass to save time along with free Google Fonts for a little style.
Delicious Shopping Cart
I can’t imagine this working on a real site but as a UI/UX experiment it is pretty cool. The self-titled Delicious Shopping Cart acts like an online bakery/sweets store with photos of different desserts.
You can move your cursor left/right to advance through the carousel or swipe on a mobile device. Each item has plus/minus icons for adding items or removing them from your order, plus an ‘X’ icon to remove it entirely from your cart.
The whole thing is built on Sass, Slim, and jQuery, so it’s one heck of a frontend project! If you’re looking to dissect some great code, this example is worth saving.
Responsive Design
Here’s another simple responsive shopping cart UI built on Sass and table-free.
I like this responsive checkout a little more than the others because the breakpoints feel more natural. Even on smaller screens, the cart items don’t feel cramped or out of place.
All of the “remove” buttons work through JavaScript, and the numeric input fields auto-update pricing. This is great for a frontend cart page where the buyer may want to increase quantities before paying and to see an estimate of the total costs.
See the Pen Responsive Shopping Cart by Justin Klemm
jQuery Shopping Basket
This pen acts more like a wireframe than a full checkout page but it’s perfect as a starting point. Developer Khurram Alvi created this responsive shopping cart with basic HTML/CSS and a little jQuery.
It is fully responsive, and the quantity inputs work as you’d expect. One nice thing is the simplicity of this cart’s design. It doesn’t impose any colors, fonts, or textures into the layout. Anyone looking to build a new cart from scratch might start here because it’s easy to build onto and restructure.
Challenge Cart
Every so often new CodePen challenges pop up asking developers to create different interfaces like signup pages or modal windows. This pen by Žiga Miklič came from a challenge for shopping cart UIs and it’s a masterpiece of frontend development.
When you add/remove items from the cart, you’ll notice the prices automatically update with a small sliding animation. You can also click any product image to remove it from the cart with ease. These small features add a lot to the interface and make cloning a breeze.
Even the checkout function has its own animated feature, although it’s not connected to anything on the backend.
Sliding Cart UI
Tabbed widgets let you add content onto a single page and give users the power over that content. In this sliding cart you can switch between the cart itself and a list of saved “favorite” items.
None of the checkout features actually work, so you can’t favorite or add/remove items into the cart. But the interface items are in place, so a little JavaScript magic would fix that. Still, I’m impressed with how clean this cart looks and the unique-yet-usable tab interface.
Dynamic Store & Cart
Mixing the store and shopping cart into one interface is a tough job but Olivia Cheng got it done in this pen.
It uses wide thumbnails in a grid set up with an “add to cart” button on hover. Click this to add the item above with auto-updating prices. One unique feature is the quantity added on top of the item thumbnail. This might get confusing on a real cart, but if the numbers were a bit smaller, this would be a great way to save space.
See the Pen Sliding Shopping Cart & Store by Olivia Cheng
Clean Shopping Cart
Developer Bart Veneman created this clean shopping cart as a simple interface template. It auto-calculates the total price and even includes taxes near the checkout button.
All of these dynamic features work through JavaScript and surprisingly this pen uses Zepto over jQuery. This is great for devs who prefer the Zepto library, but really anyone could pick up this code and rework it to suit any template.
See the Pen Shopping Cart by Bart Veneman
Simple Cart with Vue.js
Frontend coding with Vue.js makes templating a whole lot simpler. And this pen is one example of a dynamic cart practically built on a JavaScript foundation.
The cart auto-updates with each click so you can add/remove items and see results instantly. The top-right button opens your current cart in a modal window using Bootstrap’s modal component.
If you like the Vue.js syntax, then this template is a great place to start building a shopping cart. It’s easy to customize and should work well in all browsers.
See the Pen VueJS 2 Simple Shopping cart by Cristian Matos
Domain Cart
Here’s one of my favorite shopping cart designs modeled after a domain registrar. Coder Jesse Bilsten got detailed with this interface including a payment section and a required T&C area.
You have to click the “I agree” button before completing the checkout process. It’s a minor yet valuable feature for some eCommerce sites, and I really like the two-column layout. And this design is totally responsive so you can clone it for use in pretty much any eCommerce system.
Related Posts
Related Topics
This page may contain affiliate links. At no extra cost to you, we may earn a commission from any purchase via the links on our site. You can read our Disclosure Policy at any time.
How to Create a Shopping Cart UI using CSS & JavaScript
We’ll design and style the structure of a webpage using the web development technologies HTML and CSS, respectively. Any eCommerce website must have a shopping cart so that customers can choose and buy products. You may build your own shopping cart from scratch by following this guide and gaining hands-on experience in web development and design.
HTML
Step 1: Let’s create our HTML structure.
First, we need a container div, which we’ll call “.shopping-cart”.
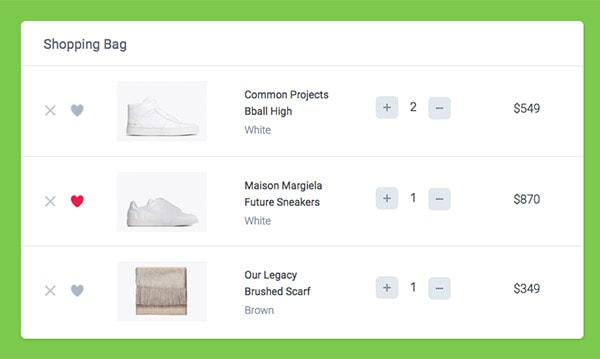
Inside the container, we will have a title and three items which will include:
With Postcards you can create and edit email templates online without any coding skills! Includes more than 100 components to help you create custom emails templates faster than ever before.
- two buttons — delete button and favorite button
- product image
- product name and description
- buttons that will adjust quantity of products
- total price
Common Projects Bball High WhiteMaison Margiela Future Sneakers WhiteOur Legacy Brushed Scarf BrownCSS
Make sure you include the font we use for this tutorial.
Now, let’s add some style to our body with the following lines:Great, now let’s make our Shopping Cart to be 750×423 and style it to look nice. Notice that we are using flexbox, so we set it to display flex and make the flex direction column, because by default the flex direction is set as row.
Next, let’s style the first item, which is the title, by changing the height to 60px and giving it some basic styling, and the next three items which are the shopping cart products, will make them 120px height each and set them to display flex.
Now we’ve styled the basic structure of our shopping cart.
Let’s style our products in order.The first elements are the delete and favorite buttons.
I’ve always loved Twitter’s heart button animation, I think it would look great on our Shopping Cart, let’s implement it..buttons < position: relative; padding-top: 30px; margin-right: 60px; >.delete-btn, .like-btn < display: inline-block; Cursor: pointer; >.delete-btn < width: 18px; height: 17px; background: url("delete-icn.svg") no-repeat center; >.like-btn
We set class “is-active” for when we click the button to animate it using jQuery, but this is for the next section.
.is-active < animation-name: animate; animation-duration: .8s; animation-iteration-count: 1; animation-timing-function: steps(28); animation-fill-mode: forwards; >@keyframes animate < 0% < background-position: left; >50% < background-position: right; >100% < background-position: right; >>Next, is the product image which needs a 50px right margin.
.image < margin-right: 50px; >Let’s add some basic style to product name and description. .description < padding-top: 10px; margin-right: 60px; width: 115px; >.description span < display: block; font-size: 14px; color: #43484D; font-weight: 400; >.description span:first-child < margin-bottom: 5px; >.description span:last-child
Then we need to add a quantity element, where we have two buttons for adding or removing product quantity. First, make the CSS and then we’ll make it work by adding some JavaScript.
With Startup App and Slides App you can build unlimited websites using the online website editor which includes ready-made designed and coded elements, templates and themes.
.quantity < padding-top: 20px; margin-right: 60px; >.quantity input < -webkit-appearance: none; border: none; text-align: center; width: 32px; font-size: 16px; color: #43484D; font-weight: 300; >button[class*=btn] < width: 30px; height: 30px; background-color: #E1E8EE; border-radius: 6px; border: none; cursor: pointer; >.minus-btn img < margin-bottom: 3px; >.plus-btn img < margin-top: 2px; >button:focus, input:focus
And last, which is the total price of the product.
Let’s also make it responsive by adding the following lines of code:
@media (max-width: 800px) < .shopping-cart < width: 100%; height: auto; overflow: hidden; >.item < height: auto; flex-wrap: wrap; justify-content: center; >.image img < width: 50%; >.image, .quantity, .description < width: 100%; text-align: center; margin: 6px 0; >.buttons < margin-right: 20px; >>JavaScript
Let’s make the heart animate when we click on it by adding the following code:
Cool! Now let’s make the quantity buttons work.
$('.minus-btn').on('click', function(e) < e.preventDefault(); var $this = $(this); var $input = $this.closest('div').find('input'); var value = parseInt($input.val()); if (value &gt; 1) < value = value - 1; >else < value = 0; >$input.val(value); >); $('.plus-btn').on('click', function(e) < e.preventDefault(); var $this = $(this); var $input = $this.closest('div').find('input'); var value = parseInt($input.val()); if (value &lt; 100) < value = value + 1; >else < value =100; >$input.val(value); >);And this is our final version:
The tutorial is done! I hope you enjoyed it and learned something new. If you have any questions, ping me!