How to Use Actions
An Action can be used to separate functionality and state from a component. For example, if you have two or more components that perform the same function, consider using an Action object to implement the function. An Action object is an action listener that provides not only action-event handling, but also centralized handling of the state of action-event-firing components such as tool bar buttons, menu items, common buttons, and text fields. The state that an action can handle includes text, icon, mnemonic, enabled, and selected status.
You typically attach an action to a component using the setAction method. Here’s what happens when setAction is invoked on a component:
- The component’s state is updated to match the state of the Action . For example, if the Action ‘s text and icon values were set, the component’s text and icon are set to those values.
- The Action object is registered as an action listener on the component.
- If the state of the Action changes, the component’s state is updated to match the Action . For example, if you change the enabled status of the action, all components it’s attached to change their enabled states to match the action.
Here’s an example of creating a tool-bar button and menu item that perform the same function:
Action leftAction = new LeftAction(); //LeftAction code is shown later . button = new JButton(leftAction) . menuItem = new JMenuItem(leftAction);
To create an Action object, you generally create a subclass of AbstractAction and then instantiate it. In your subclass, you must implement the actionPerformed method to react appropriately when the action event occurs. Here’s an example of creating and instantiating an AbstractAction subclass:
leftAction = new LeftAction("Go left", anIcon, "This is the left button.", new Integer(KeyEvent.VK_L)); . class LeftAction extends AbstractAction < public LeftAction(String text, ImageIcon icon, String desc, Integer mnemonic) < super(text, icon); putValue(SHORT_DESCRIPTION, desc); putValue(MNEMONIC_KEY, mnemonic); >public void actionPerformed(ActionEvent e) < displayResult("Action for first button/menu item", e); >> When the action created by the preceding code is attached to a button and a menu item, the button and menu item display the text and icon associated with the action. The L character is used for mnemonics on the button and menu item, and their tool-tip text is set to the SHORT_DESCRIPTION string followed by a representation of the mnemonic key.
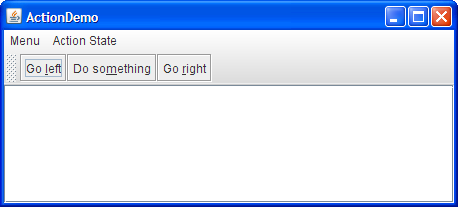
For example, we have provided a simple example, ActionDemo.java , which defines three actions. Each action is attached to a button and a menu item. Thanks to the mnemonic values set for each button’s action, the key sequence Alt-L activates the left button, Alt-M the middle button, and Alt-R the right button. The tool tip for the left button displays This is the left button. Alt-L. All of this configuration occurs automatically, without the program making explicit calls to set the mnemonic or tool-tip text. As we’ll show later, the program does make calls to set the button text, but only to avoid using the values already set by the actions.
Try this:
- Click the Launch button to run ActionDemo using Java™ Web Start (download JDK 7 or later). Or, to compile and run the example yourself, consult the example index.
- Choose the top item from the left menu (Menu > Go left).
The text area displays some text identifying both the event source and the action listener that received the event. - Click the leftmost button in the tool bar.
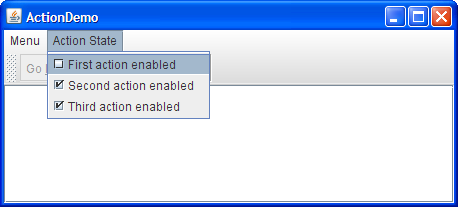
The text area again displays information about the event. Note that although the source of the events is different, both events were detected by the same action listener: the Action object attached to the components. - Choose the top item from the Action State menu.
This disables the «Go left» Action object, which in turn disables its associated menu item and button.
Here is what the user sees when the «Go left» action is disabled:
 |  |
Here’s the code that disables the «Go left» action:
boolean selected = . //true if the action should be enabled; //false, otherwise leftAction.setEnabled(selected);
After you create components using an Action , you might well need to customize them. For example, you might want to customize the appearance of one of the components by adding or deleting the icon or text. For example, ActionDemo.java has no icons in its menus, and no text in its buttons. Here’s the code that accomplishes this:
menuItem = new JMenuItem(); menuItem.setAction(leftAction); menuItem.setIcon(null); //arbitrarily chose not to use icon in menu . button = new JButton(); button.setAction(leftAction); button.setText(""); //an icon-only button We chose to create an icon-only button and a text-only menu item from the same action by setting the icon property to null and the text to an empty string. However, if a property of the Action changes, the widget may try to reset the icon and text from the Action again.
The Action API
The following tables list the commonly used Action constructors and methods. The API for using Action objects falls into three categories:
This table defines the properties that can be set on an action. The second column lists which components automatically use the properties (and what method is specifically called). For example, setting the ACCELERATOR_KEY on an action that is then attached to a menu item, means that JMenuItem.setAccelerator(KeyStroke) is called automatically.
| Property | Auto-Applied to: Class (Method Called) | Purpose |
|---|---|---|
| ACCELERATOR_KEY | JMenuItem (setAccelerator) | The KeyStroke to be used as the accelerator for the action. For a discussion of accelerators versus mnemonics, see Enabling Keyboard Operation. |
| ACTION_COMMAND_KEY | AbstractButton , JCheckBox , JRadioButton (setActionCommand) | The command string associated with the ActionEvent . |
| LONG_DESCRIPTION | None | The longer description for the action. Can be used for context-sensitive help. |
| MNEMONIC_KEY | AbstractButton , JMenuItem , JCheckBox , JRadioButton (setMnemonic) | The mnemonic for the action. For a discussion of accelerators versus mnemonics, see Enabling Keyboard Operation. |
| NAME | AbstractButton , JMenuItem , JCheckBox , JRadioButton (setText) | The name of the action. You can set this property when creating the action using the AbstractAction(String) or AbstractAction(String, Icon) constructors. |
| SHORT_DESCRIPTION | AbstractButton , JCheckBox , JRadioButton (setToolTipText) | The short description of the action. |
| SMALL_ICON | AbstractButton , JMenuItem (setIcon) | The icon for the action used in the tool bar or on a button. You can set this property when creating the action using the AbstractAction(name, icon) constructor. |
Examples that Use Actions
The following examples use Action objects.
| Example | Where Described | Notes |
|---|---|---|
| ActionDemo | This section | Uses actions to bind buttons and menu items to the same function. |
| TextComponentDemo | Text Component Features | Uses text actions to create menu items for text editing commands, such as cut, copy, and paste, and to bind key strokes to caret movement. Also implements custom AbstractAction subclasses to implement undo and redo. The text action discussion begins in Concepts: About Editor Kits. |
Class Button
This class creates a labeled button. The application can cause some action to happen when the button is pushed. This image depicts three views of a » Quit » button as it appears under the Solaris operating system:
The first view shows the button as it appears normally. The second view shows the button when it has input focus. Its outline is darkened to let the user know that it is an active object. The third view shows the button when the user clicks the mouse over the button, and thus requests that an action be performed.
The gesture of clicking on a button with the mouse is associated with one instance of ActionEvent , which is sent out when the mouse is both pressed and released over the button. If an application is interested in knowing when the button has been pressed but not released, as a separate gesture, it can specialize processMouseEvent , or it can register itself as a listener for mouse events by calling addMouseListener . Both of these methods are defined by Component , the abstract superclass of all components.
When a button is pressed and released, AWT sends an instance of ActionEvent to the button, by calling processEvent on the button. The button’s processEvent method receives all events for the button; it passes an action event along by calling its own processActionEvent method. The latter method passes the action event on to any action listeners that have registered an interest in action events generated by this button.
If an application wants to perform some action based on a button being pressed and released, it should implement ActionListener and register the new listener to receive events from this button, by calling the button’s addActionListener method. The application can make use of the button’s action command as a messaging protocol.
Set action command for JButton
In this example we are going to see how to set action command for JButton component. This is a very important task when working in a Java GUI application, as most of the times you have to bundle a button with a specific action. In short, to set action command for JButton one should follow these steps:
- Create a class that extends JFrame and implements ActionListener .
- Create a new JButton .
- Use JButton.addActionListener to add a specific ActionListener to this component.
- Use JButton.setActionCommand to add a specific command to this component.
- Override actionPerformed method and use ActionEvent.getActionCommand to get the command of the button. Then you can customize this command as you wish.
package com.javacodegeeks.snippets.desktop; import java.awt.FlowLayout; import java.awt.event.ActionEvent; import java.awt.event.ActionListener; import javax.swing.JButton; import javax.swing.JFrame; public class SetActionCommandForJButton extends JFrame implements ActionListener < private static final long serialVersionUID = 1L; public SetActionCommandForJButton() < // set flow layout for the frame this.getContentPane().setLayout(new FlowLayout()); JButton button = new JButton("Java Code Geeks - Java Examples"); //add Button add(button); //set action listeners for buttons button.addActionListener(this); // define a custom short action command for the button button.setActionCommand("Geeks"); // add button to frame add(button); >@Override public void actionPerformed(ActionEvent ae) < String action = ae.getActionCommand(); if (action.equals("Geeks")) < System.out.println("Button pressed!"); >> private static void createAndShowGUI() < //Create and set up the window. JFrame frame = new SetActionCommandForJButton(); //Display the window. frame.pack(); frame.setVisible(true); frame.setDefaultCloseOperation(JFrame.EXIT_ON_CLOSE); >public static void main(String[] args) < //Schedule a job for the event-dispatching thread: //creating and showing this application's GUI. javax.swing.SwingUtilities.invokeLater(new Runnable() < public void run() < createAndShowGUI(); >>); > > This was an example on how to set the action command for JButton.