Saved searches
Use saved searches to filter your results more quickly
You signed in with another tab or window. Reload to refresh your session. You signed out in another tab or window. Reload to refresh your session. You switched accounts on another tab or window. Reload to refresh your session.
A lightweight python package to check the status of your server and websites and send you mail alerts if there’s a problem
amineHorseman/server-monitoring
This commit does not belong to any branch on this repository, and may belong to a fork outside of the repository.
Name already in use
A tag already exists with the provided branch name. Many Git commands accept both tag and branch names, so creating this branch may cause unexpected behavior. Are you sure you want to create this branch?
Sign In Required
Please sign in to use Codespaces.
Launching GitHub Desktop
If nothing happens, download GitHub Desktop and try again.
Launching GitHub Desktop
If nothing happens, download GitHub Desktop and try again.
Launching Xcode
If nothing happens, download Xcode and try again.
Launching Visual Studio Code
Your codespace will open once ready.
There was a problem preparing your codespace, please try again.
Latest commit
Git stats
Files
Failed to load latest commit information.
readme.md
This package provides a lightweight python package to check the status of your server and send you a mail if there’s a problem. This package will:
- Monitor your services
- Restart a service if it’s down, and send you a mail notification
- Check if the websites hosted in your server are reachable
- Send you a daily mail if everything goes well
The current design aims to make it simple and light in order to avoid overwhelming your server.
pip install --upgrade subprocess pip install --upgrade sh This package is composed of 2 scripts that can run both in the same machine, or in 2 different machines.
- The service provider script will continuously run in the server, listen to our requests, check the services, restart them if necessary, and send the list of hosted websites.
- The service client script will send requests to the monitoring script, check the availability of the hosted websites, and send us mail alerts. It’s better to run it from a different machine (since we want also to be notified if our server is down).
First edit the hosted-websites.txt file and add your websites (one per each line).
You may also modify some variables in the server_monitoring.py script:
# listening port PORT = 11350 # list of the services to check SERVICES_TO_MONITOR = ['apache2', 'cron', 'mysql', 'fail2ban'] # set a password to reject the other persons from checking your running services AUTH_CODE = "password" # it's not a perfect security, but it's better than nothing xD Now, run the service provider in the background:
python service_provider/server_monitoring.py & You need first to configure some variables in the server_checker.py:
# your mail address DESTINATION_MAIL_ADDRESS = "admin@mail.com" # the adress that will be displayed in your mailbox MAIL_ADDRESS = "alerts@yourserver.com" # the IP address of your server, the listening port and the AUTH_CODE REMOTE_SERVER_IP = "127.0.0.1" PORT = 11350 AUTH_CODE = "password" Now, execute this script each time you want to check the status of your server (services states & websites):
3. Configure cron jobs (optional, but recommended)
It’s more interessting if we configure a recurrent cron job to execute our scripts automatically.
To do to this, open the crontab file first:
The following line will add a cron job to start our service_provider (server side) when the system starts:
@reboot python ~/server_monitoring/service_client/service_provider/server_monitoring.py & The following one, will add a cron job that will execute automatically the service_checker (client side) every X minutes. This way we will be notified as soon as possible if there’s a problem.
*/10 * * * * python ~/server_monitoring/service_client/server_checker.py & In this example I set X = 10 minutes. You can choose any value you want.
- Don’t forget to specify the absolute path of your scripts. In this example, we assume our package is located in the home directory.
- The server_checker (client side) can be run locally in the server, but I think it’s better to run it in another machine, since we want also to get notified if our server is down.
- If there’s a problem, you’ll be notified by mail. But it’s possible that the mail will be classified as a SPAM. Make sure to add the server’s MAIL_ADDRESS to your mailing contacts.
- If nothing’s wrong, the script will send you a daily status mail. If you don’t receive the daily mail, this means that your mailing service is probably down.
- Don’t forget to add a empty line at the end of the crontab file, this will avoid you some useless troubleshooting LOL.
About
A lightweight python package to check the status of your server and websites and send you mail alerts if there’s a problem
Простой монитор системы на Flask
Недавно возникла необходимость сделать простой и расширяемый монитор использования системы для сервера на Debian. Хотелось строить диаграммы и наблюдать в реальном времени использование памяти, дисков и тп. Нашел много готовых решений, но в итоге сделал скрипт на python + Flask + psutil. Получилось очень просто и функционально. Можно легко добавлять новые модули.
UPDATE: статья исправлена и дополнена с учетом замечаний в комментариях.
Сначала сделаем небольшой файл конфигурации для настройки.
# configuration for server monitor #general info version = 1.0 # web server info server_name = "monitor" server_port = 10000 server_host = "localhost" #monitoring time_step = 1 #s max_items_count = 100 #display fig_hw = 3 Напишем монитор, который будет по таймеру собирать нужные нам данные.
В примере — свободное место на дисках и доступная память.
import threading import time import psutil from conf import config as cfg import datetime mem_info = list() disk_usage = list() def timer_thread(): while True: time.sleep(cfg.time_step) mi = psutil.virtual_memory() if mem_info.__len__() >= cfg.max_items_count: mem_info.pop(0) if disk_usage.__len__() >= cfg.max_items_count: disk_usage.pop(0) di = list() for dp in psutil.disk_partitions(): try: du = psutil.disk_usage(dp.mountpoint) except: continue di.append(du.free / 1024 / 1024) mem_info.append([mi.available / 1024 / 1024]) disk_usage.append(di) def start(): t = threading.Thread(target=timer_thread, name="Monitor", args=(), daemon=True) t.start() И саму модель, которая реализует модули. Сюда можно добавлять любой функционал, позже я добавил еще доступность сервисов в интранет (пинг).
Для построения временных графиков берем данные из монитора (см выше).
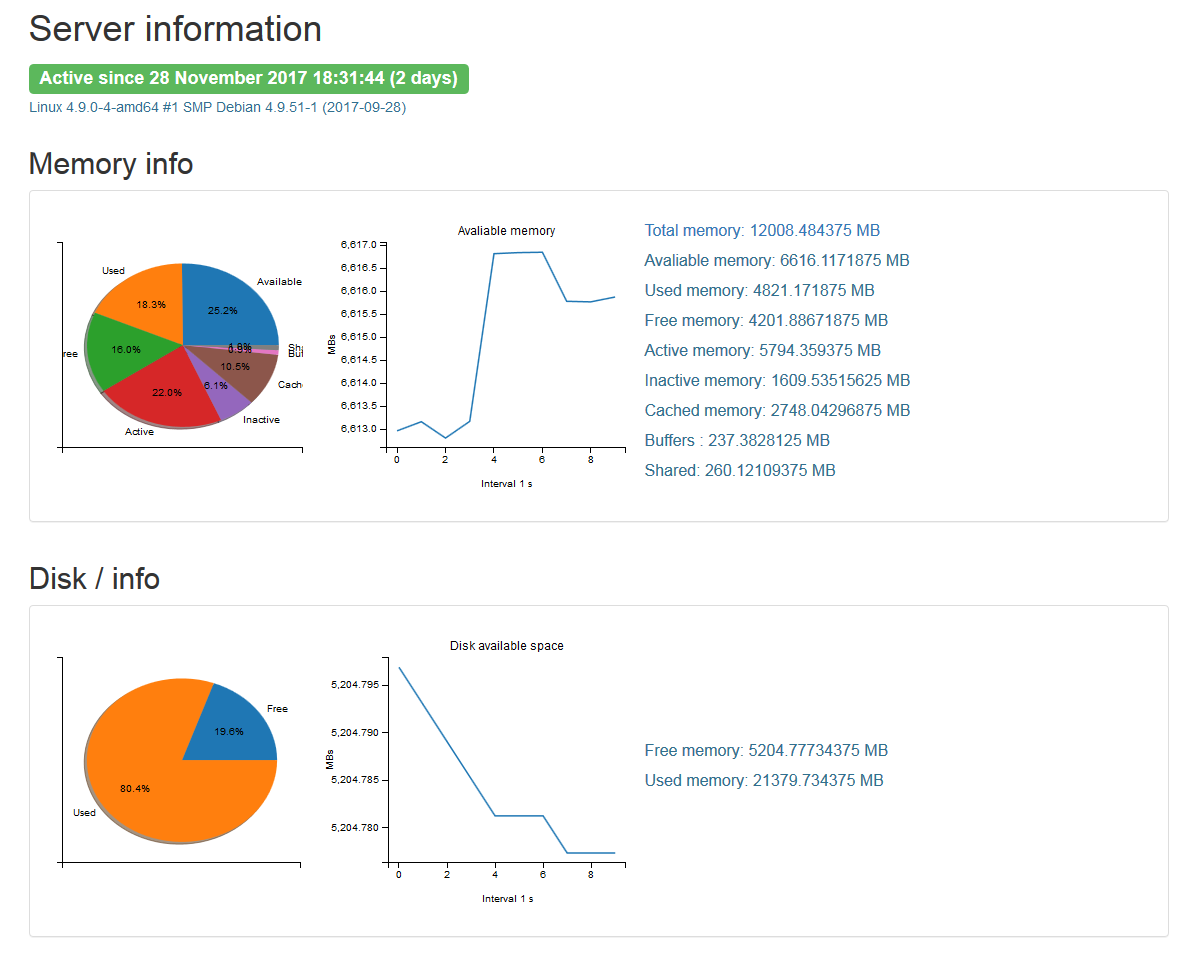
import matplotlib matplotlib.use('agg') import psutil, datetime import mpld3 from jinja2 import Markup from conf import config as cfg import platform from matplotlib import pyplot as plt import numpy from lib import timemon from operator import itemgetter def get_blocks(): blocks = list() get_mem_info(blocks) get_disks_usage(blocks) return blocks def get_mem_info(blocks): fig = plt.figure(figsize=(2 * cfg.fig_hw, cfg.fig_hw)) plt.subplot(121) mem = psutil.virtual_memory() labels = ['Available', 'Used', 'Free'] fracs = [mem.available, mem.used, mem.free] lines = list() lines.append(str.format('Avaliable memory: MB',mem.available)) lines.append(str.format('Used memory: MB', mem.used)) lines.append( str.format('Free memory: MB', mem.free)) if psutil.LINUX: labels = numpy.hstack((labels, ['Active', 'Inactive', 'Cached', 'Buffers', 'Shared'])) fracs = numpy.hstack((fracs, [mem.active, mem.inactive, mem.cached, mem.buffers, mem.shared])) lines.append(str.format('Active memory: MB', mem.active)) lines.append(str.format('Inactive memory: MB', mem.inactive)) lines.append(str.format('Cached memory: MB', mem.cached)) lines.append(str.format('Buffers memory: MB', mem.buffers)) lines.append(str.format('Shared memory: MB', mem.shared)) plt.pie(fracs, labels=labels, shadow=True, autopct='%1.1f%%') plt.subplot(122) plt.plot(timemon.mem_info) plt.ylabel('MBs') plt.xlabel(str.format('Interval s', cfg.time_step)) plt.title('Avaliable memory') plt.tight_layout() graph = mpld3.fig_to_html(fig) blocks.append( < 'title': 'Memory info', 'graph': Markup(graph), 'data': < 'primary' : str.format("Total memory: MB", mem.total / 1024 / 1024), 'lines' : lines > >) print( blocks) def get_disks_usage(blocks): num = 0 for dp in psutil.disk_partitions(): fig = plt.figure(figsize=(2 * cfg.fig_hw, cfg.fig_hw)) plt.subplot(121) try: di = psutil.disk_usage(dp.mountpoint) # gets error on Windows, just continue anyway except: continue labels = ['Free', 'Used', ] fracs = [di.free, di.used] plt.pie(fracs, labels=labels, shadow=True, autopct='%1.1f%%') plt.subplot(122) plt.plot(list(map(itemgetter(num), timemon.disk_usage))) plt.ylabel('MBs') plt.xlabel(str.format('Interval s', cfg.time_step)) plt.title('Disk available space') plt.tight_layout() graph = mpld3.fig_to_html(fig) blocks.append( < 'title': str.format('Disk info', dp.mountpoint), 'graph': Markup(graph), 'data': < 'primary': '', 'lines': [ str.format('Free memory: MB', di.free / 1024 / 1024), str.format('Used memory: MB', di.used / 1024 / 1024) ] > >) num = num + 1 Переходим к созданию веб-сервера и делаем шаблон для отображения страницы, который будет использовать данные из модели.
Server information
Active since > (> days)
> > >
>
> >
>
Наконец, добавим скрипт запуска сервера на Flask по адресу из настроек.
#!/usr/bin/python3 from flask import * from conf import config as cfg from lib import timemon as tm from lib import info import psutil import datetime import platform # server health monitoring tool app = Flask(cfg.server_name) @app.route('/') def index(): active_since = datetime.datetime.fromtimestamp(psutil.boot_time()) return render_template("index.html", script_version=cfg.version, active_since=active_since, days_active=(datetime.datetime.now() - active_since).days, system=platform.system(), release=platform.release(), version=platform.version(), blocks=info.get_blocks()) print("Starting time monitor for", cfg.time_step, "s period") tm.start() print("Starting web server", cfg.server_name, "at", cfg.server_host, ":", cfg.server_port) app.run(port=cfg.server_port, host=cfg.server_host) Вот и все. Запустив скрипт, можно посмотреть графики и диаграммы.
Весь код, как обычно, на github.
Проверено на windows и linux.
Любые улучшения и пожелания приветствуются.