- How To Send Email Using PHP
- Basics of Email
- Send Email using mail() function
- Configure PHP to use SMTP Server
- Standard Services Configuration
- Send Email using PHPMailer and SwiftMailer
- Summary
- Отправка писем через SMTP в PHPMailer
- Яндекс Почта
- Mail.ru
- Gmail
- Рамблер
- iCloud
- Мастерхост
- Timeweb
- Хостинг Центр (hc.ru)
- REG.RU
- ДЖИНО
- nic.ru
- Бегет — beget.com
- Спринтхост — sprinthost.ru
- Отправка почты через SMTP с помощью PHP
- Готовый класс — PHP
- Настройка класса
- Прикрепление файлов к письму
How To Send Email Using PHP
Shows how to send an email using PHP either directly using the email server installed on the system or via SMTP using other email services.
Email is one of the most important factors in having effective business communication. One can also use emails to host marketing campaigns to reach the appropriate audience. Apart from these uses, there are several other benefits of using email as the communication channel including keeping a record of all the messages.
In this tutorial, we will discuss the parameters involved in sending an email and the possible ways to send an email using PHP.
Basics of Email
This section explains the basics of sending an email by explaining the parameters involved in an email. We can include the below-listed parameters while sending an email.
From — The mandatory field to specify the sender email address. It must be a valid email address to send an email.
Reply-To — It’s an optional parameter to accept email replies. If not specified, the From email address will be used to send replies.
To — It’s the most important and mandatory parameter to send an email. We can include either single or multiple receiver email addresses to send an email either to single or multiple receivers.
// To - Format - RFC 2822 - Single Receipient

Receipient Name
// OR
Receipient Email

// To - Format - RFC 2822 - Multiple Receipient

Receipient 1 Name , Receipient 2 Name
, Receipient 3 Name
// OR
Receipient 1 Email, Receipient 2 Email
// OR
Receipient 1 Name , Receipient 2 Email
Cc — Carbon Copy — Similar to To, we can specify either single or multiple recipients to receive a copy of the email in order to keep them notified about the communication.
Bcc — Blank Carbon Copy — We can also involve recipients who will receive a copy of the email without mentioning them to the recipients involved in both To and CC list. The recipients involved in both To and CC list will never know that the same email is also sent to the recipients mentioned in the BCC parameter.
Subject — Though it’s not a mandatory field, one must include the subject in order to hint the recipients about the content involved in the email. A short and descriptive subject can tell the recipient about the communication context.
The subject can be of multiple lines separated with a CRLF (\r\n). Each line must not have more than 70 characters.
Message — The actual message to be sent to the recipients mentioned in To, CC, and BCC parameters. Though we can send an email without a message, it’s not a preferred way to send an email.
Send Email using mail() function
We can use the PHP function mail() to send an email as shown below. It expects that the appropriate Mail Server is installed on the system listening on port 25 to send the email or PHP is configured to use an SMTP server.
Also, make sure that the fields are validated and sanitized before passing them to the mail() function to avoid errors.
// Mail Function
$from = "";
$to = "";
$subject = "";
$message = "";
$headers = "";
$parameters = null;

mail( $to, $subject, $message, $headers, $parameters );

// Example
$from = "nick.douglas@example.com";
$replyTo = "nick.douglas@example.com";
$to = "john.dick@example.com";
$cc = "ricky.singh@example.com";
$bcc = "roy.kumar@example.com";
$subject = "Hello Guest";
$message = "Thanks for joining us.";
$headers = [ "From: $from", "Reply-To: $replyTo", "Cc: $cc", "Bcc: $bcc" ];

mail( $to, $subject, $message, implode( '\r\n', $headers ) );
// OR - PHP 7.2.0 or greater
mail( $to, $subject, $message, $headers );
This is the easiest way to send an email using PHP.
The mail function will throw an error, in case it does not find a mail server or PHP is not configured to use an SMTP server.
In absence of email server or SMTP configuration, the error should look like the one as shown below.
PHP Warning: mail(): Failed to connect to mailserver at "localhost" port 25, verify your "SMTP" and "smtp_port" setting in php.ini or use ini_set() in E:\PracticePHP\email.php on line 11
Warning: mail(): Failed to connect to mailserver at "localhost" port 25, verify your "SMTP" and "smtp_port" setting in php.ini or use ini_set() in E:\PracticePHP\email.php on line 11
PHP Stack trace:
PHP 1. () E:\PracticePHP\email.php:0
PHP 2. mail() E:\PracticePHP\email.php:11

Call Stack:
0.0078 398696 1. () E:\PracticePHP\email.php:0
0.0090 399464 2. mail() E:\PracticePHP\email.php:11

Done.
Configure PHP to use SMTP Server
In case the email server is not installed on the system or installed on a different system, you must configure PHP to use an SMTP server. The php.ini file must be updated to configure an SMTP server. You can add/modify the below-listed settings to configure the SMTP server.
; must have
SMTP =
smtp_port = 25
; optional — required in case server requires authentication
auth_username =
auth_password =
SMTP Host — Update the SMTP setting to specify the server host. It must be a valid server having a mail server installed on it.
SMTP Port — The default port to send mail via SMTP is 25. The ports 587(MSA) or 465(SMTP) can be used to send emails securely.
Auth Username — The username required to identify the valid user.
Auth Password — The password required to authenticate the user.
After applying the above-mentioned configurations, restart the webserver. If the provided details are correct, we can send emails using the mail() function of PHP with appropriate mail server configuration. In this way, we can send emails without installing our email server.
In case you are using the secure ports 587 or 465, you might get an error in case the OpenSSL module is not enabled for PHP. It can be done on Windows by following How To Configure PHP OpenSSL Module On Windows.
You also need to install and configure Sendmail on windows systems. You can follow How To Use Sendmail On Windows To Send Email Using PHP to configure Sendmail on Windows.
Standard Services Configuration
You can also use the standard email services including Gmail, Yahoo, and Outlook to send an email. Below listed are the configurations to be applied to your php.ini file to send emails using your Gmail, Yahoo, or Outlook as mentioned below.
; Gmail configurations
SMTP = smtp.gmail.com
; You can also specify port 587
smtp_port = 465
auth_username =
auth_password =
; Yahoo configurations
SMTP = smtp.mail.yahoo.com
smtp_port = 465
auth_username =
auth_password =
; Outlook configurations
SMTP = smtp.live.com
smtp_port = 465
auth_username =
auth_password =
You must take special care while sending emails using free accounts since there are limitations in sending emails using these services. These services might block your account in case you exceed the specified limit, hence avoid using personal email accounts.
Gmail limits to a maximum of 100 recipients at a time with a limit of 500 messages per day. Similarly, Yahoo also applies a limit of 100 recipients and 500 messages per day.
You might also need to keep the 2-step verification off if you’re using it.
Also, you can follow How To Use Sendmail On Windows To Send Email Using PHP to configure Sendmail on Windows.
Send Email using PHPMailer and SwiftMailer
We can also send emails using the standard libraries available in PHP. The most popular among these libraries are PHPMailer and SwiftMailer.
Summary
In this tutorial, we have discussed the parameters to be considered while sending an email. I have also mentioned the different ways to send an email with and without the SMTP server. You can follow the tutorials Send Email Using PHPMailer and Send Email Using Swift Mailer to send emails using these libraries.
Отправка писем через SMTP в PHPMailer
В последнее время письма отправляемые с хостингов через функции mail() и mb_send_mail() часто попадают в спам или совсем не доходят до адресатов. Альтернатива – это отправка e-mail через SMTP с реального почтового ящика.
use PHPMailer\PHPMailer\PHPMailer; use PHPMailer\PHPMailer\Exception; require_once '/PHPMailer/src/Exception.php'; require_once '/PHPMailer/src/PHPMailer.php'; require_once '/PHPMailer/src/SMTP.php'; // Для более ранних версий PHPMailer //require_once '/PHPMailer/PHPMailerAutoload.php'; $mail = new PHPMailer; $mail->CharSet = 'UTF-8'; // Настройки SMTP $mail->isSMTP(); $mail->SMTPAuth = true; $mail->SMTPDebug = 0; $mail->Host = 'ssl://smtp.gmail.com'; $mail->Port = 465; $mail->Username = 'Логин'; $mail->Password = 'Пароль'; // От кого $mail->setFrom('mail@snipp.ru', 'Snipp.ru'); // Кому $mail->addAddress('mail@site.com', 'Иван Петров'); // Тема письма $mail->Subject = $subject; // Тело письма $body = '«Hello, world!»
'; $mail->msgHTML($body); // Приложение $mail->addAttachment(__DIR__ . '/image.jpg'); $mail->send();Если при отправки писем возникает ошибка « Could not connect to SMTP host », то необходимо добавить следующие строки:
$mail->SMTPOptions = array( 'ssl' => array( 'verify_peer' => false, 'verify_peer_name' => false, 'allow_self_signed' => true ) );Яндекс Почта
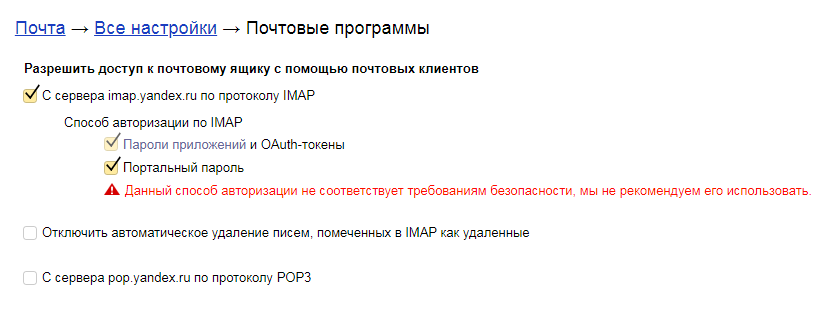
$mail->Host = 'ssl://smtp.yandex.ru'; $mail->Port = 465; $mail->Username = 'Логин@yandex.ru'; $mail->Password = 'Пароль';В настройках почты нужно разрешить доступ к почтовому ящику с помощью почтовых клиентов:
Mail.ru
$mail->Host = 'ssl://smtp.mail.ru'; $mail->Port = 465; $mail->Username = 'Логин@mail.ru'; $mail->Password = 'Пароль';Gmail
$mail->Host = 'ssl://smtp.gmail.com'; $mail->Port = 465; $mail->Username = 'Логин@gmail.com'; $mail->Password = 'Пароль';Если возникает ошибка при отправки почты, то нужно отключить двухфакторную авторизацию и разблокировать «ненадежные приложения» в настройках конфиденциальности аккаунта https://myaccount.google.com/security?pli=1
Рамблер
$mail->Host = 'ssl://smtp.rambler.ru'; $mail->Port = 465; $mail->Username = 'Логин@rambler.ru'; $mail->Password = 'Пароль';iCloud
$mail->Host = 'ssl://smtp.mail.me.com'; $mail->Port = 587; $mail->Username = 'Логин@icloud.com'; $mail->Password = 'Пароль';Мастерхост
$mail->Host = 'ssl://smtp.masterhost.ru'; $mail->Port = 465; $mail->Username = 'Логин@домен.ru'; $mail->Password = 'Пароль';Timeweb
$mail->Host = 'ssl://smtp.timeweb.ru'; $mail->Port = 465; $mail->Username = 'Логин@домен.ru'; $mail->Password = 'Пароль';Хостинг Центр (hc.ru)
Доступ к сторонним почтовым серверам по SMTP-портам (25, 465, 587) ограничен, разрешена отправка не более 300 сообщений в сутки.
$mail->Host = 'smtp.домен.ru'; $mail->SMTPSecure = 'TLS'; $mail->Port = 25; $mail->Username = 'Логин@домен.ru'; $mail->Password = 'Пароль';REG.RU
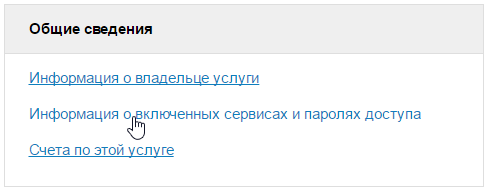
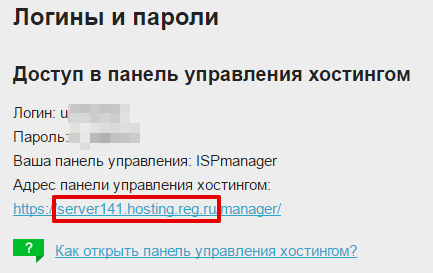
$mail->Host = 'ssl://serverXXX.hosting.reg.ru'; $mail->Port = 465; $mail->Username = 'Логин@домен.ru'; $mail->Password = 'Пароль';ДЖИНО
$mail->Host = 'ssl://smtp.jino.ru'; $mail->Port = 465; $mail->Username = 'Логин@домен.ru'; $mail->Password = 'Пароль';nic.ru
$mail->Host = 'ssl://mail.nic.ru'; $mail->Port = 465; $mail->Username = 'Логин@домен.ru'; $mail->Password = 'Пароль';Бегет — beget.com
$mail->Host = 'ssl://smtp.beget.com'; $mail->Port = 465; $mail->Username = 'Логин@домен.ru'; $mail->Password = 'Пароль';Спринтхост — sprinthost.ru
$mail->Host = 'ssl://smtp.ВАШ_ДОМЕН'; $mail->Port = 465; $mail->Username = 'Логин@домен.ru'; $mail->Password = 'Пароль';Отправка почты через SMTP с помощью PHP
Здравствуйте дорогие читатели. В этой записи я расскажу Вам как отправить письмо с вашего сайта через SMTP сервер. Перед тем, как отправлять письма через SMTP необходимо обязательно настроить DMARC, DKIM, SPF. Если не настроить, ваши письма будут попадать в спам, но нам этого не нужно. Статья — Как настроить DMARC, SPF, DKIM подпись на своем сайте.
Готовый класс — PHP
Для начала загрузите готовый класс, по ссылке — SendMailSmtpClass.php.zip
Распаковываем архив, и размещаем в любую директорию на Вашем сайте.
Настройка класса
Настройка очень простая. Разместите этот код на странице, которая присутствует на каждой. Обычно это — страница конфига.
require_once "SendMailSmtpClass.php"; // подключаем класс //ДЛЯ YANDEX.RU $mailSMTP = new SendMailSmtpClass('mail@yandex.ru', 'pass', 'ssl://smtp.yandex.ru', 465, "UTF-8"); //ДЛЯ MAIL.RU $mailSMTP = new SendMailSmtpClass('mail@mail.ru', 'pass', 'ssl://smtp.mail.ru', 465, "UTF-8"); //РАСШИФРОВКА ЗНАЧЕНИЙ $mailSMTP = new SendMailSmtpClass('логин', 'пароль', 'хост', 'порт', 'кодировка письма');Код отправки самого письма:
$from = array("Блог программиста", // Имя отправителя "support@212d.ru" // почта отправителя ); $result = $mailSMTP->send('Кому письмо, можно через , два получателя', 'Тема письма', 'Текст письма', $from); $result возвращает либо true — успешная отправка, либо false — ошибка.
Прикрепление файлов к письму
$mailSMTP->addFile("file1.jpg"); $mailSMTP->addFile("file2.jpg");В итоге, если Вы все настроили правильно Ваше письмо будет отправляется через этот SMTP сервер с подписей DKIM, и не попадет в спам.
Пишите свои вопросы, предложения в комментариях помогу Всем!


