- Java Guides
- Java Swing Radio Button Example
- Output
- Related Swing Examples
- JRadioButton basic tutorial and examples
- 2. Grouping the radio buttons together
- 3. Adding the radio buttons to a container
- 4. Getting and setting selected state of JRadioButton
- 5. Adding action listener for JRadioButton
- 6. Customizing appearance for JRadioButton
- 7. A Swing demo program for JRadioButton
- Other Java Swing Tutorials:
- About the Author:
Java Guides
In this post, I show you how to use JRadioButton class to create a Radio button in Swing-based application.
JRadioButton allows the user to select a single exclusive choice from a group of options. It is used with the ButtonGroup component.
Java Swing Radio Button Example
The example has three radio buttons; the value of the selected radio button is shown in a status bar.
package net.sourcecodeexamples.swingexample.components2; import javax.swing.ButtonGroup; import javax.swing.GroupLayout; import javax.swing.JComponent; import javax.swing.JFrame; import javax.swing.JLabel; import javax.swing.JPanel; import javax.swing.JRadioButton; import javax.swing.LayoutStyle; import java.awt.EventQueue; import java.awt.event.ItemEvent; import java.awt.event.ItemListener; import static javax.swing.LayoutStyle.ComponentPlacement.RELATED; public class RadioButtonExample extends JFrame implements ItemListener < private static final long serialVersionUID = 1L; private JLabel sbar; private void initializeUI() < JLabel lbl = new JLabel("Difficulty"); ButtonGroup group = new ButtonGroup(); JRadioButton rb1 = new JRadioButton("Easy", true); JRadioButton rb2 = new JRadioButton("Medium"); JRadioButton rb3 = new JRadioButton("Hard"); group.add(rb1); group.add(rb2); group.add(rb3); sbar = new JLabel("Selected: Easy"); rb1.addItemListener(this); rb2.addItemListener(this); rb3.addItemListener(this); createLayout(lbl, rb1, rb2, rb3, sbar); setSize(350, 250); setTitle("Radio buttons"); setLocationRelativeTo(null); setDefaultCloseOperation(JFrame.EXIT_ON_CLOSE); > @Override public void itemStateChanged(ItemEvent e) < int sel = e.getStateChange(); if (sel == ItemEvent.SELECTED) < JRadioButton button = (JRadioButton) e.getSource(); String text = button.getText(); StringBuilder sb = new StringBuilder("Selected: "); sb.append(text); sbar.setText(sb.toString()); > > private void createLayout(JComponent. arg) < JPanel pane = (JPanel) getContentPane(); GroupLayout gl = new GroupLayout(pane); pane.setLayout(gl); gl.setAutoCreateContainerGaps(true); gl.setHorizontalGroup(gl.createParallelGroup() .addComponent(arg[0]) .addComponent(arg[1]) .addComponent(arg[2]) .addComponent(arg[3]) .addComponent(arg[4]) ); gl.setVerticalGroup(gl.createSequentialGroup() .addComponent(arg[0]) .addPreferredGap(LayoutStyle.ComponentPlacement.UNRELATED) .addComponent(arg[1]) .addComponent(arg[2]) .addComponent(arg[3]) .addPreferredGap(RELATED, GroupLayout.DEFAULT_SIZE, Short.MAX_VALUE) .addComponent(arg[4]) ); > public static void main(String[] args) < EventQueue.invokeLater(() -> < RadioButtonExample radioButtonExample = new RadioButtonExample(); radioButtonExample.initializeUI(); radioButtonExample.setVisible(true); >); > >
We created three JRadioButtons and placed into the ButtonGroup. The first radio button is preselected.
ButtonGroup group = new ButtonGroup(); JRadioButton rb1 = new JRadioButton("Easy", true); JRadioButton rb2 = new JRadioButton("Medium"); JRadioButton rb3 = new JRadioButton("Hard"); group.add(rb1); group.add(rb2); group.add(rb3);
rb1.addItemListener(this); rb2.addItemListener(this); rb3.addItemListener(this);
When we select a radio button, two events are actually triggered: one for selection and one for deselection. We are interested in the selection.
if (sel == ItemEvent.SELECTED)
We get the source of the event with the getSource() method and get the text label of the radio button:
JRadioButton button = (JRadioButton) e.getSource(); String text = button.getText();
StringBuilder sb = new StringBuilder("Selected: "); sb.append(text); sbar.setText(sb.toString());
Output

Related Swing Examples
- Java Swing Exit Button— In this post, I show you how to exit a Swing application when clicking on the exit button.
- Swing ToolTip Tutorial with Example— In this tutorial, we will learn how to add tooltip text to a Swing component.
- Java Swing BorderLayout Example — In this example, we will learn how to use BorderLayout in GUI/swing based applications.
- Java Swing GridLayout Tutorial with Examples — In this tutorial, we will learn how to use GridLayout in GUI/swing based applications.
- Swing Mouse Move Events using MouseMotionAdapter — In this tutorial, we will learn how to receive mouse motion events using MouseMotionAdapter.
- Java Swing CheckBox Example — In this post, I show you how to use JCheckBox class to create a Radio button in a Swing-based application .
- Java Swing Radio Button Example— In this post, I show you how to use JRadioButton class to create a Radio button in a Swing-based application.
- Java Swing Progress Bar Example — In this post, I show you how to create a progress bar using the JProgressBar component in swing-based applications.
- Java Swing Combo Box Example — In this post, I show you how to create a combo box using a JComboBox component in swing-based applications.
- Java Swing Slider Example— In this post, I show you how to create a slider using the JSlider component in swing-based applications.
- Java Swing Toggle Button Example — In this post, we will learn how to create a toggle button using the JToggleButton component in swing-based applications.
JRadioButton basic tutorial and examples
There are several ways to construct a new JRadioButton , but the most common way is to pass some text to its constructor, for example:
JRadioButton optionLinux = new JRadioButton("Linux"); In addition to the text that tells what the option is for, it’s possible to specify an icon and selected state in any combination of [text, icon, selected]. Here are some examples:
- Creating a radio button with an icon:
JRadioButton optionLinux = new JRadioButton(ImageIcon("images/linux.png")); JRadioButton optionWin = new JRadioButton("Windows", true); Of course we can set the text and selected state for a radio button after it is created, for example:
optionWin.setText("Windows"); optionWin.setSelected(true); We can also pass an instance of a class that implements the javax.swing.Action interface when creating a radio button. Using an Action is useful in case we have multiple components that share same properties and state like a menu item, a check box, a button, etc. Here’s an example that creates a radio button with caption “Macintosh” and selected state:
Action action = new CommonAction("Macintosh", true); JRadioButton optionMac = new JRadioButton(action); class CommonAction extends javax.swing.AbstractAction < public CommonAction(String text, boolean selected) < super(text); super.putValue(SELECTED_KEY, selected); >@Override public void actionPerformed(ActionEvent event) < // code to handle click event goes here. >>
This class extends the abstract class AbstractAction which in turn, implements the javax.swing.Action interface. The AbstractAction class already implements standard behaviors from the Action interface, so our subclass can focus on implementing action event or setting other attributes if necessary (the selected state, in this case).
2. Grouping the radio buttons together
Because a typical behavior of radio buttons is only one button can be selected, so we should put all related radio buttons into a group by using the javax.swing.ButtonGroup class as follows:
ButtonGroup group = new ButtonGroup(); group.add(optionLinux); group.add(optionWin); group.add(optionMac);
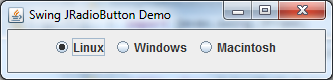
The ButtonGroup class is responsible to make sure only one button is selected (by deselecting others in the group). For example, in the following screenshot, the button “Windows” is selected:
![]()
If we don’t put the radio buttons into a group, then each button can be selected independently, for example:
![]()
Remember that the ButtonGroup class just creates a logical group of radio buttons, not a physical one. That means the physical position of the buttons is not affected.
3. Adding the radio buttons to a container
Like other Swing components, the radio buttons are usually added to a container like a JPanel or JFrame using the add() method, but there will be different ways depending on which layout manager used by the container. Here are some examples:
- Adding the radio buttons to a JFrame with FlowLayout manager:
theFrame.setLayout(new FlowLayout()); theFrame.add(optionLinux); theFrame.add(optionWin); theFrame.add(optionMac);
JPanel panel = new JPanel(new BorderLayout()); panel.add(optionLinux, BorderLayout.NORTH); panel.add(optionWin, BorderLayout.CENTER); panel.add(optionMac, BorderLayout.SOUTH);
JPanel panel = new JPanel(new GridBagLayout()); // specify constraints GridBagConstraints constraints = new GridBagConstraints(); constraints.gridx = 0; panel.add(optionLinux, constraints); constraints.gridx = 1; panel.add(optionWin, constraints); constraints.gridx = 2; panel.add(optionMac, constraints);
4. Getting and setting selected state of JRadioButton
A typical usage of radio button is checking its selected state, using the isSelected() method, for example:
boolean isLinuxSelected = optionLinux.isSelected(); if (isLinuxSelected) < // the Linux option is selected >else < // the Linux option is deselected >
// set the option Windows is selected optionWin.setSelected(true); // set option Macintosh is deselected optionMac.setSelected(false);
5. Adding action listener for JRadioButton
Like Swing’s JButton component, a radio button can receive clicking event when the user selects it. We can use the addActionListener() method to specify an action listener for the radio button, for example:
optionLinux.addActionListener(new ActionListener() < @Override public void actionPerformed(ActionEvent event) < // do something when the button is being selected. >>);
The radio button fires an ActionEvent whenever the user clicks on it, even if the radio button is selected before. If you just want to care about when a radio button’s state changes (selected or deselected), use an ItemListener as follows:
optionLinux.addItemListener(new ItemListener() < @Override public void itemStateChanged(ItemEvent event) < int state = event.getStateChange(); if (state == ItemEvent.SELECTED) < // do something when the button is selected >else if (state == ItemEvent.DESELECTED) < // do something else when the button is deselected >> >);
It’s recommended to use a same action listener for a group of related radio button, as shown in the following example:
- Code to create an action listener:
class RadioButtonActionListener implements ActionListener < @Override public void actionPerformed(ActionEvent event) < JRadioButton button = (JRadioButton) event.getSource(); if (button == optionLinux) < // option Linux is selected >else if (button == optionWin) < // option Windows is selected >else if (button == optionMac) < // option Macintosh is selected >> >
RadioButtonActionListener actionListener = new RadioButtonActionListener(); optionLinux.addActionListener(actionListener); optionWin.addActionListener(actionListener); optionMac.addActionListener(actionListener);
6. Customizing appearance for JRadioButton
optionLinux.setForeground(Color.BLUE); optionLinux.setBackground(Color.YELLOW); optionLinux.setFont(new java.awt.Font("Tahoma", Font.BOLD, 16)); optionLinux.setToolTipText("Select this option if you like Linux"); 
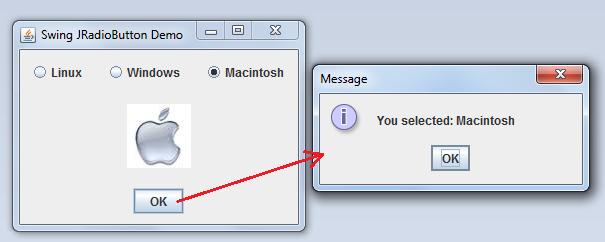
7. A Swing demo program for JRadioButton
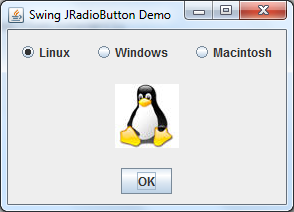
When a radio button is clicked, an appropriate image will be shown. If the OK button is clicked, a message dialog appears saying the selected option:
You can download full source code as well as executable jar file of this program under Attachments section.
Other Java Swing Tutorials:
About the Author:

Nam Ha Minh is certified Java programmer (SCJP and SCWCD). He started programming with Java in the time of Java 1.4 and has been falling in love with Java since then. Make friend with him on Facebook and watch his Java videos you YouTube.