- How to Create Html File on Android
- Video Tutorial:
- Why You Need to Learn How to Create HTML File on Android
- Method 1: Using Google Drive
- Pros:
- Cons:
- Method 2: Using Jota Text Editor App
- Pros:
- Cons:
- Method 3: Using AndroDOC App
- Pros:
- Cons:
- Method 4: Using Text Editor App
- Pros:
- Cons:
- What to Do If You Can’t Create HTML File on Android
- Bonus Tips
- FAQs
- Q1: Can I create an HTML file on Android without a Wi-Fi connection?
- Q2: Can I create an HTML file on Android and preview it?
- Q3: Can I simultaneously create an HTML file on my computer and Android device?
- Q4: Can I edit existing HTML files on Android?
- Q5: Is HTML coding difficult to learn?
- Final Thoughts
- How to Save Webpages as HTML or PDF File on Android
- Save Webpage in HTML or Text-Only Format Using UC Browser
- Save Webpage in PDF Format Using Android Google Chrome
- Final Words!
- How To Add/Create Local HTML File In Android Studio
- How to add local HTML file in android Studio
How to Create Html File on Android
Have you ever wondered how to create an HTML file on Android? While most people think that creating an HTML file is only for professionals, it’s actually quite simple. An HTML file is a text document containing hyperlinks, which allows us to create web pages, using various tools. In this blog post, we will show you how to create an HTML file on Android using several different methods.
Video Tutorial:
Why You Need to Learn How to Create HTML File on Android
- You can create webpages on your Android device
- You can edit existing HTML pages
- It will save you time and resources
- You can upload your webpages directly from your device
- It will give you a sense of accomplishment and satisfaction
Method 1: Using Google Drive
Google Drive is an excellent cloud storage and file-sharing service that enables you to store and create documents, including HTML files. Follow the steps below to create an HTML file on Android using Google Drive:
- Open Google Drive on your Android device
- Tap the ‘Plus’ icon to create a new document
- Select the ‘Document’ option from the new menu
- From there, select ‘Blank document’
- You can now start creating your HTML file by typing or pasting the HTML code into the document
- Save the file with an .html extension.
Pros:
- Google Drive is free and accessible from anywhere with an internet connection
- Google Drive has a user-friendly interface and easy-to-follow steps.
- Automatic saving and syncing of documents offer protection against data loss
- Google Docs is an excellent tool for editing and adding more formatting to your HTML file.
Cons:
- Requires an internet connection to create HTML files
- Storage capacity might be limited with free version
- Not suitable for offline work or if you prefer folders and directories to manage your work files.
Method 2: Using Jota Text Editor App
If you need an app to create, edit, and view HTML files on your Android device, you can use the Jota Text Editor app. Follow the steps below to create an HTML file on Android using the Jota Text Editor app:
- Download and install the Jota Text Editor app from the Google Play store
- Launch the app and tap the ‘New File’ button
- Select ‘HTML’ as the file type
- You can now start typing or pasting your HTML code to create the file in the editor
- Save the file with an .html extension.
Pros:
- Jota Text Editor is a free Android app for editing HTML files
- It features syntax highlighting, code completion feature for HTML code
- It has a user-friendly interface and easy-to-follow steps
- You can create, edit, and save HTML files offline using the app.
Cons:
- It may not be suitable for large files or complex editing needs
- The interface may need some getting used to for beginners
- Lack of advanced features that you would find in a desktop software program like Adobe Dreamweaver or VS Code.
Method 3: Using AndroDOC App
AndroDOC is a free Android app that lets you create, edit, and save HTML files offline. Follow the steps below to create an HTML file on Android using AndroDOC:
- Download and install the free AndroDOC app from the Google Play store
- Launch the app and tap the ‘New Document’ button
- Select ‘HTML Document’ as the document type
- You can now start typing or pasting your HTML code to create the file in the editor
- Save the file with an .html extension.
Pros:
- AndroDOC is free and easy to install
- You can edit and save HTML documents offline, anywhere, and at any time
- It has a user-friendly interface and simple steps to follow
- You can use this app to edit documents saved on your device or Google Drive account.
Cons:
- Documents you create using this app may not be compatible with advanced web design software
- Some of the advanced HTML tags, formatting, and syntax may not be fully supported by the app
- The app may not be suitable for complex web design or editing tasks
Method 4: Using Text Editor App
A text editor app is another great option for creating and editing HTML files on your Android device. Follow the steps below to create an HTML file using a Text Editor app:
- Download a Text Editor app from the Google Play store
- Launch the app and tap the ‘New File’ button
- Type the HTML code for the file into the editor
- Save the file with an .html extension.
Pros:
- Text editor apps are free or low-cost
- You can create and edit HTML files offline
- Some text editor apps have syntax highlighting, autocomplete, and other features to facilitate coding
Cons:
- Text editors mainly provide basic functionality, which may not be sufficient in more complex web development projects
- It may take longer to enter code, as you will not have specific HTML formatting and coding options
- More advanced features like version control and site management may not be available.
What to Do If You Can’t Create HTML File on Android
If you’re unable to create an HTML file on your Android device, here are some things to do:
- Ensure you have a stable internet connection when using online tools like Google Drive
- If using a text editor app, ensure you have the correct file format (.html)
- Check for any app updates to ensure proper performance
- Try reinstalling the app if it does not work after an update
- If all else fails, contact the app developer for assistance
Bonus Tips
Here are some bonus tips to keep in mind when creating an HTML file on Android:
- Double-check any code you type into the file for accuracy
- Use the W3C Markup validator tool to check the code for errors
- Try to keep your HTML code simple and easy to understand
FAQs
Q1: Can I create an HTML file on Android without a Wi-Fi connection?
A: Yes, you can create an HTML file on Android devices without a Wi-Fi connection. Use one of the Text Editors, Jota Text Editor App, or AndroDOC methods.
Q2: Can I create an HTML file on Android and preview it?
A: Yes, most text editors and document creator apps, including Google Drive, allow you to preview your HTML file before uploading it to the web.
Q3: Can I simultaneously create an HTML file on my computer and Android device?
A: Yes, if you’re using cloud-based storage or synchronization, such as Google Drive or Dropbox, you can create an HTML file on your Android device and later access it on your computer.
Q4: Can I edit existing HTML files on Android?
A: Yes, using any of the methods listed here, you can edit existing HTML files on Android. Open the file in the app and make the desired changes.
Q5: Is HTML coding difficult to learn?
A: No, HTML is one of the easiest markup languages to learn. With today’s technological advancements, online tutorials, and helpful tools, anyone can learn to create an HTML file within a few weeks.
Final Thoughts
Creating an HTML file on Android devices can seem challenging, but with the right tools and methods, it is achievable. Each of the methods outlined above offers its own advantages, and you should choose the one that best suits your specific needs and preferences. Over time, you will get used to adjusting your HTML files, and before you know it, you will be designing responsive and engaging web pages.
How to Save Webpages as HTML or PDF File on Android
Internet is like sea consisting of millions of websites. We also use them on daily basis. Few of which are regularly visited ( like social media or search engines ) while other for one time only. Many people uses Internet to learn and read online books, stories, tutorials, study notes etc., and maybe you’re one of them. Sometimes we land on webpages that can be useful in future.
To save such page either you can bookmark them or save them in HTML or PDF Format. Bookmarking is just saving a web-link and it need proper internet connectivity to access it next time while saving it as a file help us to view it even when we’re offline. This is biggest plus point and benefits of using it. You can use such webpages when you’re getting bored and have no Internet service like while traveling.
This is what I am going to teach you today. Below I have listed 2 different methods to save any webpage in html, pdf or plain text format with their complete step by step instructions. So let’s begin!
Save Webpage in HTML or Text-Only Format Using UC Browser
UC browser is one the most used and even most loved browser for android operating system and if you’re one of its million user, you can take advantage of it to save any webpage in HTML or plain text format. In my earlier tutorial, I had posted on Top 10 Tricks and Tips for UC Browser where I clearly explain what add-ons ( also called extensions ) are and how to install them. In short, these are the subprogram that has been or can be added to pre-existing programs ( here it refers to browser ). Now we will make use of UC Add-ons to save webpages. It is as simply as to install new android applications. Just follow below steps carefully —
1. Open UC Browser from your android smartphone.
2. Now click menu button ( three parallel lines ).
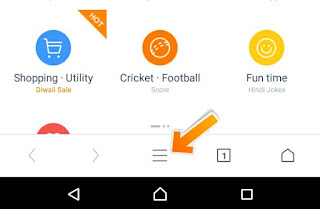
3. Select add-ons option and a new window will open.
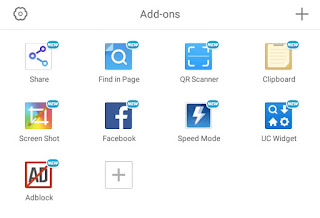
4. Here it will display a Complete list of all pre-installed add-ons. Look for «Save Page». If it isn’t available, click plus button to add it otherwise proceed with step 7.
5. It will open ucweb domain. Scroll down the page and click install button next to «save page» option as shown in below picture.

6. All UC Add-ons are in apk format. So it will redirect you to the google play store. Click install button and allow permission.
7. You’ve successfully installed it. Now Simply go to webpage that you want to save and open add-ons option ( same as in step 2nd and 3rd ).
8. Here you will find «save page» option. Click on it.
9. A small pop-up box will appear. Select three dots ( see below picture ).
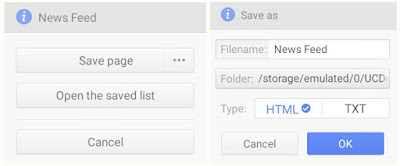
10. Now choose file name, location and format type ( html or text only ). Finally hit OK button.
If you want to access all saved pages, open save page add-on at any time and click «open the saved list» option.
Save Webpage in PDF Format Using Android Google Chrome
Chrome is another popular browser for android operating system. It is well known for its simplicity and performance. Moreover it is a part of google product, which itself is a very big thing for us. There are numbers of inbuilt functions in it. Today we will make use of «Print» option to download webpages in PDF format. All step by step instructions are given below —
1. Open Google Chrome from your android device.
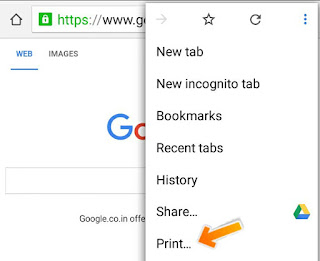
2. Now go to webpage that you want to download and click option menu button ( three dots or use external touch button ).
3. A long list will appear. Find and select print button.
4. Now a new window will open as shown in below picture. Click the drop down menu and select «Save as PDF». There will be few more options like number of copies, orientation, page size, pages, colour etc., Just change them with your choice otherwise left them unchanged with their default values.
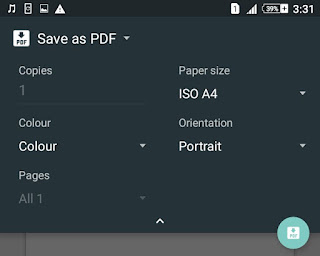
5. After above steps, click save Icon.
![]()
6. Now select the location where you want to save it and finally hit «Save» button.
To access webpage when you’re offline, open file manager and move to location where you’ve saved pdf file earlier.
Final Words!
So this is all about on how to save webpage for offline viewing on android device. Isn’t that easy? For your knowledge, there are number of android application available on google play. But why need to download them if we have alternative tested solutions. So better try above mentioned methods and enjoy. Finally if you have any questions or doubt, please comment below and let me know. What other helpful situations did you find using these methods?
How To Add/Create Local HTML File In Android Studio
We usually need HTML files for displaying your content in WebView. If you want to add any website page or want to create a local webpage for your app then it could be done using HTML files. Here we will show how to create local HTML file in Android Studio.
How to add local HTML file in android Studio
Step 1: For adding Local HTML page into your android studio project you must have Assets folder in it. Refer our Article :How to add Assets folder in Android Studio
Step 2: Once you have your assets folder inside the project then right click on assets folder then NEW>FILE

Step 3: Android Studio will show you a dialog box, it will ask you to give file name. Write any name as per your requirement.(for example: sample.html) and hit OK.

Step 4: Now you can see sample.html has created in the assets folder. Open it and edit as per your own requirements.

Step 5: Another option for adding HTML file: You can create a HTML page anywhere in your PC and then Copy it and paste it into assets folder.

Important Note: When you want to load your HTML page in web view then use below code:
WebView web = new WebView(); web.loadUrl("file:///android_asset/sample.html"); make sure you cast the web view before using loadUrl() function : web =(WebView)findViewById(R.id.webview);