- How to Run Java Apps and Games on Android: Get Your Classic Apps Back
- Method 1: JBED (root required)
- 1. Prerequisite Downloads
- jbed.zip
- library file
- 2. Installation in recovery or without it
- 3. Restart
- 4. Secure your files
- 5. Open Java
- 6. Enjoy your old apps
- Method 2: Java Manager; emulate java
- java manager; emulate java
- 1. Secure your files
- 2. Run any file
- Method 3: PhoneME
- How to run Java programs directly on Android (without creating an APK)
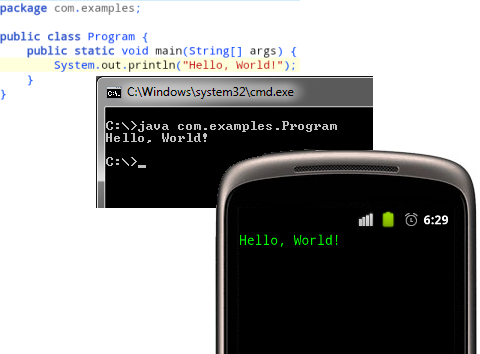
- A (not so) simple Hello World program
- Setting up the working directory
- Compiling and dexing the Java class
- Creating the startup shellscript
- Installing and running the (non-) app
- It works, but how do I get a Context?!
- Follow up articles
- Запускаем консольные Java приложения на Android
How to Run Java Apps and Games on Android: Get Your Classic Apps Back
Looking for a blast from the past that today’s apps just can’t scratch? Seems like it’s time to break away from all those old Java apps and games from a time before almost all phones were smartphones. You’ll be happy to know that it’s not impossible to play with all your old Java classics. This all sounds great, but sadly it’s harder than I’m making it sound. The closer you are to the most up-to-date version of Android, the more difficult it will be to emulate and convert from Java. There’s no version of Android where it’s 100% impossible, but if you’re running Nougat, expect a tough time.
It’s a bit like trying to run or convert an old Windows 95 program into Windows 10. If you can get it to work, it’s a miracle, but don’t expect magic on the first try and be prepared for a lot of troubleshooting.
Method 1: JBED (root required)
JBED is an amazing program that allows you to use your old Java apps and games just like APKs, but the only problem is that the program itself is finicky on a newer version of Android. So, in addition to needing a rooted device, to get the best possible results, you should be running Android 4.4 or below. There is still a chance that this method will work on newer Android phones, but it is hard to say as it works differently depending on the case. If you still want to try this first method, follow the instructions exactly.
1. Prerequisite Downloads
Recovery – If you have a custom recovery installed like TWRP Recovery or CWM Recovery, then you need to download this file:
jbed.zip
library file
2. Installation in recovery or without it
Recovery: Reboot into recovery mode and go to «install zip from SD card». Now make sure to select the JBED zip file that you downloaded earlier. The process should take a couple of seconds and you should see “Installation complete”. Now you can reboot your device. No Recovery: Go to the path where you saved the APK file using any file explorer and install the file. Then move the «libjbedvm.so» file to the system/lib folder. You will need a root-enabled file browser, such as Root Browser, to move the file. Once you move the lib file, you need to select the file and click on “Permissions” in the options menu. Be sure to check «RW-RR» on the permit. Please see the screenshots below for reference.


3. Restart
If you installed the app manually, make sure to reboot your phone after changing the permissions for the lib. Now, you should see an app called «Java» in your app drawer.

4. Secure your files
Make sure you have downloaded an application JAR that you want to use. Place the file on your SD card.
5. Open Java
Open the Java app from your app drawer and choose SD card from the menu. Click on the JAR file you want to install and the emulator will install the app on your device.

6. Enjoy your old apps
Once the installation is complete, you should see the Java app/game in your app drawer. Now you can launch the app like any other Android app from your app drawer.
Method 2: Java Manager; emulate java
While the above method requires a rooted phone and has a hard time working on newer devices, Java Manager fares better. It’s a convenient app that runs Java files with just a few taps, but it hasn’t been updated or changed in a couple of years.

Don’t let that scare you though, if the Java Manager isn’t broken, why fix it? That’s at least what I’d like to say, but Java Manager has mixed results for users across the board. For some Android users, it works perfectly and for others, they can’t even navigate the user interface. Java emulation is somewhat tricky, so don’t expect this app to do magic on the first try.
java manager; emulate java

1. Secure your files
Either before or after downloading Java Manager, download and place any .jar files on an SD card or in the root of your phone’s memory. If you don’t know where root is, that’s where all the folders on your phone are. So instead of putting the file in one of those many folders, just put it next to them.
2. Run any file
This is where things start to get complicated. Java Manager opens with all its options on the screen immediately.

You can run .java, .class, and .jar files with just a few taps, or so it seems. As soon as you upload a file, it’s a coin toss to see if it will work or not. If you can get your files to run with this app, great, but if you can’t, there isn’t much you can do to fix your problems. If this app doesn’t work for you, try:
- Soft reset your phone
- Turn off the phone for at least two minutes
- Delete and then reinstall the app
- Uploading your file from a different location
That’s all you can do, so good luck getting your old Java apps and games to load.
Method 3: PhoneME
PhoneME is another way to test and run Java apps and games on your phone, but I have to put a lot of emphasis on the word test. Unfortunately, PhoneME doesn’t make all the tricky twists of Java emulation any easier on Android.
This is one of the least reliable methods of running any Java program on your phone, but it’s a method that has a chance to work nonetheless.
How to run Java programs directly on Android (without creating an APK)
A step by step instruction for compiling a Java program into an Android executable and using ADB to run it.
When you want to create a system / commandline tool for Android, you have to write it in C(++)… or do you? TLDR; here’s the final proof of concept. Sticking with Java would have the benefit of avoiding all of the native ABI hassle and also being able to call into the Android runtime. So how do we do that?
A (not so) simple Hello World program
Let’s start with the Java program we want to run. In order to make it a bit more interesting (and because any useful program has dependencies), it won’t just print the obligatory “Hello World” message, but also use the Apache Commons CLI library to parse its commandline arguments:
package com.example; import org.apache.commons.cli.DefaultParser; import org.apache.commons.cli.HelpFormatter; import org.apache.commons.cli.Option; import org.apache.commons.cli.Options; import org.apache.commons.cli.ParseException; public class HelloWorld public static void main(String[] args) throws ParseException Option version = new Option("v", "Print version"); Option help = new Option("h", "Print help"); Options options = new Options(); options.addOption(help); options.addOption(version); for (Option opt : new DefaultParser().parse(options, args).getOptions()) if (opt.equals(version)) String os = System.getProperty("os.arch"); System.out.println("Hello World (" + os + ") v0.1"); > if (opt.equals(help)) new HelpFormatter().printHelp("Hello World", options); > > > >Setting up the working directory
We will have to manually run several commandline tools in the next step, assuming the following final directory structure:
. ├── android-sdk-linux │ └── build-tools │ └── 23.0.2 │ └── dx ├── bin │ └── com │ └── example │ └── HelloWorld.class ├── lib │ └── commons-cli-1.3.1.jar ├── src │ └── com │ └── example │ └── HelloWorld.java ├── helloworld.jar └── helloworld.sh- Android SDK (either via Android Studio or the SDK Manager). NOTE: If you are an Android developer, you’ll have the Android SDK already installed. In that case, you don’t actually need to copy it to the working directory as long as you know the path to the dx tool.
- Apache Commons CLI library v1.3.1
Afterwards copy&paste the HelloWorld code from above into the source folder. You might also find my semantic version parser class useful later on (not required here, though).
Compiling and dexing the Java class
Next step is to compile the java class (keep in mind that Android is stuck with Java 7 — bytecode for later versions won’t work). In case you are not used to doing this outside of an IDE, here’s the command:
javac -source 1.7 -target 1.7 -d bin -cp lib/commons-cli-1.3.1.jar src/com/example/HelloWorld.javaMake sure the program compiled properly:
java -cp lib/commons-cli-1.3.1.jar:bin com.example.HelloWorld -h usage: Hello world -h Print help -v Print versionAndroid cannot run Java class files directly. They have to be converted to Dalvik’s DEX format first (yes, even if you are using ART):
./android-sdk-linux/build-tools/23.0.2/dx --output=helloworld.jar --dex ./bin lib/commons-cli-1.3.1.jarNOTE: Android Build Tools v28.0.2 and later contain a dx upgrade, called d8 . The d8 tool can process Java 8 class files. I’ll stick with dx for backwards compatibility reasons here.
Creating the startup shellscript
Android does not have a (normal) JRE, so JAR files cannot be started the same way as on a PC. You need a shellscript wrapper to do this. Copy&paste the one below to the workspace.
base=/data/local/tmp/helloworld export CLASSPATH=$base/helloworld.jar export ANDROID_DATA=$base mkdir -p $base/dalvik-cache exec app_process $base com.example.HelloWorld "$@"NOTE: DEX files can also be started directly using the dalvikvm command, but going through app_process gives us a pre-warmed VM from the Zygote process (it is also the method employed by framework commands like pm and am ).
Installing and running the (non-) app
Time to push everything to the device:
adb shell mkdir -p /data/local/tmp/helloworld adb push helloworld.jar /data/local/tmp/helloworld adb push helloworld.sh /data/local/tmp/helloworld adb shell chmod 777 /data/local/tmp/helloworld/helloworld.shMoment of truth (fingers crossed):
adb shell /data/local/tmp/helloworld/helloworld.sh -v Hello World (armv7l) v0.1NOTE: Since nothing was installed into the system, getting rid of the program is simply done by deleting the directory again.
It works, but how do I get a Context?!
Contexts represent an environment that is associated with an app (which we explicitly did not build) and are also device dependant. They can only be created by the ActivityThread class (a hidden system class that you cannot instantiate). If you want to interact with the Android runtime, you have to talk to the system services directly through their Binder interfaces. But that’s a topic for another article.
Follow up articles
Запускаем консольные Java приложения на Android
Речь пойдёт о проекте-утилитке, который может пригодиться всякому кто изучает Java и не всегда имеет под рукой ПК для просмотра работы примера кода в полевых условиях (как-то — в метро, маршрутке, кафешке и т.д.).
Необходимость создать сие поделище возникла когда я готовился к OCJP-сертификации. После успешного прохождения оной, решил предоставить плоды своих задумок на обозрение уважаемым участникам хабрасообщества.
Ноутбука у меня нет, а запускать примеры кода на смартфоне, сидя на кухне за чашечкой чая, удобно.
Так уж повелось, что бо́льшая часть примеров для обучения обычно приводится именно в формате консольных программ. Замечательный инструмент AIDE позволяет собирать Android-приложение на основе Eclipse-проектов. Возможность, увы, недостаточная для запуска консольных примеров методом копипасты.
Дело за малым — перенаправляем потоки ввода/вывода в UI контролы:
private static OutputStream mOutputStream = new OutputStream() < @Override public void write(int b) < MainActivity.getInstance().write((byte)b); >>; @Override public void onCreate(Bundle savedInstanceState)
Консольная программа стартует в отдельном потоке из обработчика activity onResume() :
@Override public void run() < try < // // Здесь запускается консольное приложение // Program.main(new String[0]); >catch (Throwable ex) < // Тут же ловим все исключения setErrorColor(); ex.printStackTrace(); >> Здесь же можно задавать аргументы командной строки — старый добрый args . Пример — запуск BankTellerSimulation на 10 секунд:
BankTellerSimulation.main(new String[] < "10" >); Поддерживается работа нескольких потоков ( SimpleThreadsTest ):
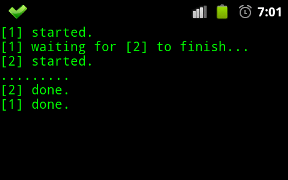
HorseRace и BankTellerSimulation — примеры более сложных многопоточных приложений (взяты из книги Thinking in Java, 4th Ed by Bruce Eckel).
Ошибки времени выполнения
class FuuuuuuException extends RuntimeException < public FuuuuuuException(String message) < super(message); >> . throw new FuuuuuuException(". TROLLFACE. "); 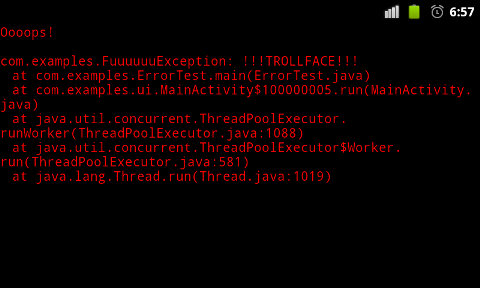
Ввод
Напоследок, для полноты возможностей, был добавлен консольный ввод. Пока что мои познания в области пользовательского интерфейса Android не велики. Кое-как впихнуть EditText удалось, но результат не идеален 🙂
Приглашение ввода строки ( ReadingInputTest ):


Функции меню
Exit выключает процесс через System.exit(0) .
Программа «одноразовая». Повторных перезапусков нет (не хотелось возиться с очисткой значений статических полей).
Что делает Clear — большой секрет.
Что не работает
• assert ‘ы Java. Т.е. оператор
исключение java.lang.AssertionError не кинет. Не путать с assert’ами JUnit — с ними всё в порядке!)
• Класс Console .
• Поле ввода не всегда подхватывает фокус.
Файлы проекта
Исходники можно забрать с GitHub, либо скачать zip-архив с проектами для Android Studio и Eclipse.
Описанные примеры находятся в пакете com.examples . Все примеры можно без изменений запускать на обычном ПК (run everywhere!).