- How to Execute and Run Java Code from the Terminal
- How to Run Java Code in the Terminal
- 📦 Step 1 – Go to the directory where your source code is
- How to go into the directory where the source code is: for Windows 🪟
- How to go into the directory where the source code is: for Linux 🐧
- 🧑💻How to Compile the Java Code
- How to compile Java code using the terminal
- 🖥️ How to Run the Java Code
- 🏅Bonus: How to Run a Java Program with Packages
- 💁♂️ Conclusion
- I/O from the Command Line
- Standard Streams
- The Console
How to Execute and Run Java Code from the Terminal

Md. Fahim Bin Amin
If you work with Java, you’ve probably used one of the well known text editors like Sublime Text, VS Code, Brackets, Atom, and Notepad++ as well as IDEs like Apache NetBeans and IntelliJ IDEA.
Running code in your IDE is straightforward, but you don’t often get to see how it executes your code (even though you can check the command in the terminal of course!).
However, it is good practice to know how your code actually executes and provides the output it gives you.
Many of you might have heard that experienced professional programmers also use the terminal to execute the programs. This gives them better clarity and helps them understand how the code is working, where it is returning the desired value, where the bug might be, and so on.
Whatever your purpose may be, executing Java code directly from the terminal is a very easy task.
In this article, I will show you how you can execute Java directly from your favorite terminal window. Fear not! The procedure is quite easy, and after reading the entire article you should be able to run your own Java code in the terminal.
How to Run Java Code in the Terminal
The process I am going to show you in this article is applicable to any operating system whether that is Windows, MacOS, or Linux.
I will be using the following Java code in the next step.
📦 Step 1 – Go to the directory where your source code is
If you have already written your Java code in an editor, then simply go into that directory. You can go straight into the directory through your file manager if you want.
How to go into the directory where the source code is: for Windows 🪟
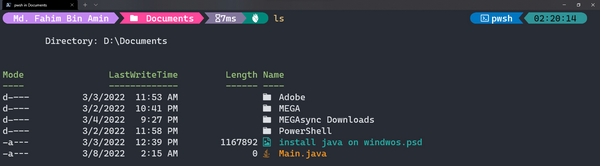
Suppose I have the source code ( Main.java ) inside This PC > Documents folder. I can simply go there through my file explorer.

Or, if I want, I can also go there using my terminal. I need to use cd to indicate that I want to change directory.
In this case, I can use cd «C:\Users\Md. Fahim Bin Amin\Documents» . As my user name contains white spaces, I have used » » to enclose them.
Then if I check all the files under that directory, then I will get the Main.java file as well.
I placed the Main.java file under my D drive this time. So I went in that directory using the cd command.
I get my Java file in the terminal as well.
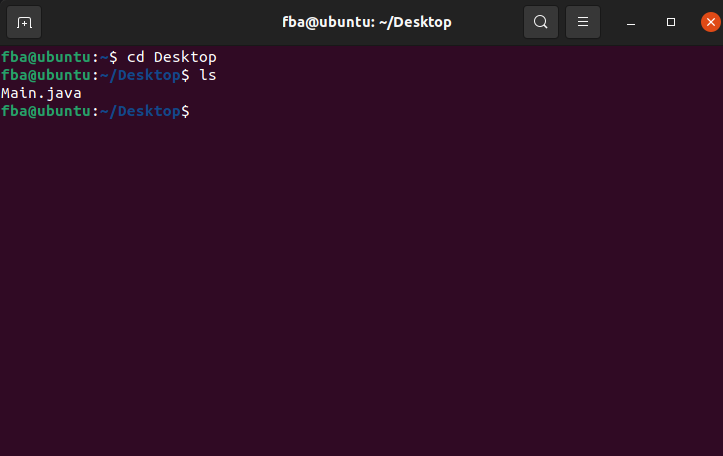
How to go into the directory where the source code is: for Linux 🐧
You can go into the directory where you have kept your source code either by following the typical GUI way or from the terminal using the cd command as well.

🧑💻How to Compile the Java Code
Before running our Java code, we need to compile it first. To compile a Java code/program, we get the class file. Then we need to execute/run the class file.
How to compile Java code using the terminal
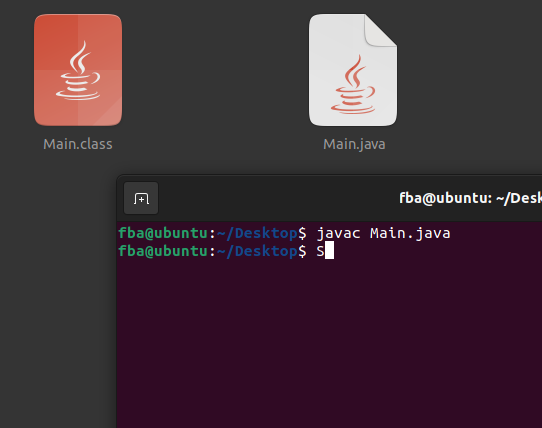
We need to use the command javac file_name_with_the_extension . For example, as I want to compile my Main.java , I will use the command javac Main.java . The c in javac indicates compile.

If the compilation process is successful, then we will not get any errors.

This will create the class file we need under the same directory.
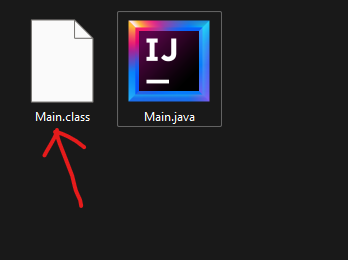
Keep in mind that we run the class file, not the .java file.
The same process is applicable for all of the operating systems out there.
🖥️ How to Run the Java Code
We run the .class file to execute the Java programs. For that, we use the command java class_file_name_without_the_extension . Like, as our .class file for this is Main.class , our command will be java Main .

The Java program has been executed successfully!
The exact same procedure is also applicable for the other operating systems as well.

🏅Bonus: How to Run a Java Program with Packages
A package basically means a folder. Earlier, I showed you how to use any regular Java code using the terminal. There, I did not use any packages inside the Java code.
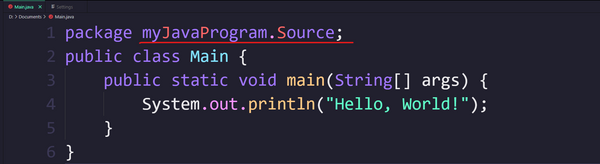
Now I will show you how you can run any Java code that has packages declared within it. This time, I will be using the following Java code.
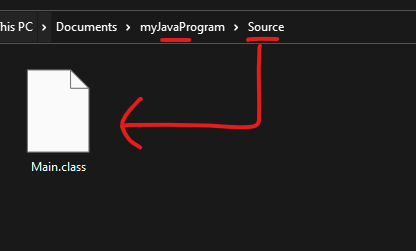
package myJavaProgram.Source; public class Main < public static void main(String[] args) < System.out.println("Hello, World!"); >>In the first line, I have written the package as package myJavaProgram.Source . This indicates that I want to create a folder named myJavaProgram . Then, I want to create another folder under that named Source . Finally, I want to create the class file of my Java code inside the Source folder.
The directory tree looks like this: myJavaProgram > Source.
For compiling this type of Java code with the packages, we use the command javac -d . file_name_with_the_extension .
As for now, I am using the Main.java file, so I will apply the command javac -d . Main.java . This will create a folder named myJavaProgram, then create another folder named Source under the myJavaProgram folder under the directory where my source file is now.

- The_Directory_Where_I_Have_Kept_My_Source_Code
- myJavaProgram folder
- Source folder
- myJavaProgram folder
It instantly creates the myJavaProgram folder.

Within the folder, it creates the Source folder.

Inside the Source folder, it creates our .class file. We need this file to run the Java program.
Now if we want to run the .class file, then we need to change the command a little, as we need to provide the directory of the .class file in the terminal window.
We use the command to run the Java program with packages, java directory_of_the_class_file.the_class_file_name_without_the_extension .
As I am using Main.java and I need to run the Main.class file, my command will be java myJavaProgram.Source.Main . It will run the Java code like below.

If you’re wondering why we are changing the command now, it’s because earlier, we did not declare any packages. So the Java compiler created the .class file within the directory where our source code was. So, we could get the .class file directly from there and execute the class file as well.
But if we declare packages inside the source code like this, then we are telling the compiler to create the .class file in another place (not within the directory where our source code currently is). This means that we do not get the class file directly there.
As we want to run the class file, we need to tell the compiler explicitly where the class file currently is so that it can get the class file and execute it.
If you think that you might mess up this step, then you can copy the directory directly from your Java code.
In line 1, we have declared the package directory (where we want the class file to be generated). So if we simply copy the directory and add the .class file name without the extension ( .class ) later with a period ( . ), then it satisfies the condition for executing any Java code that has packages declared in the source code.
The same process is also applicable for the other operating systems as well. I am providing screenshots from a Linux OS here:

Great job! 👏 You can now run any Java code/programs directly using a terminal. 🥳
I have also created a video where I have shown all the processes mentioned above. You can check that out here. 😁
💁♂️ Conclusion
I hope this article helps you run your Java programs just using the terminal.
➡️ If you want to know how to install a Java compiler for your Windows operating system, then you can check out this article.
➡️ If you want to know how to install C and C++ compilers for your Windows operating system, then you can check out this article.
➡️ If you want to know how to install Python on your Windows OS, then you can check out this article.
Thanks for reading the entire article. If it helps you then you can also check out other articles of mine at freeCodeCamp.
If you want to get in touch with me, then you can do so using Twitter, LinkedIn, and GitHub.
You can also SUBSCRIBE to my YouTube channel (Code With FahimFBA) if you want to learn various kinds of programming languages with a lot of practical examples regularly.
If you want to check out my highlights, then you can do so at my Polywork timeline.
You can also visit my website to learn more about me and what I’m working on.
I/O from the Command Line
A program is often run from the command line and interacts with the user in the command line environment. The Java platform supports this kind of interaction in two ways: through the Standard Streams and through the Console.
Standard Streams
Standard Streams are a feature of many operating systems. By default, they read input from the keyboard and write output to the display. They also support I/O on files and between programs, but that feature is controlled by the command line interpreter, not the program.
The Java platform supports three Standard Streams: Standard Input, accessed through System.in ; Standard Output, accessed through System.out ; and Standard Error, accessed through System.err . These objects are defined automatically and do not need to be opened. Standard Output and Standard Error are both for output; having error output separately allows the user to divert regular output to a file and still be able to read error messages. For more information, refer to the documentation for your command line interpreter.
You might expect the Standard Streams to be character streams, but, for historical reasons, they are byte streams. System.out and System.err are defined as PrintStream objects. Although it is technically a byte stream, PrintStream utilizes an internal character stream object to emulate many of the features of character streams.
By contrast, System.in is a byte stream with no character stream features. To use Standard Input as a character stream, wrap System.in in InputStreamReader .
InputStreamReader cin = new InputStreamReader(System.in);
The Console
A more advanced alternative to the Standard Streams is the Console. This is a single, predefined object of type Console that has most of the features provided by the Standard Streams, and others besides. The Console is particularly useful for secure password entry. The Console object also provides input and output streams that are true character streams, through its reader and writer methods.
Before a program can use the Console, it must attempt to retrieve the Console object by invoking System.console() . If the Console object is available, this method returns it. If System.console returns NULL , then Console operations are not permitted, either because the OS doesn’t support them or because the program was launched in a noninteractive environment.
The Console object supports secure password entry through its readPassword method. This method helps secure password entry in two ways. First, it suppresses echoing, so the password is not visible on the user’s screen. Second, readPassword returns a character array, not a String , so the password can be overwritten, removing it from memory as soon as it is no longer needed.
The Password example is a prototype program for changing a user’s password. It demonstrates several Console methods.
import java.io.Console; import java.util.Arrays; import java.io.IOException; public class Password < public static void main (String args[]) throws IOException < Console c = System.console(); if (c == null) < System.err.println("No console."); System.exit(1); >String login = c.readLine("Enter your login: "); char [] oldPassword = c.readPassword("Enter your old password: "); if (verify(login, oldPassword)) < boolean noMatch; do < char [] newPassword1 = c.readPassword("Enter your new password: "); char [] newPassword2 = c.readPassword("Enter new password again: "); noMatch = ! Arrays.equals(newPassword1, newPassword2); if (noMatch) < c.format("Passwords don't match. Try again.%n"); >else < change(login, newPassword1); c.format("Password for %s changed.%n", login); >Arrays.fill(newPassword1, ' '); Arrays.fill(newPassword2, ' '); > while (noMatch); > Arrays.fill(oldPassword, ' '); > // Dummy change method. static boolean verify(String login, char[] password) < // This method always returns // true in this example. // Modify this method to verify // password according to your rules. return true; >// Dummy change method. static void change(String login, char[] password) < // Modify this method to change // password according to your rules. >> The Password class follows these steps:
- Attempt to retrieve the Console object. If the object is not available, abort.
- Invoke Console.readLine to prompt for and read the user’s login name.
- Invoke Console.readPassword to prompt for and read the user’s existing password.
- Invoke verify to confirm that the user is authorized to change the password. (In this example, verify is a dummy method that always returns true .)
- Repeat the following steps until the user enters the same password twice:
- Invoke Console.readPassword twice to prompt for and read a new password.
- If the user entered the same password both times, invoke change to change it. (Again, change is a dummy method.)
- Overwrite both passwords with blanks.