- Tutorial: Node.js for Beginners
- Prerequisites
- Try NodeJS with Visual Studio Code
- Create your first NodeJS web app using Express
- Try using a Node.js module
- Feedback
- Как запустить JS-код
- Через вкладку «Консоль» в браузере
- С помощью Node.js
- С помощью веб-страницы
- Run JavaScript in Windows Terminal
- Running a JavaScript file in the terminal.
- #1 example:
- #2 example:
Tutorial: Node.js for Beginners
If you’re brand new to using Node.js, this guide will help you to get started with some basics.
Prerequisites
If you are a beginner, trying Node.js for the first time, we recommend installing directly on Windows. For more information, see Should I install Node.js on Windows or Windows Subsystem for Linux
Try NodeJS with Visual Studio Code
If you have not yet installed Visual Studio Code, return to the prerequisite section above and follow the installation steps linked for Windows or WSL.
- Open your command line and create a new directory: mkdir HelloNode , then enter the directory: cd HelloNode
- Create a JavaScript file named «app.js» with a variable named «msg» inside: echo var msg > app.js
- Open the directory and your app.js file in VS Code using the command: code .
- Add a simple string variable («Hello World»), then send the contents of the string to your console by entering this in your «app.js» file:
var msg = 'Hello World'; console.log(msg); Notice that when you type console in your ‘app.js’ file, VS Code displays supported options related to the console object for you to choose from using IntelliSense. Try experimenting with Intellisense using other JavaScript objects.
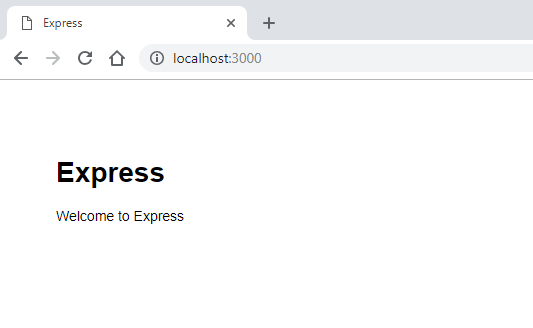
Create your first NodeJS web app using Express
Express is a minimal, flexible, and streamlined Node.js framework that makes it easier to develop a web app that can handle multiple types of requests, like GET, PUT, POST, and DELETE. Express comes with an application generator that will automatically create a file architecture for your app.
To create a project with Express.js:
- Open your command line (Command Prompt, Powershell, or whatever you prefer).
- Create a new project folder: mkdir ExpressProjects and enter that directory: cd ExpressProjects
- Use Express to create a HelloWorld project template: npx express-generator HelloWorld —view=pug
Note We are using the npx command here to execute the Express.js Node package without actually installing it (or by temporarily installing it depending on how you want to think of it). If you try to use the express command or check the version of Express installed using: express —version , you will receive a response that Express cannot be found. If you want to globally install Express to use over and over again, use: npm install -g express-generator . You can view a list of the packages that have been installed by npm using npm list . They’ll be listed by depth (the number of nested directories deep). Packages that you installed will be at depth 0. That package’s dependencies will be at depth 1, further dependencies at depth 2, and so on. To learn more, see Difference between npx and npm? on StackOverflow.
- bin . Contains the executable file that starts your app. It fires up a server (on port 3000 if no alternative is supplied) and sets up basic error handling.
- public . Contains all the publicly accessed files, including JavaScript files, CSS stylesheets, font files, images, and any other assets that people need when they connect to your website.
- routes . Contains all the route handlers for the application. Two files, index.js and users.js , are automatically generated in this folder to serve as examples of how to separate out your application’s route configuration.
- views . Contains the files used by your template engine. Express is configured to look here for a matching view when the render method is called. The default template engine is Jade, but Jade has been deprecated in favor of Pug, so we used the —view flag to change the view (template) engine. You can see the —view flag options, and others, by using express —help .
- app.js . The starting point of your app. It loads everything and begins serving user requests. It’s basically the glue that holds all the parts together.
- package.json . Contains the project description, scripts manager, and app manifest. Its main purpose is to track your app’s dependencies and their respective versions.
npx cross-env DEBUG=HelloWorld:* npm start Tip The DEBUG=myapp:* part of the command above means you are telling Node.js that you want to turn on logging for debugging purposes. Remember to replace ‘myapp’ with your app name. You can find your app name in the package.json file under the «name» property. Using npx cross-env sets the DEBUG environment variable in any terminal, but you can also set it with your terminal specific way. The npm start command is telling npm to run the scripts in your package.json file.
Try using a Node.js module
Node.js has tools to help you develop server-side web apps, some built in and many more available via npm. These modules can help with many tasks:
| Tool | Used for |
|---|---|
| gm, sharp | Image manipulation, including editing, resizing, compression, and so on, directly in your JavaScript code |
| PDFKit | PDF generation |
| validator.js | String validation |
| imagemin, UglifyJS2 | Minification |
| spritesmith | Sprite sheet generation |
| winston | Logging |
| commander.js | Creating command-line applications |
Let’s use the built-in OS module to get some information about your computer’s operating system:
- In your command line, open the Node.js CLI. You’ll see the > prompt letting you know you’re using Node.js after entering: node
- To identify the operating system you are currently using (which should return a response letting you know that you’re on Windows), enter: os.platform()
- To check your CPU’s architecture, enter: os.arch()
- To view the CPUs available on your system, enter: os.cpus()
- Leave the Node.js CLI by entering .exit or by selecting Ctrl+C twice.
Tip You can use the Node.js OS module to do things like check the platform and return a platform-specific variable: Win32/.bat for Windows development, darwin/.sh for Mac/unix, Linux, SunOS, and so on (for example, var isWin = process.platform === «win32»; ).
Feedback
Submit and view feedback for
Как запустить JS-код
JavaScript — популярный язык программирования с широким спектром применения. Раньше его использовали в основном для интерактивности веб-страницам: например, для анимации или валидации форм. Сейчас же JS используется еще и во многих других областях: разработка серверных, мобильных приложений и так далее.
Из-за широкого спектра применения JavaScript можно запустить несколькими способами:
Через вкладку «Консоль» в браузере
В большинстве современных браузеров уже есть встроенные механизмы JavaScript, поэтому запустить код на JS можно прямо в браузере. Вот, как это сделать:
Шаг 1. Откройте любой браузер (мы будем использовать Google Chrome).
Шаг 2. Откройте инструменты разработчика. Для этого щелкните правой кнопкой мыши на пустой области и выберите пункт «Просмотреть код» (Inspect). Горячая клавиша: F12.

Шаг 3. В инструментах разработчика перейдите на вкладку «Консоль» (Console). Здесь уже можно писать код на JavaScript. Попробуйте ввести console.log(«Hello, world!») и нажмите Enter, чтобы запустить код.
С помощью Node.js
Node — среда выполнения кода JavaScript вне браузера. Вот, как запустить JS с помощью Node.js:
Шаг 1. Установите последнюю версию Node.js.
Шаг 2. Установите IDE или текстовый редактор. Мы будем использовать Visual Studio Code.
Шаг 3. В VS Code перейдите в Файл > Новый файл и напишите код на JS. Сохраните файл с расширением .js. Мы написали программу, которая выводит на экран строку «Hello, world!», поэтому файл будет называться helloworld.js.
Шаг 4. Откройте терминал/командную строку, перейдите к расположению файла (используйте команду cd ). Введите node helloworld.js и нажмите Enter. Вывод появится в терминале.
Примечание. JavaScript-код можно написать и запустить непосредственно в терминале. Для этого просто введите node и нажмите Enter.
С помощью веб-страницы
JavaScript изначально создавали для того, чтобы сделать веб-страницы интерактивными, поэтому JavaScript и HTML идут рука об руку. Вот, как запустить код на JS с помощью веб-страницы:
Шаг 1. Откройте VS Code. Перейдите в Файл > Новый файл. Сохраните файл с расширением .html. У нас это будет main.html.
Шаг 2. Скопируйте doctype, расположенный ниже. Это необходимый для запуска HTML-страницы код. Сохраните скопированный текст в файле.
Шаг 3. Аналогично создайте файл с расширением .js. Напишите в файле следующий JS-код и сохраните его. У нас это будет helloworld.js.
Шаг 4. Вернитесь к файлу main.html и на 11 строке впишите название JS-файла. В нашем случае это будет выглядеть так:
Шаг 5. Откройте main.html с помощью браузера.
Шаг 6. Чтобы проверить, запустился ли ваш JS-код, щелкните правой кнопкой мыши в свободной области, нажмите «Просмотреть код» и перейдите на вкладку «Консоль».
Теперь, когда вы знаете, как запустить JavaScript, приступим к изучению основ JS.
СodeСhick.io — простой и эффективный способ изучения программирования.
2023 © ООО «Алгоритмы и практика»
Run JavaScript in Windows Terminal
A terminal is simply a text-based interface to the computer where one can type commands, manipulate files, and execute programs. We’ll learn how to run JavaScript in the terminal. To be able to run JavaScript files in the terminal, the system must have node.js already installed in it.
to install node.js on windows please use the given below link.
Running a JavaScript file in the terminal.
After finishing the installation process of node.js, let’s go through some examples:
- Open the terminal window
- Type node then hit enter
- The dialogue- Welcome to node,j shall appear followed by the greater than symbol(>)
#1 example:
// Function to add four variables. const add = (a, b , c, d) => < return a + b + c +d >console.log(add(4, 6, 4, 6))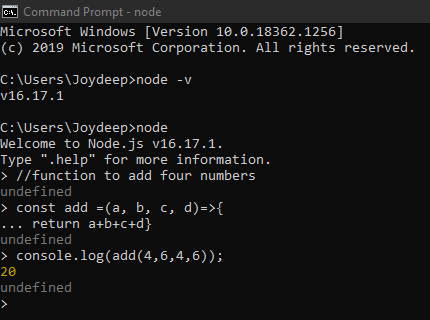
#2 example:
- Open the terminal window
- Type node then hit enter
- The dialogue- Welcome to node,j shall appear followed by the greater than symbol(>)
// Function to subtract two variables. const sub = (a, b) => < return a - b >console.log(sub(9, 2))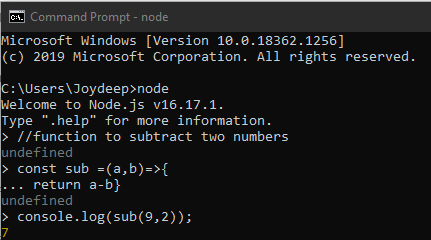
A terminal is a non-graphical text-based interface where one manipulates files or programs by entering commands. From the above article, we conclude that:
- First, installation of node.js in the system is necessary before running JavaScript in the terminal.
- node.js is not a programming language or framework. It is an open-source environment to run JavaScript files outside a browser (Follow the step-by-step instruction to install node.js mentioned above)
- Sometimes one may need to update the npm package manager for the smooth functioning of the JavaScript file.
#3940 Sector 23,
Gurgaon, Haryana (India)
Pin :- 122015
- Write for us
- Career Guidance Tool
- SAP Transaction Codes
- Sample Resume
- Institutes
- SAP PDF Books
- Classifieds
- Recent Articles
- Contact Us
- About Us
- Terms of Use
- Privacy Policy
- Cookies Policy