- Walkthrough: Creating a Standard C++ Program (C++)
- Prerequisites
- To create a project and add a source file
- To create a C++ project in Visual Studio
- To create a C++ project in Visual Studio 2017
- To create a C++ project in Visual Studio 2015
- Add a new source file
- How to Run C and C++ Program in CMD
- How to Run C and C++ Program in CMD
- How to Compile and Run a C++ Program using a Command-Line Interface in Windows
Walkthrough: Creating a Standard C++ Program (C++)
You can use Visual Studio to create Standard C++ programs. By following the steps in this walkthrough, you can create a project, add a new file to the project, modify the file to add C++ code, and then compile and run the program by using Visual Studio.
You can type your own C++ program or use one of the sample programs. The sample program in this walkthrough is a console application. This application uses the set container in the C++ Standard Library.
If conformance with a specific version of the C++ language standard (for example, C++14, C++17, or C++20) is required, use the /std:c++14 , /std:c++17 , or /std:c++20 compiler option. (Visual Studio 2017 and later.)
Prerequisites
To complete this walkthrough, you must understand the fundamentals of the C++ language.
To create a project and add a source file
The following steps vary depending on which version of Visual Studio you are using. To see the documentation for your preferred version of Visual Studio, use the Version selector control. It’s found at the top of the table of contents on this page.
To create a C++ project in Visual Studio
- From the main menu, choose File >New >Project to open the Create a New Project dialog box.
- At the top of the dialog, set Language to C++, set Platform to Windows, and set Project type to Console.
- From the filtered list of project types, choose Console App then choose Next. In the next page, enter a name for the project, and specify the project location if desired.
- Choose the Create button to create the project.
To create a C++ project in Visual Studio 2017
- Create a project by pointing to New on the File menu, and then clicking Project.
- In the Visual C++ project types pane, click Windows Desktop, and then click Windows Console Application.
- Type a name for the project. By default, the solution that contains the project has the same name as the project, but you can type a different name. You can also type a different location for the project.
- Click OK to create the project.
To create a C++ project in Visual Studio 2015
- Create a project by pointing to New on the File menu, and then clicking Project.
- In the Visual C++ project types pane, click Windows Desktop, and then click Windows Console Application.
- In the New Project dialog box, expand Installed >Templates >Visual C++, and then select Win32. In the center pane, select Win32 Console Application.
- Type a name for the project. By default, the solution that contains the project has the same name as the project, but you can type a different name. You can also type a different location for the project.
- Click OK to create the project.
- Complete the Win32 Application Wizard.
- Click Next, then make sure Console Application is selected and uncheck the Precompiled Headers box.
- Click Finish.
Add a new source file
- If Solution Explorer isn’t displayed, on the View menu, click Solution Explorer.
- Add a new source file to the project, as follows.
- In Solution Explorer, right-click the Source Files folder, point to Add, and then click New Item.
- In the Code node, click C++ File (.cpp), type a name for the file, and then click Add.
The .cpp file appears in the Source Files folder in Solution Explorer, and the file is opened in the Visual Studio editor.
How to Run C and C++ Program in CMD
In this article I will tell you how to run C and C++ program in CMD.
CMD or Command Prompt is a command line interpreter in Windows operating system. Running C and C++ programs using command prompt is useful in case you don’t have an IDE installed in your system.
Things you will need
You must have a C or C++ compiler like GCC, Visual C++, etc. already installed in your system. If you don’t have any, you can easily get them by searching on Google.
How to Run C and C++ Program in CMD
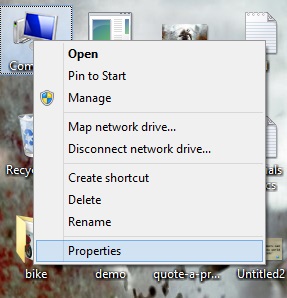
1.Before running programs we must set the path of compiler. So, first right click on Computer icon and go to Properties option.

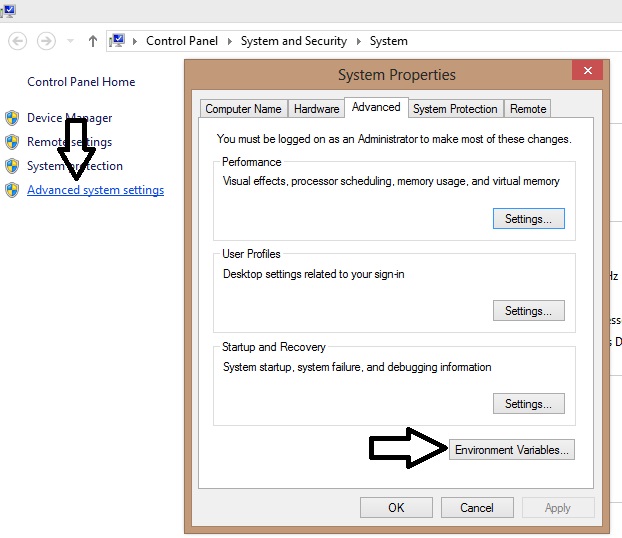
2. Click on Advance system settings and then Environment Variables.
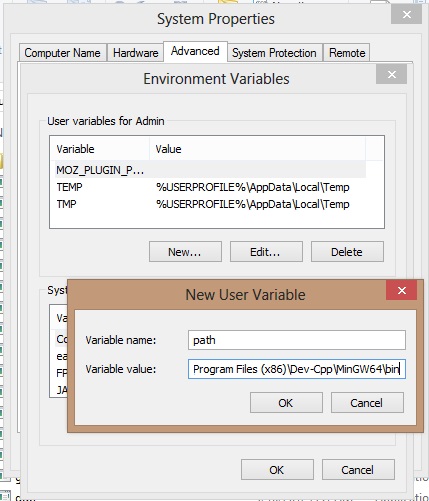
3. A new window will open, there click on New button. In Variable name filed enter path and in Variable value filed enter the path of the bin folder of compiler.
4. You can find the path of bin folder by going to the directory where you have installed the compiler.
5. After that click all OK buttons to save the information.
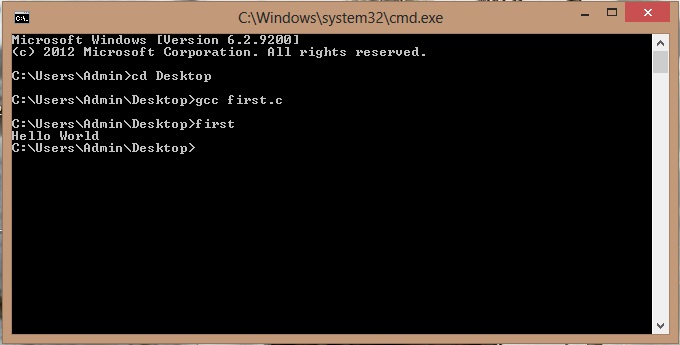
6. Press Win+R keys to open Run. Type cmd and press enter to open command prompt.
7. Now change the directory to where you have saved your C or C++ program file. Lets say you have saved the program on Desktop then type cd desktop and press enter.
8. Now for compiling the program type gcc filename. Here filename is the name of the program file. I have used gcc command because I have installed GCC compiler in my system. The command will change if you are using any other compiler, like for Turbo C++ it will be tcc, for Borland C++ it will be bcc and so on.
9. For running the program just type the name of the source file without .c or .cpp extension and press enter.
10. If you have followed steps properly then you can see the output.
Comment below if you have any doubts regarding above how to run C and C++ program in CMD article.
How to Compile and Run a C++ Program using a Command-Line Interface in Windows
In this article, we show how to compile and run a C++ program using a command-line interface in Windows. Usually Command Prompt software would be used for Windows.
So there are many ways to run a C++ program.
One way that you can do is through an IDE such as CodeLite. This has a text editor combined with a console for compiling. It’s an all-in-one package.
Another way a C++ program can be run is through using a simple text editor such as notepad, writing a C++ program, and then compile it using a command-line interface such as command prompt. We can then run the compiled file to get the output of the program.
So in order to do this, we first create a C++ program using a text editor such as notepad.
First, create a folder that simulates the workspace folder (which is a folder which contains many different projects). Then create folder within this folder (which simulates a project). Within this project folder, you want to place your C++ file that contains the C++ program that you want to run.
In order to do this, you have to make sure that the file extension is .cpp. This represents a C++ file.
The program that we will create is a basic one shown below.
We save this program as main.cpp. Make sure that the file is a C++ file and not a
So when this program is executed, the statement, «This C++ program works» will appear as its output.
So now that we have our folders and we have our C++ program within our project folder, we can now go the command-line interface, in this case, Command Prompt, in Windows, and run our code.
So open the Command Prompt and navigate to where your folder where your file is located.
Then in the Command Prompt, enter in the following line.
The statement above executes the main.cpp file, so that the program is run.
A breakdown of this statement is shown below.
-Wall is so that all warnings will be shown during compilation.
-std=c++14 is so that the program is run according to c++14 standards.
main.cpp is the file that we’re executing.
If you press ‘Enter’ and there are no errors, then the program was compiled with no problems.
Now, enter in the following statement below.
With the dir statement, you’ll get a list of all files in a directory.
Notice that after you compile the C++ file successfully, you’ll see a file named «a.exe».
This is the compiled C++ file that was created during the compiling process.
To then run this exe file, then simply type in the following.
This will run the «a.exe» file, so that its output will appear as in the command-line interface.
You should now see the output of the program.
So «a.exe» is the default executable file that is created when you run a program.
It is not really a good idea to have a compiled file be the default of «a.exe». This is because if you have more than one file in your project folder, each «a.exe» will be overridden. Therefore, when you compile a program, you never really want to leave it at the default exe file name of «a.exe». You want to name, preferably whatever is the name of the file.
So, in our example, instead of leaving the file as «a.exe», we are going to name our executable file, «main.exe».
To do this, we use the following line below.
Now the executable file is «main.exe».
Now you don’t have to recompile the «main.cpp» program each time that you want to run it.
And this is how to compile run a C++ program using a command-line interface, such as Command Prompt, in Windows.