- Work with Columns and Rows
- Find the Table Element Index
- Find the Index of a Table in a Document
- Finding the Index of a Row in a Table
- Finding the Index of a Cell in a Row
- Work with Columns
- Specify Rows as Header Rows
- Keep Tables and Rows from Breaking Across Pages
- Keep a Row from Breaking Across Pages
- Keep a Table from Breaking Across Pages
- How to Use Tables in Java
- How to Create a Table in Java
- How to Create a Table Using a Model in Java
- How to Manage Column Width & Height in Java
- Final Thoughts on Java Tables
- Rows and columns in java
Work with Columns and Rows
For more control over how tables work, learn how to manipulate columns and rows.
Find the Table Element Index
Columns, rows and cells are managed by accessing the selected document node by its index. Finding the index of any node involves gathering all child nodes of the element type from the parent node, and then using the IndexOf method to find the index of the desired node in the collection.
Find the Index of a Table in a Document
Sometimes you may need to make changes to a particular table in a document. To do this, you can refer to a table by its index.
The following code example shows how to retrieve the index of a table in a document:
Finding the Index of a Row in a Table
Similarly, you may need to make changes to a specific row in a selected table. To do this, you can also refer to a row by its index.
The following code example shows how to retrieve the index of a row in a table:
Finding the Index of a Cell in a Row
Finally, you may need to make changes to a specific cell, and you can do this by cell index as well.
The following code example shows how to retrieve the index of a cell in a row:
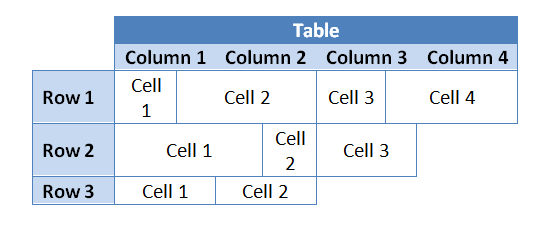
Work with Columns
In the Aspose.Words Document Object Model (DOM), the Table node consists of Row nodes and then Cell nodes. Thus, in the Document Object Model of Aspose.Words, as in Word documents, there is no concept of a column.
By design, the table rows in Microsoft Word and Aspose.Words are completely independent, and the basic properties and operations are contained only in the rows and cells of the table. This gives tables the ability to have some interesting attributes:
- Each table row can have a completely different number of cells
- Vertically, the cells of each row can have different widths
- It is possible to join tables with different row formats and number of cells
Any operations performed on columns are actually “shortcuts” that perform the operation by collectively changing row cells in such a way that it looks like they are being applied to columns. That is, you can perform operations on columns by simply iterating over the same table row cell index.
The following code example simplifies such operations by proving a facade class that collects the cells that make up a “column” of a table:
The following code example shows how to insert a blank column into a table:
The following code example shows how to remove a column from a table in a document:
Specify Rows as Header Rows
You can choose to repeat the first row in the table as the Header Row only on the first page or on each page if the table is split into several. In Aspose.Words, you can repeat the Header Row on every page using the HeadingFormat property.
You can also mark multiple header rows if such rows are located one after the other at the beginning of the table. To do this, you need to apply the HeadingFormat properties to these rows.
Note that Header Rows do not work in nested tables. That is, if you have a table inside another table, this setting will have no effect. It is a limitation of Microsoft Word that does not allow this, not Aspose.Words.
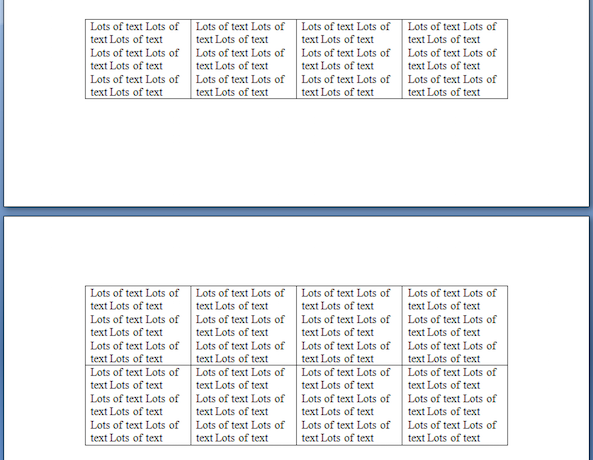
The following code example shows how to build a table which includes Header Rows that repeat on subsequent pages:
Keep Tables and Rows from Breaking Across Pages
There are times where the contents of a table should not be split across pages. For instance, if a title is above a table, the title and table should always be kept together on the same page to preserve proper appearance.
There are two separate techniques that are useful to achieve this functionality:
- Allow row break across pages , which is applied to table rows
- Keep with next , which is applied to paragraphs in table cells
By default, the above properties are disabled.

Keep a Row from Breaking Across Pages
This involves restricting content inside the cells of a row from being split across a page. In Microsoft Word, this can found under Table Properties as the option “Allow row to break across pages”. In Aspose.Words this is found under the RowFormat object of a Row as the property RowFormat.AllowBreakAcrossPages.
The following code example shows how to disable breaking rows across pages for each row in a table:
Keep a Table from Breaking Across Pages
To stop the table from splitting across pages, we need to specify that we want the content contained within the table to stay together.
To do this, Aspose.Words uses a method, which allows users to select a table and enable the KeepWithNext parameter to true for each paragraph within the table cells. The exception is the last paragraph in the table, which should be set to false.

The following code example shows how to set a table to stay together on the same page:
How to Use Tables in Java
Developer.com content and product recommendations are editorially independent. We may make money when you click on links to our partners. Learn More.
In Java, tables are used to arrange data into columns and rows. A column is space that runs horizontally on a table, while a row is a space that runs horizontally in your table. The intersection between a column and a row is called a cell and is used to hold singular piece of data.
In Java, developers can use the JTable method to create a table in their applications. JTable is a Swing component that inherits from the JComponent class.
How to Create a Table in Java
To create a table, you need to make an instance of the JTable class. You need to provide two arguments (row and column) in its constructor for the table to be constructed, as shown in this example code snippet:
JTable table = new JTable (row, column);
The row and column values can consist of two integer values, like below:
JTable table = new JTable (5,3);
The above statement creates a table with 5 rows and 3 columns.
Instead of providing the JTable constructor with integers, programmers can also supply a two dimensional array for the data in each row, and a one dimensional array for the column names. Here is how you can use arrays to create a table in Java:
JTable(Object[][] rowData, Object[] columnNames)
Here is some example code showing how to create a table in Java and fill it with data:
import javax.swing.*; import javax.swing.table.*; import java.awt.*; class Table< public static void main(String args[])< JFrame frame = new JFrame(); String[] columnNames = ; Object[][] data = < , , , , >; JTable table = new JTable(data, columnNames); frame.add(table); frame.setDefaultCloseOperation(JFrame.EXIT_ON_CLOSE); frame.setSize(400,400); frame.setLocationRelativeTo(null); frame.setVisible(true); > >
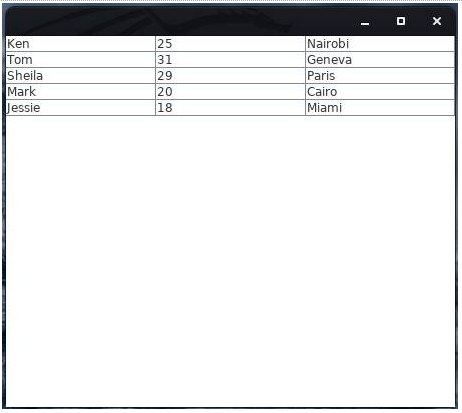
If you run this code in your integrated development environment (IDE) or code editor, it will produce the following output:

When you click on any one of the above cells, you will notice that the data in it is editable. This is not a particularly desirable feature if you are just presenting data to your user. Also, all the data is treated as a string when in its presentation to a user.
Another point of concern is that, in case you were querying a database object for particular values, you would have to copy all values to an array or vector.
To avoid these problems, you can instead create your Java table using a model.
How to Create a Table Using a Model in Java
First, it is important to understand how table data is handled. All tables (including a table created using JTable()) use a table model to manage their data. When developers do not provide a table model to the constructor of JTable, an instance of DefaultTableModel will be automatically created for it. Therefore, if you need to use a custom model, you need to provide it to the JTable constructor, as shown in this example code:
JTable table = new JTable(new MyTableModel());
To define a table model, programmers need to create a class that extends the AbstractTableModel class:
class MyTableModel extends AbstractTableModel
In your table model, you can include the data for your rows and column names, just as shown in the earlier JTable example. To ensure that your table model class is a concrete class, you need to implement the following three methods of AbstractTableModel:
public int getRowCount(); public int getColumnCount(); public Object getValueAt(int row, int column);
You can implement more methods, but you must ensure that the above methods are among those you implement. You can find the description of other methods from the official Oracle API docs.
The code example below shows how you can use a table model in Java:
import javax.swing.*; import javax.swing.table.*; import java.awt.*; class TableUsingModel < public static void main(String args[])< JFrame frame = new JFrame(); JTable table = new JTable(new MyTableModel()); frame.add(table); frame.setDefaultCloseOperation(JFrame.EXIT_ON_CLOSE); frame.setSize(400,400); frame.setLocationRelativeTo(null); frame.setVisible(true); >> class MyTableModel extends AbstractTableModel < String[] columnNames = ; Object[][] data = < , , , , >; public int getRowCount() < return data.length; >public int getColumnCount() < return columnNames.length; >public Object getValueAt(int row, int col) < return data[row][col]; >>
This results in the following output (Display):
This time, if you try double-clicking on any cell, you will notice that it is not editable.
How to Manage Column Width & Height in Java
If you want to set the height of rows, you can use the setRowHeight() method.
JTable table = new JTable(data, columnNames); table.setRowHeight(80);
The above example sets the height of each row 80 pixels.
To set the width of columns, you can use the setPreferredWidth() method. First, you need to create a column model of type TableColumnModel. Then you can get the particular column you want and then set its preferred width. Here is some example code showing how to set the column width of a table in Java:
TableColumnModel columnModel = table.getColumnModel(); columnModel.getColumn(2).setPreferredWidth(200);
Final Thoughts on Java Tables
In this programming tutorial, programmers learned how to use JTable, or a table model, to create a table in Java. The code examples shown above add the tables directly to the JFrame container. However, you can instead add your table to a scroll pane so that your user can easily navigate through the data when it does not fit its container.
Rows and columns in java
- Haskell vs. PureScript: The difference is complexity Haskell and PureScript each provide their own unique development advantages, so how should developers choose between these two .
- A quick intro to the MACH architecture strategy While not particularly prescriptive, alignment with a MACH architecture strategy can help software teams ensure application .
- How to maintain polyglot persistence for microservices Managing microservice data may be difficult without polyglot persistence in place. Examine how the strategy works, its challenges.
- The basics of implementing an API testing framework With an increasing need for API testing, having an efficient test strategy is a big concern for testers. How can teams evaluate .
- The potential of ChatGPT for software testing ChatGPT can help software testers write tests and plan coverage. How can teams anticipate both AI’s future testing capabilities .
- Retail companies gain DORA metrics ROI from specialist tools DORA metrics and other measures of engineering efficiency are popping up in add-ons to existing DevOps tools. But third-party .
- How to create and manage Amazon EBS snapshots via AWS CLI EBS snapshots are an essential part of any data backup and recovery strategy in EC2-based deployments. Become familiar with how .
- Prices for cloud infrastructure soar 30% Tough macroeconomic conditions as well as high average selling prices for cloud computing and storage servers have forced .
- Deploy a low-latency app with AWS Local Zones in 5 steps Once you decide AWS Local Zones are right for your application, it’s time for deployment. Follow along in this step-by-step video.
- Using defense in depth to secure cloud-stored data To better secure cloud-resident data, organizations are deploying cloud-native tools from CSPs and third-party tools from MSPs to.
- Multiple Adobe ColdFusion flaws exploited in the wild One of the Adobe ColdFusion flaws exploited in the wild, CVE-2023-38203, was a zero-day bug that security vendor Project .
- Ransomware case study: Recovery can be painful In ransomware attacks, backups can save the day and the data. Even so, recovery can still be expensive and painful, depending on .
- AWS Control Tower aims to simplify multi-account management Many organizations struggle to manage their vast collection of AWS accounts, but Control Tower can help. The service automates .
- Break down the Amazon EKS pricing model There are several important variables within the Amazon EKS pricing model. Dig into the numbers to ensure you deploy the service .
- Compare EKS vs. self-managed Kubernetes on AWS AWS users face a choice when deploying Kubernetes: run it themselves on EC2 or let Amazon do the heavy lifting with EKS. See .