- HTML Registration Form
- HTML User Registration Form Design Demo
- Step 1: Setting Up Your HTML File
- Step 2: Creating the Form in HTML
- Step 3: Styling the Form with CSS
- HTML Code For Registration Form with Validation
- HTML Registration Form
- HTML Code For Registration Form
- Registration form HTML codes
- CSS Code For Registration Form
- Validation In Javascript For Registration Form
- Conclusion
HTML Registration Form
Creating an interactive and responsive user registration form is a fundamental skill in web development. On most websites, users interact primarily through forms, whether to sign up for a service, enter personal information, or leave feedback. This tutorial will show you how to use HTML and CSS to build a stylish and simple user registration form.
HTML User Registration Form Design Demo
Step 1: Setting Up Your HTML File
First, create a new HTML file. Name it whatever you want, such as register.html.
In your new HTML file, you’ll need to add the basic structure of an HTML document:
The above code creates a blank HTML page titled «Registration Form.»
Step 2: Creating the Form in HTML
Next, let’s add a form inside the tag:
By clicking Sign Up, you are indicating that you have read and agree to the Terms of Use and Privacy Policy.
The above code adds a registration form with fields for the user’s first name, last name, email, and password. The form also contains links to the Terms of Use and Privacy Policy and a Submit button.
Step 3: Styling the Form with CSS
Let’s add some CSS to the form to make it more visually appealing. You can include this within the tag in the document’s or a separate CSS file. For this tutorial, we’ll place this in an HTML file:
/* Outer box styles */ .box-outer < border: 1px solid #ccc; background-color: #FFFFFF; margin-bottom: 1rem; padding: 1rem; border-radius: .12rem; >/* Heading styles */ .heading < margin-bottom: 1rem; >/* Input control styles */ .input-control < transition: border .1s linear 0s, box-shadow .1s, width .25s, color .2s; border: 1px solid #ced4da; box-shadow: 0 1px 3px rgb(50 50 93 / 10%), 0 1px 0 rgb(0 0 0 / 2%); display: block; width: 100%; padding: .375rem .75rem; font-size: .969rem; font-weight: 400; line-height: 1.6; color: #212529; background-color: #FFF; background-clip: padding-box; appearance: none; border-radius: .12rem; margin-bottom: 1rem; >.input-control:focus < border-color: #9fd4fc; box-shadow: 0 0 0 4px rgb(0 149 255 / 15%); background-color: #fffffa; outline: 0; >/* Button styles */ .button < color: #FFFFFF; box-shadow: 0 1px 3px rgb(50 50 93 / 10%), 0 1px 0 rgb(0 0 0 / 2%); background: linear-gradient(#6dbd45, #51a326); border: 0; padding: .5rem; border-radius: .12rem; >.button:focus
This CSS adds styles to the form, input, and button.
Thats all! You have created a user registration form using HTML and CSS. Also note that when you submit this form, no data is sent anywhere; to do so, server-side programming would need to be added.
Remember to replace the # in the form’s action attribute with the URL of your server-side script, verify that the links in your Terms of Use and Privacy Policy point to the correct documents.
HTML Code For Registration Form with Validation
In this article, we are going to write HTML code for registration form with validation in JavaScript. Validation in javascript for registration form is explained step by step with examples.
The registration forms help us to register user’s details on online portals like subscription, tickets booking, slot booking, sending and receiving data from the database, etc.
A registration form is an HTML form that contains input fields and submit button to submit your details.
Users can fill out the form with their details and submit it to the server. But before submitting the form, we need to check the validation of the form whether the form is filled correctly or not so that we can prevent the user from submitting the form with invalid data.
This article creates and discusses a beautiful registration form with HTML, CSS and validate it with Javascript in detail, and also provides complete code for it.
HTML Registration Form
To begin with, creating a registration form first you need to decide what kind of information you want from the users. For different uses, form sections could be different but the basic idea behind form designing is the same.
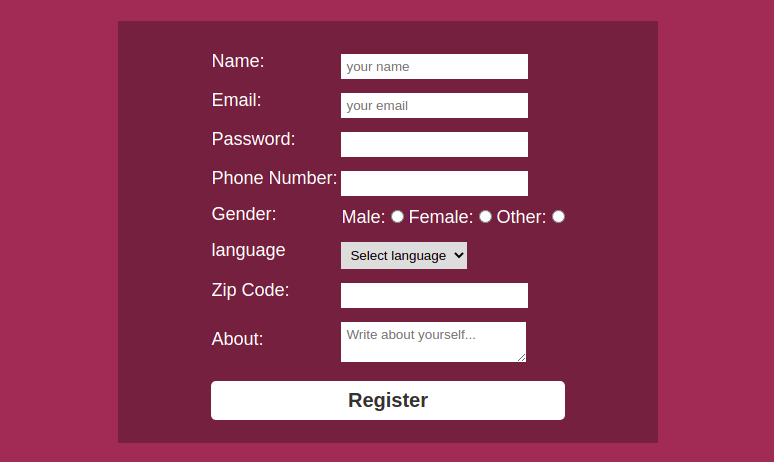
For this section we have taken the following detail into consideration ( you can add or remove parts as your choice ):
- Name
- Password
- Phone Number
- Gender
- Language
- Zip Code
- About
Here is what our registration form would look like:
HTML Code For Registration Form
To create form in HTML tag is used. The form consists of many different kinds of inputs, to create inputs tag is used. The has attribute type which defines what is type of input you want, it may be text, email, password, number, date, file, etc.
Each input in a form has a label that defines the purpose of the input element.
So basically a form consists of different types of input with their label and a submit button.
Let’s first look at the HTML code for the registration form and then we will explain the code
Registration form HTML codes
HTML registration form with varification You can see the HTML code for the registration form above and notice we have used inside the form which is wrapping our label and input elements in form of rows and columns.
You can directly use inputs with their labels without wrapping them in a table but those form elements will not be aligned in the same verticle line.
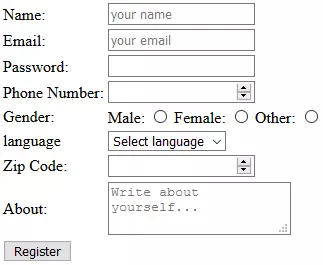
Let’s look at the output of the above code to understand how its elements are vertically aligned.
As you can see in the above image all the labels are of different sizes but their input starts with the same verticle line which improves the look of the registration form.
CSS Code For Registration Form
HTML defines the structure of form, but its CSS which makes the registration form look beautiful.
We generally work with CSS classes when talking about CSS. In the HTML code, you can see we have set the .registartion-form class to the form to style it.
Let’s see the CSS code for the form and understand how you can style it.
* < margin: 0 >.container < display: flex; justify-content: center; align-items: center; flex-direction: column; height: 100vh; background-color: #6699cc; >.container h1 < color: white; font-family: sans-serif; margin: 20px; >.registartion-form < display: flex; justify-content: center; align-items: center; width: 600px; color: rgb(255, 255, 255); font-size: 18px; font-family: sans-serif; background-color: #154a68; padding: 20px; >.registartion-form input, .registartion-form select, .registartion-form textarea < border: none; padding: 5px; margin-top: 10px; font-family: sans-serif; >.registartion-form input:focus, .registartion-form textarea:focus < box-shadow: 3px 3px 10px rgb(228, 228, 228), -3px -3px 10px rgb(224, 224, 224); >.registartion-form .submit < width: 100%; padding: 8px 0; font-size: 20px; color: rgb(44, 44, 44); background-color: #ffffff; border-radius: 5px; >.registartion-form .submit:hover
As you can see in the above code, the form elements are aligned to the center using CSS flexbox applied on class .registration-form class and other necessary styles are defined like, width, background-color, font style, color, etc.
Submit button gives colspan=»2″ so that it may cover the full width of the registration form. Submit button has class .submit which adds a few CSS styles to it like, border-radius, font-size, background-color, etc.
You can see codes for :hover and :focus these are used to change certain CSS styles of elements on different actions on the element.
Validation In Javascript For Registration Form
You can verify whether the data given by the user in the registration form is valid or not using javascript.
As soon as the register button (submit button) is clicked, all the data is submitted but validation in javascript for registration form is necessary before sending data to the server because data given by user may not be valid.
When you validate the data and find it is not valid, you can show the error message to the user.
For validation, you can use regex (regular expression) with javascript.
Note : regex is a pattern that is used to match character combinations in strings.
Let’s first look at the javascript verification code then we will look at the code in detail.
// Select all input elements for varification const name = document.getElementById("name"); const email = document.getElementById("email"); const password = document.getElementById("password"); const phoneNumber = document.getElementById("phoneNumber"); const gender = document.registration; const language = document.getElementById("language"); const zipcode = document.getElementById("zipcode"); // function for form varification function formValidation() < // checking name length if (name.value.length < 2 || name.value.length >20) < alert("Name length should be more than 2 and less than 21"); name.focus(); return false; >// checking email if (email.value.match(/^\w+([\.-]?\w+)*@\w+([\.-]?\w+)*(\.\w)+$/)) < alert("Please enter a valid email!"); email.focus(); return false; >// checking password if (!password.value.match(/^.$/)) < alert("Password length must be between 5-15 characters!"); password.focus(); return false; >// checking phone number if (!phoneNumber.value.match(/^24$/)) < alert("Phone number must be 10 characters long number and first digit can't be 0!"); phoneNumber.focus(); return false; >// checking gender if (gender.gender.value === "") < alert("Please select your gender!"); return false; >// checking language if (language.value === "") < alert("Please select your language!") return false; >// checking zip code if (!zipcode.value.match(/^8$/)) < alert("Zip code must be 6 characters long number!"); zipcode.focus(); return false; >return true; >From the above example, you can see there is a javascript function formValidation which validates our form.
This function runs whenever a user submits the form if there is any input value that doesn’t satisfy some constrain it alerts a message and stops the submission of the form by returning false.
For name it checks whether the length of the name given by the user is between 3 and 21 or not. If not then it alerts a message, focus on name input, and returns a false which stops form submission.
When checking email it matches user input by regex string /^w+([.-]?w+)*@w+([.-]?w+)*(.w)+$/ . By using javascript match() function we can check a string’s validation by passing regex as an argument. If string does not satisfy regex then it return false and stop form submittion.
All rest verification is done in a similar manner.
Conclusion
In this tutorial, we have seen HTML code for registration form with validation using javascript .
We have also learned how to create a registration form with validation using HTML and CSS.


