- PHP Configuration Tips
- 1. Switching to php-fpm
- 1.1. Remove mod_php
- 1.2. Install php-fpm
- 1.3. PHP tuning
- 1.3.1. php_value, php-flag
- 1.3.2. .htaccess
- 1.3.3. Process tuning
- 1.4. Apache HTTP Server tuning
- 1.4.1. Threaded MPM
- 1.4.2. Unix Domain Socket
- 1.4.2. Separate frontend and backend servers
- 1.4.3 Multiple php backends
- 2. Running a recent PHP version
- 2.1. Installation
- 2.2. Switch to newer PHP versions
- 2.3. Additional packages
- 3. Running multiple versions of PHP
- 3.1. Installation
- 4. Conclusion
- How to Setup Apache with PHP/FastCGI on CentOS/RHEL 7/6
- Step 1 – Prerequsitis
- Step 2 – Install Apache2
- Step 3 – Install PHP and FastCGI
- Step 4 – Disable Default PHP Handler
- Step 5 – Setup FastCGI Handler
- Step 6 – Setup VirtualHost with FastCGI
- Step 7 – Restart Apache and Test Setup
PHP Configuration Tips
![]()
RHEL 7 provides the Apache HTTP Server version 2.4 and PHP version 5.4.
The most common configuration for Apache httpd and PHP uses, but this has some limitations and drawbacks:
- a single PHP version of mod_php can be used
- mod_php run in the httpd process, without any isolation
- mod_phpis only supported for the prefork MPM
This article will explain how to configure Apache httpd to delegate PHP scripts execution to a backend using the FastCGI protocol, how to use a more recent PHP version, how to run multiple PHP versions, and how to improve Apache httpd performance.
The Apache httpd package available in RHEL provides all features needed to use such configuration.
1. Switching to php-fpm
1.1. Remove mod_php
It is recommended to remove or disable mod_php to reduce the memory footprint of each httpd process.
You can either remove the php package, which only provides this module:
or simply disable it by commenting out the LoadModule directive in /etc/httpd/conf.modules.d/10-php.conf.
# disabled # LoadModule php5_module modules/libphp5.so
1.2. Install php-fpm
You now can install the php-fpm and enable its service.
yum install php-fpm systemctl start php-fpm systemctl enable php-fpm
Notice: php-fpm package is available in the optional channel, which has to be enabled.
To configure PHP scripts execution, edit or create the /etc/httpd/conf.d/php.conf file:
The following lines prevent .user.ini files from being viewed by Web clients.
Allow php to handle Multiviews:
Add index.php to the list of files that will be served as directory indexes:
Following line, enable the http authorization headers:
SetEnvIfNoCase ^Authorization$ "(.+)" HTTP_AUTHORIZATION=$1
Redirect the PHP scripts execution to the FPM backend.
SetHandler "proxy:fcgi://127.0.0.1:9000"
If you have some php_value directive in this file, you need to remove them, they are only for mod_php.
Now you can (re)start the web server and a simple PHP test page with;
it will show you are now running PHP through the FatCGI backend.
PHP Version 5.4.16 Server API= FPM/FastCGI
1.3. PHP tuning
The main FPM configuration file is /etc/php-fpm.conf, which have a lot of comments explaining each option.
FPM can run various pools, each one running PHP scripts with possible different options, the default pool (www) configuration file is /etc/php-fpm.d/www.conf, which also have lot of comments.
1.3.1. php_value, php-flag
PHP Options can be set using the php_value, php_admin_value, php_flag and php_admin_flag directives:
- with mod_php, in the Apache httpd configuration files.
- with FPM, in the pool configuration files.
1.3.2. .htaccess
Additional options can be set in a specific directory:
- with mod_php, using a .htaccess file.
- with FPM, using a .user.ini file (php_* keywords are not needed).
1.3.3. Process tuning
FPM run as a daemon and launch various processes to be able to handle various requests simultaneously, and offers various modes:
- pm = ondemand, child is only started when a connection is open and stopped when idle, suitable for development environment
- pm = dynamic, a set of idle processes is always running, more processes can be started if needed, suitable for production
- pm = static, a fixed set of processes is always running, suitable for production, can be better for performance
1.4. Apache HTTP Server tuning
1.4.1. Threaded MPM
By default, the Apache HTTP Server uses a set of processes to manage incoming requests (prefork MPM).
As we now don’t use mod_php we can switch to a threaded MPM (worker of an event) so a set of threads will manage the requests, reducing the number of running processes and the memory footprint, and improving performance, especially when a lot of static files are served.
Switch the used MPM in the /etc/httpd/conf.modules.d/00-mpm.conf configuration files.
# disabled # LoadModule mpm_prefork_module modules/mod_mpm_prefork.so # disabled # LoadModule mpm_worker_module modules/mod_mpm_worker.so LoadModule mpm_event_module modules/mod_mpm_event.so
1.4.2. Unix Domain Socket
By default, FPM listens for incoming requests on a network socket but can use a Unix Domain Socket, which can slightly improve performance.
In FPM pool configuration:
listen = /run/php-fpm/www.sock listen.owner = apache listen.mode = 0660
In Apache httpd configuration:
SetHandler "proxy:unix:/run/php-fpm/www.sock|fcgi://localhost"
1.4.2. Separate frontend and backend servers
By default, FPM listens for incoming requests on a local network socket. Of course, it can run on a separate server, another virtual machine or a container (docker instance)
In FPM pool configuration:
listen = 10.0.0.2:9000 listen.allowed_clients = 10.0.0.1
In Apache httpd configuration:
SetHandler "proxy:fcgi://10.0.0.2:9000"
1.4.3 Multiple php backends
To be able to handle more simultaneous requests, we may want to balance the load between various PHP backends, which is easy.
Apache httpd configuration sample, with 3 backends:
# Load balancer creationBalancerMember fcgi://10.0.0.2:9000 BalancerMember fcgi://10.0.0.3:9000 BalancerMember fcgi://10.0.0.4:9000 # Redirect PHP execution to the balancerSetHandler "proxy:balancer://phpfpmlb"
2. Running a recent PHP version
RHEL provides PHP version 5.4 which was the current version when RHEL-7 was released, but which can be too old for some recent projects.
PHP versions 5.6 and 7.0 are supported on RHEL today as part of Red Hat Software Collections (RHSCL), and PHP version 7.1 is currently in Beta testing with the 3.0 update of RHSCL.
In the example below, we’ll use version 7.0, but it can be used for the others available versions.
2.1. Installation
Install the Software Collection, after having enabled the RHSCL channel:
Install the FPM service for this version:
yum install rh-php70-php-fpm
Install any needed additional extensions:
yum install rh-php70-php-mbstring rh-php70-php-pgsql rh-php70-php-opcache
Tips: compare the list of available extensions to ensure everything needed is available.
php --modules | tee /tmp/54 scl enable rh-php70 'php --modules' | tee /tmp/70 diff /tmp/54 /tmp/70
Tips: never rely on the package name, but prefer extension name (e.g. php-mysqli or rh-php70-php-simplexml), as the package layout may change across versions.
2.2. Switch to newer PHP versions
When running FPM, this is as simple as stopping the old version service and starting the new one:
systemctl stop php-fpm systemctl start rh-php70-php-fpm
2.3. Additional packages
The Software Collections provide the same set of PHP extensions than standard packages in RHEL.
As users are used to finding some additional extensions, in the EPEL repository, an additional extension can be found in the community centos-sclo-sclo repository, for more information search sclo-php on https://www.softwarecollections.org/.
3. Running multiple versions of PHP
As PHP execution is redirected to the FastCGI service using the SetHandler directive, this can be set per vhost, project or directory.
In the example below, we will run both PHP version 5.4 from base system (for some legacy applications, already configured above) and PHP version 7.1 simultaneously.
3.1. Installation
Install the Software Collection, after having enabled the RHSCL beta channel:
yum install rh-php71 rh-php71-php-fpm rh-php71-php-mbstring rh-php71-php-opcache .
Configure FPM to listen to a different port than the one used by the default php-fpm service, in /etc/opt/rh/rh-php71/php-fpm.d/www.conf.
Ensure this port is not blocked by SELinux:
semanage port -a -t http_port_t -p tcp 9071
systemctl start rh-php71-php-fpm
Now, it is possible to choose PHP version for each directory, from Apache httpd configuration file.
# Use PHP 7.1 by defaultSetHandler "proxy:fcgi://127.0.0.1:9071" # Some legacy application use PHP 5.4SetHandler "proxy:fcgi://127.0.0.1:9000"
4. Conclusion
I hope this small article has shown the various benefits of switching to FPM for your PHP scripts:
- process isolation between frontend (httpd) and backend (fpm)
- performance improvement
- running modern PHP version
- running multiple PHP versions
Last updated: October 18, 2018
How to Setup Apache with PHP/FastCGI on CentOS/RHEL 7/6
FastCGI functionality is very similar to working of CGI. FastCGI makes differences at few places than CGI like FastCGI processes are persistent and they can handle more than one request per process. FastCGI allows running programs on remote machines by multiplexes the environment information, standard input, output and error over a single full-duplex connection. Read more about FastCGI.
This tutorial will help you to set up Apache webserver with PHP and FastCGI on RedHat based systems.
Step 1 – Prerequsitis
Fast of all, enable REMI and EPEL yum repositories on your system. These repositories provide the lastest packages for RedHat based systems.
Step 2 – Install Apache2
Apache2 packages are available with the name HTTPD for Redhat based systems. You can use the following commands to install the latest available Apache2 (HTTPD) packages in configured repositories on your system.
Step 3 – Install PHP and FastCGI
After installing the Apache web server, let’s install PHP and FastCGI Apache module on your system. You can install any version of the required PHP or simply use the following command to install available PHP packages. This tutorial doesn’t include installing PHP modules, So you can also install required PHP modules.
yum install php php-cli mod_fcgid
Step 4 – Disable Default PHP Handler
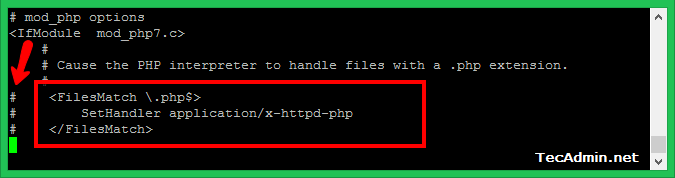
Before using PHP/FastCGI handler, you have to disable the default PHP handler on your system. Edit PHP configuration file for Apache (/etc/httpd/conf.d/php.conf) in your favorite text editor and comment following lines showing in below screenshot by adding the hash (#) sign at the start of the lines.
Step 5 – Setup FastCGI Handler
At this point we have successfully installed Apache FastCGI Module. Now nagigate to /var/www/cgi-bin directory, If not exists create directory. Then create a php.fastcgi file and add the following content to this file. Also make sure the php.ini file and php-cgi exist on your system.
vim /var/www/cgi-bin/php.fastcgi
#!/bin/bash PHPRC="/etc/php.ini" PHP_FCGI_CHILDREN=4 PHP_FCGI_MAX_REQUESTS=1000 export PHPRC export PHP_FCGI_CHILDREN export PHP_FCGI_MAX_REQUESTS exec /usr/bin/php-cgi
Change permissions of php.fastcgi script to make it executable by Apache server.
chown apache:apache /var/www/cgi-bin/php.fastcgi chmod +x /var/www/cgi-bin/php.fastcgi
Step 6 – Setup VirtualHost with FastCGI
Finally, create a VirtualHost in our Apache configuration file with FastCGI support. VirtualHosts are used to configure multiple sites with a single IP. Below configuration will allow siting svr1.tecadmin.net with any system IP on port 80.
ServerName svr1.tecadmin.net ServerAdmin [email protected] DocumentRoot /var/www/html ScriptAlias /cgi-bin/ "/var/www/cgi-bin/" Options +Indexes +FollowSymLinks +ExecCGI AddHandler php-fastcgi .php Action php-fastcgi /cgi-bin/php.fastcgi AllowOverride All Order allow,deny Allow from All
Step 7 – Restart Apache and Test Setup
At this point, you have completed the Apache configuration with FastCGI support. Let’s restart the Apache server using the following command.
Now create a file in your document root /var/www/html/info.php and add following content to check detailed php information.