- Real-Time Chat Application In Python
- Creating server.py
- Real-time Chat Application Using Python Flask
- A quick intro to the flask
- Prerequisites
- Setting up Virtual environment in Python
- Installing packages in python
- Coding our web application ( Real-time Chat Application Using Python)
- Running our application
- Code Files
- Summary:
Real-Time Chat Application In Python
The repository of this application consists of two python files, server.py and client.py. server.py is the script that runs the server, which all the clients will use to communicate to each other. And client.py will be used by the client to connect to server and send messages to other clients. So we will start off by server.py script
Creating server.py
import socket import threading We would need socket module to communicate with clients and threading module to create a thread that would keep listening for messages from clients. Next we will set up some variables
HOST = '127.0.0.1' PORT = 1234 LISTENER_LIMIT = 5 active_clients = [] HOST and PORT here determines the host and port at which the server will run, LISTENER_LIMIT stores the amount of clients that will be able to connect to a server at a time. And finally, active_clients will store all the users that will be connected to the server at any instance Next we will create the listen_for_messages function
def listen_for_messages(client, username): while 1: message = client.recv(2048).decode('utf-8') if message != '': final_msg = username + '~' + message send_messages_to_all(final_msg) else: print(f"The message send from client is empty") This function will keep listening for messages from the connected clients. In case if it received a message, it will call the send_message_to_all function to send the received message to all currently connected clients. Next we create the send_message_to_client function
def send_message_to_client(client, message): client.sendall(message.encode()) This function is used to send message to a single client Next we create the send_message_to_all function
def send_messages_to_all(message): for user in active_clients: send_message_to_client(user[1], message) This function will send a message to all connected clients by calling the send_message function for each connected client. Next we create the client_handler function
def client_handler(client): # Server will listen for client message that will # Contain the username while 1: username = client.recv(2048).decode('utf-8') if username != '': active_clients.append((username, client)) prompt_message = "SERVER~" + f" added to the chat" send_messages_to_all(prompt_message) break else: print("Client username is empty") threading.Thread(target=listen_for_messages, args=(client, username, )).start() This function will use the client object (explained later in this blog) which we get when we connect to a client, to get username from a client, add the client to the list of active clients, and start a listener thread which will keep listening for new messages from the client.
Note: This function is also executed as a thread, for each new connected client.
def main(): server = socket.socket(socket.AF_INET, socket.SOCK_STREAM) try: server.bind((HOST, PORT)) print(f"Running the server on ") except: print(f"Unable to bind to host and port ") server.listen(LISTENER_LIMIT) while 1: client, address = server.accept() print(f"Successfully connected to client ") threading.Thread(target=client_handler, args=(client, )).start() if __name__ == '__main__': main() - Creating a socket (that acts as the server)
- Binding IP and Port to the server
- Setting up listener limit
- Accept any upcoming connection from clients
- Calling the client handler for any new connected client
That’s all for the server side code, The server side code is a bit long to explain in a single blog, so I have created this playlist on YouTube, where I explain all the code, both server and client side code. So do check out this playlist to understand the client side code as well.
Real-time Chat Application Using Python Flask
In this tutorial, we will build a real-time chat application using a python microframework flask. I am going to name this application chat.py in this users will be able to register themselves and post their messages in a group where all other members of the group will be able to see them. Users can create their new chatroom where they can add other users. On posting the link, the links will be expanded with a small description about them. This tutorial will be divided into multiple sections with each section containing the code and explanation.
A quick intro to the flask
Flask is a python web application framework, it is used to build microservices, it can also be used to build scalable web applications. It does not come with batteries included in the philosophy of Django, rather it gives the developer freedom to choose their project structure and various third-party modules as and when required. Enough about flask let’s dive into building our real time chat application using python.
Prerequisites
This tutorial assumes no prerequisites in the flask but basic knowledge of Python is preferred you should be familiar with Python syntax, loop constructs, and functions in python, that is all that you need to know. Everything else will be learned as we go along building our application.
Setting up Virtual environment in Python
A virtual environment is a separate python interpreter which will contain all the dependencies required for your project to work. Suppose you are working on multiple projects, one requires Django and the other one required Flask. Now without the concept of the virtual environment, you will be installing all the third-party modules in your main python interpreter which is a bad practice, because the same python interpreter can’t have multiple versions of any package like, you can’t have Django 2 and Django 3 in the same environment, you need to separate them using the concept of the virtual environment.
To set up a virtual environment you need to type the following command in your command line:
python -m venv chat python3 -m venv chat (for Linux users since Linux has both versions python2 and python3)
Here the name of the virtual environment is “chat”, you can use any name that you prefer. This command is platform-independent however in Linux-based systems if you get any error you need to install python3-venv package then this command will work. Okay, now you should see a folder created named chat inside the directory from where you executed this command. Okay our work is not done here we have created our virtual environment but we need to activate this to use it. Type:
and press Enter. for Linux user, execute the following command:

You should see a (chat) prefixed before your current directory prompt. Now you have successfully created and activated your venv. Note: I would use venv and virtual environment interchangeably both refer to the same thing.
Installing packages in python
Python comes with a built-in package manager pip which is used to manage packages for our environment. For building our application we are going to need the flask web framework in our venv. So for installing it we need to type:
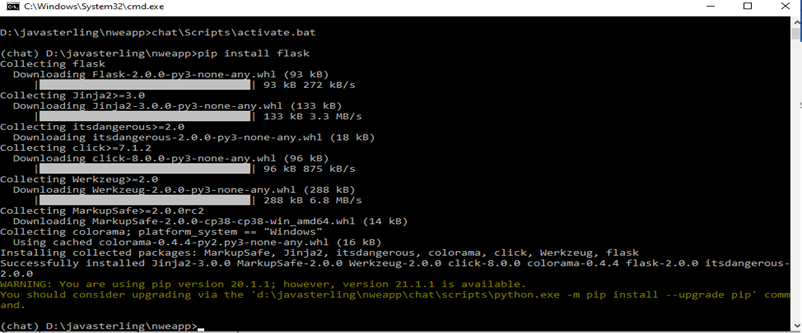
that’s it you would see some installation going on in your terminal. Now you have successfully installed the flask. To verify whether it’s properly installed or not, type

In the command prompt, you should see something like Flask 2.0.0, etc. If you’re seeing this output that means the flask is installed correctly. Okay, now we’re ready to start writing our web application.
Coding our web application ( Real-time Chat Application Using Python)
Let’s code our real time chat application using python. Create a new directory named chatapp inside directory again create a new directory chat.py. This folder structure is entirely up to you and all the naming conventions. But having a structured format is good and avoids confusion when you work on multiple apps together. I will paste screenshots of the directory structure and also the code files to help you understand better.
Directory structure:
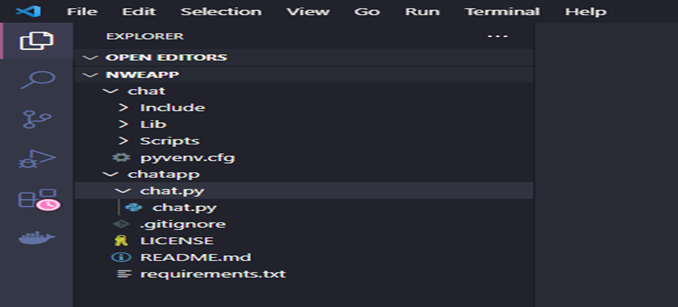
- Create a file named chat.py inside the chat.py folder. Now add the following lines:

- The first line of the chat.py file imports the Flask class from the flask package. Here Flask( with capital F) is the main class for our application.
- In line 3, We create an instance of this class by passing (__name__) as a constructor variable.
- Line 5: We are using @app.route(“/”) decorator, what this doing is telling our application to call this method whenever a request comes to our page, we will explain this in just a bit.
- Line 6: We are defining a python function named chat() which is just returning “My chat application.” to the caller.
- Line 9: Well this we need to understand whenever we run our python script from the command line the script is referred to by a special name known as ” __main__”. So what this, if statement is doing, is just checking
- Whether we are running this file directly or not if we are running this directly and not importing it only then will the below lines execute.
- Line 10: Now here’s the crux of running the application. Our flask application has a method run which is taking these few parameters like host, port, etc. Now, since this is a web application we need to access it from our web browser but how does our app know, where should I run my self or how should the browser know where to request it. Do we need the internet to run our website? Absolutely not. So there is a special IP
Address provided to run it which is “127.0.0.1” also known as localhost. Now what is the second parameter the port number, again our app needs a specific port to listen on so by default flask takes 5000 and I’ve also explicitly passed it to help you understand better. The third variable is threaded, I’ve set it true by default it’s also true. With every request, the flask server creates a separate thread to handle the request, so if we want multiple people to use our website at once we need to set it as true. Now the debug option, by default, is False which means you need to rerun your application every time so since we’re developing it’s nice to set it to true.
Running our application
- Type python chat.py and you should see the below output in VScode or your terminal.

- It’s saying Serving Flask app ’chat’ (lazy loading). Here this name chat is coming from that Flask(__name__) constructor name contains the name of our python script file.
- Environment: production we will look at it later, for now, you can ignore it.
- Debug mode: on again this value we passed in app.run() method where we set debug=True
- Running on http://127.0.0.1:5000/ this is the actual address which you need to type in the web browser to see whether your app is working.
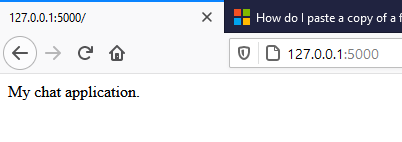
- Here, you can see the address bar of the browser I’ve typed http://127.0.0.1:5000/ here and you can see the web page is showing My chat application. But how this is happening.
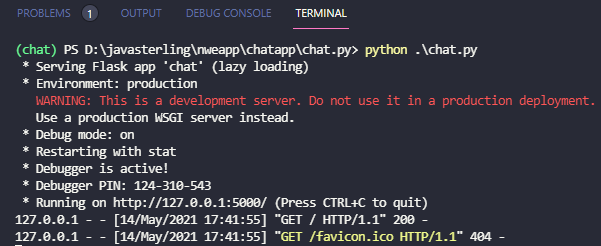
- You noticed two new lines added here well these are what we called as web server logs, we will talk about these in a later part of our tutorial, but for now you can understand that every time someone will visit that URL our app will record that in logs and display them in the console.
- Now regarding the output on a webpage what is happening in our chat() function is mapped to the root of the URL whenever anyone visits that URL the chat() function will be called and the value that is returned will be displayed on the webpage. How this is doing is the magic of flask. But what you need to understand is that what the browser did when it went to that URL is it requested our application to return something and our app called that method and returned the response that was “My chat application” which was displayed on the web browser.
Code Files
All code files will be available on this Github repository: https://github.com/abhinayy0/chat.py
Summary:
In this mini-tutorial, we have created a real time chat application using python. further, we have understand the Flask python web framework and what it is used for after that we dive into virtual environments and the problem they solved. The essence of computer programs is that they are created to solve a particular type of problem. Later we learned how to install Flask using pip and after that, we dived into the development of our minimal application. In the application, we understood about Flask class and how python scripts are executed, and also about the methods provided by this class. After that starting our application we understood the output of our app and what each line means. In the next part of this tutorial, we will start from here and will start developing the real-time chat application chat.py.