- Deployment Diagram for Web Application
- Deployment Diagram for Web Application
- Web Application Deployment Diagram: Table of Contents
- Deployment Diagram for Web Application: Project Details
- Web Application UML Deployment Diagram (Explanation)
- Deployment Diagram for Web Application (PDF)
- Elements used in Creating your Deployment Diagram
- Steps in creating Deployment Diagram for Web Application
- Benefits of UML Deployment Diagram
- Additional Knowledge
- Conclusion:
- Related Articles:
- Recommended Articles from the Author:
- Inquiries
Deployment Diagram for Web Application
Deployment Diagram for Web Application
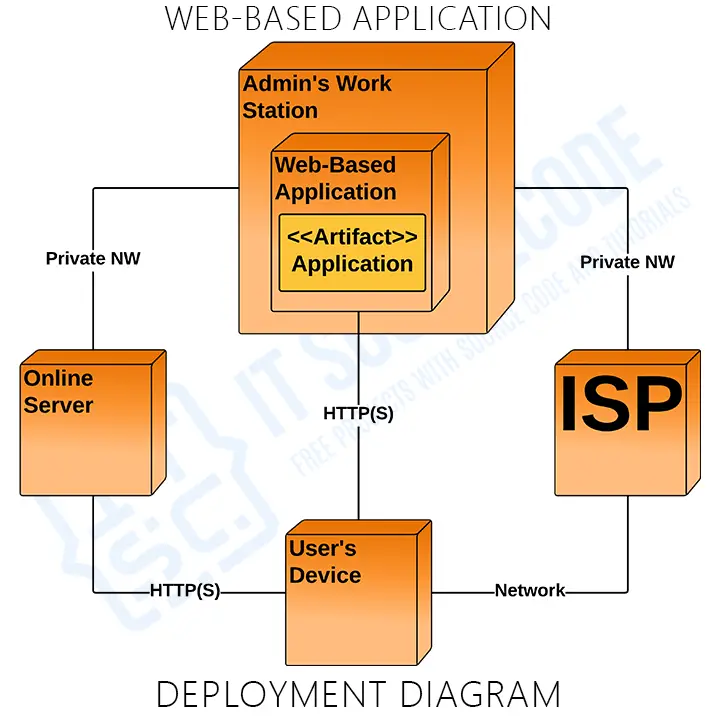
This UML deployment diagram for web application was used to define how the software and hardware work and where the processing takes place. The needed hardware and software specifications of the web-based application are visualized using deployment diagrams. It is one of the structural diagrams which describes the physical aspects of a real-world project.
The Deployment Diagram is a sort of UML model that depicts the web-based application’s execution architecture. It includes nodes such as hardware or software execution environments and their relationships. This shows included PCs and other devices for hardware, OS and applications for software, and TCP/IP and other connection forms for their connections.
Web Application Deployment Diagram: Table of Contents
Deployment Diagram for Web Application: Project Details
The table shows the basic details of the deployment diagram of the web application. It has quick description details of the project.
Deployment Diagram of Web Application in UML
It is important to create the deployment diagram to clarify the needs of the project before it will put into operation. This will help you avoid unnecessary difficulties that may encounter because of specification deficiency.
Web Application UML Deployment Diagram (Explanation)
The web application UML deployment diagram explains the sketch of the relationship between software and hardware. These hardware and software are labeled to clarify their part to the system’s operation. They were represented by nodes and the connections were represented by labeled arrows.
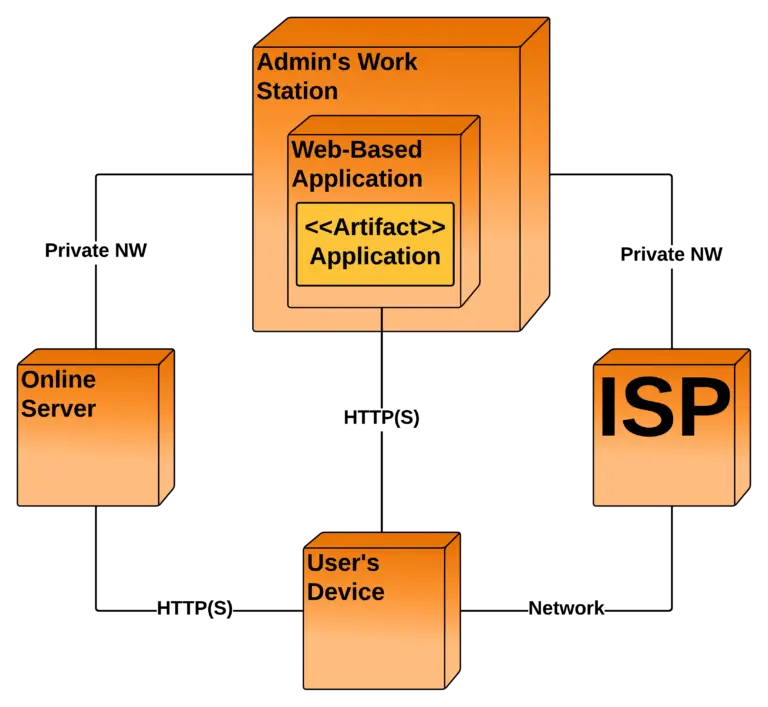
The deployment diagram shows the scenario when the system is deployed. It has 5 nodes represented with boxes and relationship connections. The nodes are the admin’s workstation, the ISP, the user’s device, the online server, and the application. The web application contains the artifact application.
For the connection, the application is connected to the server using a private network which enables it to pass data to the server and will be accessed by the users. The users then can communicate using the internet connection.
Deployment Diagram for Web Application (PDF)
You may download the Deployment Diagram for Web Application PDF by clicking the button below. It has the full details and discussion on Web Application Deployment Diagram. You can also modify its content to complete your project requirements and needs.
Elements used in Creating your Deployment Diagram
- Artifact : A rectangle with the name and term “artifact” enclosed by two arrows represents a software-created product.
- Association : A message or other sort of communication between nodes is indicated by a line.
- Component : A rectangle with two tabs that indicate a software part is called a component.
- Dependency : A dashed line that ends in an arrow denotes the dependency of one node or component on another.
- Interface : A contract relationship is indicated by a circle. Those items that realize the interface are required to fulfill some sort of task.
- Node : A three-dimensional box represents a hardware or software object.
- Node as Container : This is a node that has another node within it, such as the nodes that contain components.
- Stereotype : A device housed within the node, displayed at the top of the node and flanked by two arrows.
Steps in creating Deployment Diagram for Web Application
Here are the steps in creating the deployment diagram for a web application. In creating this deployment diagram, we used lucidchart.com
- Step 1: Open your Diagramming tool.
When you open the tool, you may see a blank page. It has several buttons at the top of the page and on the bottom. You can use any tool which will make you comfortable. It is up to you what diagram you want to use. You can draw it manually if you like.
You can use any diagramming tool as long as it provides the deployment diagram symbols or elements. These are the artifacts, association, component, dependency, interface, node, etc. This is to make your diagram complete and detailed.
You just have to search for the UML Deployment on the search bar of your tool which looks like this.
After that, pin the Deployment Diagram Shapes and Symbols to make it viewable in your workspace.
Step 2: Finalize the Nodes (Software and Hardware)
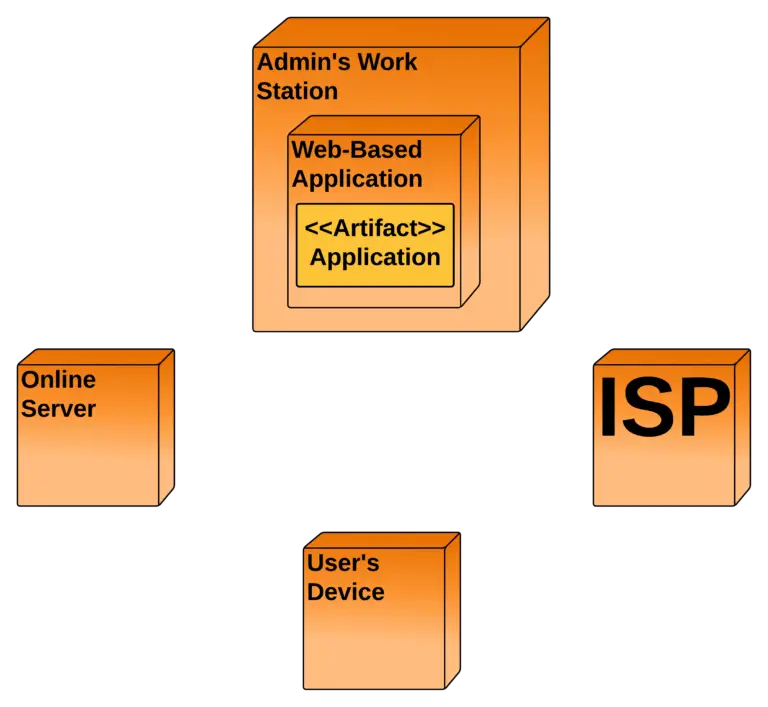
The second step in creating your deployment diagram is finalizing the projects’ hardware and software specifications. Then you will plot them wisely, giving space for the arrows that will determine their connections. This step will look like this.
The nodes presented here simply show the possible hardware and software needed for a web application to operate. These nodes are composed of users’ devices (hardware) and applications (software).
The admin’s device holds the web application (software) which is only available for a private network to enable users to access its’ database. The users that can access the system have their information uploaded to the server. It will serve as their qualifications to login into the system. The devices of the users are also considered nodes.
Finally, you will map the arrows that will emphasize the connections of nodes. These connections should be labeled to know the forms of the relationship used between nodes. The common connections are forms of Networking connections and others.
Benefits of UML Deployment Diagram
- It aids in the visualization of the various aspects involved.
- Aids in a more accurate description of all the hardware elements used by software components.
- It clarifies the description of the runtime involved in processing nodes.
- Provides hardware specified details for the distributed application.
- Helps in modeling the system’s hardware topology.
- It aids in the modeling of inserted or included software.
- Provides more information on the hardware system.
- Reverse engineering is made easier using the UML deployment diagram.
Additional Knowledge
The topology of the physical components of a system, where the software components are installed, is visualized using deployment diagrams. Deployment diagrams are used to depict a system’s static deployment view. Nodes and their relationships are depicted in deployment diagrams.
The Deployment Model shows how components will be distributed across the system architecture in detail. It contains information about network capabilities, server specifications, hardware requirements, and other aspects of the planned system’s deployment.
Conclusion:
You need to know the diagrams used to design and develop the web-based application. That is because you cannot perfectly create a fully-functional system without it. But if you create this deployment diagram, you will know the software and hardware components that the project should possess. Not only that, you will find out the needed specifications and connect them to the other UML Diagrams.
The deployment diagram is used to model the system’s physical architecture. It describes the connections of components between software and hardware system. By completing the Diagrams per module or process, you will easily achieve your desired system. Check out our Related and Recommended Articles for more Learning and Information.
Related Articles:
Recommended Articles from the Author:
Inquiries
If you have inquiries or suggestions about Deployment Diagram for Web Applications, just leave us your comments below. We would be glad to hear to concerns and suggestions and be part of your learning.
Keep us updated and Good day!


