- Connecting DHT11 Sensor with Raspberry Pi 4 / 3 using Python
- Parts List
- Raspberry Pi Pin Configuration
- Connection Diagram
- Installation of required Libraries
- How to run the same code in Raspberry Pi 4?
- Alternate way to edit this file
- Coding
- Construction
- Executing the Code & Testing
- Conclusion
- 12 thoughts on “Connecting DHT11 Sensor with Raspberry Pi 4 / 3 using Python”
- Saved searches
- Use saved searches to filter your results more quickly
- License
- szazo/DHT11_Python
- Name already in use
- Sign In Required
- Launching GitHub Desktop
- Launching GitHub Desktop
- Launching Xcode
- Launching Visual Studio Code
- Latest commit
- Git stats
- Files
- README.md
- About
Connecting DHT11 Sensor with Raspberry Pi 4 / 3 using Python
You might have heard of Raspberry Pi which is a single board computer and it is very popular among student and electronics hobbyist. It is compact and advanced device. We will also use a DHT11 Temperature and Humidity sensor. In this tutorial we will learn connecting DHT11 Sensor with Raspberry Pi 4 / 3 using Python.
The sensor is connected using one wire for sending the data signal. These are quite popular and used in different projects like soil monitors, remote weather stations, home automation systems etc. You can also used DHT11 sensor with Raspberry Pi 4 using python code.
Collecting data using DHT11 Temperature and humidity sensor using Raspberry Pi is simple. In this tutorial, we will demonstrate how to connect the DHT11 sensor with Raspberry Pi and get the output i.e. temperature and humidity readings. We will be doing this using python programming. In fact we will be extracting DHT11 sensor data using Python.
Parts List
You can use any raspberry Pi you have.
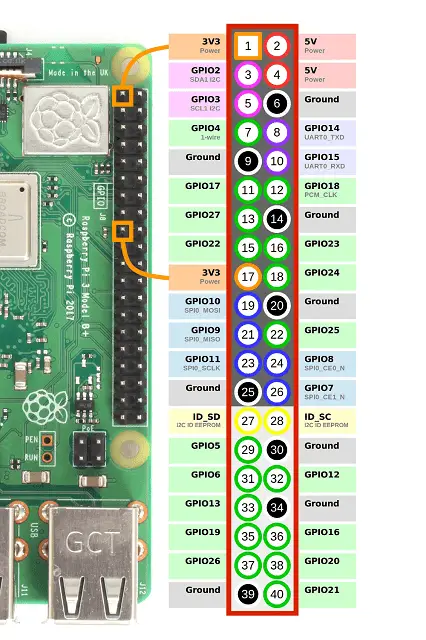
Raspberry Pi Pin Configuration
Below diagram shows pin definitions of Raspberry Pi. In this tutorial we have connected it with Pin 7 which is GPIO4 of Raspberry Pi. GPIO pin configurations are same for all Raspberry Pi.
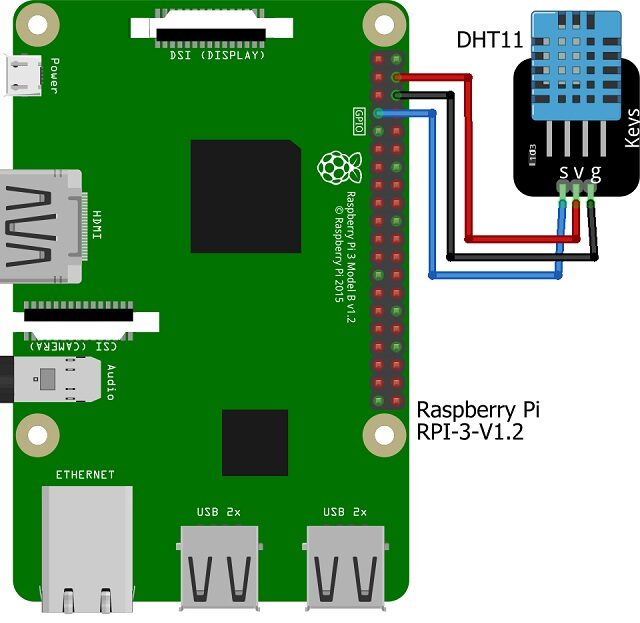
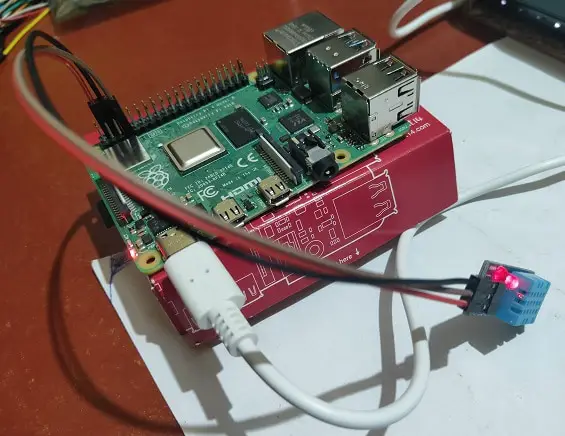
Connection Diagram
Here we have connected DHT11 temperature and Humidity sensor with Raspberry Pi. You can also connect DHT11 sensor using WeMos D1 Mini wifi module.
Popular Projects:
- NodeMCU ESP8266 IoT based LPG Gas Leakage Alarm
- IoT Project using Local Blynk Server
- Low Cost Local Blynk Server for IoT Projects
- ESP32 / NodeMCU based Web Server with Physical Switch Feedback
- Telegram NodeMCU based Home Automation
- DHT11 based Temperature Humidity Monitoring IoT Project
- Touch Based Switch board using TTP223
Installation of required Libraries
First we have to install Adafruit DHT library for this tutorial. Login to raspberry pi via VNC Viewer or SSH (Using putty) and run the below code.
git clone https://github.com/adafruit/Adafruit_Python_DHT.git
It will download the necessary files under a folder named Adafruit_Python_DHT. Once your download in completed run the command “ls” for listing the files and folders. You will see Adafruit_Python_DHT is listed there.
pi@raspberrypi:~ $ ls Adafruit_Python_DHT Desktop
Now go to Adafruit_Python_DHT folder as shown below
pi@raspberrypi:~ $ cd Adafruit_Python_DHT/
Run the below command for installation of Python version 2 and 3
sudo python setup.py install sudo python3 setup.py install pi@raspberrypi:~/Adafruit_Python_DHT $ sudo python setup.py install pi@raspberrypi:~/Adafruit_Python_DHT $ sudo python3 setup.py install
Once the python installation please make sure GPIO is enabled in your raspberry Pi. Run the below command and enable it.
pi@raspberrypi:~ $ sudo raspi-config
pi@raspberrypi:~/Adafruit_Python_DHT $ cd
How to run the same code in Raspberry Pi 4?
For executing the same python code in Raspberry Pi 4 we have to make some changes. The above library supports till Raspberry Pi 3. Now to make it compatible with Raspberry Pi 4 we have to make below changes.
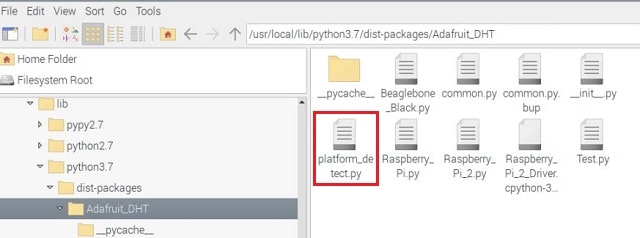
/usr/local/lib/python3.7/dist-packages/Adafruit_DHT/ pi@raspberrypi:~ $ cd /usr/local/lib/python3.7/dist-packages/Adafruit_DHT/
Again list the files and folders with “ls” command as shown below
pi@raspberrypi:/usr/local/lib/python3.7/dist-packages/Adafruit_DHT $ ls Beaglebone_Black.py __pycache__ common.py Raspberry_Pi_2_Driver.cpython-37m-arm-linux-gnueabihf.so common.py.bup Raspberry_Pi_2.py __init__.py Raspberry_Pi.py platform_detect.py Test.py
You will see a file named platform_detect.py, This is the file we have to edit. Since this file has read only permissions hence we can’t make changes and save it. In order to change this file we have to change the permission of this file. you can run below command to change the permission.
sudo chmod a+w platform_detect.py pi@raspberrypi:/usr/local/lib/python3.7/dist-packages/Adafruit_DHT $ sudo chmod a+w platform_detect.py
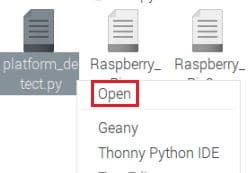
Now go to directory /usr/local/lib/python3.7/dist-packages/Adafruit_DHT and open the file platform_detect.py.
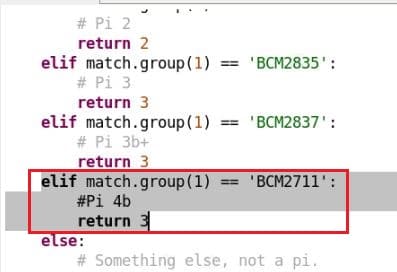
Once you open it, add the below lines of code at the bottom and save it.
elif match.group(1) == 'BCM2711': #Pi 4b return 3
Alternate way to edit this file
You can edit platform_detect.py using putty by remote SSH session. First navigate to usr/local/lib/python3.7/dist-packages/Adafruit_DHT directory and then run the below command.
nano platform_detect.py pi@raspberrypi:/usr/local/lib/python3.7/dist-packages/Adafruit_DHT $ nano platform_detect.py
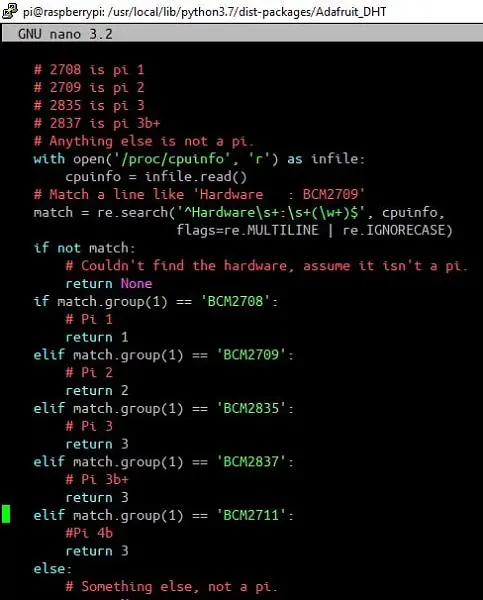
You can add the same set of code here and save the file.
Coding
You can copy paste the below code in a empty text file and save it with extension .py. You can create a new file in /home/pi directory and name it anything you want. Make sure the extension should be “.py“.
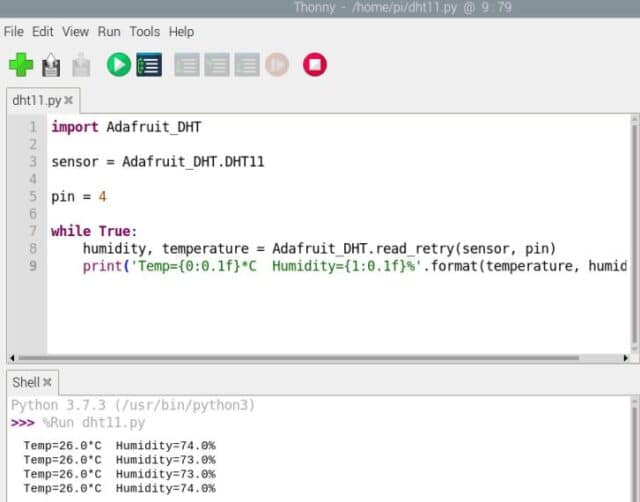
Now right click and open that file, the file will get opened using Thonny python editor. Now you can copy the code below and paste it there and save it.
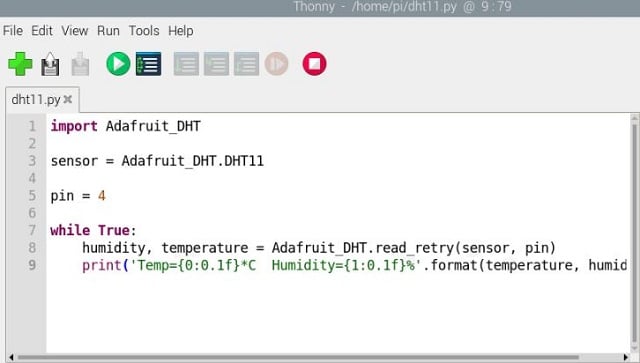
import Adafruit_DHT sensor = Adafruit_DHT.DHT11 pin = 4 while True: humidity, temperature = Adafruit_DHT.read_retry(sensor, pin) print('Temp=*C Humidity=%'.format(temperature, humidity)) Construction
As per the circuit diagram we have connected the sensor with Raspberry Pi 3 and same done with Raspberry Pi 4 as well since the GPIO pins are same.
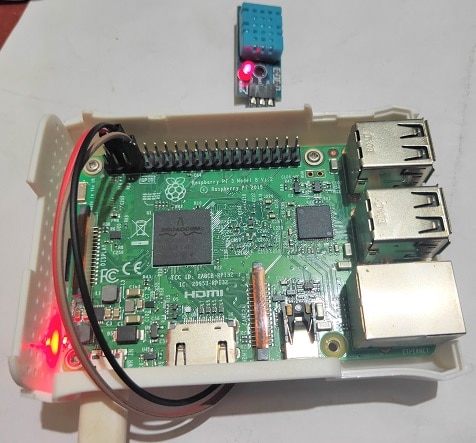
Connection with Raspberry Pi 4
Executing the Code & Testing
Executing the code is slightly different in Raspberry Pi 3 and Pi 4.
In Raspberry Pi 3
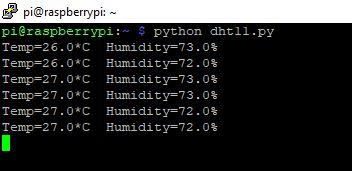
You can run the code either logging into Raspberry Pi or via taking SSH using Putty. Once you have the code file ready then you can run the below command. Here we have named the code file as “dht11.py“.
If everything is correct the you will get a output on you SSH terminal as shown below.
In Raspberry Pi 4
For Raspberry Pi 4 you have to open the code file and by default it will open using Thonny python editor. Now click the Play button which is green in color. Just below that window you will get the output as shown below.
Conclusion
This is a simple project interfacing DHT11 temperature and humidity sensor with Raspberry Pi 3 and Raspberry Pi 4 using a simple python code. Any beginner can try this and build this as a project to understand the concept of interfacing DHT11 module with Pi’s. Try to build this and comment below if you facing any challenges.
12 thoughts on “Connecting DHT11 Sensor with Raspberry Pi 4 / 3 using Python”
Really appreciate this guide. I couldn’t get my sensor running on the pi 4 but this guide worked a treat. Thank you very much. 5 stars. Reply
Traceback (most recent call last):
File “/home/pi/dht11.py”, line 6, in
print(‘Temp=*C Humidity=%’.format(temperature, humidity))
TypeError: unsupported format string passed to NoneType.__format__ Reply
Hi,
I have followed the tutorial several times, I get the following error
pi@compdev:~ $ sudo python3 altdht11.py 11 4
Traceback (most recent call last):
File “altdht11.py”, line 5, in
humidity, temperature = Adafruit_DHT.read_retry(sensor, pin)
File “/usr/local/lib/python3.7/dist-packages/Adafruit_DHT-1.4.0-py3.7-linux-armv7l.egg/Adafruit_DHT/common.py”, line 94, in read_retry
humidity, temperature = read(sensor, pin, platform)
File “/usr/local/lib/python3.7/dist-packages/Adafruit_DHT-1.4.0-py3.7-linux-armv7l.egg/Adafruit_DHT/common.py”, line 80, in read
platform = get_platform()
File “/usr/local/lib/python3.7/dist-packages/Adafruit_DHT-1.4.0-py3.7-linux-armv7l.egg/Adafruit_DHT/common.py”, line 55, in get_platform
from . import Raspberry_Pi_2
File “/usr/local/lib/python3.7/dist-packages/Adafruit_DHT-1.4.0-py3.7-linux-armv7l.egg/Adafruit_DHT/Raspberry_Pi_2.py”, line 22, in
from . import Raspberry_Pi_2_Driver as driver
ImportError: cannot import name ‘Raspberry_Pi_2_Driver’ from ‘Adafruit_DHT’ (/usr/local/lib/python3.7/dist-packages/Adafruit_DHT-1.4.0-py3.7-linux-armv7l.egg/Adafruit_DHT/__init__.py) It cant find raspberry_Pi_2.driver which exists in ~/Adafruit_DHT/source but looks like it has not been installed.
Any ideas as to how I can investigate and fix? Steve Reply
I also have the same problem as Steve above.
I updated the platform_detect.py with the code you have provided and get this error when i run the program on Raspberry Pi 4 Model B Rev 1.4
===========================
>>> %Run dht_simpletest.py
Traceback (most recent call last):
File “/home/pi/codes/dht_simpletest.py”, line 5, in
humidity, temperature = Adafruit_DHT.read_retry(sensor, pin)
File “/usr/local/lib/python3.7/dist-packages/Adafruit_DHT-1.4.0-py3.7-linux-armv7l.egg/Adafruit_DHT/common.py”, line 94, in read_retry
humidity, temperature = read(sensor, pin, platform)
File “/usr/local/lib/python3.7/dist-packages/Adafruit_DHT-1.4.0-py3.7-linux-armv7l.egg/Adafruit_DHT/common.py”, line 80, in read
platform = get_platform()
File “/usr/local/lib/python3.7/dist-packages/Adafruit_DHT-1.4.0-py3.7-linux-armv7l.egg/Adafruit_DHT/common.py”, line 55, in get_platform
from . import Raspberry_Pi_2
File “/usr/local/lib/python3.7/dist-packages/Adafruit_DHT-1.4.0-py3.7-linux-armv7l.egg/Adafruit_DHT/Raspberry_Pi_2.py”, line 22, in
from . import Raspberry_Pi_2_Driver as driver
ImportError: cannot import name ‘Raspberry_Pi_2_Driver’ from ‘Adafruit_DHT’ (/usr/local/lib/python3.7/dist-packages/Adafruit_DHT-1.4.0-py3.7-linux-armv7l.egg/Adafruit_DHT/__init__.py)
=========================== Reply
grazie, mi è stato molto utile! finalmente dopo un pomeriggio sono riuscito a farlo funzionare. ancora grazie mille per il tuo ottimo lavoro! Reply
Saved searches
Use saved searches to filter your results more quickly
You signed in with another tab or window. Reload to refresh your session. You signed out in another tab or window. Reload to refresh your session. You switched accounts on another tab or window. Reload to refresh your session.
Pure Python library for reading DHT11 sensor on Raspberry Pi
License
szazo/DHT11_Python
This commit does not belong to any branch on this repository, and may belong to a fork outside of the repository.
Name already in use
A tag already exists with the provided branch name. Many Git commands accept both tag and branch names, so creating this branch may cause unexpected behavior. Are you sure you want to create this branch?
Sign In Required
Please sign in to use Codespaces.
Launching GitHub Desktop
If nothing happens, download GitHub Desktop and try again.
Launching GitHub Desktop
If nothing happens, download GitHub Desktop and try again.
Launching Xcode
If nothing happens, download Xcode and try again.
Launching Visual Studio Code
Your codespace will open once ready.
There was a problem preparing your codespace, please try again.
Latest commit
Git stats
Files
Failed to load latest commit information.
README.md
This simple class can be used for reading temperature and humidity values from DHT11 sensor on Raspberry Pi.
To install, just run following:
- Instantiate the DHT11 class with the pin number as constructor parameter.
- Call read() method, which will return DHT11Result object with actual values and error code.
import RPi.GPIO as GPIO import dht11 # initialize GPIO GPIO.setwarnings(False) GPIO.setmode(GPIO.BCM) GPIO.cleanup() # read data using pin 14 instance = dht11.DHT11(pin = 14) result = instance.read() if result.is_valid(): print("Temperature: %-3.1f C" % result.temperature) print("Humidity: %-3.1f %%" % result.humidity) else: print("Error: %d" % result.error_code)
For working example, see dht11_example.py (you probably need to adjust pin for your configuration)
This project is licensed under the terms of the MIT license.
About
Pure Python library for reading DHT11 sensor on Raspberry Pi